In this post I'll walk through the process of adding localisation to an ASP.NET Core application using the recommended approach with resx resource files.
Introduction to Localisation
Localisation in ASP.NET Core is broadly similar to the way it works in the ASP.NET 4.X. By default you would define a number of .resx resource files in your application, one for each culture you support. You then reference resources via a key, and depending on the current culture, the appropriate value is selected from the closest matching resource file.
While the concept of a .resx file per culture remains in ASP.NET Core, the way resources are used has changed quite significantly. In the previous version, when you added a .resx file to your solution, a designer file would be created, providing static strongly typed access to your resources through calls such as Resources.MyTitleString.
In ASP.NET Core, resources are accessed through two abstractions, IStringLocalizer and IStringLocalizer<T>, which are typically injected where needed via dependency injection. These interfaces have an indexer, that allows you to access resources by a string key. If no resource exists for the key (i.e. you haven't created an appropriate .resx file containing the key), then the key itself is used as the resource.
Consider the following example:
using Microsoft.AspNet.Mvc;
using Microsoft.Extensions.Localization;
public class ExampleClass
{
private readonly IStringLocalizer<ExampleClass> _localizer;
public ExampleClass(IStringLocalizer<ExampleClass> localizer)
{
_localizer = localizer;
}
public string GetLocalizedString()
{
return _localizer["My localized string"];
}
}
In this example, calling GetLocalizedString() will cause the IStringLocalizer<T> to check the current culture, and see if we have an appropriate resource file for ExampleClass containing a resource with the name/key "My localized string". If it finds one, it returns the localised version, otherwise, it returns "My Localized string".
The idea behind this approach is to allow you to design your app from the beginning to use localisation, without having to do up front work to support it by creating the default/fallback .resx file. Instead, you can just write the default values, then add the resources in later.
Personally, I'm not sold on this approach - it makes me slightly twitchy to see all those magic strings around which are essentially keys into a dictionary. Any changes to the keys may have unintended consequences, as I'll show later in the post.

Adding localisation to your application
For now, I'm going to ignore that concern, and dive in using Microsoft's recommended approach. I've started from the default ASP.NET Core Web application without authentication.
The first step is to add the localisation services in your application. As we are building an MVC application, we'll also configure View localisation and DataAnnotations localisation. The localisation packages are already referenced indirectly by the Microsoft.AspNetCore.MVC package, so you should be able to add the services and middleware directly in your Startup class:
public void ConfigureServices(IServiceCollection services)
{
services.AddLocalization(opts => { opts.ResourcesPath = "Resources"; });
services.AddMvc()
.AddViewLocalization(
LanguageViewLocationExpanderFormat.Suffix,
opts => { opts.ResourcesPath = "Resources"; })
.AddDataAnnotationsLocalization();
}
These services allow you to inject the IStringLocalizer service into your classes. They also allow you to have localised View files (so you can have Views with names like MyView.fr.cshtml) and inject the IViewLocalizer, to allow you to use localisation in your view files. Calling AddDataAnnotationsLocalizationconfigures the Validation attributes to retrieve resources via an IStringLocalizer.
The ResourcePath parameter on the Options object specifies the folder of our application in which resources can be found. So if the root of our application is found at ExampleProject, we have specified that our resources will be stored in the folder ExampleProject/Resources.
Configuring these classes is all that is required to allow you to use the localisation services in your application. However you will typically also need some way to select what the current culture is for a given request.
To do this, we use the RequestLocalizationMiddleware. This middleware uses a number of different providers to try and determine the current culture. To configure it with the default providers, we need to decide which cultures we support, and which is the default culture.
Note that the configuration example in the documentation didn't work for me, though the Localization.StarterWeb project they reference did, and is reproduced below.
public void ConfigureServices(IServiceCollection services)
{
// ... previous configuration not shown
services.Configure<RequestLocalizationOptions>(
opts =>
{
var supportedCultures = new[]
{
new CultureInfo("en-GB"),
new CultureInfo("en-US"),
new CultureInfo("en"),
new CultureInfo("fr-FR"),
new CultureInfo("fr"),
};
opts.DefaultRequestCulture = new RequestCulture("en-GB");
// Formatting numbers, dates, etc.
opts.SupportedCultures = supportedCultures;
// UI strings that we have localized.
opts.SupportedUICultures = supportedCultures;
});
}
public void Configure(IApplicationBuilder app)
{
app.UseStaticFiles();
var options = app.ApplicationServices.GetService<IOptions<RequestLocalizationOptions>>(); app.UseRequestLocalization(options.Value);
app.UseMvc(routes =>
{
routes.MapRoute(
name: "default",
template: "{controller=Home}/{action=Index}/{id?}");
});
}
Using localisation in your classes
We now have most of the pieces in place to start adding localisation to our application. We don't yet have a way for users to select which culture they want to use, but we'll come to that shortly. For now, lets look at how we go about retrieving a localised string.
Controllers and services
Whenever you want to access a localised string in your services or controllers, you can inject an IStringLocalizer<T> and use its indexer property. For example, imagine you want to localise a string in a controller:
public class HomeController: Controller
{
private readonly IStringLocalizer<HomeController> _localizer;
public HomeController(IStringLocalizer<HomeController> localizer)
{
_localizer = localizer;
}
public IActionResult Index()
{
ViewData["MyTitle"] = _localizer["The localised title of my app!"];
return View(new HomeViewModel());
}
}
Calling _localizer[] will lookup the provided string based on the current culture, and the type HomeController. Assuming we have configured our application as discussed previously, the HomeController resides in the ExampleProject.Controllers namespace, and we are currently using the fr culture, then the localizer will look for either of the following resource files:
- Resources/Controller.HomeController.fr.resx
- Resources/Controller/HomeController.fr.resx
If a resource exists in one of these files with the key "The localised title of my app!" then it will be used, otherwise the key itself will be used as the resource. This means you don't need to add any resource files to get started with localisation - you can just use the default language string as your key and come back to add .resx files later.
Views
There are two kinds of localisation of views. As described previously, you can localise the whole view, duplicating it and editing as appropriate, and providing a culture suffix. This is useful if the views need to differ significantly between different cultures.
You can also localise strings in a similar way to that shown for the HomeController. Instead of an IStringLocalizer<T>, you inject an IViewLocalizer into the view. This handles HTML encoding a little differently, in that it allows you to store HTML in the resource and it won't be encoded before being output. Generally you'll want to avoid that however, and only localise strings, not HTML.
The IViewLocaliser uses the name of the View file to find the associated resources, so for the HomeController's Index.cshtml view, with the fr culture, the localiser will look for:
- Resources/Views.Home.Index.fr.resx
- Resources/Views/Home/Index.fr.resx
The IViewLocalizer is used in a similar way to IStringLocalizer<T> - pass in the string in the default language as the key for the resource:
@using Microsoft.AspNetCore.Mvc.Localization
@model AddingLocalization.ViewModels.HomeViewModel
@inject IViewLocalizer Localizer
@{
ViewData["Title"] = Localizer["Home Page"];
}
<h2>@ViewData["MyTitle"]</h2>
DataAnnotations
One final common area that needs localisation is DataAnnotations. These attributes can be used to provide validation, naming and UI hints of your models to the MVC infrastructure. When used, they provide a lot of additional declarative metadata to the MVC pipeline, allowing selection of appropriate controls for editing the property etc.
Error messages for DataAnnotation validation attributes all pass through an IStringLocalizer<T> if you configure your MVC services using AddDataAnnotationsLocalization(). As before, this allows you to specify the error message for an attribute in your default language in code, and use that as the key to other resources later.
public class HomeViewModel
{
[Required(ErrorMessage = "Required")]
[EmailAddress(ErrorMessage = "The Email field is not a valid e-mail address")]
[Display(Name = "Your Email")]
public string Email { get; set; }
}
Here you can see we have three DataAnnotation attributes, two of which are ValidationAttributes, and the DisplayAttribute, which is not. The ErrorMessage specified for each ValidationAttribute is used as a key to lookup the appropriate resource using an IStringLocalizer<HomeViewModel>. Again, the files searched for will be something like:
- Resources/ViewModels.HomeViewModel.fr.resx
- Resources/ViewModels/HomeViewModel.fr.resx
A key thing to be aware of is that the DisplayAttribute is not localised using the IStringLocalizer<T>. This is far from ideal, but I'll address it in my next post on localisation.
Allowing users to select a culture
With all this localisation in place, the final piece of the puzzle is to actually allow users to select their culture. The RequestLocalizationMiddleware uses an extensible provider mechanism for choosing the current culture of a request, but it comes with three providers built in
- QueryStringRequestCultureProvider
- AcceptLanguageHeaderRequestCultureProvider
- CookieRequestCultureProvider
These allow you to specify a culture in the querystring (e.g ?culture=fr-FR), via the Accept-Languageheader in a request, or via a cookie. Of the three approaches, using a cookie is the least intrusive, as it will obviously seamlessly be sent with every request, and does not require the user to set the Accept-Language header in their browser, or require adding to the querystring with every request.
Again, the Localization.StarterWeb sample project provides a handy implementation that shows how you can add a select box to the footer of your project to allow the user to set the language. Their choice is stored in a cookie, which is handled by the CookieRequestCultureProvider for each request. The provider then sets the CurrentCulture and CurrentUICulture of the thread for the request to the user's selection.
To add the selector to your application, create a partial view _SelectLanguagePartial.cshtml in the Shared folder of your Views:
@using System.Threading.Tasks
@using Microsoft.AspNetCore.Builder
@using Microsoft.AspNetCore.Localization
@using Microsoft.AspNetCore.Mvc.Localization
@using Microsoft.Extensions.Options
@inject IViewLocalizer Localizer
@inject IOptions<RequestLocalizationOptions> LocOptions
@{
var requestCulture = Context.Features.Get<IRequestCultureFeature>();
var cultureItems = LocOptions.Value.SupportedUICultures
.Select(c => new SelectListItem { Value = c.Name, Text = c.DisplayName })
.ToList();
}
<div title="@Localizer["Request culture provider:"] @requestCulture?.Provider?.GetType().Name">
<form id="selectLanguage" asp-controller="Home"
asp-action="SetLanguage" asp-route-returnUrl="@Context.Request.Path"
method="post" class="form-horizontal" role="form">
@Localizer["Language:"] <select name="culture"
asp-for="@requestCulture.RequestCulture.UICulture.Name" asp-items="cultureItems"></select>
<button type="submit" class="btn btn-default btn-xs">Save</button>
</form>
</div>
We want to display this partial on every page, so update the footer of your _Layout.cshtml to reference it:
<footer>
<div class="row">
<div class="col-sm-6">
<p>© 2016 - Adding Localization</p>
</div>
<div class="col-sm-6 text-right">
@await Html.PartialAsync("_SelectLanguagePartial")
</div>
</div>
</footer>
Finally, we need to add the controller code to handle the user's selection. This currently maps to the SetLanguage action in the HomeController:
[HttpPost]
public IActionResult SetLanguage(string culture, string returnUrl)
{
Response.Cookies.Append(
CookieRequestCultureProvider.DefaultCookieName,
CookieRequestCultureProvider.MakeCookieValue(new RequestCulture(culture)),
new CookieOptions { Expires = DateTimeOffset.UtcNow.AddYears(1) }
);
return LocalRedirect(returnUrl);
}
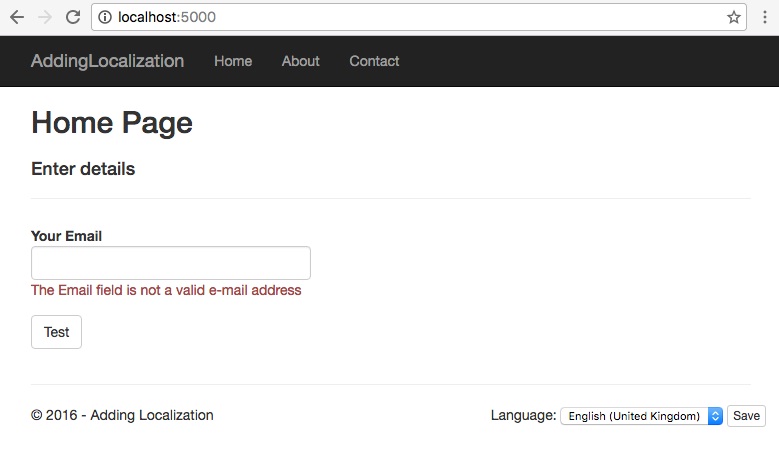
And that's it! If we fire up the home page of our application, you can see the culture selector in the bottom right corner. At this stage, I have not added any resource files, but if I trigger a validation error, you can see that the resource key is used for the resource itself:
My development flow is not interrupted by having to go and mess with resource files, I can just develop the application using the default language and add resx files later in development. If I later add appropriate resource files for the fr culture, and a user changes their culture via the selector, I can see the effect of localisation in the validation attributes and other localised strings:
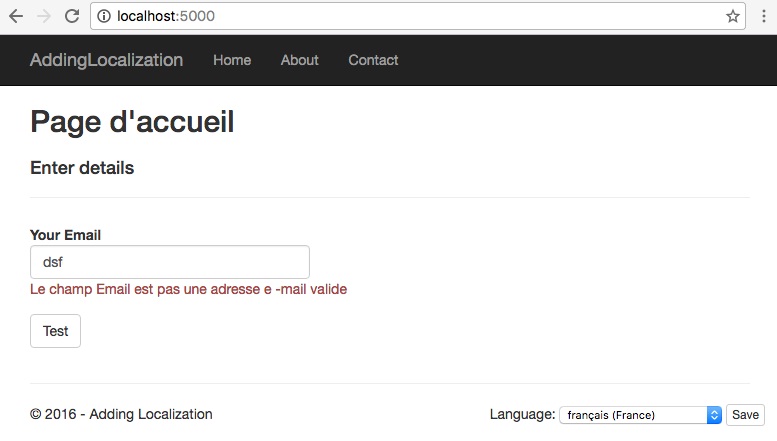
As you can see, the validation attributes and page title are localised, but the label field 'Your Email' has not, as that is set in the DisplayAttribute.
Summary
In this post I showed how to add localisation to your ASP.NET Core application using the recommended approach of providing resources for the default language as keys, and only adding additional resources as required later.
In summary, the steps to localise your application are roughly as follows:
1. Add the required localisation services
2. Configure the localisation middleware and if necessary a culture provider
3. Inject IStringLocalizer<T> into your controllers and services to localise strings
4. Inject IViewLocalizer into your views to localise strings in views
5. Add resource files for non-default cultures
6. Add a mechanism for users to choose their culture