European ASP.NET 4.5 Hosting BLOG

BLOG about ASP.NET 4, ASP.NET 4.5 Hosting and Its Technology - Dedicated to European Windows Hosting Customer

ASP.NET Core 8 Hosting - HostForLIFE.eu :: Third-party API Integration in the ASP.NET Core Web API

clock February 28, 2024 07:16 by author Peter

ASP.NET Core is a sophisticated framework for developing online APIs that enables developers to build strong and scalable applications. One of the most important aspects of current web development is the use of third-party APIs, which give access to external services and data.

Create a Model

using System.Text.Json.Serialization;

namespace _1_3rdAPIIntegrationInAspNetCoreWebAPI.Models
{
    public class Product
    {
        public int Id { get; set; }
        public string Title { get; set; }
        public string Description { get; set; }
        public decimal Price { get; set; }
        public double DiscountPercentage { get; set; }
        public double Rating { get; set; }
        public int Stock { get; set; }
        public string Brand { get; set; }
        public string Category { get; set; }
        public string Thumbnail { get; set; }
        public List<string> Images { get; set; }
    }
}

Here's a breakdown of each property.

  • ID: An integer representing the unique identifier of the product.
  • Title: A string representing the title or name of the product.
  • Description: A string representing the description or details of the product.
  • Price: A decimal representing the price of the product.
  • DiscountPercentage: A double representing the discount percentage applied to the product.
  • Rating: A double representing the rating of the product (e.g., star rating).
  • Stock: An integer representing the available quantity of the product in stock.
  • Brand: A string representing the brand or manufacturer of the product.
  • Category: A string representing the category or type of the product.
  • Thumbnail: A string representing the URL or path to the thumbnail image of the product.
  • Images: A list of strings representing the URLs or paths to additional images of the product.


Create the Interface for the Product Service
using _1_3rdAPIIntegrationInAspNetCoreWebAPI.Models;

namespace _1_3rdAPIIntegrationInAspNetCoreWebAPI.Interfaces
{
public interface IProducts
{
    Task<List<ProductsResponse>> GetProductsAsync();
}
}


GetProductsAsync: This function returns a Task<List<ProductsResponse>>. It indicates that implementing classes will enable the asynchronous retrieval of a list of products. The List<ProductsResponse> contains product responses, including IDs, titles, descriptions, and pricing. The method is asynchronous, as shown by the Task return type, which means that it can be anticipated for asynchronous execution.

Create the service for the products
using _1_3rdAPIIntegrationInAspNetCoreWebAPI.Interfaces;
using _1_3rdAPIIntegrationInAspNetCoreWebAPI.Models;
using System.Net;
using System.Text.Json;

namespace _1_3rdAPIIntegrationInAspNetCoreWebAPI.Services
{
public class ProductService : IProducts
{
    private static readonly HttpClient httpClient;

    static ProductService()
    {
        httpClient = new HttpClient()
        {
            BaseAddress = new Uri("https://dummyjson.com/")
        };

    }

    public async Task<List<ProductsResponse>> GetProductsAsync()
    {
        try
        {
            var url = string.Format("products");
            var result = new List<ProductsResponse>();
            var response = await httpClient.GetAsync(url);

            if (response.IsSuccessStatusCode)
            {
                var stringResponse = await response.Content.ReadAsStringAsync();
                var productsResponse = JsonSerializer.Deserialize<ProductsResponse>(stringResponse, new JsonSerializerOptions()
                {
                    PropertyNamingPolicy = JsonNamingPolicy.CamelCase
                });

                // Add the deserialized ProductsResponse to the result list
                result.Add(productsResponse);
            }
            else
            {
                if (response.StatusCode == HttpStatusCode.NotFound)
                {
                    throw new Exception("Products not found.");
                }
                else
                {
                    throw new Exception("Failed to fetch data from the server. Status code: " + response.StatusCode);
                }
            }

            return result;

        }
        catch (HttpRequestException ex)
        {
            throw new Exception("HTTP request failed: " + ex.Message);
        }
        catch (JsonException ex)
        {
            throw new Exception("JSON deserialization failed: " + ex.Message);
        }
        catch (Exception ex)
        {
            throw new Exception("An unexpected error occurred: " + ex.Message);
        }
    }
}
}

Create the Controller for the Products
using _1_3rdAPIIntegrationInAspNetCoreWebAPI.Interfaces;
using _1_3rdAPIIntegrationInAspNetCoreWebAPI.Models;
using Microsoft.AspNetCore.Http;
using Microsoft.AspNetCore.Mvc;

namespace _1_3rdAPIIntegrationInAspNetCoreWebAPI.Controllers
{
[Route("api/[controller]/[action]")]
[ApiController]
public class ProductsController : ControllerBase
{
    private readonly IProducts _productService;

    public ProductsController(IProducts productService)
    {
        _productService = productService;
    }

    [HttpGet]
    public async Task<IEnumerable<ProductsResponse>> GetProducts()
    {
        return await _productService.GetProductsAsync();
    }
}
}


Register the Services in IOC Container

using _1_3rdAPIIntegrationInAspNetCoreWebAPI.Interfaces;
using _1_3rdAPIIntegrationInAspNetCoreWebAPI.Services;

var builder = WebApplication.CreateBuilder(args);

// Add services to the container.
builder.Services.AddSingleton<IProducts, ProductService>();

builder.Services.AddControllers();
// Learn more about configuring Swagger/OpenAPI at https://aka.ms/aspnetcore/swashbuckle
builder.Services.AddEndpointsApiExplorer();
builder.Services.AddSwaggerGen();

var app = builder.Build();

// Configure the HTTP request pipeline.
if (app.Environment.IsDevelopment())
{
app.UseSwagger();
app.UseSwaggerUI();
}

app.UseHttpsRedirection();

app.UseAuthorization();

app.MapControllers();

app.Run();

Output


ASP.NET Core 8 Hosting - HostForLIFE.eu :: Hands-On Prompt Engineering with .NET Core

clock February 20, 2024 08:29 by author Peter

Prompt engineering

For conversational AI systems to be effective, prompt engineering is essential. We'll examine how to apply rapid engineering with.NET Core, a flexible framework for creating cross-platform apps, in this practical course. In order to demonstrate several prompt engineering strategies, such as contextual prompts, error management, and response variation, we'll develop a basic chatbot application.

Setting up your development environment
Before we begin, ensure you have the .NET Core SDK installed on your system. You can download it from the official .NET website

Once installed, open your terminal or command prompt and run the following command to verify the installation.
dotnet --version

If the installation was successful, you should see the version of .NET Core.

Creating a new .NET core console application

Let's start by creating a new .NET Core console application. Open your terminal or command prompt and navigate to the directory where you want to create the project. Then, run the following command.
dotnet new console -n ChatbotApp

This command creates a new console application named "ChatbotApp."
Building the Chatbot

Now that we have our project set up, let's build the chatbot functionality. Open the Program.cs file in your preferred code editor and replace the existing code with the following.
using System;

class Program
{
    static void Main(string[] args)
    {
        Console.WriteLine("Welcome to the Chatbot!");
        Console.WriteLine("What's your name?");
        string userName = Console.ReadLine();
        Console.WriteLine($"Hello, {userName}! How can I assist you today?"); // Your prompt engineering logic goes here
    }
}


This code prompts the user for their name and greets them accordingly. Let's add some prompt engineering logic to provide a more interactive experience.

Implementing prompt engineering

  • Contextual Prompts: Based on the user's input, we can tailor the prompts to provide relevant responses. For example, if the user asks for help, we can provide assistance prompts.
  • Error Handling: Handle user input errors gracefully. If the user provides invalid input, prompt them to try again.
  • Response Variation: Introduce a variety of responses to make the conversation feel more natural and engaging.


Here's an example of how you can enhance the chatbot with these prompt engineering techniques.
using System;

class Program
{
    static void Main(string[] args)
    {
        Console.WriteLine("Welcome to the Chatbot!");
        Console.WriteLine("What's your name?");
        string userName = Console.ReadLine();
        Console.WriteLine($"Hello, {userName}! How can I assist you today?");

        // Continuously prompt the user for input
        while (true)
        {
            string userInput = Console.ReadLine().ToLower();

            // Handle specific user inputs
            if (userInput.Contains("help"))
            {
                Console.WriteLine("Sure, I can help you with that!");
                continue;
            }
            else if (userInput.Contains("quit") || userInput.Contains("exit"))
            {
                Console.WriteLine("Goodbye! Have a great day!");
                break;
            }

            // Default response for other inputs
            Console.WriteLine("I'm sorry, I didn't understand. Can you please rephrase?");
        }
    }
}


Running the Chatbot


To run the chatbot, navigate to the project directory in your terminal or command prompt and execute the following command.
dotnet run

You'll see the chatbot welcome message and prompt for the user's name. Then, you can interact with the chatbot by entering different inputs and observing the prompt engineering logic in action.

In this hands-on tutorial, we explored prompt engineering using .NET Core by building a simple chatbot application. We implemented various prompt engineering techniques, including contextual prompts, error handling, and response variation, to create an engaging conversational experience. By mastering prompt engineering with .NET Core, you can develop conversational interfaces that provide seamless interactions and enhance user engagement.

Start experimenting with prompt engineering in your .NET Core projects today and unleash the full potential of conversational AI systems.


ASP.NET Core 8 Hosting - HostForLIFE.eu :: Describe the.NET 8 Keyed Services

clock February 13, 2024 07:19 by author Peter

Keyed services are a major improvement to the built-in dependency injection (DI) framework of.NET 8. This functionality, which has long been a part of third-party DI frameworks like Autofac and StructureMap, gives developers more freedom and control over how dependencies are delivered to their applications. Now let's explore keyed services in more detail: Understanding Keyed Services


In the past,.NET DI registered services exclusively on the basis of their kind. Although this worked well in most cases, it became less successful when there were several implementations of the same interface. This is mitigated by keyed services, which enable us to link a special "key" to every service registration. An enum, string, or any other item that specifically defines the intended implementation can be used as this key.

Advantages of Services with Keys

  • Flexibility: You can inject particular implementations according to runtime circumstances, configuration settings, or dynamic conditions.
  • Decoupling: Implement different versions of the same interface for distinct uses to keep concerns apart.
  • Maintainability: Clearly name and reference desired dependencies in your code to improve readability.
  • Configurability: Apply several implementations according to configuration files or environment variables.

Consider a scenario where an application requires data storage because of configuration settings or user preferences. We have two implementations of the IDataStore interface: LocalStorage and CloudStorage.

1. Explain interfaces
public interface IDataStore
{
    void SaveData(string data);
}

public class LocalStorage : IDataStore
{
    public void SaveData(string data)
    {
        // Implementation to save data locally
        Console.WriteLine($"Saving data locally: {data}");
    }
}

public class CloudStorage : IDataStore
{
    public void SaveData(string data)
    {
        // Implementation to save data in the cloud
        Console.WriteLine($"Saving data in the cloud: {data}");
    }
}

2. Register Services with Keys
// In Startup.cs

public void ConfigureServices(IServiceCollection services)
{
    services.AddSingleton<IDataStore, LocalStorage>(key: "local");
    services.AddSingleton<IDataStore, CloudStorage>(key: "cloud");
}


3. Inject and Use Keyed Service
public class MyService
{
    private readonly IKeyedServiceProvider _provider;
    private readonly IConfiguration _configuration;

    public MyService(IKeyedServiceProvider provider, IConfiguration configuration)
    {
        _provider = provider;
        _configuration = configuration;
    }

    public void DoSomething()
    {
        string storageType = _configuration["StorageType"]; // e.g., "local" or "cloud"

        IDataStore store = _provider.GetKeyedService<IDataStore>(storageType);
        store.SaveData("This data will be saved based on the configuration.");
    }
}


4. Run the Application
// Program.cs
public static void Main(string[] args)
{
    var builder = WebApplication.CreateBuilder(args);

    // Configure services and app...

    var app = builder.Build();

    // Run the app...
}

With their more sophisticated and adaptable approach to dependency injection, keyed services are a great addition to the.NET 8 DI architecture. You can gain more authority and clarity over the design of your program by comprehending their advantages, usage trends, and sophisticated applications. Learn about, play with, and take use of keyed services to create more flexible, dynamic, and organized.NET applications!


ASP.NET Core 8 Hosting - HostForLIFE.eu :: .NET MAUI Dev Express Charts

clock February 6, 2024 05:49 by author Peter

Use Devexpress Charts to give your.NET MAUI projects a boost! This blog post will walk you through the process of utilizing the free lifetime plugin Dev Express to implement the chart in.NET MAUI projects. With so many customization options, this plugin will jump straight to the implementation section.

Establishing the Project
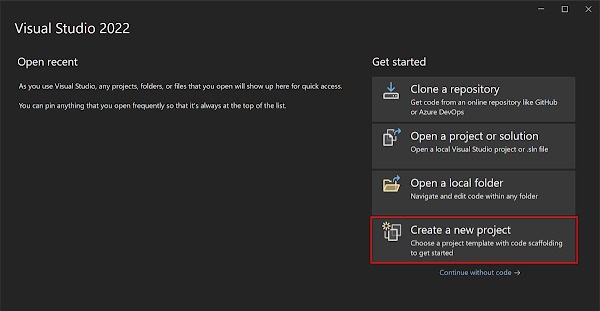
To create a new project, launch Visual Studio 2022 and select Create a new project from the Start box.

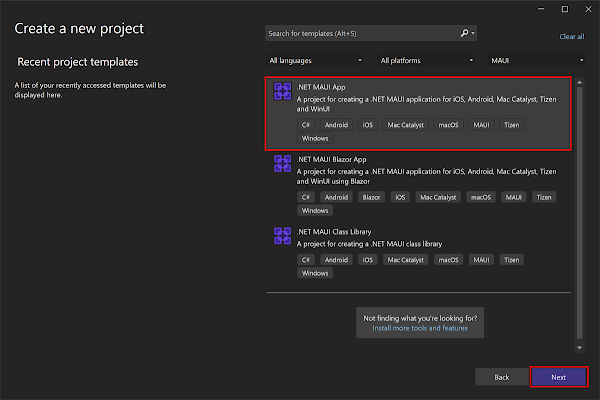
Click the Next button after choosing the.NET MAUI App template and MAUI from the All project types drop-down menu in the Create a new project box.

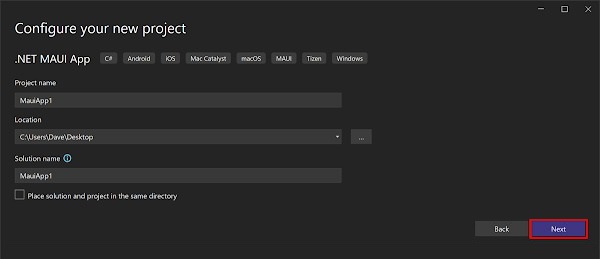
Click the Next button after giving your project a name and selecting an appropriate location in the Configure your new project window.

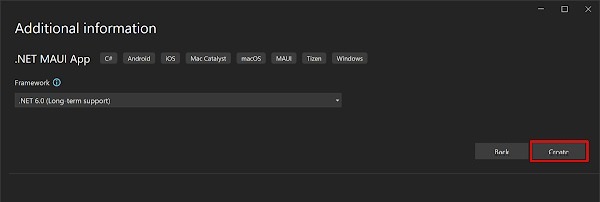
Click the Create button located in the Additional Information window.

Once the project is created, we can able to see the Android, iOS, Windows, and other running options in the toolbar. Press the emulator or run button to build and run the app.

Install Plugin

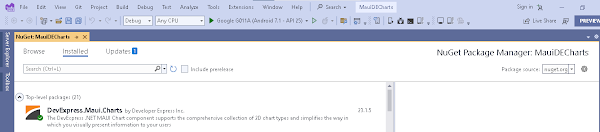
  • Library Requirement: The Dev Express's Nuget link should be mapped as a package source and we need to install "DevExpress.Maui.Charts" into our project.
  • Installation via NuGet: Obtain the Charts library by searching for "DevExpress.Maui.Charts" in the NuGet Package Manager.
  • User Interface Guidance: Open the NuGet Package Manager interface to facilitate the installation process.
  • Visual Confirmation: The library, once searched, should appear as "DevExpress.Maui.Charts" in the NuGet interface.

Implementation
First, we need to open "MauiProgram.cs" and include the following namespace and line to allow the app to use the Chart Library.

using DevExpress.Maui;

.UseDevExpress()

Open the MainPage.xaml file and add the following namespace. (the page will be replaced according to you).
xmlns:dxc="clr-namespace:DevExpress.Maui.Charts;assembly=DevExpress.Maui.Charts"

Then, remove the default content and add an instance of the ChartView class to the page.

<ContentPage xmlns="http://schemas.microsoft.com/dotnet/2021/maui"
             xmlns:x="http://schemas.microsoft.com/winfx/2009/xaml"
             xmlns:dxc="clr-namespace:DevExpress.Maui.Charts;assembly=DevExpress.Maui.Charts"
             x:Class="ScatterChartGetStarted.MainPage">
    <dxc:ChartView/>
</ContentPage>


Consider removing the event handlers from the code behind the default content. It is advisable to eliminate default styles (such as fonts, colors, and other settings) in the App.xaml file as well.

In this instance, the chart features a line series displaying the annual GDP for three countries. Generate a ViewModel.cs file that includes the following classes.
public class ViewModel {
    public CountryGdp GdpValueForUSA { get; }
    public CountryGdp GdpValueForChina { get; }
    public CountryGdp GdpValueForJapan { get; }

    public ViewModel() {
        GdpValueForUSA = new CountryGdp(
            "USA",
            new GdpValue(new DateTime(2020, 1, 1), 20.93),
            new GdpValue(new DateTime(2019, 1, 1), 21.43),
            new GdpValue(new DateTime(2018, 1, 1), 20.58),
            new GdpValue(new DateTime(2017, 1, 1), 19.391),
            new GdpValue(new DateTime(2016, 1, 1), 18.624),
            new GdpValue(new DateTime(2015, 1, 1), 18.121),
            new GdpValue(new DateTime(2014, 1, 1), 17.428),
            new GdpValue(new DateTime(2013, 1, 1), 16.692),
            new GdpValue(new DateTime(2012, 1, 1), 16.155),
            new GdpValue(new DateTime(2011, 1, 1), 15.518),
            new GdpValue(new DateTime(2010, 1, 1), 14.964)
        );
        GdpValueForChina = new CountryGdp(
            "China",
            new GdpValue(new DateTime(2020, 1, 1), 14.72),
            new GdpValue(new DateTime(2019, 1, 1), 14.34),
            new GdpValue(new DateTime(2018, 1, 1), 13.89),
            new GdpValue(new DateTime(2017, 1, 1), 12.238),
            new GdpValue(new DateTime(2016, 1, 1), 11.191),
            new GdpValue(new DateTime(2015, 1, 1), 11.065),
            new GdpValue(new DateTime(2014, 1, 1), 10.482),
            new GdpValue(new DateTime(2013, 1, 1), 9.607),
            new GdpValue(new DateTime(2012, 1, 1), 8.561),
            new GdpValue(new DateTime(2011, 1, 1), 7.573),
            new GdpValue(new DateTime(2010, 1, 1), 6.101)
        );
        GdpValueForJapan = new CountryGdp(
            "Japan",
            new GdpValue(new DateTime(2020, 1, 1), 4.888),
            new GdpValue(new DateTime(2019, 1, 1), 5.082),
            new GdpValue(new DateTime(2018, 1, 1), 4.955),
            new GdpValue(new DateTime(2017, 1, 1), 4.872),
            new GdpValue(new DateTime(2016, 1, 1), 4.949),
            new GdpValue(new DateTime(2015, 1, 1), 4.395),
            new GdpValue(new DateTime(2014, 1, 1), 4.850),
            new GdpValue(new DateTime(2013, 1, 1), 5.156),
            new GdpValue(new DateTime(2012, 1, 1), 6.203),
            new GdpValue(new DateTime(2011, 1, 1), 6.156),
            new GdpValue(new DateTime(2010, 1, 1), 5.700)
        );
    }
}

public class CountryGdp {
    public string CountryName { get; }
    public IList<GdpValue> Values { get; }

    public CountryGdp(string country, params GdpValue[] values) {
        this.CountryName = country;
        this.Values = new List<GdpValue>(values);
    }
}

public class GdpValue {
    public DateTime Year { get; }
    public double Value { get; }

    public GdpValue(DateTime year, double value) {
        this.Year = year;
        this.Value = value;
    }
}

In the MainPage.xaml file, incorporate three LineSeries objects into the ChartView.Series collection. To establish a connection between the series and data, assign each LineSeries object's Data property to a SeriesDataAdapter object. Utilize the adapter's properties to indicate the data source and fields containing arguments and values for each series.

Additionally, define a local XAML namespace referring to a CLR namespace encompassing the view model. Subsequently, employ the page's BindingContext property to link the view model with the view.
<ContentPage xmlns="http://schemas.microsoft.com/dotnet/2021/maui"
             xmlns:x="http://schemas.microsoft.com/winfx/2009/xaml"
             xmlns:dxc="clr-namespace:DevExpress.Maui.Charts;assembly=DevExpress.Maui.Charts"
             xmlns:ios="clr-namespace:Microsoft.Maui.Controls.PlatformConfiguration.iOSSpecific;assembly=Microsoft.Maui.Controls"
             ios:Page.UseSafeArea="True"
             xmlns:local="clr-namespace:MauiDevExpress"
             x:Class="MauiDevExpress.MainPage">
    <ContentPage.BindingContext>
        <local:ViewModel/>
    </ContentPage.BindingContext>
    <dxc:ChartView>
        <dxc:ChartView.Series>
            <dxc:LineSeries DisplayName="{Binding GdpValueForUSA.CountryName}">
                <dxc:LineSeries.Data>
                    <dxc:SeriesDataAdapter DataSource="{Binding GdpValueForUSA.Values}"
                                           ArgumentDataMember="Year">
                        <dxc:ValueDataMember Type="Value" Member="Value"/>
                    </dxc:SeriesDataAdapter>
                </dxc:LineSeries.Data>
            </dxc:LineSeries>

            <dxc:LineSeries DisplayName="{Binding GdpValueForChina.CountryName}">
                <dxc:LineSeries.Data>
                    <dxc:SeriesDataAdapter DataSource="{Binding GdpValueForChina.Values}"
                                           ArgumentDataMember="Year">
                        <dxc:ValueDataMember Type="Value" Member="Value"/>
                    </dxc:SeriesDataAdapter>
                </dxc:LineSeries.Data>
            </dxc:LineSeries>

            <dxc:LineSeries DisplayName="{Binding GdpValueForJapan.CountryName}">
                <dxc:LineSeries.Data>
                    <dxc:SeriesDataAdapter DataSource="{Binding GdpValueForJapan.Values}"
                                           ArgumentDataMember="Year">
                        <dxc:ValueDataMember Type="Value" Member="Value"/>
                    </dxc:SeriesDataAdapter>
                </dxc:LineSeries.Data>
            </dxc:LineSeries>
        </dxc:ChartView.Series>
    </dxc:ChartView>
</ContentPage>

Configure the X-axis to display labels for years by assigning a DateTimeAxisX object with the specified settings to the ChartView.AxisX property.
<dxc:ChartView> <dxc:ChartView.AxisX>
    <dxc:DateTimeAxisX MeasureUnit="Year" GridAlignment="Year"
    GridSpacing="2"/> </dxc:ChartView.AxisX> </dxc:ChartView>


Configure the title and labels on the Y-axis. Set the ChartView.AxisY property to a NumericAxisY object and specify this object’s Title and Label properties.
<dxc:ChartView>
<!-- The X-axis config is here. -->
    <dxc:ChartView.AxisY>
        <dxc:NumericAxisY>
            <dxc:NumericAxisY.Title>
                <dxc:AxisTitle Text="Trillions of US$">
                    <dxc:AxisTitle.Style>
                        <dxc:TitleStyle>
                            <dxc:TitleStyle.TextStyle>
                                <dxc:TextStyle Size="16"/>
                            </dxc:TitleStyle.TextStyle>
                        </dxc:TitleStyle>
                    </dxc:AxisTitle.Style>
                </dxc:AxisTitle>
            </dxc:NumericAxisY.Title>
            <dxc:NumericAxisY.Label>
                <dxc:AxisLabel TextFormat="#.#" Position="Inside"/>
            </dxc:NumericAxisY.Label>
        </dxc:NumericAxisY>
    </dxc:ChartView.AxisY>
</dxc:ChartView>

Configure the legend position and orientation. Set the ChartView.Legend property to a Legend object, and specify this object’s properties as follows.
<dxc:ChartView>
    <dxc:ChartView.Legend>
        <dxc:Legend VerticalPosition="TopOutside"
                    HorizontalPosition="Center"
                    Orientation="LeftToRight"/>
    </dxc:ChartView.Legend>
</dxc:ChartView>

Establish the chart to showcase a series point hint as a crosshair cursor by setting the ChartView.Hint property to a Hint object and assigning a CrosshairHintBehavior object to Hint.Behavior. Subsequently, define the hint's content, data format, and visibility options. Set the LineSeries.HintOptions property to a SeriesCrosshairOptions object with the specified settings.
<ContentPage.Resources>
    <dxc:SeriesCrosshairOptions x:Key="lineSeriesHintOptions"
                                PointTextPattern="{}{S}: {V}M"
                                ShowInLabel="True"
                                AxisLabelVisible="True"
                                AxisLineVisible="True"/>
</ContentPage.Resources>
<dxc:ChartView>
    <dxc:ChartView.Hint>
        <dxc:Hint>
            <dxc:Hint.Behavior>
                <dxc:CrosshairHintBehavior GroupHeaderTextPattern="{}{A$YYYY}"
                                           MaxSeriesCount="3"/>
            </dxc:Hint.Behavior>
        </dxc:Hint>
    </dxc:ChartView.Hint>

    <dxc:ChartView.Series>
        <dxc:LineSeries HintOptions="{StaticResource lineSeriesHintOptions}">
            <!--Series Data-->
        </dxc:LineSeries>
        <dxc:LineSeries HintOptions="{StaticResource lineSeriesHintOptions}">
            <!--Series Data-->
        </dxc:LineSeries>
        <dxc:LineSeries HintOptions="{StaticResource lineSeriesHintOptions}">
            <!--Series Data-->
        </dxc:LineSeries>
    </dxc:ChartView.Series>
</dxc:ChartView>


Set the LineSeries.MarkersVisible property to True to display point markers. To change the line series appearance, set the LineSeries.Style property to a LineSeriesStyle object. This object’s Stroke, StrokeThickness, MarkerSize, and MarkerStyle properties allow you to configure the appearance of the series line and point markers.
<dxc:LineSeries MarkersVisible="True">
    <!--Series Data-->
    <dxc:LineSeries.Style>
        <dxc:LineSeriesStyle Stroke="#7145a7" StrokeThickness="2" MarkerSize="8">
            <dxc:LineSeriesStyle.MarkerStyle>
                <dxc:MarkerStyle Fill="#7145a7"/>
            </dxc:LineSeriesStyle.MarkerStyle>
        </dxc:LineSeriesStyle>
    </dxc:LineSeries.Style>
</dxc:LineSeries>


ASP.NET Core 8 Hosting - HostForLIFE.eu :: Integrate Health Checks Into a.NET Core Program

clock January 25, 2024 07:05 by author Peter

The following describes how to incorporate health checks into a.NET Core application:

1. Set up the NuGet package for Health Checks
You must install Microsoft.Extensions.Diagnostics in your project.The NuGet package HealthChecks. You can accomplish this by include the package reference in your project file or by using the Package Manager Console:
dotnet add package Microsoft.Extensions.Diagnostics.HealthChecks

2. Configure Health Checks
In your Startup.cs file, configure the health checks in the ConfigureServices method:
using Microsoft.AspNetCore.Builder;
using Microsoft.Extensions.DependencyInjection;
using Microsoft.Extensions.Diagnostics.HealthChecks;

public class Startup
{
    public void ConfigureServices(IServiceCollection services)
    {
        services.AddHealthChecks();
        // Add other services...
    }

    public void Configure(IApplicationBuilder app)
    {
        app.UseRouting();

        app.UseEndpoints(endpoints =>
        {
            endpoints.MapHealthChecks("/health");
            // Map other endpoints...
        });
    }
}

A health check endpoint at /health is configured in this example.

3. Explain Health Examinations

By including checks for other components, you can define health checks. You may wish to verify the state of an external API, a database connection, or any other crucial element. These checks can be included in the ConfigureServices method:
public void ConfigureServices(IServiceCollection services)
{
    services.AddHealthChecks()
        .AddSqlServer("YourConnectionString", name: "DatabaseHealthCheck")
        .AddUrlGroup(new Uri("https://api.example.com"), name: "ApiHealthCheck");
    // Add other services...
}

4. Execute and Verify
Launch your application at this point, and go to the health check endpoint (http://localhost:5000/health, for example). A JSON response with the status of each health check ought to appear.

In summary

  • The status of each check and any further information you supply are usually included in health check responses.
  • Health checks can be modified and expanded to meet your unique needs.

It's a good idea to include health checks if you want to make sure that your.NET Core application is reliable, particularly in production scenarios where you want to keep an eye on any problems and take proactive measures to address them.


ASP.NET Core 8 Hosting - HostForLIFE.eu :: Difference between .NET 7 and .NET 8

clock January 18, 2024 06:18 by author Peter

The differences between.NET 7 and.NET 8 can be better understood by contrasting their compatibility, integration powers, performance, and diagnostic features. A thorough grasp of these frameworks can also be attained by exploring the new features added in.NET 8 and comparing them with those of.NET 7. Examining these specifics can help identify the best version of the Microsoft.NET framework.

The improvements in.NET 8 constitute a noteworthy achievement for Microsoft, offering an extensive feature set with the goals of strengthening security, enhancing performance, enabling smooth integration, and streamlining maintenance. The question of whether the new features in.NET 8 are superior to those in.NET 7 is still up for dispute.

Examining the main distinctions between.NET 7 and.NET 8 is essential to obtain understanding and make wise choices about a possible upgrade. With the clarity this article will offer, it will be possible to comprehend the advantages and improvements brought forth by.NET 8.

Despite being created by Microsoft,.NET 8 and.NET 7 differ significantly. We've divided up their differences into categories based on a number of important factors, such as integration capabilities, cross-platform compatibility, performance, diagnostics, observability, and support services. It will enable you to fully comprehend how the two differ from one another.

1. Enhancements in Performance
Performance is one of the most important factors that developers consider when assessing technology for building applications. Notably,.NET 8 exhibits better optimization than.NET 7 in terms of speed and efficiency. A JIT (Just-In-Time) compiler is used by the Microsoft.NET framework in both versions, but in.NET 8, substantial improvements have been made to speed up code processing, leading to faster process execution and shorter loading times.

Furthermore, significant improvements to the runtime environment and garbage collector in.NET 8 also add to increased efficiency. With these improvements, companies can save a great deal of resources and maintain high performance even during busy hours.

2. Development Across Platforms

When it comes to facilitating the development of cross-platform compatible applications,.NET 8 outperforms.NET 7. .NET 8 is notably more capable than.NET 7 of facilitating the creation of programs customized for different hardware intrinsics.

  • AVX-512
  • Vector 512
  • Optimized support for ARM64 and WebAssembly

These enhancements expand the accessibility of your program, making it available to a larger range of users on desktop and mobile devices, covering a variety of operating systems such as Windows, Linux, macOS, and other platforms.

3. Assistance for Platforms
For every.NET version, Microsoft offers different support durations based on two main policies: LTS (Long Term Support) and STS (Short Term Support). Long Term Support (LTS) for the.NET 8 version ensures Microsoft's assistance from November 14, 2023, to November 10, 2026. On the other hand, May 14th, 2024 is when support for the Dotnet 7 version is supposed to end. Selecting.NET 8 guarantees improved upkeep and durability for the well-being of your program.


Version Latest patch version Patch release date Release type Support phase End of support
.NET 8 8.0.0 November 14, 2023 LTS Active November 10, 2026
.NET 7 7.0.14 November 14, 2023 STS Active May 14, 2024

4. Consolidation
In contrast to.NET 7, which necessitates that developers create unique code in order to integrate with APIs and other components,.NET 8 provides more convenience. Major integrated development environments, APIs, and services are all pre-supported by default. Additionally, the debugging features have been much enhanced, enabling better process execution and problem correction with less time commitment.

New Features in.NET 8

Now that we know why.NET 8 is better than.NET 7, it's imperative that you be familiar with all of its key characteristics. Comprehending these fundamental features of.NET 8 is essential as it confirms its place as a reliable technology for application development, outperforming.NET 7.

1. An improved source generator
When it comes to earlier iterations, the source generator included in.NET 8 is a major improvement. Microsoft has made significant improvements to System.Text.Json, bringing it closer to parity with the reflection-based serializer. Among the improvements included in.NET 8 are:

  • Support for the "init" and "required" properties when using the source generator to serialize types.
  • source-generated code formatted more neatly and systematically.
  • Two new diagnoses, SYSLIB1034 and SYSLIB1039, have been added.
  • Support for JsonStringEnumConverter<TEnum> is integrated into.NET 8.

2. Original AOT
By compiling only the essential parts rather than the complete codebase,.NET 8 apps improve code use with native AOT (Ahead-of-Time) compilation.

For instance, just the code specifically responsible for the login feature will be used when a user enters in with a.NET 8 application; the rest of the codebase stays in its current configuration. Thus, there are several benefits to this strategy.

  • Elimination of the need for a Just-In-Time compiler.
  • It increased the loading speed.
  • Conservation of network and memory resources.
  • Reduced execution time and resource costs.
  • Improved user experience and satisfaction.

3. Enhanced Artificial Intelligence Skills
AI integration is now more stable, quick, and smooth with.NET 8. The AI components in.NET 8 are the outcome of multiple technologies working together, including Qdrant, Microsoft Teams, Azure OpenAI, Milvus, and Azure Cognitive Search. Together, these many technological advances enable.NET 8 applications to leverage sophisticated artificial intelligence (AI) capabilities, producing outputs that are accurate and exact.
  
4. Elevated .NET MAUI
.NET 8 brings significant enhancements to .NET MAUI. Now, a single codebase caters to API 34 and XCode 15, enabling seamless operation of your .NET MAUI application across WinUI, iOS, Android, and Mac Catalyst systems.

5. SHA-3 Hashing Primitives
Compared to .NET 7, the security enhancements in .NET 8 are notably robust. It introduces support for configuring the SHA-3 hashing algorithm, ensuring compatibility with APIs that complement SHA-3 within your .NET 8 applications. The SHA-3 cryptography algorithms available in .NET 8 include.

  • SHA3_256, SHA3_384, and SHA3_512 (for Hashing purposes)
  • HMACSHA3_256, HMACSHA3_384, and HMACSHA3_512 (for HMAC usage)
  • HashAlgorithmName.SHA3_256, HashAlgorithmName.SHA3_384, and HashAlgorithmName.SHA3_512 (for developer-configurable algorithm settings)
  • RSAEncryptionPadding.OaepSHA3_256, RSAEncryptionPadding.OaepSHA3_384, and RSAEncryptionPadding.OaepSHA3_512 (for RSA OAEP encryption)

6. HTTPS Proxy

Support: Man-in-the-middle attacks are prevented with HTTPS proxy support, which.NET 8 brings to improve the security of client connections. By creating encrypted communication channels, this function protects the confidentiality and integrity of data.

Should you upgrade from .NET 7 to .NET 8?

Considering the analysis of various factors, .NET 8 is more advanced and proficient than .NET 7. So, you should upgrade your application to .NET 8.

Conclusion

.NET 8 stands out as a remarkable software development technology by Microsoft, surpassing .NET 7 in every aspect. From performance and integration to C# code compilation, observability, and support, .NET 8 excels in every aspect when compared. Moreover, .NET experts and professionals widely endorse .NET 8 for their projects.


ASP.NET Core 8 Hosting - HostForLIFE.eu :: Effective Bandwidth Management with.NET Core Techniques

clock January 12, 2024 07:28 by author Peter

In web development, response compression is an essential technique used to maximize the speed and responsiveness of HTTP applications. Response compression improves user experience, speeds up page loads, and uses less bandwidth by lowering the size of HTTP responses.


Advantages of Compression Response:

  • Enhanced Performance: Compression speeds up page loads by reducing the quantity of data sent over the network.
  • Decreased Bandwidth Usage: Less data transfer from compressed answers results in lower hosting and bandwidth expenses.
  • Improved SEO: Page load times are taken into account by search engines, which could result in a website that loads faster ranking better in search results.

Response Compression Implementation in.NET
Middleware can be used to implement response compression in a.NET web application. This is an example that makes use of AddResponseCompression, a.NET middleware.
var builder = WebApplication.CreateBuilder(args);
builder.Services.AddResponseCompression(options =>
{
    options.EnableForHttps = true;
});

var app = builder.Build();
app.UseResponseCompression();
app.MapGet("/", () => "Hello World!");
app.Run();


In this example, EnableForHttps is set to true, but caution is advised due to potential security vulnerabilities like CRIME and BREACH attacks. It's recommended to use anti-forgery tokens to mitigate these risks.

builder.Services.AddResponseCompression(options =>
{
    options.EnableForHttps = true;
    options.Providers.Add<BrotliCompressProvider>();
    options.Providers.Add<GzipCompressProvider>();
    options.MimeTypes = ResponseCompressionDefaults.MimeTypes;
});


Compression Levels
Each compression provider has different compression levels.

builder.Services.Configure<BrotliCompressionProviderOptions>(options =>
{
    options.Level = CompressionLevel.SmallestSize;
});
builder.Services.Configure<GzipCompressProviderOptions>(options =>
{
    options.Level = CompressionLevel.Optimal;
});

These levels include Optimal, Fastest, No Compression, and Smallest Size.

Custom Providers

You can also create custom compression providers by implementing the ICompressionProvider interface.
builder.Services.AddResponseCompression(options =>
{
    options.Providers.Add<BrotliCompressionProvider>();
    options.Providers.Add<GzipCompressionProvider>();
    options.Providers.Add<CustomCompressionProvider>();
});


When to Compress and When not?

Compress responses that are not natively compressed (e.g., CSS, JS, HTML, XML, JSON). Avoid compressing natively compressed assets (e.g., PNG) and smaller files (150-1000 bytes).

Verifying Compression

To ensure compression is working, use middleware, set compression levels, and send requests from tools like Postman with different values of Accept-Encoding in the header.

Default MIME Types Supported

Common MIME types supported by default include text/CSS, text/XML, text/JSON, text/HTML, text/plain, application/XML, application/JSON, application/WASM, and application/javascript.

One useful method for improving the performance and user experience of web applications is to add response compression. Smaller HTTP response sizes result in quicker page loads, less bandwidth used, and possibly higher search engine ranks. A strong framework for effectively handling response compression is provided by the AddResponseCompression middleware in the.NET environment, in conjunction with providers such as Brotli and Gzip compression. It is imperative to take security concerns into account, particularly when enabling HTTPS compression. It is recommended to take steps to address potential vulnerabilities such as CRIME and BREACH attacks, such as implementing anti-forgery tokens.

Developers can adapt compression algorithms to individual application requirements thanks to the flexibility of bespoke compression providers. It is possible to adjust compression levels according to optimization, speed, or file size considerations. It's important to know when to apply compression, focusing on replies that aren't already compressed and avoiding it on smaller or previously compressed data. It is important to confirm that the compression settings you have put in place are working as intended by using tools such as Postman to verify the efficiency of the compression with different Accept-Encoding header variants.

Developers can further improve the effectiveness of response compression by covering a variety of frequently used content kinds by utilizing default MIME types for compression. To put it simply, response compression is a crucial component of web development that, when used carefully, greatly improves an application's overall functionality, responsiveness, and cost-effectiveness..


ASP.NET Core 8 Hosting - HostForLIFE.eu :: How Can I Make.NET Channels?

clock January 8, 2024 05:58 by author Peter

An essential feature to the asynchronous programming paradigm in.NET is channels. They offer a thread-safe method of data transfer between producers and consumers, improving application performance and scalability. The System is the foundation of channels.Threading.Namespaces and channels provide an adaptable and effective way to communicate.

How to Make a Channel in.NET?
To get started, let's develop a basic example that shows how to use and create a channel in.NET 8.0.

using System.Threading.Channels;

Console.WriteLine("Channels In .NET");

// Create an unbounded channel
var channel = Channel.CreateUnbounded<int>();

// Producer writing data to the channel
async Task ProduceAsync()
{
    for (int i = 0; i < 5; i++)
    {
        await channel.Writer.WriteAsync(i);
        Console.WriteLine($"Produced: {i}");
    }
    channel.Writer.Complete();
}

// Consumer reading data from the channel
async Task ConsumeAsync()
{
    while (await channel.Reader.WaitToReadAsync())
    {
        while (channel.Reader.TryRead(out var item))
        {
            Console.WriteLine($"Consumed: {item}");
        }
    }
}

// Run producer and consumer asynchronously
var producerTask = ProduceAsync();
var consumerTask = ConsumeAsync();

// Wait for both tasks to complete
await Task.WhenAll(producerTask, consumerTask);

Console.ReadLine();

An explanation of the example:

  • Using Channel, we construct an infinite channel of integers.ConstructUnbounded<int>().
  • As the producer, the ProduceAsync() method uses a channel to write data to the channel.Author.Use WriteAsync().
  • As the consumer, the ConsumeAsync() method uses the channel to read data from it.Peruser.TryRead().
  • Task allows both producer and consumer tasks to run asynchronously.WhenAll() to await their finish

Channel Properties in.NET
There are various options available with.NET Channels to manage data flow:

  • Boundary and Non-Boundary Channels: You can decide whether to let an infinite amount of objects through or restrict the capacity of the channel.
  • Completion: Use the channel to indicate that the channel is finished.Author.To indicate that the data stream has ended, use Complete().
  • Cancellation: To manage the channel activities lifetime, use cancellation tokens.
  • numerous Writers/Readers: Use channels to properly support numerous writers or readers.


ASP.NET Core 8 Hosting - HostForLIFE.eu :: How Can I Use Dapper to Create a Generic Repository in.NET Core?

clock January 4, 2024 06:11 by author Peter

We can utilize Dapper, an ORM (Object-Relational Mapper) or, more accurately, a Micro ORM, to interface with the database in our projects. Dapper allows us to write SQL statements just like we would in a SQL Server. Dapper works well since it doesn't convert.NET queries into SQL.


Dapper's SQL Injection safety is crucial to know since it allows us to perform parameterized queries, which is something we should do at all times. The fact that Dapper supports a variety of database providers is another crucial factor. In order to query our database, it offers helpful extension methods that extend ADO.NET's IDbConnection. Writing queries that work with our database provider is a must, of course.

Company.cs
using System.ComponentModel.DataAnnotations;

namespace DapperApp.Model
{
    public class Company
    {
        public int Id { get; set; }

        [Display(Name = "Company Name")]
        [Required(ErrorMessage = "Company Name is required")]
        public string CompanyName { get; set; }

        [Display(Name = "Company Address")]
        [Required(ErrorMessage = "Company Address is required")]
        public string CompanyAddress { get; set; }

        [Required(ErrorMessage = "Country is required")]
        public string Country { get; set; }

        [Display(Name = "Glassdoor Rating")]
        [Range(1, 5, ErrorMessage = "Glassdoor Rating must be between 1 and 5")]
        public int GlassdoorRating { get; set; }
    }
}

HomeController.cs
using Dapper;
using DapperApp.Model;
using DapperApp.Repository;
using Microsoft.AspNetCore.Http;
using Microsoft.AspNetCore.Mvc;
using System.Data;

namespace DapperApp.ControllerApp
{
    public class HomeController : Controller
    {
        readonly IGenericRepository _genericController;

        public HomeController(IGenericRepository genericController)
        {
            _genericController = genericController;
        }
        // GET: HomeController
        public async Task<IActionResult> Index()
        {
            var query = "SELECT * FROM Companies";

            var companies = await _genericController.GetData<Company>(query);
            return View(companies);
        }

        // GET: HomeController/Details/5
        public async Task<IActionResult> Details(int id)
        {
            var query = "SELECT * FROM Companies WHERE Id = @Id";
            if (id == null)
            {
                return NotFound();
            }

            var company = await _genericController.GetDataById<Company>(query, id);
            if (company == null)
            {
                return NotFound();
            }

            return View(company);
        }

        // GET: HomeController/Create
        public ActionResult Create()
        {
            return View();
        }

        // POST: HomeController/Create
        [HttpPost]
        [ValidateAntiForgeryToken]
        public async Task<IActionResult> Create([Bind("Id,CompanyName,CompanyAddress,Country,GlassdoorRating")] Company company)
        {
            var parameters = new DynamicParameters();
            parameters.Add("CompanyName", company.CompanyName, DbType.String);
            parameters.Add("CompanyAddress", company.CompanyAddress, DbType.String);
            parameters.Add("Country", company.Country, DbType.String);
            parameters.Add("GlassdoorRating", company.GlassdoorRating, DbType.Int32);
            var query = "INSERT INTO Companies (CompanyName, CompanyAddress, Country,GlassdoorRating) VALUES (@CompanyName, @CompanyAddress, @Country, @GlassdoorRating)";

            if (ModelState.IsValid)
            {
                await _genericController.CreateData(query, parameters);
                return RedirectToAction("Index");
            }
            return View(company);
        }


        // GET: HomeController/Edit/5
        public ActionResult Edit(int id)
        {
            return View();
        }

        // POST: HomeController/Edit/5
        [HttpPost]
        [ValidateAntiForgeryToken]
        public async Task<IActionResult> Edit(int id, [Bind("Id,CompanyName,CompanyAddress,Country,GlassdoorRating")] Company company)
        {
            if (id != company.Id)
            {
                return NotFound();
            }
            var parameters = new DynamicParameters();
            parameters.Add("CompanyName", company.CompanyName, DbType.String);
            parameters.Add("CompanyAddress", company.CompanyAddress, DbType.String);
            parameters.Add("Country", company.Country, DbType.String);
            parameters.Add("GlassdoorRating", company.GlassdoorRating, DbType.Int32);
            parameters.Add("Id", company.Id, DbType.Int32);
            var query = "UPDATE Companies SET CompanyName = @CompanyName, CompanyAddress = @CompanyAddress, Country = @Country, GlassdoorRating = @GlassdoorRating WHERE Id = @Id";

            if (ModelState.IsValid)
            {
                await _genericController.UpdateData(query, parameters);
                return RedirectToAction("Index");
            }

            return View(company);
        }

        // GET: HomeController/Delete/5
        public ActionResult Delete(int id)
        {
            return View();
        }

        // POST: HomeController/Delete/5
        [HttpPost]
        [ValidateAntiForgeryToken]
        public async Task<IActionResult> DeleteConfirmed(int id)
        {
            var query = "DELETE FROM Companies WHERE Id = @Id";
            await _genericController.DeleteData(query, id);
            return RedirectToAction("Index");
        }
    }
}

DapperContext.cs

using System.Data;
using Microsoft.Data.SqlClient;

namespace DapperApp.Context
{
    public class DapperContext
    {
        private readonly IConfiguration _configuration;
        private readonly string _connectionString;
        public DapperContext(IConfiguration configuration)
        {
            _configuration = configuration;
            _connectionString = _configuration.GetConnectionString("DefaultConnection");
        }

        public IDbConnection CreateConnection() => new SqlConnection(_connectionString);
    }
}

IGenericRepository.cs

using DapperApp.Model;

namespace DapperApp.Repository
{
    public interface IGenericRepository
    {
        Task CreateData(string query, DynamicParameters parameters);
        Task DeleteData(string query, int id);
        Task<T> GetDataById<T>(string query, int id);
        Task<IEnumerable<T>> GetData<T>(string SQL, string DbName = "TEST");
        Task UpdateData(string query, DynamicParameters parameters);
    }
}

C#

GenericRepository.cs

using DapperApp.Context;
using DapperApp.Model;
using DapperApp.Repository;
using Dapper;
using Microsoft.Data.SqlClient;
using System.Data;

namespace DapperApp.Repository
{
    public class GenericRepository: IGenericRepository
    {
        readonly DapperContext _context;

        public GenericRepository(DapperContext context)
        {
            this._context = context;
        }

        public async Task<IEnumerable<T>> GetData<T>(string SQL, string DbName = "TEST")
        {

            using (var connection = _context.CreateConnection())
            {
                var companies = await connection.QueryAsync<T>(SQL);
                return companies.ToList();
            }
        }
        public async Task<T> GetDataById<T>(string query, int id)
        {
            using (var connection = _context.CreateConnection())
            {
                var company = await connection.QuerySingleOrDefaultAsync<T>(query, new { id });
                return company;
            }
        }

        public async Task CreateData(string query, DynamicParameters parameters)
        {

            using (var connection = _context.CreateConnection())
            {
                await connection.ExecuteAsync(query, parameters);
            }
        }

        public async Task UpdateData(string query, DynamicParameters parameters)
        {

            using (var connection = _context.CreateConnection())
            {
                await connection.ExecuteAsync(query, parameters);
            }
        }


        public async Task DeleteData(string query, int id)
        {
            using (var connection = _context.CreateConnection())
            {
                await connection.ExecuteAsync(query, new { id });
            }
        }

    }
}


ASP.NET Core 8 Hosting - HostForLIFE.eu :: Unleash the Power of SuperInject with.NET Dependency Injection

clock December 18, 2023 05:53 by author Peter

Overview
Greetings, fellow programmers! Has your.NET project ever left you entangled in the complex web of dependency injection? Do not be alarmed! We've got you covered, and today we're launching the revolutionary SuperInject NuGet Library!

How does SuperInject work?
SuperInject is your reliable dependency injection sidekick, not just another NuGet package. Imagine this: simplified service and repository registration that incorporates a little bit of fun and simplicity.

How to Begin

First Step: The Installation Dance
Now let's start the celebration! Grab a terminal and give SuperInject a hug:

dotnet add package SuperInject

SuperInject loves to be invited to the party!

Step 2. Mark Your Classes, It’s Attribute Time!
Now, here comes the fun part. Mark your classes with the ServiceAttribute or RepositoryAttribute. It’s like giving your classes a VIP pass for the dependency injection club.

using SuperInject;

[Service(ServiceLifetime.Singleton)]
public class MySingletonService : ISomeInterface
{
// Implementation goes here...
}


And for repositories:
using SuperInject;

[Repository(ServiceLifetime.Transient)]
public class MyTransientRepository : ISomeInterface
{
// Implementation goes here...
}

Let’s Get SuperInjecting!

The stage is set, and the lights are on, now let’s call the shots with the SuperInject extension method. In your Startup.cs or Program.cs file, give your services and repositories a grand entrance:
// ConfigureServices method in Startup.cs
public void ConfigureServices(IServiceCollection services)
{
// Use the AddSuperInject extension method to automatically register services and repositories
services.AddSuperInject();

// Your other service registrations go here...

// And the party continues...
}


Why SuperInject?
Attribute Awesomeness: No more tedious configurations! SuperInject’s attributes make your classes stand out, like stars on the red carpet.
Extension Method Magic: Say goodbye to manual registrations. Let SuperInject handle the heavy lifting, leaving you with more time for the fun stuff.
Avoid Circular Dependency Drama: SuperInject knows how to navigate the tricky paths of circular dependencies. It’s like having a GPS for your dependency injection journey.

Wrapping Up
SuperInject isn’t just a NuGet package; it’s your accomplice in writing cleaner, more maintainable code. So, what are you waiting for? Add a dash of SuperInject to your projects, and let the dependency injection party begin!

Ready to supercharge your dependency injection game? Grab SuperInject, and let the coding festivities begin!


About HostForLIFE.eu

HostForLIFE.eu is European Windows Hosting Provider which focuses on Windows Platform only. We deliver on-demand hosting solutions including Shared hosting, Reseller Hosting, Cloud Hosting, Dedicated Servers, and IT as a Service for companies of all sizes.

We have offered the latest Windows 2016 Hosting, ASP.NET Core 2.2.1 Hosting, ASP.NET MVC 6 Hosting and SQL 2017 Hosting.


Tag cloud

Sign in