European ASP.NET 4.5 Hosting BLOG

BLOG about ASP.NET 4, ASP.NET 4.5 Hosting and Its Technology - Dedicated to European Windows Hosting Customer

European ASP.NET 4.5 Hosting - HostForLIFE.eu :: Websockets with ASP.NET 4.5 and Visual Studio 2012

clock November 14, 2013 07:09 by author Scott

Web applications are becoming increasingly sophisticated and it is common to need to communicate with various services.

There are a number of options to accomplish this task with probably the most popular being to continually poll a server with XHR requests. Other alternatives exist that delay disconnections. These can be tricky to implement and don’t scale well (sometimes worse than polling as they keep a connection open) so aren’t used as much.

HTTP isn’t really an ideal protocol for performing frequent requests as:

- It’s not optimized for speed
- It utilizes a lot of bandwidth for every request with various headers etc sent with every request
- To keep an application up to date many requests must be sent
- Provides limited cross domain support (relying on workarounds such as JSONP
- Firewalls & proxys sometimes buffer streaming/long polling solutions increasing latency
- Long polling & streaming solutions are not very scalable

WebSockets are a new technology that attempts to resolve some of these limitations by:

- Sending the minimum amount of data necessary
- Making more efficient usage of bandwidth
- Providing cross domain support
- Still operating over HTTP so it can transverse firewalls and proxies
- Works with some load balancers (TCP l4)
- Provides support for binary data (note some JavaScript implementations don’t currently support this)

When would web sockets be a suitable protocol for your application?

You might want to consider using web sockets in the following scenarios:

- Games
- Real time data
- Chat applications
- News tickers

There is a nice set of demos at: http://www.html5rocks.com/en/tutorials/websockets/basics/ and an interesting article that compares a Web Sockets and polling solution in terms of latency & throughput at http://websocket.org/quantum.html.

Websockets pitfalls

Websockets is a relatively new protocol that has already undergone a number of versions as various issues are addressed. This is important as support across browsers varies.

At the time of writing Websockets (in some form) can be used by the following browsers (check caniuse.com for the most up to date info):

- IE10
- Chrome 13+
- Firefox 7
- Safari 5+
- Opera 11+

Earlier implementations of websockets had some security issues so your connections may work but are not secure (Firefox disabled support in Firefox 4 & 5 for this reason).

The other issue that you may encounter is that some older proxy servers don’t support the http upgrade system that websockets uses to connect so some clients may be unable to connect.

.net 4.5 Web Socket Support

.net 4.5 introduces a number of APIs for working with web sockets. If you find you need more control than the ASP.net API’s offers then look into WCF as that has also been updated.

Before we begin there are a couple of requirements for using ASP.net web sockets API:

- Application must be hosted on IIS 8 (available only with some version of Windows 8 – please note currently IIS Express currently does not work)
- Web Sockets protocol feature installed (IIS option)
- .net 4.5
- A compatible browser on the client (IE10 or Chrome will 18 work fine at time of writing)
- It would help if your Chinese birth animal was the horse

Currently Microsoft have no plans to release Websockets support for earlier versions of IIS so if you plan to run it on Windows Server 2008 then you are going to have to look at other options such ashttp://superwebsocket.codeplex.com/.

You could also look at the SignalR library from Microsoft which is designed for developing async applications and provides WebSockets (and fallback) support: https://github.com/SignalR/SignalR/wiki/WebSockets.

Example

Ok I am going to assume that you are already working with some version of Windows 8 that has IIS & ASP.net 4.5 installed. The other thing we are going to need to do is make sure IIS has the Web Sockets Protocol feature installed (this is in the add/remove programs bit):

First create a new empty ASP.net project called WebSockets

Add the Nuget package Microsoft.Websockets

Pull down the latest jQuery library and put it in a scripts directory (I am using 1.7.2) – note jQuery isn’t necessary it just saves a bit of tedious event and manipulation code.

Now add a file called index.htm and enter the following code:

<!doctype html>
<head>
<script src="Scripts/jquery-1.7.2.min.js" type="text/javascript"></script>
<script type="text/javascript">
$(document).ready(function () {
var name = prompt('what is your name?:');
var url = 'ws://' + window.location.hostname + window.location.pathname.replace('index.htm', 'ws.ashx') + '?name=' + name;
alert('Connecting to: ' + url);
ws = new WebSocket(url);
ws.onopen = function () {
$('#messages').prepend('Connected <br/>');
$('#cmdSend').click(function () {
ws.send($('#txtMessage').val());
$('#txtMessage').val('');
});
}
ws.onmessage = function (e) {
$('#chatMessages').prepend(e.data + '<br/>');
};
$('#cmdLeave').click(function () {
ws.close();
});
ws.onclose = function () {
$('#chatMessages').prepend('Closed <br/>');
};
ws.onerror = function (e) {
$('#chatMessages').prepend('Oops something went wront <br/>');
};
});
</script>
</head>
<body>
<input id="txtMessage" />
<input id="cmdSend" type="button" value="Send" />
<input id="cmdLeave" type="button" value="Leave" />
<br />
<div id="chatMessages" />
</body>
</html>

We need to create an http handler so add a new generic handler to the project called ws.ashx and enter the following code:

using System;
using System.Collections.Generic;
using System.Linq;
using System.Web;
using Microsoft.Web.WebSockets;
namespace WebSockets
{
public class WSHttpHandler : IHttpHandler
{
public void ProcessRequest(HttpContext context)
{
if (context.IsWebSocketRequest)
context.AcceptWebSocketRequest(new TestWebSocketHandler());
}
public bool IsReusable
{
get
{
return false;
}
}
}
}

Finally we need to create something to handle the websocket connection (TestWebSocketHandler that is created in the AcceptWebSocketRequest method).

Create a new class called TestWebSocketHandler and enter the following code:

using System;
using System.Collections.Generic;
using System.Linq;
using System.Threading;
using System.Web;
using Microsoft.Web.WebSockets;
namespace WebSockets
{
public class TestWebSocketHandler : WebSocketHandler
{
private static WebSocketCollection clients = new WebSocketCollection();
private string name;
public override void OnOpen()
{
this.name = this.WebSocketContext.QueryString["name"];
clients.Add(this);
clients.Broadcast(name + " has connected.");
}
public override void OnMessage(string message)
{
clients.Broadcast(string.Format("{0} said: {1}", name, message));
}
public override void OnClose()
{
clients.Remove(this);
clients.Broadcast(string.Format("{0} has gone away.", name));
}
}
}

That’s all you need so now compile the project and run it in a compatible browser (IE10 or the latest Chrome will do fine) making sure you are hosting your project from IIS (project properties if you are not).

Once you have run it up you will be prompted to provide a name, then an alert box will indicate the end point of your application (ws://localhost/.. – note the secure https version is wss://).

Now open up a different browser and you should find you can via websockets!


European ASP.NET 4.5 Hosting - Amsterdam :: Windows Identity Foundation 4.5 in NET 4.5

clock October 16, 2013 12:03 by author Scott

Windows Identity Foundation 4.5 (WIF) is a framework for building identity-aware and more specifically claims-aware applications. It furthermore provides an abstraction  to the underlying protocols (ex: WS-Trust, WS-Federation, etc …) and therefore encapsulates and standardizes application security.

Developers do not need to know how to exactly implement and use those protocols anymore. Instead they may use API calls to the WIF Toolkit for implementing secure applications, thus resulting in applications which are loosely coupled to their security implementations. Tokens issued from a large scale of different security providers (including  ADFS 2.0, ACS and custom Security Token Services) can be handled.

The default configuration and behavior works great and with ease you will be able to implement it in no time. But the best of all : the WIF Toolkit is highly customizable. You may completely override and customize the default behavior on some or on all the step of the process (Protocol Module, Session Module, Claims Authorization Module, Token, STS, etc..).

WIF in its first version (1.0) is available as a runtime and as an external SDK for .NET 3.5 and .NET 4.0. You have to install it separately for being able to using it in your applications. The WIF Training Kit contains everything necessary to start with claims based security (explication, tutorials, examples, etc…).

WIF 4.5 and .NET 4.5

So what’s new in WIF 4.5 ? Well first of all WIF is now part of the .NET framework. You do not need to install it manually anymore. It is shipped and installed with .NET 4.5, which means that it is now an integral part of the framework ! Most of the classes and methods are now part of Mscorlib.dll !

Also it is now much easier and straightforward use WIF and to query for claims. Let me show this in the following example.

Create a new web application, right click on your project in the Solution Explorer and select "Identity and Access…” from the list.

You will see a new configuration wizard, which will guide you through the process of setting up a STS reference. You may either use a development STS, a business provider based on ADFS2 or Windows Azure Access Control Service (ACS).

For the example I use the development STS :

You may now run your web application and the development STS gets started automatically. When you see the little icon in the tray area you know that everything working correctly.

Now lets see how to query for a claim by using the ClaimsPrincipal in the System.Security.Claims namespace and calling its FindFirst(…) method.

Where you had to write at least 3 lines of code and do casting operations in WIF 1.0, you now have everything in a single line ! Much easier to implement, to understand, to maintain and also to extend !

Note that there are a variety of other utility methods to aid you in working with claims (FindAll, FindFirst, HasClaim, etc…) and that you have access to almost everything just by using the  ClaimsPrincipal.

Another improvement is the seamless integration of WCF 4.5 and WIF 4.5. You now can use both together much more easily. Custom service host factories or federation behaviors are not needed anymore. This can be achieved via the useIdentityConfiguration switch.

WIF 4.5 and WebFarms

Great news for all developers using WIF in a WebFarms environment. With .NET 4.5 it is finally possible to use WIF without implementing complicated and time consuming workarounds to encrypt your WIF cookies with a single encryption key.

You just configure a new MachineSessionSecurityHandler by setting it in your Web.config file and it will work without any further changes ! This has even been added to the wizard as a checkbox! How easy is that compared to the old way of resolving this problem !

WIF 4.5 and Windows Server 2012

Windows Server 2012 Domain Controllers are going to support the claims based model and provide extra claims via Kerberos (User Claims and Device Claims), which you may then query for within your WIF 4.5 implementations. This is actually a quite interesting feature.

WIF 4.5 and Visual Studio 2012

The integration of WIF tools has been completely re-designed, as you saw in my quick example above. This has been done to simplify the whole process and to render it much more comprehensive. So it is now easier to understand with less steps and quicker configuration.

As you saw above the new tools contain a local development STS which simulates a real STS (comparable to the development fabric within the Windows Azure SDK). The development STS is by the way completely configurable (Token format, port, test claims, etc..).

Furthermore, the WIF 4.5 tools and all samples are now distributed as VSIX via the Visual Studio Extensions Gallery.

Conclusion

As you can see WIF 4.5 has been greatly enhanced and industrialized. It will become the the primary choice when working with application security. Come on and give it at try,  test all these new features by downloading the Windows Identity Foundation Tools for Visual Studio 2012 RC.


European ASP.NET 4.5 Hosting - Amsterdam :: Web API. VB.NET Example ASP.NET 4.5

clock August 15, 2013 08:55 by author Scott

The new feature that appeals to me is the new “Web API” which eases the development of REST and AJAX APIs (API is the new Microsoft jargon for a web service!)

Wanting to have a play with this new feature, I fired up Visual Studio Express 2012 and created a standard web application in vb.net. Although many examples on the web are showing the Web API with MVC, it can be used in any .net application.


Using the new “Web API”  requires two parts.

1. Setup the controller class that will perform the logic.

2. Setup up route tables in your global.asax.vb file, to correctly “route” the client request to the correct controller class.

So down to code. The examples below assume a GET request to the Web API Server.

1. Create a standard web application, remembering to specify .net 4.5 as the target framework.

2. Create a new folder within the application called “Controllers”. See Picture below.

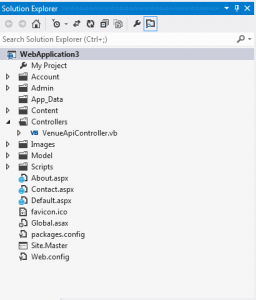
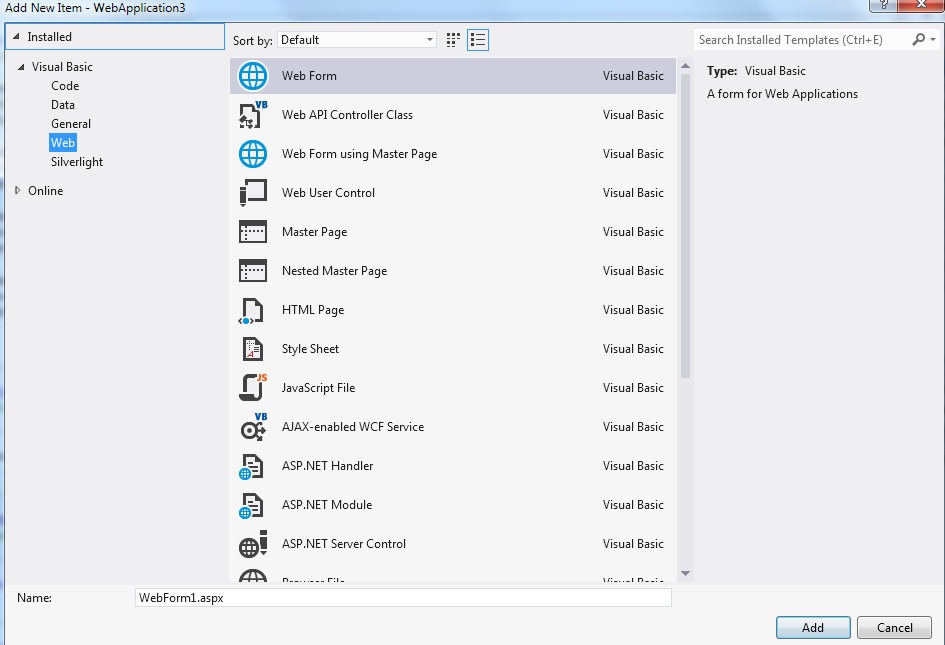
3. Within this folder, create a new “Web API Controller Class”, by right clicking on the Controllers folder and clicking Add. Then choose “Web API Controller Class” from the list as shown below

4. When naming this new controller class, remember to leave the word controller at the end of the name, otherwise the routing won’t work! As you can see below, I called my class VenueApiController.vb

5. When you open this new class, you will see some get, post,delete functions already filled in. I just created new functions to suit my client data requirements.

The sample data that I am using is for a project we have been working on call nejola.com. This allows local businesses to “push” their deals to Android smartphone users in the locality.

We have some test data in the SQL Server, so used this to try the Web API out.

The first function that I created returned a full list of the test venues available. I named this function GetVenues. No search data was needed to be passed to the function and I wanted the result fetched as a dataset to the client. The beauty of the “Web API” is the data is then presented to the client depending upon the headers of the calling client. For example an ajax call will return the data in a json format

Public Function GetVenues() As DataSet

Try

                Using sqlConn As New
SqlConnection(ConfigurationManager.ConnectionStrings("DefaultConnection").ConnectionString)
                    Dim sqlComm As SqlCommand = New SqlCommand
                    sqlComm.Connection = sqlConn
                    sqlComm.CommandText = "SELECT * From df_Locations"
                    Dim sqlDataAdapt As SqlDataAdapter = New SqlDataAdapter(sqlComm)
                    Dim ds As DataSet = New DataSet
                    sqlDataAdapt.Fill(ds)
                    sqlDataAdapt.Dispose() : sqlComm.Dispose() : sqlConn.Close() : sqlConn.Dispose()
                    ds.DataSetName = "VenueData"
                    ds.Tables(0).TableName = "exgVenuesData"
                    Return ds
                End Using

            Catch ex As Exception

                Return Nothing

            End Try

And that’s it for the data logic ! Nothing too fancy here, just perform some SQL on the SQL server and return the dataset. I would normally call a stored procedure for but this purpose used the commandtext

The function below requires a parameter to be passed, in this case the town name as a string.

Public Function GetVenueByTown(ByVal town As String) As DataSet
Dim sqlConn As SqlConnection = New SqlConnection("Connection info here")
sqlConn.Open()
Dim sqlComm As SqlCommand = New SqlCommand()
sqlComm.Connection = sqlConn
sqlComm.CommandText = "SELECT * From df_Locations WHERE VenueTown = '" & town & "'"
Dim sqlDataAdapt As SqlDataAdapter = New SqlDataAdapter(sqlComm)
Dim ds As DataSet = New DataSet
sqlDataAdapt.Fill(ds)
sqlDataAdapt.Dispose() : sqlComm.Dispose() : sqlConn.Close() : sqlConn.Dispose()
ds.DataSetName = "VenueTownData"
ds.Tables(0).TableName = "EXGTownData"
Return ds
End Function

Now that we have two working functions within the API Class, we need to add routing to call the functions. Users Of Microsoft MVC should be aware of routing and controllers, however for VB.net users this is new with .net 4.5

What the routing and controllers allows us to do is present the URL’s called by the clients  in a nice format. For example to call the GetVenues function above, the client can call :

http://domain.com/venues

To call the GetVenueByTown function and pass the town parameter the client can use :

http://domain.com/venues/town/townname

Ok, so now we need to setup the routing for this to work !

1. Open the global.asax.vb file and look for the sub

Sub Application_Start(ByVal sender As Object, ByVal e As EventArgs)

End sub

2. At the top of the page add :

Imports System.Web.Routing

Imports System.Web.Http

3. Here is the code for the GetVenues Function which is the default function called. Add this to the Application_Start Sub.

RouteTable.Routes.MapHttpRoute(name:="Venue", _
routeTemplate:="venues", _
defaults:=New With {.symbol = RouteParameter.Optional, .controller = "VenueApi"})

To break down the above, here is what is happening. This example is the default call, with no parameters being passed to the function.

name:=”Venue” –> This is the name given to this routetable. Each routetable has a different name.

routeTemplate:=”venues” –> This is the actual name that the client will call. In this example http://domain.com/venues.

.controller = “VenueApi” –> This MUST match the name that you gave your controller class without the controller part.

The route code to call the GetVenueByTown function that requires a town parameter to be passed is as follows :

RouteTable.Routes.MapHttpRoute(name:="VenueTowns", _
routeTemplate:="venues/town/{town}", _
defaults:=New With {.symbol = RouteParameter.Optional, .controller = "VenueApi"})

Again a break down of the code is as follows :

name:=”VenueTowns” –> Unique name of the routetable.

routeTemplate:=”venues/town/{town}” –> This is the path that will be entered by the client to get to the correct function. Note we have added the /town/ path and the parameter {town}. This parameter name must match that of the function otherwise the routing won’t work correctly.

controller = “VenueApi” –> This is the same as before and is the controller class without the controller part.


European ASP.NET 4.5 Hosting - Amsterdam :: Change Session Timeout in ASP.NET

clock July 1, 2013 11:53 by author Scott

You’re trying to increase session timeout on your ASP.NET site? In this tutorial, I will gonna talk about this issue. But, if you use shared hosting, you cant use session as it will impact to other clients site.

ASP.NET

Usually, the first and easiest thing to do is just change the configuration/system.web/sessionState@timeout value to something like “90″.  This should mean that you’d like your users’ sessions to be persisted until a 90 minute window of idle time has elapsed.

<configuration>
  <system.web>
  ...
   <sessionState timeout="90" />
  ...
 </system.web>
</configuration>

Hmm… Not only about change on your code, but please check this application pool timeout on your IIS setting.

Ensure this value is set to the timeout of your session, at a minimum, to ensure that all sessions persist for the entire session timeout period.

The reason that these two values are dependent on one another is because the session information is actually stored within the worker process of the application pool. That is to say, if the worker process is shutdown or killed for any reason, the session information will be lost.

Session Storage Mode

There are the modes of storing the session information:

  • InProc (or In Process) – Default – Stores session information within the IIS worker process
  • StateServer – Stores session information in a separate process (the ASP.NET state service)
  • SQLServer – Stores session information in a SQL database

The only mode that is vulnerable to losing session information on a worker process is when the state is stored in the worker process. Both StateServer and SQLServer modes are not affected by worker process resets. Likewise, StateServer and SQLServer modes are the only options when it is necessary to share session state across more than a single IIS server.

For more information about these modes, check out MSDN.

ASP

There’s two ways to change the session timeout when you’re dealing with classic ASP.

You can set it at the application level, or programmatically, which means that the value can be different within the application.

Since it doesn’t specifically state that the setting is for classic ASP, it may be confusing to know that the value is in: Application Properties -> Configuration… -> Options -> Enable session state.

It’s as simple as updating this value, and the session timeout for your entire classic ASP application is changed!

Programmatically

You can also use modify the Session.Timeout property at runtime to affect the timeout period of the session. One popular location to put this piece of code is in the global.asa file.

<script language="VBScript" runat="Server">
Sub Session_OnStart
 Session.Timeout = 90
End Sub
</SCRIPT>

Hope this tutorial helpful. 


European ASP.NET 4.5 Hosting - Amsterdam :: Creating Security System for ASP.NET 4.5

clock June 18, 2013 06:23 by author Scott

First, you noticed you were assigning users to roles that gave them more access than they needed. So you started tailoring roles more specifically and ended up with roles with one user in them. (And at that point, why bother with roles at all?) Finally, you started creating very targeted roles and assigning multiple roles to each user.

That final strategy is moving you to claims-based security: each role really represents a kind of claim. One role says the user is a manager, another that the user is in the Western division, a third that the user can authorize expenditures up to $10,000. The Microsoft .NET Framework 4.5 supports claims-based security directly, but you can create an equivalent system in ASP.NET 4 (either in MVC, Web Forms or Web API) without much trouble.

The first step is to create an object that implements the IPrincipal interface and has properties for the data (claims) that you'll use to authorize requests. A class that implements IPrincipal has to have a property called Identity that returns a GenericIdentity object (which provides the user's name) and a method called IsInRole method that returns True if a user is assigned to a specific role. The user object in Listing 1 does all of that and adds three additional properties (Division, Job and ApprovalLevel).

Listing 1. A custom user object.

Public Class PHVUser
  Implements IPrincipal

  Dim _gi As GenericIdentity
  Dim _roles As New List(Of String)

  Public Sub New(Name As String, Optional Roles As String = "")
    _gi = New GenericIdentity(Name)
    If Roles <> "" And Roles <> String.Empty Then
      For Each rol In Roles.Split(",").
        Select(Function(r) r.Trim()).ToArray
        _roles.Add(rol)
      Next
    End If

  End Sub

  Public Property Division As String
  Public Property Job As String
  Public Property ApprovalLevel As Integer

  Public ReadOnly Property Identity _
    As IIdentity Implements IPrincipal.Identity
    Get
      Return _gi
    End Get
  End Property

  Public Function IsInRole(role As String) _
    As Boolean Implements IPrincipal.IsInRole
    If _roles.Contains(role) Then
      Return True
    Else
      Return False
    End If
  End Function
End Class

To create a user object for a user named "Peter" who's assigned to the roles manager and clerk, you'd use this code:

usr = New PHVUser("Scott", "manager, clark")

Replacing the User

Now you have to get ASP.NET to use your security object. ASP.NET looks for its IPrincipal object in the CurrentPrincipal object of the Thread class and the User property of HttpContext.Current. If you put your object in there, ASP.NET will use it for its default user name and roles authorization.

To get your IPrincipal object into those two spots, you need to create an HTTP module (a class that implements the IHttpModule and IDisposable events) and add it to your site's processing pipeline. ASP.NET will fire the PostAuthenticateRequest event on your module whenever a request comes in to your site. You need to wire up a method to that event in your module's Init event to create and insert your object.

The class begins like this (I've omitted some code that implements the IDisposable interface that Visual Studio will generate for you):

Public Class PHVAuthHttp
  Implements IHttpModule, IDisposable

  Public Sub Init(context As HttpApplication) _
    Implements IHttpModule.Init
    AddHandler context.PostAuthenticateRequest,
      New EventHandler(AddressOf ReplaceUser)
  End Sub

In your method, you need to find out who the current user is so you can create your IPrincipal object for that user. When a user successfully gets through Forms Authentication, they're given a cookie with their name (and some other information) encrypted inside of it. You can grab that cookie and decrypt it like this:

Private Shared Sub ReplaceUser(sender As Object,
                               e As EventArgs)
  Dim authCookie As HttpCookie
  authCookie = HttpContext.Current.Request.Cookies.
               Get(FormsAuthentication.FormsCookieName)
  If authCookie IsNot Nothing Then
    Dim tkt As FormsAuthenticationTicket
    tkt = FormsAuthentication.Decrypt(authCookie.Value)

After you check that everything has worked, you can use the user's name to retrieve information about the user, and create your IPrincipal object and set your properties on it before putting it where ASP.NET will look for it:

If tkt.Name IsNot Nothing AndAlso
   tkt.Name <> String.Empty AndAlso
   tkt.Name <> "" Then
     // ... Retrieve user information into a variable called emp ...
     Threading.Thread.CurrentPrincipal = New PHVUser(tkt.Name) With
                        {.Region = emp.Region,
                         .Job = emp.Job,
                         .ApprovalLevel = 10000}
     HttpContext.Current.User = Threading.Thread.CurrentPrincipal
End If

Because you're doing this on every request, it would be a good idea to put the user's information (my emp variable in the previous example) in ASP.NET Cache and look for it there before going to the database to retrieve it.

Finally, you need to get ASP.NET to use your HTTP module by adding a modules element to your web.config file inside the system.webServer element. Inside the modules element put an add tag. You can set the name attribute to anything you want, but the type attribute must be set to the full name for your class (namespace and class name) followed by the name of the DLL it's in:

<modules>
  <add name="PHVAuth" type="PHVProj.PHVAuthHttp, PHVProj" />
</modules>

Testing Authorization

You can now test for your user's claims in your own code:

Dim usr As PHVUser = TryCast(HttpContext.Current.User, PHVUser)
If usr IsNot Nothing AndAlso
   usr.Region = "West" AndAlso
   usr.ApprovalLevel = 10000 Then

If you're working in ASP.NET MVC you can also create a custom Authorize filter that checks your user. Listing 2 shows an Authorize filter that checks a user's Region and works well in an asynchronous world. You could add it to a method like this:

<DivisionAuthAttribute(Region="West")>

Listing 2. An Authorize filter that checks a user's Region.

<AttributeUsage(AttributeTargets.Class Or AttributeTargets.Method)>
Public Class DivisionAuthAttribute
  Inherits AuthorizeAttribute

  Private Const IS_AUTHORIZED As String = "isAuthorized"
  Private RedirectUrl As String = "~/Error/Unauthorized"

  Public Property Division As String

  Protected Overrides Function AuthorizeCore(
    httpContext As Web.HttpContextBase) As Boolean
    Dim IsAuthorized As Boolean = False
    Dim us As UserSecurity = TryCast(httpContext.User, PHVUser)
    If us IsNot Nothing AndAlso
      Me.Division <> String.Empty AndAlso
      us.Division = Me.Division Then
        httpContext.Items.Add(IS_AUTHORIZED, IsAuthorized)
        Return True
    End If

    httpContext.Items.Add(IS_AUTHORIZED, IsAuthorized)
    Return False
  End Function

  Public Overrides Sub OnAuthorization(
    filterContext As Web.Mvc.AuthorizationContext)
    MyBase.OnAuthorization(filterContext)
    Dim IsAuthorized As Boolean
    If filterContext.HttpContext.Items(IS_AUTHORIZED) _
      IsNot Nothing Then
      IsAuthorized = Convert.ToBoolean(
        filterContext.HttpContext.Items(IS_AUTHORIZED))
    Else
      IsAuthorized = False
    End If
    If IsAuthorized = False AndAlso
       filterContext.RequestContext.HttpContext.
         User.Identity.IsAuthenticated Then
      filterContext.Result = New RedirectResult(RedirectUrl)
    End If
  End Sub
End Class

You can now extend your user object to encompass any information about your user that you need to authorize requests.


European ASP.NET 4.5 Hosting - Amsterdam :: Revisiting IBundleTransform ASP.NET 4.5 and MVC 4

clock May 13, 2013 10:12 by author Scott

Web optimization frameworks include two defaults transform type JsMinify and CssMinify which is used by ScriptBundle and StyleBundle respectively. However we can create our own custom transform type to processe references as per our need. To create custom transform type, we need to create class which implements IBundleTransform interface.

IBundleTransform interface define a method named Process which process bundle response. In developer preview version, Process method had only one parameter of type BundleResponse, however onwards RC release, Process method introduced one more parameter of type BundleContext. In this post, we will see how we can utilize this additional parameter while creating our custom transform type.

BundleContext

As name suggest, with BundleContext, we can get information about bundles which could include existing bundle information, bundle url, HTTP context for bundle, etc. Following is the list of all property of BundleContext.

- BundleContext.BundleCollection : We can get collection of all bundles including default and custom bundle in application through this property.

- BundleContext.BundleVirtualPath : This property expose virtual bundle url i.e. ~/bundles/MyBundle.

- BundleContext.HttpContext : This property is type of HttpContextBase, and we can have access of HTTP context through this property. This is very much useful property when we are creating transform type which generate dynamic response. For e.g. we can access query string parameter passed to bundle url (~/bundles/MyBundle?id=123) through this property (context.HttpContext.Request.QueryString["id"]) and we can use it to create dynamic bundle response.

- BundleContext.UseServerCache : Default value of this property is true. It means only first request to bundle url will be intercepted by transform types and once response is generated it will be stored in server cache and further request to bundle url will be served from server cache without processing it. This will help to reduce bundle processing time and to increase performance. If we set BundleContext.UseServerCache to false then all request will be processed by transform type this is only necessary when bundle url are generating dynamic response. See detailed walkthrough later in this post showing how to use this property in accordance with BundleResponse.Cacheability.

- BundleContext.EnableInstrumentation : Default value of this property is false. This is used for tracing and analysis purpose. We can check value of this property and can write tracing code accordingly. We can also set true to this property to enable instrumentation for further lifecycle of Web optimization frameworks for current bundle request.

BundleResponse

Now let us recall BundleResponse parameter from old post. BundleResponse is used to retrieve list of files included in bundle so we can process it and generate response for bundle. As BundleResponse is used to generate response of bundles, it needs to take care of two primary properties of generated response. One is response content type and another one is HTTP Cache-Control header. So BundleResponse also expose properties for the same. Following is the list of all properties in BundleResponse class.

- BundleResponse.Files : This is IEnumerable collection of files which is included in bundle. We can iterate through this collection and process file content to generate bundle response.

- BundleResponse.ContentType : Through this property, we can set content type for bundle so that browser can render it appropriately. Default content type "text/html".

- BundleResponse.Cacheability : We can use this property to set Cache-Control HTTP header of bundled response. Default value of this property is Public.

- BundleResponse.Content : Anything which we set as a value of this property, that content will be sent back to browser as a response of bundle.

Following is the complete code which shows how to create custom transform type and how we can use it with bundling.

public class CustomTransformType : IBundleTransform
{
    public void Process(BundleContext context, BundleResponse response)
    {
        string strBundleResponse = string.Empty;
        foreach (FileInfo file in response.Files)
        {
            // PROCESS FILE CONTENT
        }
        response.Content = strBundleResponse;
    }


Bundle myBundle = new Bundle("~/bundles/MyBundle", new CustomTransformType());
myBundle.Include("~/path/to/file");
bundles.Add(myBundle);

Bundle and truly dynamic response

As we noted earlier, we can set BundleContext.UseServerCache to false in order to process all bundle request and generate dynamic response. Let try to simulate this by small walkthrough and see it works or we need to take care any additional parameter.

public void Process(BundleContext context, BundleResponse response)

{
    context.UseServerCache = false;
    response.Content = DateTime.Now.ToString();
}


We are returning current date time with UseServerCache set to false. Now try to hit bundle url multiple times by pressing F5. Oops… it seems it has processed bundle response only first time. Let dig more into this, open another browser and hit same url… ahmm it seems it has processed bundle response one more time… again press F5 multiple times…bad luck

As we can see, it seems (read again it seems) it is processing bundle response only first time for separate client (is it really? nop). Nop this is not the case. In fact this is how client deals with it due to HTTP cache control header. Confused? See response header of bundle url to get more information.

As we noted earlier default value of BundleResponse.Cacheability is Public. So even if we have set BundleContext.UseServerCache to false then also due to Expires response header and Public Cache-Control header client is not sending request back to server. So in this case we need to also set BundleResponse.Cacheability to NoCache. We can also set it to Private but in some client we need to press Ctrl + F5 to refresh bundle response.

public void Process(BundleContext context, BundleResponse response)
{
    context.UseServerCache = false;
    response.Cacheability = HttpCacheability.NoCache;
    response.Content = DateTime.Now.ToString();
}

After setting BundleResponse.Cacheability to NoCache try to refresh bundle url again now it is re generating bundle response on each request.


European ASP.NET 4.5 Hosting - Amsterdam :: AjaxControlToolkit version 7.0123 with .NET 4.5

clock April 25, 2013 06:26 by author Scott

Here’s my steps and workarounds from the very beginning (in Visual Studio 2012), hopefully some part of this will help fix whatever error you are encountering.

File -> New Project
.NET Framework 4.5
Visual C# -> Web
ASP.NET Web Forms Application
Add AjaxControlToolkit version 7.0123 (dll is actually 4.5.7.123 which is January 2013 I believe) via NuGet

Open Default.aspx
Add a calendar to the BodyContent / MainContent:

<asp:TextBox ID="myTextBox" runat="server" />
<ajaxToolkit:CalendarExtender ID="myCalendar" runat="server" TargetControlID="myTextBox" Format="dd/MM/yyyy" />

Run it up (F5 will do)

It might error about ASP.NET Ajax 4.0 scripts:
0x800a139e – JavaScript runtime error: AjaxControlToolkit requires ASP.NET Ajax 4.0 scripts. Ensure the correct version of the scripts are referenced. If you are using an ASP.NET ScriptManager, switch to the ToolkitScriptManager in AjaxControlToolkit.dll.

I’ve also seen it error about:
‘MsAjaxBundle’ is not a valid script name. The name must end in ‘.js’.

No bother, let’s remove that reference from the Site.Master, so:

<asp:ScriptManager runat="server">
    <Scripts>
        <%--Framework Scripts--%>
        <asp:ScriptReference Name="MsAjaxBundle" />
        <asp:ScriptReference Name="jquery" />
        <asp:ScriptReference Name="jquery.ui.combined" />
        <asp:ScriptReference Name="WebForms.js" Assembly="System.Web" Path="~/Scripts/WebForms/WebForms.js" />
        <asp:ScriptReference Name="WebUIValidation.js" Assembly="System.Web" Path="~/Scripts/WebForms/WebUIValidation.js" />
        <asp:ScriptReference Name="MenuStandards.js" Assembly="System.Web" Path="~/Scripts/WebForms/MenuStandards.js" />
        <asp:ScriptReference Name="GridView.js" Assembly="System.Web" Path="~/Scripts/WebForms/GridView.js" />
        <asp:ScriptReference Name="DetailsView.js" Assembly="System.Web" Path="~/Scripts/WebForms/DetailsView.js" />
        <asp:ScriptReference Name="TreeView.js" Assembly="System.Web" Path="~/Scripts/WebForms/TreeView.js" />
        <asp:ScriptReference Name="WebParts.js" Assembly="System.Web" Path="~/Scripts/WebForms/WebParts.js" />
        <asp:ScriptReference Name="Focus.js" Assembly="System.Web" Path="~/Scripts/WebForms/Focus.js" />
        <asp:ScriptReference Name="WebFormsBundle" />
        <%--Site Scripts--%>

    </Scripts>
</asp:ScriptManager>

Now becomes:

<asp:ScriptManager runat="server">
    <Scripts>
        <asp:ScriptReference Name="jquery" />
        <asp:ScriptReference Name="jquery.ui.combined" />
        <asp:ScriptReference Name="WebForms.js" Assembly="System.Web" Path="~/Scripts/WebForms/WebForms.js" />
        <asp:ScriptReference Name="WebUIValidation.js" Assembly="System.Web" Path="~/Scripts/WebForms/WebUIValidation.js" />
        <asp:ScriptReference Name="MenuStandards.js" Assembly="System.Web" Path="~/Scripts/WebForms/MenuStandards.js" />
        <asp:ScriptReference Name="GridView.js" Assembly="System.Web" Path="~/Scripts/WebForms/GridView.js" />
        <asp:ScriptReference Name="DetailsView.js" Assembly="System.Web" Path="~/Scripts/WebForms/DetailsView.js" />
        <asp:ScriptReference Name="TreeView.js" Assembly="System.Web" Path="~/Scripts/WebForms/TreeView.js" />
        <asp:ScriptReference Name="WebParts.js" Assembly="System.Web" Path="~/Scripts/WebForms/WebParts.js" />
        <asp:ScriptReference Name="Focus.js" Assembly="System.Web" Path="~/Scripts/WebForms/Focus.js" />
        <asp:ScriptReference Name="WebFormsBundle" />
    </Scripts>
</asp:ScriptManager>

Next is ToolkitScriptManager, the snippet above now becomes:

<ajaxToolkit:ToolkitScriptManager runat="server">
    <Scripts>
        <asp:ScriptReference Name="jquery" />
        <asp:ScriptReference Name="jquery.ui.combined" />
        <asp:ScriptReference Name="WebForms.js" Assembly="System.Web" Path="~/Scripts/WebForms/WebForms.js" />
        <asp:ScriptReference Name="WebUIValidation.js" Assembly="System.Web" Path="~/Scripts/WebForms/WebUIValidation.js" />
        <asp:ScriptReference Name="MenuStandards.js" Assembly="System.Web" Path="~/Scripts/WebForms/MenuStandards.js" />
        <asp:ScriptReference Name="GridView.js" Assembly="System.Web" Path="~/Scripts/WebForms/GridView.js" />
        <asp:ScriptReference Name="DetailsView.js" Assembly="System.Web" Path="~/Scripts/WebForms/DetailsView.js" />
        <asp:ScriptReference Name="TreeView.js" Assembly="System.Web" Path="~/Scripts/WebForms/TreeView.js" />
        <asp:ScriptReference Name="WebParts.js" Assembly="System.Web" Path="~/Scripts/WebForms/WebParts.js" />
        <asp:ScriptReference Name="Focus.js" Assembly="System.Web" Path="~/Scripts/WebForms/Focus.js" />
        <asp:ScriptReference Name="WebFormsBundle" />
    </Scripts>
</ajaxToolkit:ToolkitScriptManager>

But of course this fails with:
Could not load file or assembly ‘System.Web’ or one of its dependencies. The system cannot find the file specified.

Remove the Assembly=”System.Web” part from the ScriptReference so we have have:

<ajaxToolkit:ToolkitScriptManager runat="server">
    <Scripts>
        <asp:ScriptReference Name="jquery" />
        <asp:ScriptReference Name="jquery.ui.combined" />
        <asp:ScriptReference Name="WebForms.js" Path="~/Scripts/WebForms/WebForms.js" />
        <asp:ScriptReference Name="WebUIValidation.js" Path="~/Scripts/WebForms/WebUIValidation.js" />
        <asp:ScriptReference Name="MenuStandards.js" Path="~/Scripts/WebForms/MenuStandards.js" />
        <asp:ScriptReference Name="GridView.js" Path="~/Scripts/WebForms/GridView.js" />
        <asp:ScriptReference Name="DetailsView.js" Path="~/Scripts/WebForms/DetailsView.js" />
        <asp:ScriptReference Name="TreeView.js" Path="~/Scripts/WebForms/TreeView.js" />
        <asp:ScriptReference Name="WebParts.js" Path="~/Scripts/WebForms/WebParts.js" />
        <asp:ScriptReference Name="Focus.js" Path="~/Scripts/WebForms/Focus.js" />
        <asp:ScriptReference Name="WebFormsBundle" />
    </Scripts>
</ajaxToolkit:ToolkitScriptManager>

It seems the new web forms project template adds ‘Microsoft.AspNet.ScriptManager.MSAjax 4.5.6′ package, this appears to conflict with the toolkit, so remove this via “Manage NuGet Packages”
Visual Studio might still leave the dll in your bin directory even after a clean, make sure you manually clean that out.


European ASP.NET 4.5 Hosting Tips :: How to Improve your ASP.NET Website Performance

clock April 5, 2013 08:27 by author Scott

In this article I will sharing few tips to improve the performance in ASP.NET site. This is the things that I have done:

1. HTTP Compression

HTTP compression is used to compress page content from the server end. It compress HTTP requests and responses, so is a great performance improvement. My project is hosted in Windows Server 2003, and I implemented HTTP compression after reading this article.

2. Disable Possible ViewState

View State allows the page state to be persisted with the client, and it does not require cookies or server memory. View State saves data in a hidden input filed inside a page. Definitely, it is a powerful feature, but the drawback is it increases page size and memory allocation in the server.

So, we should avoid View State where it is not necessary. Especially, in the case of DataGrid controls, we should avoid View State as it loads all the grid data in the page state.

In my application, I disabled View State for most of the controls and pages where View State is not necessary. This made the page sizes smaller. 

3. Changes in the Web.Config File

a. Use page caching:

This will save your page only for a certain amount of time, and the page will be faster to load. But, remember that if your page data changes frequently, it is not a good idea to use page caching.

<caching>
<outputCacheSettings>
    <outputCacheProfiles>
        <add name="cached" duration="600"
            varyByParam="none" enabled="true"/>
    </outputCacheProfiles>
</outputCacheSettings>
</caching>

b.Remove unnecessary httpModules from the web.config:

<add name="ScriptModule"
     type="System.Web.Handlers.ScriptModule, System.Web.Extensions,
           Version=3.5.0.0, Culture=neutral,
           PublicKeyToken=31BF3856AD364E35"/>
<remove name="WindowsAuthentication" />
<remove name="PassportAuthentication" />
<remove name="AnonymousIdentification" />
<remove name="UrlAuthorization" />
<remove name="FileAuthorization" />

c.Turn off trace:

<trace enabled="false" pageOutput="false" />

d.As I have used membership, I disabled automatic save for profiles:

<profile enabled="true" automaticSaveEnabled="false" />

e.Set debug=false:

<compilation debug="false">

4. Optimize Stylesheets

It is important to clean up style sheets and remove unnecessary code from style sheets because it increases the load time. Remove all unnecessary classes from style sheets and try to use a single CSS file.

5. Optimize JavaScript

6. JS and CSS File Position

According to the advice from some good articles, I put the CSS file declaration at the top of my master page. It is recommended to call CSS files at the top of a page because the page rendering will progressively become efficient.

I put JavaScript file links at the bottom of the main master file. If we put scripts at the top of the page, then it will cause unnecessarily high load times.

7. Client-side Script for Validation

For page validation, I use client-side validations instead of postbacks. This way, I reduce round trips in pages.

The above are few trips to improve your ASP.NET performance.

Looking for ASP.NET hosting on European server? Please visit HostForLIFE.eu. HostForLIFE.eu is awarded Top No#1 SPOTLIGHT Recommended Hosting Partner by Microsoft (see http://www.microsoft.com/web/hosting/HostingProvider/Details/953). Our service is ranked the highest top #1 spot in several European countries, such as: Germany, Italy, Netherlands, France, Belgium, United Kingdom, Sweden, Finland, Switzerland and other European countries. Besides this award, we have also won several awards from reputable organizations in the hosting industry and the detail can be found on our official website.


European ASP.NET 4.5 Hosting - Amsterdam :: Create ASP.NET 4.5 File Security Process

clock March 20, 2013 07:24 by author Scott

Often when working with web applications it is necessary to secure access to documents or other user supplied resources.  If you look online you will find a number of different recommendations on how to accomplish this.  Some will recommend a HTTP Handler, some will recommend a simple ASPX, others will have other random ideas.  Regardless of the actual implementation there is always a common area of mixed recommendation, once you have validated that the user has the proper permissions to access the resource, how do you get the item to the user?  In this post I'll discuss a new API that is publicly available in .NET 4.5 that helps with one problem area.

The Problem

Determining if the user has access to the resource in question is rarely the area that causes trouble.  The problem comes with the process of serving the desired files to the user.  When you let IIS handle the serving of a file it automatically sets the Content Type on the HTTP Response to match the proper type for the file, however, if you are sitting in the middle of this process, you have to handle this yourself.

Recommendation to Solve Issue

If you look into this issue, try googleing "Determining File MIME Types" or similar.  You will find all kinds of recommendations.  They will range from creating a custom look up process based on file extension, to weird PInvoke calls into windows, or even from the really crafty individuals a reflection call to an internal member of previous versions of the .NET framework.

In the end, there has never really been a good, consistent way to handle this.  Often times if you are working with a limited subset of file types the switch statement solution will work, however, as new file types are added etc it becomes harder to manage.

New Solution

With .NET 4.5, there is a newly exposed class that can be used to solve this complicated process.  System.Web.MimeMapping is a class that has existed for a while prior to .NET 4.5 but was "internal" to the framework and could not easily be called without using reflection.  Now you can simply call a method with a file path and it will return the Content Type.

This makes it so that we can now use something as simple as the following to serve a secured document after validating that the user has permissions.

Response.Clear();
Response.ContentType =
  System.Web.MimeMapping.GetMimeMapping(Server.MapPath(document.ServerDocumentPath));
Response.AddHeader("Content-Disposition",
                    "attachment; filename=" + document.UploadedDocumentName);
Response.WriteFile(Server.MapPath(document.ServerDocumentPath));
Response.End();

As you can see here, it is just 5 lines of code. In the first line of code we clear anything that  might have already been written to the response.  In the second line we call out to MimeMapping's GetMimeMapping method providing it the filepath to our document.  The third line we are telling the browser that we want to force download the file and are specifying a custom file name.  Then in the last two lines we write the file to the response and end.

The nice thing with this approach as you can see in the above example we can have a different ServerDocumentPath than our actual document name.  This allows us to hide the files in a different manner and serve them up to users with a friendly name.

I hope this helps someone looking for a way to introduce a security process to file downloads.  This .NET framework MimeType mapping is very helpful for this type of situation.


European ASP.NET 4.5 Hosting - Amsterdam :: How to Enable Unobtrusive Validation Mode in ASP.NET 4.5

clock February 27, 2013 05:09 by author Scott

In this article we will learn how to enable Unobtrusive Validation in ASP.NET 4.5.

Visual Studio 2012 provides some new Validation features that include Unobtrusive Validation. When you work with this Validation mode you will find that there is not much difference in this validation and previous validations but to enable this type of validation you had to first configure your Web Application.

There are three ways to enable the Unobtrusive Validation in your Web Application; they are:

- By using Web.Config file
- By using Global.asax file
- By using Page_Load event on each page

The first method is by using the Web.Config file.

Step 1

Write the following code in your Web.Config file:

<configuration>
  <
appSettings>
    <
add key="ValidationSettings:UnobtrusiveValidationMode" value="None"></add>
  </
appSettings>
    <
system.web>
      <
compilation
 debug="true" targetFramework="4.5" />
      <
httpRuntime targetFramework="4.5" />
    </
system.web> 
</configuration>

Step 2

Now write the following code in your WebForm.aspx Page:

<asp:TextBox runat="server" ID="txt" />
     <asp:RequiredFieldValidator ID="RequiredFieldValidator1" ErrorMessage="txt is required"ControlToValidate="txt" runat="server" Text="Text is Required" Display="Dynamic" />

    <asp:Button ID="Button1" Text="Send info" runat="server" />

Step 3

Now debug your code, on debugging the code you will get the output like this:

When you click on the button in the output window you will see an Error Message. As you write in the Text Box and click again on the Button the error message will be disposed of automatically.

The second method is by using a Global.asax file.

Step 1

In the Global.asax file, first add the namespace "using System.Web.UI;".

After adding the namespace write the following code in the Application_Start method:

protected void Application_Start(object sender, EventArgs e)
{
    ValidationSettings.UnobtrusiveValidationMode =
 UnobtrusiveValidationMode.None;
}

Step 2

Now write the following code in your WebForm.aspx page:

<asp:TextBox runat="server" ID="txt" />
     <asp:RequiredFieldValidator ID="RequiredFieldValidator1" ErrorMessage="txt is required"ControlToValidate="txt" runat="server" Text="Text is Required" Display="Dynamic" />

    <asp:Button ID="Button1" Text="Send info" runat="server" />

Step 3

Again debugging your Web Application you will again get the same output as you got in the first method.

The third method is by simply writing the code on each page inside the Page_Load event.

Step 1

protected void Page_Load(object sender, EventArgs e)
{
    this.UnobtrusiveValidationMode = System.Web.UI.UnobtrusiveValidationMode.None;

}

Step 2

Now write the following code in your WebForm.aspx page:

<asp:TextBox runat="server" ID="txt" />
     <asp:RequiredFieldValidator ID="RequiredFieldValidator1" ErrorMessage="txt is required"ControlToValidate="txt" runat="server" Text="Text is Required" Display="Dynamic" />

    <asp:Button ID="Button1" Text="Send info" runat="server" />

Step 3

Again debug your Web Application and you will again get the same output as you got in the first method.


About HostForLIFE.eu

HostForLIFE.eu is European Windows Hosting Provider which focuses on Windows Platform only. We deliver on-demand hosting solutions including Shared hosting, Reseller Hosting, Cloud Hosting, Dedicated Servers, and IT as a Service for companies of all sizes.

We have offered the latest Windows 2016 Hosting, ASP.NET Core 2.2.1 Hosting, ASP.NET MVC 6 Hosting and SQL 2017 Hosting.


Tag cloud

Sign in