European ASP.NET 4.5 Hosting BLOG

BLOG about ASP.NET 4, ASP.NET 4.5 Hosting and Its Technology - Dedicated to European Windows Hosting Customer

ASP.NET 5 Hosting - HostForLIFE.eu :: Implementing Cookie Authentication in ASP.NET 5

clock June 9, 2016 20:03 by author Anthony

In this tutorial, I'm going to explain about cookie based authentication in ASP.NET 5. I am implementing a cookie authentication in ASP.NET MVC application. Similar to other middleware components in ASP.NET, Cookie Authentication is also a middleware component, which you need to plug into ASP.NET pipeline.

For implementing cookie authentication, you require reference of Cookie middleware, here is the project.json file.
{
    "dependencies": {
        "Microsoft.AspNet.Diagnostics": "1.0.0-beta1",
        "Microsoft.AspNet.Hosting": "1.0.0-beta1",
        "Microsoft.AspNet.Mvc": "6.0.0-beta1",
        "Microsoft.AspNet.Server.WebListener": "1.0.0-beta1",
        "Microsoft.AspNet.Security": "1.0.0-beta1",
        "Microsoft.AspNet.Security.Cookies": "1.0.0-beta1",
        "Microsoft.AspNet.StaticFiles": "1.0.0-beta1",
    },
    "commands": {
        "web": "Microsoft.AspNet.Hosting --server Microsoft.AspNet.Server.WebListener --server.urls http://localhost:5001"
    },
     "frameworks": {
        "aspnet50": {}
  }
}


All the components used in this project are available in ASP.NET Core Framework as well.

Now you need to plug the Cookie authentication module to use in ASP.NET pipeline, you can do this via Startup.cs file.

public class Startup
{
    public void Configure(IApplicationBuilder app)
    {
        app.UseErrorPage();
 
        app.UseServices(services =>
        {
            services.AddMvc();
        });
     
        app.UseCookieAuthentication(options => {
            options.LoginPath = new PathString("/Home/Login");
        });
        app.UseMvc();                       
    }       
}


Now, you need to apply the Authorize filter to protect resources, I am applying it in the class level. When there is a unauthorized request to such resource, filter returns 401 and the cookie middleware redirects to /Home/Login.

Note: You need to set the LoginPath property explicitly, otherwise it may not redirect.

Authorize]
public class HomeController : Controller
{
    public IActionResult Index()
    {
        return View();
    }
}


And here is the Login action method, this code is for illustration purpose only, I not validating against database, if username and password matches the hard coded credentials, identity is established with that username.

[AllowAnonymous]
public IActionResult Login()
{
    return View();
}
 
[HttpPost, AllowAnonymous]
public IActionResult Login(User user)
{
    if(user.UserName == "admin" && user.Password == "Password")
    {
        var claims = new[]
        {
            new Claim("name", user.UserName)
        };
        var identity = new ClaimsIdentity(claims,
            CookieAuthenticationDefaults.AuthenticationType);
        Context.Response.SignIn(identity);
 
        return Redirect("~/");
    }
    else
    {
        ModelState.AddModelError("LogOnError",
            "The user name or password provided is incorrect.");
    }
    return View(user);
}
 
public IActionResult Logout()
{
    Context.Response.SignOut
    (CookieAuthenticationDefaults.AuthenticationType);
    return View("Login");
}


And here is the Login view

@using(Html.BeginForm())
{
    @Html.LabelFor(model => model.UserName)
    @Html.EditorFor(model => model.UserName)
    @Html.LabelFor(model => model.Password)
    @Html.PasswordFor(model => model.Password)
    <input type="submit" value="Sign In" />
    <br/>
    @Html.ValidationMessage("LogOnError")
}


To verify the implementation, install the required packages using kpm restore command, once it finishes, execute k web command. If web server is started, browse http://localhost:5001/, which will redirect to /Home/Login page, where you can enter the credentials, you will redirect back to /Home/Index page.

HostForLIFE.eu ASP.NET 5 Hosting
European best, cheap and reliable ASP.NET hosting with instant activation. HostForLIFE.eu is #1 Recommended Windows and ASP.NET hosting in European Continent. With 99.99% Uptime Guaranteed of Relibility, Stability and Performace. HostForLIFE.eu security team is constantly monitoring the entire network for unusual behaviour. We deliver hosting solution including Shared hosting, Cloud hosting, Reseller hosting, Dedicated Servers, and IT as Service for companies of all size.


ASP.NET 5 Hosting - HostForLIFE.eu :: Json Files Configuration

clock April 29, 2016 23:12 by author Anthony

The JSON format is syntactically identical to the code for creating JavaScript objects. Because of this similarity, instead of using a parser (like XML does), a JavaScript program can use standard JavaScript functions to convert JSON data into native JavaScript objects.

Much Like XML Because

  • Both JSON and XML is "self describing" (human readable)
  • Both JSON and XML is hierarchical (values within values)
  • Both JSON and XML can be parsed and used by lots of programming languages
  • Both JSON and XML can be fetched with an XMLHttpRequest

Much Unlike XML Because

  • JSON doesn't use end tag
  • JSON is shorter
  • JSON is quicker to read and write
  • JSON can use arrays

The biggest difference is:

XML has to be parsed with an XML parser, JSON can be parsed by a standard JavaScript function.

Visual Studio 2015 with ASP.NET 5 is a sweet surprise for developers. ASP.NET 5 has various JSON files to play with. These files handles global settings for solution, project specific settings, client side packages and node modules packages. In the post, we will take a close look at every JSON file and its code.
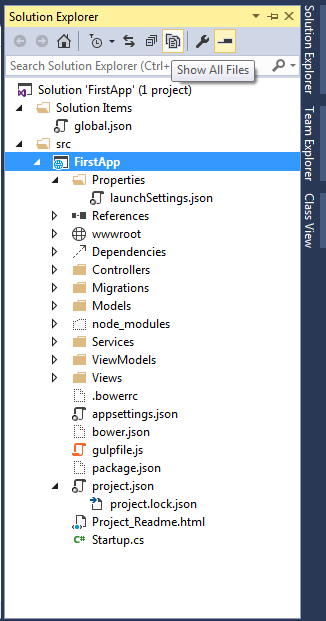
Solution Explorer in ASPNET 5 RC1


As seen from the above image, there are mainly 6 configuration json files.

  • Global.json
  • appsetting.json
  • Project.json
  • launchsetting.json
  • bower.json
  • package.json
  • hosting.json: Though this file is not present in solution explorer till RC 1 release but you can add it manually.


Global.json

As the name suggests, the settings defined in the file should work for the solution as whole. The settings defined in global.json implies to all the projects in the solution. If you open the file, by default you will see the following code.

{
  "projects": [ "src", "test" ],
  "sdk": {
    "version": "1.0.0-rc1-update1"
  }
}

The projects property defines the locations of your solution’s source code. VS 2015, specifies two location for projects in the solution src and test. While the src contains the actual application and test project contains any test (if you have selected option of creating test project while creating the solution for first time].

The team has also made a very interesting and useful change. If you recollect, when you build your application, then all your .dll are placed in bin directory in the same path, where your project is. And we have to handle bin folder very carefully while check-in the code in source control and at the time of deployment. But good news is that it is moved to another location. So you don’t have to worry now. The build artifact is now placed in “Artifact” folder (at the same location), which makes life easy while excluding things from source control.

Artifact folder

And the second property sdk specifies the version of the DNX (.Net Execution Environment) that Visual Studio will use when opening the solution. Specifying the version has an advantage as while working on multiple projects, you can target different versions of ASP.NET 5.

appsettings.json

appsettings.json file is used to define application related settings like connection string, logging settings, or any other custom key which we used to define in web.config file.

{
  "Data": {
    "DefaultConnection": {
      "ConnectionString": "Server=(localdb)\\mssqllocaldb;Database=aspnet5-FirstApp-0ed2f710-6535-4c4e-b080-c26601fbb414;Trusted_Connection=True;MultipleActiveResultSets=true"
    }
  },
  "Logging": {
    "IncludeScopes": false,
    "LogLevel": {
      "Default": "Verbose",
      "System": "Information",
      "Microsoft": "Information"
    }
  }
}


Project.json

This file is used to define project settings and server side dependencies. It largely replaces the web.config file from previous versions of ASP.NET. Read “What is Project.json in ASP.NET 5 (vNext)”. Few things have changed in ASP.NET 5 RC1 release for project.json file.

launchSetting.json

This json file holds project specific settings associated with each profile Visual Studio is configured to use to launch the application, including any environment variables that should be used. You can define framework for your project for compliation and debugging for specific profiles.

{
  "iisSettings": {
    "windowsAuthentication": false,
    "anonymousAuthentication": true,
    "iisExpress": {
      "applicationUrl": "http://localhost:2137/",
      "sslPort": 0
    }
  },
  "profiles": {
    "IIS Express": {
      "commandName": "IISExpress",
      "launchBrowser": true,
      "environmentVariables": {
        "Hosting:Environment": "Development"
      }
    },
    "web": {
      "commandName": "web",
      "environmentVariables": {
        "Hosting:Environment": "Development"
      },
      "sdkVersion": "dnx-clr-win-x86.1.0.0-rc1-update1"
    },
    "kestrel": {
      "commandName": "kestrel",
      "sdkVersion": "dnx-clr-win-x86.1.0.0-rc1-update1"
    }
  }
}


ASP.NET 5 ships with support for 3 different servers:

  • Microsoft.AspNet.Server.IIS
  • Microsoft.AspNet.Server.WebListener (WebListener)
  • Microsoft.AspNet.Server.Kestrel (Kestrel)

So by default, there will be 3 different profiles. However, it also depends on the commands section of project.json. You can change settings for each profile via right click on the Project and then select properties. Read detailed post about launchsetting.json in ASP.NET 5
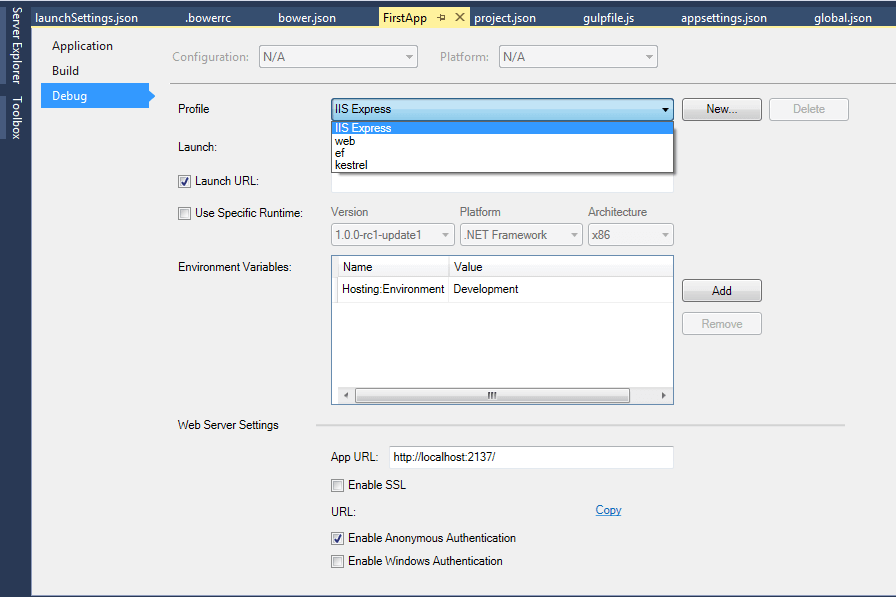
change launchsetting.json settings

Bower.json

Bower is a package manager for the web. Bower can manage components that contain HTML, CSS, JavaScript, fonts or even image files. Bower doesn’t concatenate or minify code or do anything else – it just installs the right versions of the packages you need and their dependencies. With ASP.NET 5 web projects jQuery and bootstrap packages are already installed and bower, gulp and NPM are already in place.
Client-side packages are listed in the bower.json file. As mentioned earlier, bootstrap, jQuery and jQuery validation are pre-configured with ASP.NET 5 project templates.

{
  "name": "ASP.NET",
  "private": true,
  "dependencies": {
    "bootstrap": "3.3.5",
    "jquery": "2.1.4",
    "jquery-validation": "1.14.0",
    "jquery-validation-unobtrusive": "3.2.4"
  }
}


Visual Studio watches the bower.json file for changes. Upon saving, the bower install command is executed. There is another file named “ .bowerrc” which defines the location at which bower package needs to be installed. Open it, and notice that the directory property is set to “wwwroot/lib”.

Package.json

npm is another package manager like bower. But npm is used for installing Node js modules where bower is used for managing front end components like html, css, js, etc. As mentioned earlier, the ASP.NET 5 project template pre-configures NPM, Gulp and bower. Gulp is JavaScript task runner which is used to automate various tasks like minification and bundling of js and css, checking errors in js etc… Since Gulp is a node.js module so npm is used. So node.js modules are listed in package.json.\

{
  "name": "ASP.NET",
  "version": "0.0.0",
  "devDependencies": {
    "gulp": "3.8.11",
    "gulp-concat": "2.5.2",
    "gulp-cssmin": "0.1.7",
    "gulp-uglify": "1.2.0",
    "rimraf": "2.2.8"
  }
}

You can see the installed bower and npm modules by expanding src -> dependencies option.


HostForLIFE.eu ASP.NET 5 Hosting
European best, cheap and reliable ASP.NET hosting with instant activation. HostForLIFE.eu is #1 Recommended Windows and ASP.NET hosting in European Continent. With 99.99% Uptime Guaranteed of Relibility, Stability and Performace. HostForLIFE.eu security team is constantly monitoring the entire network for unusual behaviour. We deliver hosting solution including Shared hosting, Cloud hosting, Reseller hosting, Dedicated Servers, and IT as Service for companies of all size.


ASP.NET 5 Hosting - HostForLIFE.eu :: How to Make Ext.NET in ASP.NET?

clock April 11, 2016 23:29 by author Anthony

In this article, I want to share about Ext.Net. Before we begin to learn Ext.net, we need to know what it Ext.net, according to the official web ext.net of are.

Ext.Net is ported to .Net Programming Ext JS, Ext JS is actually also be used in .Net programming, but this Ext.Net easier for developers because it has been created controls can be drag directly to the webform.

Things need to be prepared are:

  • IDE for .Net Programming, here I am using Visual Studio 2010
  • Ext.Net, which can be downloaded on the official website download ext.net, in sharing this time I used ext.net 2.0.0.rc2 community edition version.
  • Extract the downloaded ext.net, in which there Ext.net.dll.
  • ASP.Net with C # code behind.

When you get all the things that needed to be prepared:

  • Create a project, select Visual C # => Web, and then select ASP.Net Web Application
  • Give the name of this project ext.net
  • In the ToolBox window, usually on the left side of the screen, or if no can press Ctrl + Alt + X, right-click the toolbox and select Add Tab, named Ext.Net
  • Right-click the Toolbox Ext.Net, select Choose Items.
  • On the .Net Framework Components, click Browse, find Ext.net.dll then click OK
  • Now the ToolBox Ext.Net already charged components Ext.net.
  • The next step is to create a webform, named WebForm1.aspx
  • Add a ResourceManager to WebForm1.aspx (ResourceManager can be found in the ToolBox Ext.net). ResourceManager is needed by each component Ext.net.
  • Add Ext: Button, set property looks like this:
    <ext:Button ID="Button1" runat="server" Text="Direct Event">
          <DirectEvents>
              <Click OnEvent="Button1_Click" />
          </DirectEvents>
    </ext:Button>

    Button1 DirectEvents method to perform the action.
  • Then, we move on Code Behind of Webform1.aspx, open webform1.aspx.cs or by pressing the F7 key or you can also select the menu View => Code.
  • On Windows Code Behind, on the declaration using (top) add using Ext.Net;
  • Then, add the following method Button1_Click
    protected void Button1_Click(Object sender, DirectEventArgs e)
    {
       X.Msg.Notify("DirectEvent", DateTime.Now.ToLongTimeString()).Show();
    }
  • Back again to WebForm1.aspx by pressing the Shift + F7 keys or select menu View => Designer.
    Add an Ext: Button again into Webform1.aspx, set its properties as follows.
    <ext:Button ID="Button2" runat="server" Text="Direct Method">
          <Listeners>
              <Click Handler="Ext.net.DirectMethods.DoSomething();" />
          </Listeners>
    </ext:Button>
  • Then, add Method Do Something in Code Behind (press F7 to switch to Code Behind window.
    [DirectMethod]
    public void DoSomething()
    {
       X.Msg.Notify("DirectMethod", "Akhirnya bisa Ext.Net").Show();
    }
  • When finished, open the Web.Config the solution Explorer, add the following script.
    <httpModules>
       <add name="DirectRequestModule" type="Ext.Net.DirectRequestModule, Ext.Net" />
    </httpModules>
  • Run the Project by Press F5 or select Debug menu => Start Debugging


HostForLIFE.eu ASP.NET 5 Hosting
European best, cheap and reliable ASP.NET hosting with instant activation. HostForLIFE.eu is #1 Recommended Windows and ASP.NET hosting in European Continent. With 99.99% Uptime Guaranteed of Relibility, Stability and Performace. HostForLIFE.eu security team is constantly monitoring the entire network for unusual behaviour. We deliver hosting solution including Shared hosting, Cloud hosting, Reseller hosting, Dedicated Servers, and IT as Service for companies of all size.


ASP.NET 5 Hosting - HostForLIFE.eu :: Root Of ASP.NET 5

clock April 8, 2016 19:00 by author Anthony

Today we will discuss about the root of ASP.NET 5, which is WWWroot. When you take a closer look at the ASP.NET 5 project, you will see that there are many things which are carry forwarded like Model, View, Controller, clean separation of concerns and may more.

But, there are also some significant changes around ASP.NET 5. Now, the root of the website is no longer the root of the project. By default, root will be WWWroot folder. The idea behind this to maintain the clean separation between the files at the web-server retrieved and sent to the client and the files which contains the logic and configuration. Static files like JS, CSS, HTMLs can live in WWWroot folder.

15th

Now, lets suppose when i run the app and tried to see the image which i have placed in My Imgaes folder, then it will give me 404 error. On the other hand, if i go ahead and add the same folder in WWWroot folder and try to navigate the same then it will produce me the result.

18th

so, the point is all static files are served by root folder and logical stuffs served by project space as we initially saw, when i added controller in the controller’s folder and it took effect. One more thing you might have observed that there is no web.config file now in the solution. Also now there is no Global.asax file; however the same is replaced by startup.cs file. But, we’ll see this later. 1st let’s see project.json file. This file now manages many aspects of website.

19th

First thing which you will notice here that root folder is set to WWWroot here. So, this is the place which is telling website that this is the root folder. So begin the show from here. This you can change as well or rename if you like to. Now, this configuration file is in JSON format. This is also telling the ASP.NET runtime what dependencies project is going to need. In this new ASP.NET 5 system there is a new way to manage dependencies. No need to reference assemblies and store the lists of referenced assemblies in the project file. Instead we refer to nuget packages as dependencies and these dependencies are listed in our project.json file. Now, there are couple of reasons for this change. One reason is to simplify the dependency management. Another good reason for this is that ASP.NET is moving away from VS dependency. So, in future i can use any text editor to build the ASP.NET App.

Now, these dependencies can be both the ways. One way which we used already shown below in the screen shot.

20th

21th

Now, the UI of this also changed. Initially we used to have Modal window. Now, this is more like complete screen giving wider visibility. I can also see the installed templates like

22nd

Also, i still have the flexibility of different nuget source. 2nd Option is via project.json file. Let’s suppose i am planning to install some custom package. Then i can do like shown below as well

24th

However, whatever package you install; you can find its references under “References“. Below, in the screen shot you can see that there are two versions of runtime here. 1st one is the core version and 2nd one is the cloud optimized version.

25th

Let’s collapse the same and drill into it. Now, here dependency management system will keep your assemblies in nice tree structure. So, it nicely tells which package are dependent on which package.

27th

Now, as far as Framework and runtime is concerned as you can see below in the screen shot; i have both frameworks listed here.

28th

So, whenever i am building the solution i am building against both of these frameworks. By building against both i am actually ensuring that it will work well against both the frameworks. This also means whenever i am switching platform my code won’t break there.

But, let’s go ahead and break something here. You remember in the last segment i created one new controller with a notepad. Now, let’s modify the same and refresh the app.

29th

As you can see that it says that GetCallingAssembly() which is part of System.Reflection is not supported in the cloud optimized version. But, let’s suppose i overlooked this error and refresh the app.So, it actually produced me desired result.

31th

But, when i explicitly build the project and checked the output window, then it gave me below error message.

32nd

So, building with error but application is working fine with full blown CLR. Now, if you have decided that you don’t want CORE CLR version. so, you can just comment the Core CLR section in the project.json file as shown below in the screen shot.

33th

As soon as i commented the above section, below references got refreshed automatically.

34th

Now, when i build the app then it will build fine. But, suppose you want the other way means you would like to keep the cloud optimized version also and build should also succeed. For this scenario i need to refer the conditional build as shown below.

36th


HostForLIFE.eu ASP.NET 5 Hosting
European best, cheap and reliable ASP.NET hosting with instant activation. HostForLIFE.eu is #1 Recommended Windows and ASP.NET hosting in European Continent. With 99.99% Uptime Guaranteed of Relibility, Stability and Performace. HostForLIFE.eu security team is constantly monitoring the entire network for unusual behaviour. We deliver hosting solution including Shared hosting, Cloud hosting, Reseller hosting, Dedicated Servers, and IT as Service for companies of all size.


ASP.NET 5 Hosting - HostForLIFE.eu :: How to Use Entity Framework 7 To Persist Movie Data To a Database?

clock April 4, 2016 19:50 by author Anthony

Today I will explain about how to use entity framework 7 to presist movie data to a database. But before you start, you must add Entity Framework 7 NuGet packages to your project. Also make sure that your project.json file includes the following two dependencies (you’ll get Intellisense while entering the names of the packages and their versions).

"EntityFramework.SqlServer": "7.0.0-beta2",
"EntityFramework.Commands": "7.0.0-beta2",


After you complete this step, the Entity Framework packages should appear under References.

Creating the Model and DbContext

Next, we need to create our Movie model class. This class represents the entity that we want to store in the database. Add the following Movie.cs class to your Models folder:

namespace MovieAngularJSApp.Models
{
    public class Movie
    {
        public int Id { get; set; }
 
        public string Title { get; set; }
 
        public string Director { get; set; }
    }
}

We also need to create an Entity Framework DbContext class. We create this class when using Entity Framework 7 in exactly the same way as we created this class for previous versions of the Entity Framework.

using Microsoft.Data.Entity;
namespace MovieAngularJSApp.Models
{
    public class MoviesAppContext:DbContext
    {
 
        public DbSet<Movie> Movies { get; set; }
 
    }
}

Registering the Entity Framework Services
Now that we have our DbContext class, we need to register the DbContext with our application services. Modify your Startup.cs file so it contains the code for registering the Entity Framework in the code below:

using Microsoft.AspNet.Builder;
using Microsoft.Framework.DependencyInjection;
using Microsoft.Data.Entity;
using MovieAngularJSApp.Models;
using Microsoft.AspNet.Hosting;
using Microsoft.Framework.ConfigurationModel;
namespace MovieAngularJSApp
{
    public class Startup
    {
        public Startup(IHostingEnvironment env)
        {
            // Setup configuration sources.
            Configuration = new Configuration()
                .AddJsonFile("config.json")
                .AddEnvironmentVariables();
        }
         public IConfiguration Configuration { get; set; }
         public void ConfigureServices(IServiceCollection services)
        {
            services.AddMvc();
 
            // Register Entity Framework
            services.AddEntityFramework(Configuration)
                .AddSqlServer()
                .AddDbContext<MoviesAppContext>();
        }
        public void Configure(IApplicationBuilder app)
        {
            app.UseMvc();
        }
 
    }
}

The database connection string is loaded up from the Config.json file (notice the constructor in the Startup.cs file). Here is what the Config.json file looks like:

{
    "Data": {
        "DefaultConnection": {
            "ConnectionString": "Server=(localdb)\\mssqllocaldb;Database=MoviesDatabase;Trusted_Connection=True;MultipleActiveResultSets=true"
        }
    },
    "EntityFramework": {
        "MoviesAppContext": {
            "ConnectionStringKey": "Data:DefaultConnection:ConnectionString"
        }
    }
}

Updating the MoviesController

Because we registered our MoviesAppContext class as a service, we can take advantage of the built-in ASP.NET 5 Dependency Injection framework to use the MoviesAppContext in our MoviesController. Notice that the MoviesAppContext class is added to the MoviesController using constructor dependency injection in the code below:

using System;
using System.Collections.Generic;
using System.Linq;
using Microsoft.AspNet.Mvc;
using MovieAngularJSApp.Models;
namespace MovieAngularJSApp.API.Controllers
{
    [Route("api/[controller]")]
    public class MoviesController : Controller
    {
        private readonly MoviesAppContext _dbContext;
 
        public MoviesController(MoviesAppContext dbContext)
        {
            _dbContext = dbContext;
        }
 
        [HttpGet]
        public IEnumerable<Movie> Get()
        {
            return _dbContext.Movies;
        }
        [HttpGet("{id:int}")]
        public IActionResult Get(int id)
        {
            var movie = _dbContext.Movies.FirstOrDefault(m => m.Id == id);
            if (movie == null) {
                return new HttpNotFoundResult();
            } else {
                return new ObjectResult(movie);
            }
        }
        [HttpPost]
        public IActionResult Post([FromBody]Movie movie)
        {
            if (movie.Id == 0)
            {
                _dbContext.Movies.Add(movie);
                _dbContext.SaveChanges();
                return new ObjectResult(movie);
            }
            else
            {
                var original = _dbContext.Movies.FirstOrDefault(m => m.Id == movie.Id);
                original.Title = movie.Title;
                original.Director = movie.Director;
                _dbContext.SaveChanges();
                return new ObjectResult(original);
            }
        }
        [HttpDelete("{id:int}")]
        public IActionResult Delete(int id)
        {
            var movie = _dbContext.Movies.FirstOrDefault(m => m.Id == id);
            _dbContext.Movies.Remove(movie);
            _dbContext.SaveChanges();
            return new HttpStatusCodeResult(200);
        }
 
 
    }
}

Performing Database Migrations

After we complete all of the steps above, our application still won’t work. If we run the Movies app then we will get an error message about not being able to open the MoviesDatabase.

The Entity Framework 7 does not support database initializers. Instead, you are encouraged to use Database Migrations.There are two ways to use Migrations with ASP.NET 5: from a Command Prompt or from the NuGet Package Manager Console. I used the Command Prompt approach and I executed the following two commands from the same directory that contains my project.json file:

k ef migration add initial
k ef migration apply

KPrompt

After you execute the two ef commands above, a new database named MoviesDatabase will be created. You can see the new database by opening up the Visual Studio SQL Server Object Explorer:

SQLExplorer

Executing the ef commands above will also add a new Migrations folder to your project.

Migrations

You now should be able to run the Movies app successfully.

HostForLIFE.eu ASP.NET 5 Hosting
European best, cheap and reliable ASP.NET hosting with instant activation. HostForLIFE.eu is #1 Recommended Windows and ASP.NET hosting in European Continent. With 99.99% Uptime Guaranteed of Relibility, Stability and Performace. HostForLIFE.eu security team is constantly monitoring the entire network for unusual behaviour. We deliver hosting solution including Shared hosting, Cloud hosting, Reseller hosting, Dedicated Servers, and IT as Service for companies of all size.


European ASP.NET 4.5 Hosting - Spain :: How to Optimize Your ASP Pages

clock August 14, 2014 13:09 by author Onit

This Article will tell you how to faster loading of your ASP Pages and make the performance better, If you read the internet and all of the websites dedicated to Asp.Net you will inevitably read about the wonders of the DataGrid, DataList, and Repeater controls. While each of these has its place, if you are only displaying data there is a much faster and more efficient means to do so. Let's say you have a page that displays articles based on a query string. A normal asp page execution procedure goes like this. The code queries the database based on the Article I.D. and then brings back that information to the page where you display it in the fashion that you would like. This is a fairly straight forward approach with asp and is done all the time.


Check The Easy Step Below!

Use Asp.Net Caching

This is a no-brainer, and I won't go into the brilliance or details of asp.net caching here because at the time of this writing Google has 2,780,000 articles on the topic. Basically instead of querying the database each time the page is loaded you only query the database once and load that result into the system cache. Subsequent calls to load the page retrieve the data from the cache as opposed to the database which gives you an instant and considerable performance boost. You can then set the cache for how long the cache should store the information as well as many other features. If you are not using the cache, you should be whenever possible!

If possible, do NOT use the standard Asp.Net controls.

That's right. The standard asp.net controls are designed for rapid development and not page performance. They allow you to design pages that grab and display data very quickly but their actual performance suffers because of the extra overhead which is there for ease and speed of development time and not page execution speed.

Instead, create either a User Control or even better yet a Web Custom Control which is by far the fastest performance wise and really quite easy to create and use.

Use an SqlDataReader or even better yet use a set based command for Sql Server data retrieval and simply execute that one command against the database.

An asp.net SqlDataReader is a fast forward only datareader that closes the connection after it reads the last set of results. Now for my article pages we are only returning 1 particular result. In this case we would opt for the set based command. If you had more than 1 result returned, in your table of contents for instance, you would use the SqlDataReader because you are returning multiple sets of results.

Set based commands are stored procedures that bring back data through parameters as opposed to a result set which then in turn needs to be looped through to obtain your data. So instead of writing your stored procedure like the following which brings back 1 result set:

Select Title, Body, Author
From Articles
Where ArtID = 215

We can write it using a set based command like this.

Create Procedure mysp_GetArticle

@Title varchar(200) Output,
@Body varchar(8000) Output,
@Author varchar(500) Output


As

Select @Title = Title, @Body = Body, @Author = Author
From Articles
Where ArtID = 215

GO
The above query will return only the three parameters called for and not a result or record set so you
don't have to then walk through the returned record set that has only 1 result in it anyway. This second
little process of work decreases your performance so you should avoid it whenever possible. Combine
this technique with the asp.net cache

Use Classes and ArrayLists as opposed to returning an SqlDataReader.

Create a class and then if there are more than one set of results store those results into individual instantiations of that class. Finally store each of those classes into an ArrayList. You can then store only that ArrayList into the asp.net cache. So instead of getting the results back from a SqlDataReader when loading your page you get them from the ArrayList which is stored in the cache.

On the first time the page loads, query the database and return all of your data storing it into individual classes. Then store each of those classes into an ArrayList. If you only have one single result you may store only the class into the cache. Then take your ArrayList and store it into the cache.

Next create a Web Custom Control and pass the cached ArrayList to the custom control and loop out your data using the HtmlTextWriter which is very fast. Remember each subsequent call to load the page will be called from the cache which stores your ArraList of classes or your single class.

Certainly it takes a significant amount of additional coding to do it in this fashion, especially when you take proper error handling into consideration, but if you follow this approach your pages will be screeching fast, you will immediately notice the difference, and your asp.net pages will execute in the proper sequence - Data handling in the Page_Load function and the html display in the Page_Render function.


About HostForLIFE.eu

HostForLIFE.eu is European Windows Hosting Provider which focuses on Windows Platform only. We deliver on-demand hosting solutions including Shared hosting, Reseller Hosting, Cloud Hosting, Dedicated Servers, and IT as a Service for companies of all sizes.

We have offered the latest Windows 2016 Hosting, ASP.NET Core 2.2.1 Hosting, ASP.NET MVC 6 Hosting and SQL 2017 Hosting.


Tag cloud

Sign in