European ASP.NET 4.5 Hosting BLOG

BLOG about ASP.NET 4, ASP.NET 4.5 Hosting and Its Technology - Dedicated to European Windows Hosting Customer

European ASP.NET Core Hosting :: File Upload in Angular 7

clock September 20, 2019 10:52 by author Scott

In this article, we will see how to upload a file into the database using the Angular 7 app in an ASP.NET project. Let us create a new project in Visual Studio 2017. We are using ASP.NET Core 2 and Angular 7 for this project.

Prerequisites:

  • Node JS must be installed
  • Angular CLI must be installed
  • Basic knowledge of Angular

Let’s get started.

Create a new project and name it as FileUploadInAngular7

Select a new project with Angular in .NET Core and uncheck the configure HTTPS

Your project will be created. Left click on ClientApp and open it in file explorer

Type cmd as shown in the picture.

Type npm install in the cmd

Now it will take time and all the node_modules will be installed in the project.

Create a Web API controller as UploadController.

Add the following code in it.

using System.IO;
using System.Net.Http.Headers;
using Microsoft.AspNetCore.Hosting;
using Microsoft.AspNetCore.Mvc;
namespace FileUploadInAngular7.Controllers
{
    [Produces("application/json")]
    [Route("api/[controller]")]
    public class UploadController : Controller
    {
        private IHostingEnvironment _hostingEnvironment;
        public UploadController(IHostingEnvironment hostingEnvironment)
        {
            _hostingEnvironment = hostingEnvironment;
        }
        [HttpPost, DisableRequestSizeLimit]
        public ActionResult UploadFile()
        {
            try
            {
                var file = Request.Form.Files[0];
                string folderName = "Upload";
                string webRootPath = _hostingEnvironment.WebRootPath;
                string newPath = Path.Combine(webRootPath, folderName);
                if (!Directory.Exists(newPath))
                {
                    Directory.CreateDirectory(newPath);
                }
                if (file.Length > 0)
                {
                    string fileName = ContentDispositionHeaderValue.Parse(file.ContentDisposition).FileName.Trim('"');
                    string fullPath = Path.Combine(newPath, fileName);
                    using (var stream = new FileStream(fullPath, FileMode.Create))
                    {
                        file.CopyTo(stream);
                    }
                }
                return Json("Upload Successful.");
            }
            catch (System.Exception ex)
            {
                return Json("Upload Failed: " + ex.Message);
            }
        }
    }
}

Navigate to the following path and open both the files.

In home.component.html write the following code.

<h1>File Upload Using Angular 7 and ASP.NET Core Web API</h1>
<input #file type="file" multiple (change)="upload(file.files)" />
<br />
<span style="font-weight:bold;color:green;" *ngIf="progress > 0 && progress < 100">
  {{progress}}%
</span>
<span style="font-weight:bold;color:green;" *ngIf="message">
  {{message}}
</span>

In home.component.ts file write the following code in it.

import { Component, OnInit } from '@angular/core';
import { HttpClient, HttpRequest, HttpEventType, HttpResponse } from '@angular/common/http';
@Component({
  selector: 'app-home',
  templateUrl: './home.component.html',
})
export class HomeComponent {
  public progress: number;
  public message: string;
  constructor(private http: HttpClient) { }
  upload(files) {
    if (files.length === 0)
      return;
    const formData = new FormData();
    for (let file of files)
      formData.append(file.name, file);
    const uploadReq = new HttpRequest('POST', `api/upload`, formData, {
      reportProgress: true,
    });
    this.http.request(uploadReq).subscribe(event => {
      if (event.type === HttpEventType.UploadProgress)
        this.progress = Math.round(100 * event.loaded / event.total);
      else if (event.type === HttpEventType.Response)
        this.message = event.body.toString();
    });
  }
}

Run the project and you will see the following output.


ASP.NET 4.8 Hosting - HostForLIFE.eu :: Display SiteMap Links On ASP.NET Page

clock September 17, 2019 12:33 by author Peter

Create a sitemap sml based file and save it with sitemap.config name. Here is an example.
    <?xml version="1.0" encoding="utf-8" ?> 
    <siteMap> 
    <siteMapNode title="Home" controller="Home" action="Overview"> 
    <siteMapNode title="Dashboard" nopResource="Admin.Dashboard" controller="Home" action="Index" ImageUrl="~/Administration/Content/images/ico-dashboard.png" /> 
    <siteMapNode title="Catalog" nopResource="Admin.Catalog" PermissionNames="ManageCatalog" ImageUrl="~/Administration/Content/images/ico-catalog.png" > 
    <siteMapNode title="Categories" nopResource="Admin.Catalog.Categories"> 
    <siteMapNode title="List" nopResource="Admin.Common.List" controller="Category" action="List"/> 
    <siteMapNode title="Tree view" nopResource="Admin.Common.Treeview" controller="Category" action="Tree"/> 
    </siteMapNode> 
    </siteMap> 


If you're new to sitemap, learn here how to create a site map in Visual Studio.
 
To bind above sitemap and display on a page, please follow the below code example.
    @using System.Data; 
    @using System; 
    <div class="page-title"> 
    <h2>"Sitemap"</h2> 
    </div> 
    @{ 
    string fileName = System.Web.HttpContext.Current.Server.MapPath("~/sitemap.config"); 
    DataSet ds = new DataSet(); 
    ds.ReadXml(fileName); 
    <table> 
    <tr> 
    <td width="20%"></td> 
    <td style="border: 2px double #CCCCCC; padding-left: 50px;" width="30%"> 
    @for(int i=1;i<ds.Tables[0].Rows.Count/2;i++) 
    { 
    if(ds.Tables[0].Rows[i]["action"].ToString()=="") 
    { 
    <h4>@ds.Tables[0].Rows[i]["title"].ToString()</h4> 
    } 
    else 
    { 
    string url = "../" + @ds.Tables[0].Rows[i]["controller"].ToString() + "/" + @ds.Tables[0].Rows[i]["action"].ToString(); 
    <ul class="top-menu"><li><a href="@url" temp_href="@url">@ds.Tables[0].Rows[i]["title"].ToString()</a></li></ul> 
    } 
    } 
    </td> 
    <td style="border: 2px double #CCCCCC; padding-left: 50px;" width="30%"> 
    @for (int i = ds.Tables[0].Rows.Count / 2; i < ds.Tables[0].Rows.Count; i++) 
    { 
    if(ds.Tables[0].Rows[i]["action"].ToString()=="") 
    { 
    <h4>@ds.Tables[0].Rows[i]["title"].ToString()</h4> 
    } 
    else 
    { 
    string url = "../" + @ds.Tables[0].Rows[i]["controller"].ToString() + "/" + @ds.Tables[0].Rows[i]["action"].ToString(); 
    <ul class="top-menu"><li><a href="@url" temp_href="@url">@ds.Tables[0].Rows[i]["title"].ToString()</a></li></ul> 
    } 
    } 
    </td> 
    </tr> 
    </table> 
    } 


Run application and you'll see a page with sitemap links.

HostForLIFE.eu ASP.NET 4.8 Hosting

European best, cheap and reliable ASP.NET hosting with instant activation. HostForLIFE.eu is #1 Recommended Windows and ASP.NET hosting in European Continent. With 99.99% Uptime Guaranteed of Relibility, Stability and Performace. HostForLIFE.eu security team is constantly monitoring the entire network for unusual behaviour. We deliver hosting solution including Shared hosting, Cloud hosting, Reseller hosting, Dedicated Servers, and IT as Service for companies of all size.


European ASP.NET Core Hosting :: InProcess and OutOfProcess Hosting Model In ASP.NET Core

clock September 17, 2019 11:37 by author Scott

Once you finish developing an ASP.NET Core web application, you need to deploy it on a server so that end users can start using it. When it comes to deployment to IIS, ASP.NET Core offers two hosting models namely InProcess and OutOfProcess. In this article you learn about these hosting models and how to configure them.

When you deploy your web application to IIS, various requests to the application are handled by what is known as ASP.NET Core Module. Under default settings the hosting model for your application is InProcess. This means ASP.NET Core Module forwards the requests to IIS HTTP Server (IISHttpServer). The IIS HTTP Server is a server that runs in-process with IIS. This results in great performance as compared to Out Of Process model. In-process models bypasses built-in Kestrel web server of ASP.NET Core.

If you decide to use Out-Of-Process hosting model then IIS HTTP Server won't be used. Instead Kestrel web server is used to process your requests. So, ASP.NET Core Module forwards your requests to Kestrel web server. This communication is out-of-process communication and is therefore slower than the in-process model.

Now that you have some basic idea about the in-process and out-of-process hosting models let's see how to configure them.

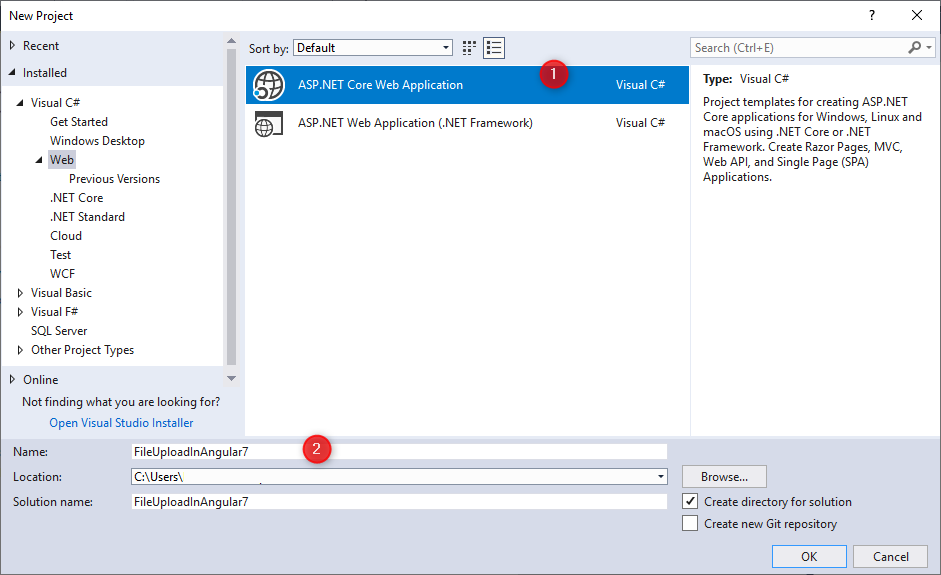
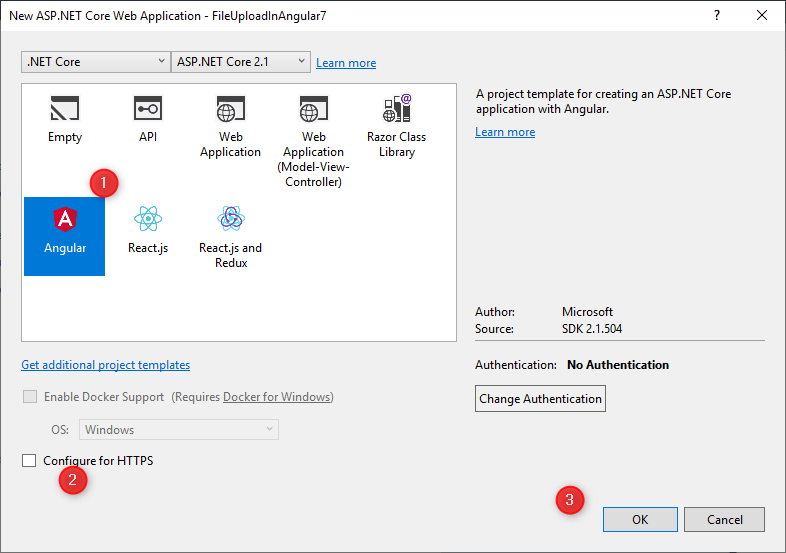
In order to understand the hosting models discussed in this article you first need to create an ASP.NET Core web application using Visual Studio. So, go ahead and do so based on any of the web application project templates. Make sure to use ASP.NET Core version 2.2 or later.

Once you create the project, click on the Build > Publish menu and Web Deploy the output (or manually copy to IIS) to IIS. Once you finish deploying the application locate the web.config file generated during the deployment process. In this web.config you will find a section like this:

<system.webServer>
  <handlers>
    <add name="aspNetCore" path="*" verb="*"
modules="AspNetCoreModuleV2" />
  </handlers>
  <aspNetCore processPath="dotnet"
              arguments=".\MyWebApp.dll"  
              stdoutLogEnabled="false"
              stdoutLogFile=".\logs\stdout"
              hostingModel="inprocess" />
</system.webServer>

As you can see the <aspNetCore> tag has hostingModel attribute that is set to inprocess by default.

Now, run the application from the browser with this default setting in place and observe the HTTP headers. The following figure shows one such sample run of the application.

As you can see the Server is Microsoft IIS.

Now, change the hostingModel attribute from inprocess to outofprocess. Run the application again. This time you will get the following output:

As you can see the Server is now Kestrel indicating that Out-Of-Process model is active.

In the preceding example you change the hosting model in the web.config generated during the publish operation. You can also specify the hosting model in project's .csproj file. Consider the following markup from .csproj file that does that.

<PropertyGroup>
    <TargetFramework>netcoreapp2.2</TargetFramework>
    <AspNetCoreHostingModel>InProcess</AspNetCoreHostingModel>
</PropertyGroup>

The <AspNetCoreHostingModel> element sets the hosting model to InProcess. To set it to Out-Of-Process you need to set it like this:

<AspNetCoreHostingModel>OutOfProcess</AspNetCoreHostingModel>

Run the application with these settings and confirm whether you get the outcome as before.

That's it for now! Keep coding!!


ASP.NET 4.8 Hosting - HostForLIFE.eu :: Use Distinct And FirstOrDefault Clauses In .NET Using linq.js

clock September 10, 2019 12:37 by author Peter

In this version, I will tell you about using Let us see how to use Distinct() and FirstOrDefault() clauses with the help of linq.js in .NET Web Application. It's useful to write simple LINQ queries from Entityframework to client side with LinqJS.

It’s better for validating data at the client side.
Improves performance of the application.

Let’s see one by one,
Distinct() function is different here.

C#.NET Code
    var FirstNameCollection = myDataArray.Select(x => x.FirstName).Distinct(); 
LinqJS Code
    // Retrieves non-duplicate FirstName values. 
    var FirstNameCollection = Enumerable.From(myDataArray).Distinct(function(x) { 
        return x.FirstName; 
    }).Select(function(FName) { 
        return FName; 
    }).ToArray(); 
The FirstOrDefault() function is nearly similar.

C#.NET Code
    public class cmbMonthOfWeek { 
        public string cmbMonth { 
            get; 
            set; 
        } 
        public int Id { 
            get; 
            set; 
        } 
    } 
    List < cmbMonthOfWeek > weekInfo = new List < cmbMonthOfWeek > (); 
    weekInfo.Add(new cmbMonthOfWeek { 
        cmbMonth = "First week", Id = 0 
    }); 
    weekInfo.Add(new cmbMonthOfWeek { 
        cmbMonth = "Second week", Id = 1 
    }); 
    weekInfo.Add(new cmbMonthOfWeek { 
        cmbMonth = "Third week", Id = 2 
    }); 
    weekInfo.Add(new cmbMonthOfWeek { 
        cmbMonth = "Fourth week", Id = 3 
    }); 
    var defaultWeekData = (from p in weekInfo where p.Id == 1 select p).FirstOrDefault();
Note

Here in defaultWeekData, you will get cmbMonth = "Second week".

LinqJS Code
    $scope.cmbMonthOfWeek = [{ 
        "cmbMonth": "First week", 
        "Id": 0 
    }, { 
        "cmbMonth": "Second week", 
        "Id": 1 
    }, { 
        "cmbMonth": "Third week", 
        "Id": 2 
    }, { 
        "cmbMonth": "Fourth week", 
        "Id": 3 
    }, ]; 
    var defaultWeekData = Enumerable.From($scope.cmbMonthOfWeek).Where(function(x) { 
        return x.Id == 1 
    }).FirstOrDefault();  Distinct And FirstOrDefault Clauses In .NET Using linq.js

HostForLIFE.eu ASP.NET 4.8 Hosting

European best, cheap and reliable ASP.NET hosting with instant activation. HostForLIFE.eu is #1 Recommended Windows and ASP.NET hosting in European Continent. With 99.99% Uptime Guaranteed of Relibility, Stability and Performace. HostForLIFE.eu security team is constantly monitoring the entire network for unusual behaviour. We deliver hosting solution including Shared hosting, Cloud hosting, Reseller hosting, Dedicated Servers, and IT as Service for companies of all size.


ASP.NET Hosting HostForLIFE.eu :: Centralized Exception Handling Without Using Try Catch Block In .Net Core 2.2 Web API

clock September 3, 2019 12:00 by author Peter

Rather than writing try catch block for each method, throwing exceptions manually and handling them, here we will use the power of .Net Core middleware to handle the exceptions at one single place, so that when an exception occurs anywhere in the code, the appropriate action can be taken. We will use UseExceptionHandler extension method that will add a middleware to the pipeline, and it will catch exceptions, log them, reset the request path, and re-execute the request if response has not already started.

Developer can customize the response format as well.

To achive this in .NetCore 2.2, this code snippet is very simple and it's just a matter of adding a few lines in your Startup.cs.

Simply go in Configure method and add the below code,
if (env.IsDevelopment()) {  
    app.UseDeveloperExceptionPage();  
} else {  
    app.UseExceptionHandler(errorApp => errorApp.Run(async context => {  
        // use Exception handler path feature to catch the exception details   
        var exceptionHandlerPathFeature = context.Features.Get < IExceptionHandlerPathFeature > ();  
        // log errors using above exceptionHandlerPathFeature object   
        Console.WriteLine(exceptionHandlerPathFeature ? .Error);  
        // Write a custom response message to API Users   
        context.Response.StatusCode = "500";  
        // Set a response format    
        context.Response.ContentType = "application/json";  
        await context.Response.WriteAsync("Some error occured.");  
    }));  
}  


The Console.WriteLine() is for demonstration purposes only. Here a developer can log the exceptions using any tool/package getting used in their project.

When any exceptions are thrown in the application this code will be executed and will produce the desired custom response in non-development environments (as in a development env we are using UseDeveloperExceptionPage() as a middleware).

HostForLIFE.eu ASP.NET 4.8 Hosting
HostForLIFE.eu is European Windows Hosting Provider which focuses on Windows Platform only. We deliver on-demand hosting solutions including Shared hosting, Reseller Hosting, Cloud Hosting, Dedicated Servers, and IT as a Service for companies of all sizes. We have customers from around the globe, spread across every continent. We serve the hosting needs of the business and professional, government and nonprofit, entertainment and personal use market segments.


About HostForLIFE.eu

HostForLIFE.eu is European Windows Hosting Provider which focuses on Windows Platform only. We deliver on-demand hosting solutions including Shared hosting, Reseller Hosting, Cloud Hosting, Dedicated Servers, and IT as a Service for companies of all sizes.

We have offered the latest Windows 2016 Hosting, ASP.NET Core 2.2.1 Hosting, ASP.NET MVC 6 Hosting and SQL 2017 Hosting.


Tag cloud

Sign in