European ASP.NET 4.5 Hosting BLOG

BLOG about ASP.NET 4, ASP.NET 4.5 Hosting and Its Technology - Dedicated to European Windows Hosting Customer

ASP.NET 5 Hosting - HostForLIFE.eu :: Implementing Cookie Authentication in ASP.NET 5

clock June 9, 2016 20:03 by author Anthony

In this tutorial, I'm going to explain about cookie based authentication in ASP.NET 5. I am implementing a cookie authentication in ASP.NET MVC application. Similar to other middleware components in ASP.NET, Cookie Authentication is also a middleware component, which you need to plug into ASP.NET pipeline.

For implementing cookie authentication, you require reference of Cookie middleware, here is the project.json file.
{
    "dependencies": {
        "Microsoft.AspNet.Diagnostics": "1.0.0-beta1",
        "Microsoft.AspNet.Hosting": "1.0.0-beta1",
        "Microsoft.AspNet.Mvc": "6.0.0-beta1",
        "Microsoft.AspNet.Server.WebListener": "1.0.0-beta1",
        "Microsoft.AspNet.Security": "1.0.0-beta1",
        "Microsoft.AspNet.Security.Cookies": "1.0.0-beta1",
        "Microsoft.AspNet.StaticFiles": "1.0.0-beta1",
    },
    "commands": {
        "web": "Microsoft.AspNet.Hosting --server Microsoft.AspNet.Server.WebListener --server.urls http://localhost:5001"
    },
     "frameworks": {
        "aspnet50": {}
  }
}


All the components used in this project are available in ASP.NET Core Framework as well.

Now you need to plug the Cookie authentication module to use in ASP.NET pipeline, you can do this via Startup.cs file.

public class Startup
{
    public void Configure(IApplicationBuilder app)
    {
        app.UseErrorPage();
 
        app.UseServices(services =>
        {
            services.AddMvc();
        });
     
        app.UseCookieAuthentication(options => {
            options.LoginPath = new PathString("/Home/Login");
        });
        app.UseMvc();                       
    }       
}


Now, you need to apply the Authorize filter to protect resources, I am applying it in the class level. When there is a unauthorized request to such resource, filter returns 401 and the cookie middleware redirects to /Home/Login.

Note: You need to set the LoginPath property explicitly, otherwise it may not redirect.

Authorize]
public class HomeController : Controller
{
    public IActionResult Index()
    {
        return View();
    }
}


And here is the Login action method, this code is for illustration purpose only, I not validating against database, if username and password matches the hard coded credentials, identity is established with that username.

[AllowAnonymous]
public IActionResult Login()
{
    return View();
}
 
[HttpPost, AllowAnonymous]
public IActionResult Login(User user)
{
    if(user.UserName == "admin" && user.Password == "Password")
    {
        var claims = new[]
        {
            new Claim("name", user.UserName)
        };
        var identity = new ClaimsIdentity(claims,
            CookieAuthenticationDefaults.AuthenticationType);
        Context.Response.SignIn(identity);
 
        return Redirect("~/");
    }
    else
    {
        ModelState.AddModelError("LogOnError",
            "The user name or password provided is incorrect.");
    }
    return View(user);
}
 
public IActionResult Logout()
{
    Context.Response.SignOut
    (CookieAuthenticationDefaults.AuthenticationType);
    return View("Login");
}


And here is the Login view

@using(Html.BeginForm())
{
    @Html.LabelFor(model => model.UserName)
    @Html.EditorFor(model => model.UserName)
    @Html.LabelFor(model => model.Password)
    @Html.PasswordFor(model => model.Password)
    <input type="submit" value="Sign In" />
    <br/>
    @Html.ValidationMessage("LogOnError")
}


To verify the implementation, install the required packages using kpm restore command, once it finishes, execute k web command. If web server is started, browse http://localhost:5001/, which will redirect to /Home/Login page, where you can enter the credentials, you will redirect back to /Home/Index page.

HostForLIFE.eu ASP.NET 5 Hosting
European best, cheap and reliable ASP.NET hosting with instant activation. HostForLIFE.eu is #1 Recommended Windows and ASP.NET hosting in European Continent. With 99.99% Uptime Guaranteed of Relibility, Stability and Performace. HostForLIFE.eu security team is constantly monitoring the entire network for unusual behaviour. We deliver hosting solution including Shared hosting, Cloud hosting, Reseller hosting, Dedicated Servers, and IT as Service for companies of all size.


ASP.NET 5 Hosting - HostForLIFE.eu :: Json Files Configuration

clock April 29, 2016 23:12 by author Anthony

The JSON format is syntactically identical to the code for creating JavaScript objects. Because of this similarity, instead of using a parser (like XML does), a JavaScript program can use standard JavaScript functions to convert JSON data into native JavaScript objects.

Much Like XML Because

  • Both JSON and XML is "self describing" (human readable)
  • Both JSON and XML is hierarchical (values within values)
  • Both JSON and XML can be parsed and used by lots of programming languages
  • Both JSON and XML can be fetched with an XMLHttpRequest

Much Unlike XML Because

  • JSON doesn't use end tag
  • JSON is shorter
  • JSON is quicker to read and write
  • JSON can use arrays

The biggest difference is:

XML has to be parsed with an XML parser, JSON can be parsed by a standard JavaScript function.

Visual Studio 2015 with ASP.NET 5 is a sweet surprise for developers. ASP.NET 5 has various JSON files to play with. These files handles global settings for solution, project specific settings, client side packages and node modules packages. In the post, we will take a close look at every JSON file and its code.

Solution Explorer in ASPNET 5 RC1


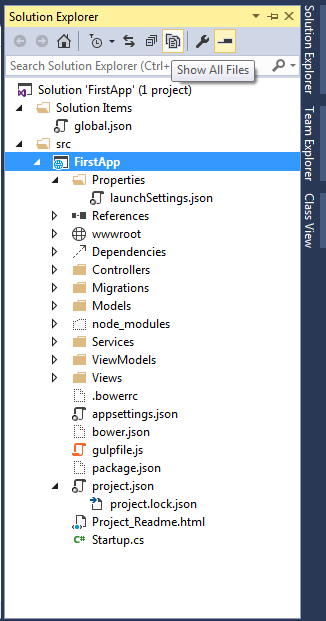
As seen from the above image, there are mainly 6 configuration json files.

  • Global.json
  • appsetting.json
  • Project.json
  • launchsetting.json
  • bower.json
  • package.json
  • hosting.json: Though this file is not present in solution explorer till RC 1 release but you can add it manually.


Global.json

As the name suggests, the settings defined in the file should work for the solution as whole. The settings defined in global.json implies to all the projects in the solution. If you open the file, by default you will see the following code.

{
  "projects": [ "src", "test" ],
  "sdk": {
    "version": "1.0.0-rc1-update1"
  }
}

The projects property defines the locations of your solution’s source code. VS 2015, specifies two location for projects in the solution src and test. While the src contains the actual application and test project contains any test (if you have selected option of creating test project while creating the solution for first time].

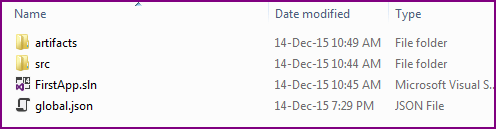
The team has also made a very interesting and useful change. If you recollect, when you build your application, then all your .dll are placed in bin directory in the same path, where your project is. And we have to handle bin folder very carefully while check-in the code in source control and at the time of deployment. But good news is that it is moved to another location. So you don’t have to worry now. The build artifact is now placed in “Artifact” folder (at the same location), which makes life easy while excluding things from source control.

Artifact folder

And the second property sdk specifies the version of the DNX (.Net Execution Environment) that Visual Studio will use when opening the solution. Specifying the version has an advantage as while working on multiple projects, you can target different versions of ASP.NET 5.

appsettings.json

appsettings.json file is used to define application related settings like connection string, logging settings, or any other custom key which we used to define in web.config file.

{
  "Data": {
    "DefaultConnection": {
      "ConnectionString": "Server=(localdb)\\mssqllocaldb;Database=aspnet5-FirstApp-0ed2f710-6535-4c4e-b080-c26601fbb414;Trusted_Connection=True;MultipleActiveResultSets=true"
    }
  },
  "Logging": {
    "IncludeScopes": false,
    "LogLevel": {
      "Default": "Verbose",
      "System": "Information",
      "Microsoft": "Information"
    }
  }
}


Project.json

This file is used to define project settings and server side dependencies. It largely replaces the web.config file from previous versions of ASP.NET. Read “What is Project.json in ASP.NET 5 (vNext)”. Few things have changed in ASP.NET 5 RC1 release for project.json file.
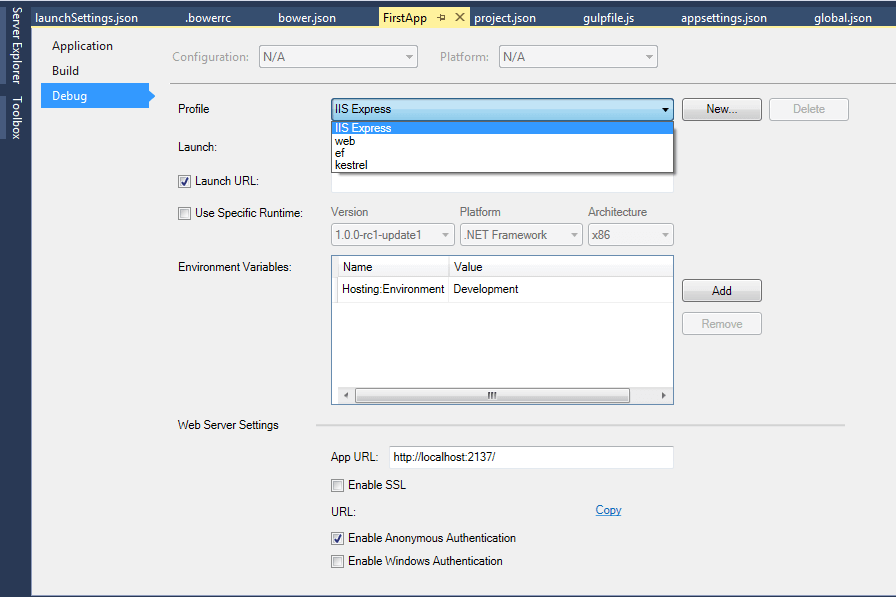
launchSetting.json

This json file holds project specific settings associated with each profile Visual Studio is configured to use to launch the application, including any environment variables that should be used. You can define framework for your project for compliation and debugging for specific profiles.

{
  "iisSettings": {
    "windowsAuthentication": false,
    "anonymousAuthentication": true,
    "iisExpress": {
      "applicationUrl": "http://localhost:2137/",
      "sslPort": 0
    }
  },
  "profiles": {
    "IIS Express": {
      "commandName": "IISExpress",
      "launchBrowser": true,
      "environmentVariables": {
        "Hosting:Environment": "Development"
      }
    },
    "web": {
      "commandName": "web",
      "environmentVariables": {
        "Hosting:Environment": "Development"
      },
      "sdkVersion": "dnx-clr-win-x86.1.0.0-rc1-update1"
    },
    "kestrel": {
      "commandName": "kestrel",
      "sdkVersion": "dnx-clr-win-x86.1.0.0-rc1-update1"
    }
  }
}


ASP.NET 5 ships with support for 3 different servers:

  • Microsoft.AspNet.Server.IIS
  • Microsoft.AspNet.Server.WebListener (WebListener)
  • Microsoft.AspNet.Server.Kestrel (Kestrel)

So by default, there will be 3 different profiles. However, it also depends on the commands section of project.json. You can change settings for each profile via right click on the Project and then select properties. Read detailed post about launchsetting.json in ASP.NET 5

change launchsetting.json settings

Bower.json

Bower is a package manager for the web. Bower can manage components that contain HTML, CSS, JavaScript, fonts or even image files. Bower doesn’t concatenate or minify code or do anything else – it just installs the right versions of the packages you need and their dependencies. With ASP.NET 5 web projects jQuery and bootstrap packages are already installed and bower, gulp and NPM are already in place.
Client-side packages are listed in the bower.json file. As mentioned earlier, bootstrap, jQuery and jQuery validation are pre-configured with ASP.NET 5 project templates.

{
  "name": "ASP.NET",
  "private": true,
  "dependencies": {
    "bootstrap": "3.3.5",
    "jquery": "2.1.4",
    "jquery-validation": "1.14.0",
    "jquery-validation-unobtrusive": "3.2.4"
  }
}


Visual Studio watches the bower.json file for changes. Upon saving, the bower install command is executed. There is another file named “ .bowerrc” which defines the location at which bower package needs to be installed. Open it, and notice that the directory property is set to “wwwroot/lib”.

Package.json

npm is another package manager like bower. But npm is used for installing Node js modules where bower is used for managing front end components like html, css, js, etc. As mentioned earlier, the ASP.NET 5 project template pre-configures NPM, Gulp and bower. Gulp is JavaScript task runner which is used to automate various tasks like minification and bundling of js and css, checking errors in js etc… Since Gulp is a node.js module so npm is used. So node.js modules are listed in package.json.\

{
  "name": "ASP.NET",
  "version": "0.0.0",
  "devDependencies": {
    "gulp": "3.8.11",
    "gulp-concat": "2.5.2",
    "gulp-cssmin": "0.1.7",
    "gulp-uglify": "1.2.0",
    "rimraf": "2.2.8"
  }
}

You can see the installed bower and npm modules by expanding src -> dependencies option.


HostForLIFE.eu ASP.NET 5 Hosting
European best, cheap and reliable ASP.NET hosting with instant activation. HostForLIFE.eu is #1 Recommended Windows and ASP.NET hosting in European Continent. With 99.99% Uptime Guaranteed of Relibility, Stability and Performace. HostForLIFE.eu security team is constantly monitoring the entire network for unusual behaviour. We deliver hosting solution including Shared hosting, Cloud hosting, Reseller hosting, Dedicated Servers, and IT as Service for companies of all size.


ASP.NET 5 Hosting - HostForLIFE.eu :: How to Make Ext.NET in ASP.NET?

clock April 11, 2016 23:29 by author Anthony

In this article, I want to share about Ext.Net. Before we begin to learn Ext.net, we need to know what it Ext.net, according to the official web ext.net of are.

Ext.Net is ported to .Net Programming Ext JS, Ext JS is actually also be used in .Net programming, but this Ext.Net easier for developers because it has been created controls can be drag directly to the webform.

Things need to be prepared are:

  • IDE for .Net Programming, here I am using Visual Studio 2010
  • Ext.Net, which can be downloaded on the official website download ext.net, in sharing this time I used ext.net 2.0.0.rc2 community edition version.
  • Extract the downloaded ext.net, in which there Ext.net.dll.
  • ASP.Net with C # code behind.

When you get all the things that needed to be prepared:

  • Create a project, select Visual C # => Web, and then select ASP.Net Web Application
  • Give the name of this project ext.net
  • In the ToolBox window, usually on the left side of the screen, or if no can press Ctrl + Alt + X, right-click the toolbox and select Add Tab, named Ext.Net
  • Right-click the Toolbox Ext.Net, select Choose Items.
  • On the .Net Framework Components, click Browse, find Ext.net.dll then click OK
  • Now the ToolBox Ext.Net already charged components Ext.net.
  • The next step is to create a webform, named WebForm1.aspx
  • Add a ResourceManager to WebForm1.aspx (ResourceManager can be found in the ToolBox Ext.net). ResourceManager is needed by each component Ext.net.
  • Add Ext: Button, set property looks like this:
    <ext:Button ID="Button1" runat="server" Text="Direct Event">
          <DirectEvents>
              <Click OnEvent="Button1_Click" />
          </DirectEvents>
    </ext:Button>

    Button1 DirectEvents method to perform the action.
  • Then, we move on Code Behind of Webform1.aspx, open webform1.aspx.cs or by pressing the F7 key or you can also select the menu View => Code.
  • On Windows Code Behind, on the declaration using (top) add using Ext.Net;
  • Then, add the following method Button1_Click
    protected void Button1_Click(Object sender, DirectEventArgs e)
    {
       X.Msg.Notify("DirectEvent", DateTime.Now.ToLongTimeString()).Show();
    }
  • Back again to WebForm1.aspx by pressing the Shift + F7 keys or select menu View => Designer.
    Add an Ext: Button again into Webform1.aspx, set its properties as follows.
    <ext:Button ID="Button2" runat="server" Text="Direct Method">
          <Listeners>
              <Click Handler="Ext.net.DirectMethods.DoSomething();" />
          </Listeners>
    </ext:Button>
  • Then, add Method Do Something in Code Behind (press F7 to switch to Code Behind window.
    [DirectMethod]
    public void DoSomething()
    {
       X.Msg.Notify("DirectMethod", "Akhirnya bisa Ext.Net").Show();
    }
  • When finished, open the Web.Config the solution Explorer, add the following script.
    <httpModules>
       <add name="DirectRequestModule" type="Ext.Net.DirectRequestModule, Ext.Net" />
    </httpModules>
  • Run the Project by Press F5 or select Debug menu => Start Debugging


HostForLIFE.eu ASP.NET 5 Hosting
European best, cheap and reliable ASP.NET hosting with instant activation. HostForLIFE.eu is #1 Recommended Windows and ASP.NET hosting in European Continent. With 99.99% Uptime Guaranteed of Relibility, Stability and Performace. HostForLIFE.eu security team is constantly monitoring the entire network for unusual behaviour. We deliver hosting solution including Shared hosting, Cloud hosting, Reseller hosting, Dedicated Servers, and IT as Service for companies of all size.


ASP.NET 5 Hosting - HostForLIFE.eu :: Root Of ASP.NET 5

clock April 8, 2016 19:00 by author Anthony

Today we will discuss about the root of ASP.NET 5, which is WWWroot. When you take a closer look at the ASP.NET 5 project, you will see that there are many things which are carry forwarded like Model, View, Controller, clean separation of concerns and may more.

But, there are also some significant changes around ASP.NET 5. Now, the root of the website is no longer the root of the project. By default, root will be WWWroot folder. The idea behind this to maintain the clean separation between the files at the web-server retrieved and sent to the client and the files which contains the logic and configuration. Static files like JS, CSS, HTMLs can live in WWWroot folder.

15th

Now, lets suppose when i run the app and tried to see the image which i have placed in My Imgaes folder, then it will give me 404 error. On the other hand, if i go ahead and add the same folder in WWWroot folder and try to navigate the same then it will produce me the result.

18th

so, the point is all static files are served by root folder and logical stuffs served by project space as we initially saw, when i added controller in the controller’s folder and it took effect. One more thing you might have observed that there is no web.config file now in the solution. Also now there is no Global.asax file; however the same is replaced by startup.cs file. But, we’ll see this later. 1st let’s see project.json file. This file now manages many aspects of website.

19th

First thing which you will notice here that root folder is set to WWWroot here. So, this is the place which is telling website that this is the root folder. So begin the show from here. This you can change as well or rename if you like to. Now, this configuration file is in JSON format. This is also telling the ASP.NET runtime what dependencies project is going to need. In this new ASP.NET 5 system there is a new way to manage dependencies. No need to reference assemblies and store the lists of referenced assemblies in the project file. Instead we refer to nuget packages as dependencies and these dependencies are listed in our project.json file. Now, there are couple of reasons for this change. One reason is to simplify the dependency management. Another good reason for this is that ASP.NET is moving away from VS dependency. So, in future i can use any text editor to build the ASP.NET App.

Now, these dependencies can be both the ways. One way which we used already shown below in the screen shot.

20th

21th

Now, the UI of this also changed. Initially we used to have Modal window. Now, this is more like complete screen giving wider visibility. I can also see the installed templates like

22nd

Also, i still have the flexibility of different nuget source. 2nd Option is via project.json file. Let’s suppose i am planning to install some custom package. Then i can do like shown below as well

24th

However, whatever package you install; you can find its references under “References“. Below, in the screen shot you can see that there are two versions of runtime here. 1st one is the core version and 2nd one is the cloud optimized version.

25th

Let’s collapse the same and drill into it. Now, here dependency management system will keep your assemblies in nice tree structure. So, it nicely tells which package are dependent on which package.

27th

Now, as far as Framework and runtime is concerned as you can see below in the screen shot; i have both frameworks listed here.

28th

So, whenever i am building the solution i am building against both of these frameworks. By building against both i am actually ensuring that it will work well against both the frameworks. This also means whenever i am switching platform my code won’t break there.

But, let’s go ahead and break something here. You remember in the last segment i created one new controller with a notepad. Now, let’s modify the same and refresh the app.

29th

As you can see that it says that GetCallingAssembly() which is part of System.Reflection is not supported in the cloud optimized version. But, let’s suppose i overlooked this error and refresh the app.So, it actually produced me desired result.

31th

But, when i explicitly build the project and checked the output window, then it gave me below error message.

32nd

So, building with error but application is working fine with full blown CLR. Now, if you have decided that you don’t want CORE CLR version. so, you can just comment the Core CLR section in the project.json file as shown below in the screen shot.

33th

As soon as i commented the above section, below references got refreshed automatically.

34th

Now, when i build the app then it will build fine. But, suppose you want the other way means you would like to keep the cloud optimized version also and build should also succeed. For this scenario i need to refer the conditional build as shown below.

36th


HostForLIFE.eu ASP.NET 5 Hosting
European best, cheap and reliable ASP.NET hosting with instant activation. HostForLIFE.eu is #1 Recommended Windows and ASP.NET hosting in European Continent. With 99.99% Uptime Guaranteed of Relibility, Stability and Performace. HostForLIFE.eu security team is constantly monitoring the entire network for unusual behaviour. We deliver hosting solution including Shared hosting, Cloud hosting, Reseller hosting, Dedicated Servers, and IT as Service for companies of all size.


ASP.NET 5 Hosting - HostForLIFE.eu :: How to Use Entity Framework 7 To Persist Movie Data To a Database?

clock April 4, 2016 19:50 by author Anthony

Today I will explain about how to use entity framework 7 to presist movie data to a database. But before you start, you must add Entity Framework 7 NuGet packages to your project. Also make sure that your project.json file includes the following two dependencies (you’ll get Intellisense while entering the names of the packages and their versions).

"EntityFramework.SqlServer": "7.0.0-beta2",
"EntityFramework.Commands": "7.0.0-beta2",


After you complete this step, the Entity Framework packages should appear under References.

Creating the Model and DbContext

Next, we need to create our Movie model class. This class represents the entity that we want to store in the database. Add the following Movie.cs class to your Models folder:

namespace MovieAngularJSApp.Models
{
    public class Movie
    {
        public int Id { get; set; }
 
        public string Title { get; set; }
 
        public string Director { get; set; }
    }
}

We also need to create an Entity Framework DbContext class. We create this class when using Entity Framework 7 in exactly the same way as we created this class for previous versions of the Entity Framework.

using Microsoft.Data.Entity;
namespace MovieAngularJSApp.Models
{
    public class MoviesAppContext:DbContext
    {
 
        public DbSet<Movie> Movies { get; set; }
 
    }
}

Registering the Entity Framework Services
Now that we have our DbContext class, we need to register the DbContext with our application services. Modify your Startup.cs file so it contains the code for registering the Entity Framework in the code below:

using Microsoft.AspNet.Builder;
using Microsoft.Framework.DependencyInjection;
using Microsoft.Data.Entity;
using MovieAngularJSApp.Models;
using Microsoft.AspNet.Hosting;
using Microsoft.Framework.ConfigurationModel;
namespace MovieAngularJSApp
{
    public class Startup
    {
        public Startup(IHostingEnvironment env)
        {
            // Setup configuration sources.
            Configuration = new Configuration()
                .AddJsonFile("config.json")
                .AddEnvironmentVariables();
        }
         public IConfiguration Configuration { get; set; }
         public void ConfigureServices(IServiceCollection services)
        {
            services.AddMvc();
 
            // Register Entity Framework
            services.AddEntityFramework(Configuration)
                .AddSqlServer()
                .AddDbContext<MoviesAppContext>();
        }
        public void Configure(IApplicationBuilder app)
        {
            app.UseMvc();
        }
 
    }
}

The database connection string is loaded up from the Config.json file (notice the constructor in the Startup.cs file). Here is what the Config.json file looks like:

{
    "Data": {
        "DefaultConnection": {
            "ConnectionString": "Server=(localdb)\\mssqllocaldb;Database=MoviesDatabase;Trusted_Connection=True;MultipleActiveResultSets=true"
        }
    },
    "EntityFramework": {
        "MoviesAppContext": {
            "ConnectionStringKey": "Data:DefaultConnection:ConnectionString"
        }
    }
}

Updating the MoviesController

Because we registered our MoviesAppContext class as a service, we can take advantage of the built-in ASP.NET 5 Dependency Injection framework to use the MoviesAppContext in our MoviesController. Notice that the MoviesAppContext class is added to the MoviesController using constructor dependency injection in the code below:

using System;
using System.Collections.Generic;
using System.Linq;
using Microsoft.AspNet.Mvc;
using MovieAngularJSApp.Models;
namespace MovieAngularJSApp.API.Controllers
{
    [Route("api/[controller]")]
    public class MoviesController : Controller
    {
        private readonly MoviesAppContext _dbContext;
 
        public MoviesController(MoviesAppContext dbContext)
        {
            _dbContext = dbContext;
        }
 
        [HttpGet]
        public IEnumerable<Movie> Get()
        {
            return _dbContext.Movies;
        }
        [HttpGet("{id:int}")]
        public IActionResult Get(int id)
        {
            var movie = _dbContext.Movies.FirstOrDefault(m => m.Id == id);
            if (movie == null) {
                return new HttpNotFoundResult();
            } else {
                return new ObjectResult(movie);
            }
        }
        [HttpPost]
        public IActionResult Post([FromBody]Movie movie)
        {
            if (movie.Id == 0)
            {
                _dbContext.Movies.Add(movie);
                _dbContext.SaveChanges();
                return new ObjectResult(movie);
            }
            else
            {
                var original = _dbContext.Movies.FirstOrDefault(m => m.Id == movie.Id);
                original.Title = movie.Title;
                original.Director = movie.Director;
                _dbContext.SaveChanges();
                return new ObjectResult(original);
            }
        }
        [HttpDelete("{id:int}")]
        public IActionResult Delete(int id)
        {
            var movie = _dbContext.Movies.FirstOrDefault(m => m.Id == id);
            _dbContext.Movies.Remove(movie);
            _dbContext.SaveChanges();
            return new HttpStatusCodeResult(200);
        }
 
 
    }
}

Performing Database Migrations

After we complete all of the steps above, our application still won’t work. If we run the Movies app then we will get an error message about not being able to open the MoviesDatabase.

The Entity Framework 7 does not support database initializers. Instead, you are encouraged to use Database Migrations.There are two ways to use Migrations with ASP.NET 5: from a Command Prompt or from the NuGet Package Manager Console. I used the Command Prompt approach and I executed the following two commands from the same directory that contains my project.json file:

k ef migration add initial
k ef migration apply

KPrompt

After you execute the two ef commands above, a new database named MoviesDatabase will be created. You can see the new database by opening up the Visual Studio SQL Server Object Explorer:

SQLExplorer

Executing the ef commands above will also add a new Migrations folder to your project.

Migrations

You now should be able to run the Movies app successfully.

HostForLIFE.eu ASP.NET 5 Hosting
European best, cheap and reliable ASP.NET hosting with instant activation. HostForLIFE.eu is #1 Recommended Windows and ASP.NET hosting in European Continent. With 99.99% Uptime Guaranteed of Relibility, Stability and Performace. HostForLIFE.eu security team is constantly monitoring the entire network for unusual behaviour. We deliver hosting solution including Shared hosting, Cloud hosting, Reseller hosting, Dedicated Servers, and IT as Service for companies of all size.


European ASP.NET 4.5 Hosting - France :: Using HTML 5 and ASP.NET to Upload Files

clock December 4, 2014 07:03 by author Scott

ASP.NET web applications that require uploading files from the client machine to the server use the file field to select files. The selected files are uploaded to the server using form submission techniques. In addition to the file field, HTML5 also allows you to select files using drag and drop. Using this feature you can drag files from Windows Explorer or Desktop and drop them on a predefined area of a web page. The files can then be uploaded to the server. This article illustrates how the HTML5 drag and drop feature can be used to upload files on the server.  

Traditionally you use the HTML file field to select files that are to be uploaded to the server. ASP.NET web forms wrap the file field into the FileUpload server control and ASP.NET MVC applications can use an <input> element with type attribute set to file. Another alternative offered by HTML5 is dragging one or more files from Windows Explorer or Desktop and drop them onto some predefined HTML element of a web page. You can then access the dropped files using the dataTransfer object available to drag and drop events.

To understand how files can be selected using the drag and drop features of HTML5, let's develop a new ASP.NET web forms application. The HTML markup of the default web form is shown below:

<form id="form1" runat="server">
<center>
 
<div id="box">Drag & Drop files from your machine on this box.</div>
 
<br />
 
<input id="upload" type="button" value="Upload Selected Files" />
</center>
</form>

As you can see, the <form> consists of a <div> element and a button. The <div> element is intended to drop the files dragged from the local machine. Merely dropping the files won't upload them to the server. Clicking on the button initiates the file upload operation.

To handle the file drop operation you need to wire certain event handlers to the box <div> element. The following jQuery code shows how that can be done:

var selectedFiles; 

$(document).ready(function () {
  var box;
  box = document.getElementById("box");
  box.addEventListener("dragenter", OnDragEnter, false);
  box.addEventListener("dragover", OnDragOver, false);
  box.addEventListener("drop", OnDrop, false);
...
}

The code declares a global variable named selectedFiles for storing a list of selected files. The ready() function wires three event handler functions to the respective events of the box <div> element, viz. dragenter, dragover and drop using addEventListener() method. The first parameter of the addEventListener() method is the event name and the second parameter is the event handler function. The event handler functions are shown below:

function OnDragEnter(e) {
  e
.stopPropagation();
  e
.preventDefault();
} 

function OnDragOver(e) {
  e
.stopPropagation();
  e
.preventDefault();
} 

function OnDrop(e) {
  e
.stopPropagation();
  e
.preventDefault();
  selectedFiles
= e.dataTransfer.files;
  $
("#box").text(selectedFiles.length + " file(s) selected for uploading!");
}

The OnDragEnter() and OnDragOver() event handler functions are simple and they merely prevent the event bubbling of the respective events. The OnDrop() function is important since it handles the drop event. The list of files dragged and dropped on the <div> element is obtained using the files property of the dataTransfer object. The files object is of type FileList and each item of the FileList collection is of type File. These two objects are available as a part of the HTML5 File API. The OnDrop() function stores the selected files in the global variable - selectedFiles and displays a message in the <div> using the text() method that indicates the number of files selected. The following figure shows how the default web form looks after dragging and dropping files on the <div> element.

Default web form after dragging and dropping files to the <div> element

How to Send Files to the Servere?

To send the selected files from the client to the server you can use different techniques but in this example you will use jQuery $.ajax() method for uploading the files. The following code shows how $.ajax() method can be used for this purpose.

$("#upload").click(function () {
  var data = new FormData();
  for (var i = 0; i < selectedFiles.length; i++) {
    data.append(selectedFiles[i].name, selectedFiles[i]);
  }
  $.ajax({
    type: "POST",
    url: "FileHandler.ashx",
    contentType: false,
    processData: false,
    data: data,
    success: function (result) {
      alert(result);
    },
    error: function () {
      alert("There was error uploading files!");
    }
  });
});

The code shown above first creates a FormData object. The FormData object encapsulates form's data that you wish to send to the server. All the selected files are added to the FormData object using its append() method. The first parameter of the append() method is the name of the file being added and the second parameter is the File object itself. Once the FormData object is ready you make a POST request to a Generic ASP.NET Handler (FileHandler.ashx) using jQuery $.ajax() method. You will create the generic handler in the next section.

The type of the request is POST. The url is FileHandler.ashx. Notice that the processData option is set to false. By default when you use the $.ajax() method the data is sent in URL encoded format. To prevent this behavior processData is set to false. The data option  is set to the FormData object created earlier. The success function simply displays the message returned by the generic handler. The error handler function displays an error message in case there is any error while calling FileHandler.ashx.

Receive the Uploaded Files

The ASP.NET generic handler - FileHandler.ashx - receives the files sent by the $.ajax() method. The generic handler also saves them to a folder on the server. The following code shows how the handler accomplishes this task:

public void ProcessRequest(HttpContext context)
{
   
if (context.Request.Files.Count > 0)
   
{
       
HttpFileCollection files = context.Request.Files;
       
foreach (string key in files)
       
{
           
HttpPostedFile file = files[key];
           
string fileName = file.FileName;
            fileName
= context.Server.MapPath("~/uploads/" + fileName);
            file
.SaveAs(fileName);
       
}
   
}
    context
.Response.ContentType = "text/plain";
    context
.Response.Write("File(s) uploaded successfully!");
}

The ProcessRequest() method of the FileHandler.ashx is called when the files are sent to the server using the $.ajax() method. The uploaded files can be accessed using the Files collection of the Request object. Each item inside the Files collection is of type HttpPostedFile. A foreach loop iterates through all the files from the Files collection and saves the individual file using the SaveAs() method of HttpPostedFile class. Once all files are saved a success message is sent to the client.

Note that by default ASP.NET sets request length to 4096 bytes. If you wish to upload large files you may adjust the request length using web.config file as shown below:

<httpRuntime
  
maxRequestLength="20000"
  
requestValidationMode="4.5"
  
targetFramework="4.5"
  
encoderType="..." />

As you can see the maxRequestLength attribute of the <httpRuntime> section is set to 20000 bytes. You need to adjust this value as per your requirement.

That's it! You can now run the web form, drag and drop files on the <div> element and click on the "Upload Selected Files" button to upload them on the server. 


UK ASP.NET 4.5.2 Hosting - HostForLIFE.eu :: How to Use NServiceBus with ASP.NET SignalR ?

clock November 24, 2014 06:35 by author Peter

In this tutorial, I will tell you how to use NServiceBus with ASP.NET SignalR. In detail right listed below what I'm planning to do is periodically publish an event utilizing NServiceBus. I will be able to use a ASP.NET MVC application as my front end and there I will be able to use a an additional NServiceBus client and that is liable for capturing event broadcasted from the NServiceBus publisher. Then working with ASP.NET SignalR, I will certainly be updating the UI with others captured events content.

First, Add a new ASP. NET MVC application to the solution.

Currently I'm running NServiceBus. Host and Microsoft ASP. NET SignalR nuget packages on ASP. NET MVC project using Package Manager Console. NServiceBus. Host can add the EndpointConfig. cs towards the project and I'm keeping as it's. Currently I'm making a folder named “SignalR” within my project and I'm heading to add a brand new category there named “EventMessageHandler”.
public class EventMessageHandler : IHandleMessages<MyMessage>
{
    public void Handle(MyMessage message)
    { 
    }
}

When the NServiceBus has revealed an event of kind “MyMessage”, “Handle” method in “EventMessageHandler” class can tackle it. For the moment, lets maintain the “Handle” method empty and let’s add a OWIN Startup class towards the project by right clicking upon the App_Start folder and selecting a OWIN Startup class template.

Next step, I am modifying the created OWIN Startup class with these code:
using Owin;
using Microsoft.Owin;
using NServiceBus; 
[assembly: OwinStartup(typeof(NServiceBusSignalRSample.Startup))]
namespace NServiceBusSignalRSample
{
    public class Startup
    {
        public static IBus Bus { get; private set; } 
        public static void Configuration(IAppBuilder app)
        {
            Bus = Configure
                    .With()
                    .DefaultBuilder()
                    .DefiningEventsAs(t => t.Namespace != null && t.Namespace.StartsWith("NServiceBusSignalRSample.Messages"))
                    .PurgeOnStartup(false)
                    .UnicastBus()
                    .LoadMessageHandlers()
                    .CreateBus()
                    .Start(); 
            app.MapSignalR();
        }
    }
}


Right listed below I've configured my NServiceBus host and I'm mapping SignalR hubs towards the app builder pipeline. Next action is to make a SignalR hub. For the I'm adding the listed class towards the previously produced “SignalR” folder.

public class MyHub : Hub{
    public void Send(string name, string message)
    {
        Clients.All.addNewMessageToPage(name, message);
    }
}

Currently right listed below I'm deriving “MyHub” class from “Hub” and I ve got a method there named “Send” that takes 2 parameters. Within the method, I'm calling the consumer aspect “addNewMessageToPage” that still I haven’t wrote.

Just before starting off using the client aspect code, let’s modify the “Handle” method in “EventMessageHandler” class now to call my hubs’ send method.
public class EventMessageHandler : IHandleMessages<MyMessage>
{
    public void Handle(MyMessage message)
    {
        IHubContext hubContext = GlobalHost.ConnectionManager.GetHubContext<MyHub>();
        hubContext.Clients.All.addNewMessageToPage(message.Message, "Peter");
    }
}

Next,  I'm ready along with the back end code. Final thing to become done is to make a view in client side, initiate the hub connection and build a method named “addNewMessageToPage”. For the first I'm modifying the “HomeController” and adding a brand new Action there named “SignalR”.
public ActionResult SignalR()
{
    return View();
}

Then I'm correct clicking upon the Motion and making a new view along with a similar name “SignalR”. I'm modifying the “SignalR” view as follows.
@{
    ViewBag.Title = "SignalR";
}
<h2>SignalR</h2> 
<div class="container">
    <ul id="output"></ul>
</div> 
@section scripts {
    <script src="~/Scripts/jquery.signalR-2.1.1.min.js"></script>
    <script src="~/signalr/hubs"></script>
     <script>       
       $(function () {
            $.connection.hub.logging = true;
            $.connection.hub.start();
            var chat = $.connection.myHub; 
            chat.client.addNewMessageToPage = function (message, name) {
$('#output').append('<li>' + message + ' ' + name + '</li>');          
 };
        });
    </script>
}

Now I'm ready. One last factor to become done is to line multiple startup projects.

Finally, I'm running the Apps. Hope this post works for you!


ASP.NET 4.5.2 Hosting Germany - HostForLIFE.eu :: Learn How to Add or Update Record with GridView control in ASP.NET

clock November 21, 2014 05:08 by author Peter

A Gridview is really a control for displaying and manipulating data from completely different data sources. It shows data from a sort of data sources inside a tabular format. Rather than boundfiled, I like to make use of TemplateField coz of the simplicity. In this article I am going to implement how to Add, Update, Delete selected record from GirdView control in ASP.NET 4.5.2

This the code for Add new record from footer and Update the selected row.

Default.aspx:
<asp:gridview allowpaging="True" autogeneratecolumns="False" cellpadding="4" forecolor="#333333" gridlines="None" id="gvstatus" onpageindexchanging="gvstatus_PageIndexChanging" onrowcancelingedit="gvstatus_RowCancelingEdit" onrowcommand="gvstatus_RowCommand" onrowediting="gvstatus_RowEditing" onrowupdating="gvstatus_RowUpdating" onselectedindexchanged="gvstatus_SelectedIndexChanged" runat="server" showfooter="True" width="600px">
            <columns>
 <asp:templatefield headerstyle-horizontalalign="Left" headertext="SrNo ">
            <itemtemplate>
                    &lt;%# Container.DataItemIndex + 1 %&gt;
                </itemtemplate>
 </asp:templatefield>

 <asp:templatefield headertext="ID" visible="false">
      <itemtemplate>
      <asp:label columnname_id="" id="lblid" runat="server" text="&lt;%# Bind(">"&gt; </asp:label>
     </itemtemplate>
</asp:templatefield>
<asp:templatefield headertext="EmpName">
      <itemtemplate>
        <asp:label columnname_empname="" id="lblEmpName" runat="server" text="&lt;%# Bind(">"&gt;</asp:label>
       </itemtemplate>
       <edititemtemplate>
           <asp:textbox id="txtEmpName" runat="server" text="&lt;%# Bind(&quot;columnname_EmpName&quot;) %&gt;"></asp:textbox>
        </edititemtemplate>
        <footertemplate>
              <asp:textbox id="txtfEmpName" runat="server"></asp:textbox>
        </footertemplate>
</asp:templatefield>
 <asp:templatefield headertext="empSalary">
        <itemtemplate>
           <asp:label id="lblempSalary" runat="server" text="&lt;%# Bind(&quot;columnname_EmpSalary&quot;) %&gt;"></asp:label>
        </itemtemplate>
        <edititemtemplate>
             <asp:textbox id="txtempSalary" runat="server" text="&lt;%# Bind(&quot;columnname_EmpSalary&quot;) %&gt;"></asp:textbox>
         </edititemtemplate>
         <footertemplate>
            <asp:textbox id="txtfempSalary" runat="server"></asp:textbox>
         </footertemplate>
</asp:templatefield>
 <asp:templatefield itemstyle-width="190px" showheader="False">
         <itemtemplate>
             <asp:button causesvalidation="False" commandname="Edit" id="btnedit" runat="server" text="Edit"></asp:button>
          </itemtemplate>
          <edititemtemplate>
               <asp:button causesvalidation="True" commandname="Update" id="btnupdate" runat="server" text="Update"></asp:button>
                        &nbsp;<asp:button causesvalidation="False" commandname="Cancel" id="btncancel" runat="server" text="Cancel"></asp:button>
         </edititemtemplate>
        <footertemplate>
            <asp:button commandname="Add" id="btnadd" runat="server" text="Add">
        </asp:button></footertemplate>
 </asp:templatefield>
            </columns>
            <pagerstyle backcolor="#A86E07" forecolor="White" horizontalalign="Center">
            <selectedrowstyle backcolor="#E2DED6" font-bold="True" forecolor="#333333">
          <headerstyle backcolor="#A86E07" font-bold="True" forecolor="White">
        <editrowstyle backcolor="#d9d9d9">
    <alternatingrowstyle backcolor="White" forecolor="#A86E07">
 </alternatingrowstyle></editrowstyle></headerstyle></selectedrowstyle>
</pagerstyle>
</asp:gridview>

CodeBehind:
protected void Page_Load(object sender, EventArgs e)
    {
       if (!Page.IsPostBack)
       {
         gvBind(); //Bind gridview
       }
     }
public void gvBind()
{   
SqlDataAdapter dap = new SqlDataAdapter("select id, empName,empSalary from myTable", conn);    DataSet ds = new DataSet();
     dap.Fill(ds);
     gvstatus.DataSource = ds.Tables[0];
     gvstatus.DataBind();
}
Update the select row from girdview
protected void gvstatus_RowUpdating(object sender, GridViewUpdateEventArgs e)
    {
        lblmsg.Text = "";
        try
        {
            GridViewRow row = (GridViewRow)gvstatus.Rows[e.RowIndex];
            Label lblid = (Label)gvstatus.Rows[e.RowIndex].FindControl("lblid");
            TextBox txtname = (TextBox)gvstatus.Rows[e.RowIndex].FindControl("txtEmpName");
            TextBox txtSalary = (TextBox)gvstatus.Rows[e.RowIndex].FindControl("txtempSalary");
            string empName = txtname.Text;
            string empSalary = txtSalary.Text;
            string lblID=lblid.Text;
            int result = UpdateQuery(empName, empSalary,lblID);
            if (result > 0)
            {
                lblmsg.Text = "Record is updated successfully.";
            }
            gvstatus.EditIndex = -1;
            gvBind();
        }
        catch (Exception ae)
        {
            Response.Write(ae.Message);
        }
    }

And this is the Code that I used to add new record into database form GirdView footer
  protected void gvstatus_RowCommand(object sender, GridViewCommandEventArgs e)   
{       
        if (e.CommandName == "Add")
        {
            string empName = ((TextBox)gvstatus.FooterRow.FindControl("txtfempName")).Text;
            string empSalry = ((TextBox)gvstatus.FooterRow.FindControl("txtfempSalary")).Text;
            int result = InsertNewRecord(empName, empSalry);
            if (result > 0)
            {
                lblmsg.Text = "Record is added successfully.";
            }
            gvstatus.EditIndex = -1;
            gvBind();
        }
    }
protected void gvstatus_RowCancelingEdit(object sender, GridViewCancelEditEventArgs e)
{
 gvstatus.EditIndex = -1;
 gvBind();
}
 protected void gvstatus_RowEditing(object sender, GridViewEditEventArgs e)
{
 lblmsg.Text = "";
 gvstatus.EditIndex = e.NewEditIndex;
 gvBind();
}
public void UpdateQuery(string empName, string empSalary, string lblID)
{
 SqlCommand cmd = new SqlCommand("update myTable set empName='" + empName + "',empSalary='" + empSalary + "' where  id='" + lblID + "'", conn);
 conn.Open();
 int temp = cmd.ExecuteNonQuery();
 conn.Close();
 return temp;
}
public void InsertNewRecord(string empName, string empSalary)
{
 SqlCommand cmd = new SqlCommand("your insert query ", conn);
 conn.Open();
 int temp = cmd.ExecuteNonQuery();
 conn.Close();
 return temp;
}


ASP.NET 4.5.2 Hosting UK - HostForLIFE.eu :: How to Create PDF from DataTable in ASP.NET 4.5.2 ?

clock November 17, 2014 05:58 by author Peter

With this article, i'm explaining you learn how to create PDF File from datatable with ASP.NET 4.5.2. I'm passing a DataTable during this function and code to convert this in pdf file. I'm working with iTextSharp you'll be able to download it from internet. It totally free. you will need to make an easy ASP.NET page and have data from database. Then pass it to ExportToPDF method. We are able to established PDF page margins, alter page orientation (portrait, landscape), custaomize headers and footers add page numbers and a lot of. Carry out a few R & D along with iTextSharp.

And here is the code that I use to create PDF file from DataTable:
public void ExportToPdf(DataTable myDataTable) 
   {     
     Document pdfDoc = new Document(PageSize.A4, 10, 10, 10, 10); 
     try 
     { 
       PdfWriter.GetInstance(pdfDoc, System.Web.HttpContext.Current.Response.OutputStream); 
       pdfDoc.Open(); 
       Chunk c = new Chunk("" + System.Web.HttpContext.Current.Session["CompanyName"] + "", FontFactory.GetFont("Verdana", 11)); 
       Paragraph p = new Paragraph(); 
       p.Alignment = Element.ALIGN_CENTER; 
       p.Add(c); 
       pdfDoc.Add(p); 
       string clientLogo = System.Web.HttpContext.Current.Session["CompanyName"].ToString(); 
       clientLogo = clientLogo.Replace(" ", ""); 
       string clogo = clientLogo + ".jpg"; 
       string imageFilePath = System.Web.HttpContext.Current.Server.MapPath("../ClientLogo/" + clogo + ""); 
       iTextSharp.text.Image jpg = iTextSharp.text.Image.GetInstance(imageFilePath); 
       //Resize image depend upon your need  
       jpg.ScaleToFit(80f, 60f); 
       //Give space before image  
       jpg.SpacingBefore = 0f; 
       //Give some space after the image  
       jpg.SpacingAfter = 1f; 
       jpg.Alignment = Element.HEADER; 
       pdfDoc.Add(jpg); 
       Font font8 = FontFactory.GetFont("ARIAL", 7); 
       DataTable dt = myDataTable; 
       if (dt != null) 
       { 
         //Craete instance of the pdf table and set the number of column in that table 
         PdfPTable PdfTable = new PdfPTable(dt.Columns.Count); 
         PdfPCell PdfPCell = null; 
         for (int rows = 0; rows < dt.Rows.Count; rows++) 
         { 
           for (int column = 0; column < dt.Columns.Count; column++)  
           { 
             PdfPCell = new PdfPCell(new Phrase(new Chunk(dt.Rows[rows][column].ToString(), font8))); 
             PdfTable.AddCell(PdfPCell); 
           } 
         } 
         //PdfTable.SpacingBefore = 15f; // Give some space after the text or it may overlap the table           
         pdfDoc.Add(PdfTable); // add pdf table to the document  
       } 
       pdfDoc.Close(); 
       Response.ContentType = "application/pdf"; 
       Response.AddHeader("content-disposition", "attachment; filename= SampleExport.pdf"); 
       System.Web.HttpContext.Current.Response.Write(pdfDoc); 
       Response.Flush(); 
       Response.End(); 
       //HttpContext.Current.ApplicationInstance.CompleteRequest(); 
     } 
     catch (DocumentException de) 
     { 
       System.Web.HttpContext.Current.Response.Write(de.Message); 
     } 
     catch (IOException ioEx) 
     { 
       System.Web.HttpContext.Current.Response.Write(ioEx.Message); 
     } 
     catch (Exception ex) 
     { 
       System.Web.HttpContext.Current.Response.Write(ex.Message); 
     } 
   } 


ASP.NET 4.5.2 Hosting with Paris (France) Server - HostForLIFE.eu :: How to Resize Image With Maintain The Ratio in ASP.NET 4.5.2 ?

clock November 14, 2014 04:54 by author Peter

Now, I am going to tell you how to Re-size Image along with maintain the ration employing ASP.NET 4.5.2 and C# code. Sometimes we must store totally different size images to get a certain images as applied to e-commerce web page. for that we both re-size the image and save multiple images collectively small, medium along with a full size image. Other then When we've got issue relating to space having very fine performance server then we are able to use dynamically re-sizing of image merely save only huge image then when want to utilize re-size it in run time when you need.

For achieving this process I generate a code that response the re-size image. I utilize it for jpg and png images not for gif. Call the page in which code for image merging :
Image1.ImageUrl = "dynamicimage.aspx";

And this is the Code for image generation and merging (dynamicimage.aspx or dynamicimage.aspx.cs) using System.Drawing;
using System.Drawing.Drawing2D;
using System.Drawing.Imaging;
using System.IO;
protected void Page_Load(object sender, EventArgs e)
{
  string testimage = Server.MapPath(@"images/hemant_image.jpg");
  getimage(testimage, 400, 400); 
  // can set imageurl, max-width and max-height using query string...
}
public void getimage(string ThumbnailPath, int maxwidth, int maxheight)
{
    System.Drawing.Image image = System.Drawing.Image.FromFile(ThumbnailPath);
    Size ThumbNailSize = setimagesize(maxwidth, maxheight, image.Width, image.Height);
    System.Drawing.Image ImgThnail = new Bitmap(ThumbNailSize.Width, ThumbNailSize.Height);
    System.Drawing.Graphics graphics = System.Drawing.Graphics.FromImage(ImgThnail);  
    graphics.InterpolationMode = InterpolationMode.HighQualityBicubic;
    graphics.SmoothingMode = SmoothingMode.HighQuality;
    graphics.PixelOffsetMode = PixelOffsetMode.HighQuality;
    graphics.CompositingQuality = CompositingQuality.HighQuality;
    graphics.DrawImage(image, 0, 0, ThumbNailSize.Width, ThumbNailSize.Height);
    ImageCodecInfo[] info = ImageCodecInfo.GetImageEncoders();
    EncoderParameters encoderParameters;
    encoderParameters = new EncoderParameters(1);
    encoderParameters.Param[0] = new EncoderParameter(System.Drawing.Imaging.Encoder.Quality, 100L);
    string sExt = System.IO.Path.GetExtension(ThumbnailPath);
    if (sExt.ToString() == ".png")  
  {
        Response.ContentType = "image/png";
        ImgThnail.Save(Response.OutputStream, image.RawFormat);
    }
    else
    {
        Response.ContentType = "image/jpeg";
        ImgThnail.Save(Response.OutputStream, info[1], encoderParameters);
    }
    image.Dispose();
}
// below code is my old one for calculating height and width with maintain image ratio.
public Size setimagesize(int maxwidth, int maxheight, int OriginalWidth, int OriginalHeight)
{
    Size NewSize = new Size();
    int sNewWidth = OriginalWidth;
    int sNewHeight = OriginalHeight;
    int tempheight = 0;
    int tempwidht = 0;
    if (OriginalWidth >= OriginalHeight)
    {
        if (OriginalWidth >= maxwidth)
        {
            sNewWidth = maxwidth;
            sNewHeight = OriginalHeight * maxwidth / OriginalWidth;
        }
        if (sNewHeight > maxheight)
        {
            tempheight = sNewHeight;
            sNewHeight = maxheight;
            sNewWidth = sNewWidth * maxheight / tempheight;
        }
    }
    else
    {
        if (OriginalHeight >= maxheight)
        {
            sNewHeight = maxheight;
            sNewWidth = OriginalWidth * maxheight / OriginalHeight;
        }
        if (sNewWidth > maxwidth)
        {
            tempwidht = sNewWidth;
            sNewWidth = maxwidth;
            sNewHeight = sNewHeight * maxwidth / tempwidht;
        }
    }
    NewSize = new Size(sNewWidth, sNewHeight);
    return NewSize;
}


About HostForLIFE.eu

HostForLIFE.eu is European Windows Hosting Provider which focuses on Windows Platform only. We deliver on-demand hosting solutions including Shared hosting, Reseller Hosting, Cloud Hosting, Dedicated Servers, and IT as a Service for companies of all sizes.

We have offered the latest Windows 2016 Hosting, ASP.NET Core 2.2.1 Hosting, ASP.NET MVC 6 Hosting and SQL 2017 Hosting.


Tag cloud

Sign in