European ASP.NET 4.5 Hosting BLOG

BLOG about ASP.NET 4, ASP.NET 4.5 Hosting and Its Technology - Dedicated to European Windows Hosting Customer

ASP.NET 4.6 Hosting - HostForLIFE.eu :: How to Use C# to Create AJAX Confirm Button Extension

clock August 31, 2015 09:03 by author Rebecca

In this tutorial, we will learn how to create and use an AJAX Confirm Button Extender using C#. This button can be used to warn people of what a button does once they press it. This control is used in lots of websites and it is easy to setup and use.

Step 1

Let's we create the form:

1. Start by Creating a new Web Form and naming it “Default.aspx”
2. Create a Button and a Label on the form named “Button1″ and “Label1″
3. Add an AJAX Script Manager to the Form so that you can use AJAX Controls:

<html xmlns="http://www.w3.org/1999/xhtml">
<head runat="server">
    <title></title>
</head>
<body>
    <form id="form1" runat="server">
    <div>
   
        <br />
        <asp:ScriptManager ID="ScriptManager1" runat="server">
        </asp:ScriptManager>
        <br />
        <asp:UpdatePanel ID="UpdatePanel1" runat="server">
            <ContentTemplate>
                <asp:Label ID="Label1" runat="server" Text="Label"></asp:Label>
                <br />
                <br />
                <asp:Button ID="Button1" runat="server" onclick="Button1_Click" Text="Button" />
                <asp:ConfirmButtonExtender ID="Button1_ConfirmButtonExtender" runat="server"
                    ConfirmText="Click OK to make the Label say OK or click Cancel to Cancel the Operation"
                    Enabled="True" TargetControlID="Button1">
                </asp:ConfirmButtonExtender>
            </ContentTemplate>
        </asp:UpdatePanel>
   
    </div>
    </form>
</body>
</html>


4. Add the Confirm Button Extender to the button by clicking the Smart tag and selecting Add Extender
5. Now the Web Form is complete, but it is not ready to be run yet. You must create the code behind.

Step 2

1. Double click on the Button Control in the Design View to open up the Code window.
2. Enter the Code Below, this code would normally make the Label say OK every time you click the button, however the code in the front end only lets it run once you confirm.
3. Once this code is in you can go ahead and run the project and see how it works:

protected void Button1_Click(object sender, EventArgs e)
        {
           
            Label1.Text = "you clicked OK";
        }

Happy coding!

HostForLIFE.eu ASP.NET 4.6 Hosting
HostForLIFE.eu is European Windows Hosting Provider which focuses on Windows Platform only. We deliver on-demand hosting solutions including Shared hosting, Reseller Hosting, Cloud Hosting, Dedicated Servers, and IT as a Service for companies of all sizes. We have customers from around the globe, spread across every continent. We serve the hosting needs of the business and professional, government and nonprofit, entertainment and personal use market segments.


European ASPEmail Hosting - HostForLIFE.eu :: How to Use ASPEMail to Send Email

clock August 27, 2015 11:45 by author Scott

This is only short tutorial about how to send email using ASPEmail. If you require ASPEmail Hosting with low cost, please visit our site at http://www.hostforlife.eu. You can always start from €3.00/month to get this feature.

AspEmail is an active server component for sending email messages using an external SMTP server in an ASP or VB environment. AspEmail supports multiple recipients, multiple CC, multiple Bcc, multiple file attachments, HTML format, embedded images, and non-US ASCII character sets. 

A free copy of AspEmail can be downloaded from www.aspemail.com/download.html. 

Changing from AspMail to AspEmail 

Please make sure that you have valid email address to implement this code below:

<%
Set Mail = Server.CreateObject("Persits.MailSender")
Mail.Host = "mail.yourdomain.com" 
Mail.From = "[email protected]
Mail.FromName = "Support Team" 

Mail.AddAddress "[email protected]", "ScottT”
Mail.AddAttachment "e:\html\domains\yourdomaincom\html\filename.htm"

Mail.Subject = "Support Issue"
Mail.Body = "Dear Scott:" & chr(13) & chr(10) & _
"Have a nice day and thank you."

On Error Resume Next
Mail.Send
If Err <> 0 Then
Response.Write "An error occurred: " & Err.Description
End If
%> 


NOTE: For the Mail.Host line, put the IP address of your web server, NOT the mail server IP. 

To add the message recipients, CCs, BCCs, and Reply-To's, use the AddAddress, AddCC, AddBcc and AddReplyTo methods, respectively. These methods accept two parameters: the email address and, optionally, name. Notice that you must not use an '= 'sign to pass values to the methods. For example: 

Mail.AddAddress "[email protected], "Support Team"
Mail.AddCC "[email protected]" ' Name is optional


Use the Subject and Body properties to specify the message subject and body text, respectively. A body can be in a text or HTML format. In the latter case, you must also set the IsHTML property to True.

For example: Mail.Subject = "Support Issue"
Mail.Body = "Dear Scott:" & chr(13) & chr(10) & "Have a nice day and thank you."


or

Mail.Subject = "Support Issue"
Mail.Body="<HTML><BODY BGCOLOR=#0000FF>DearScott:....</BODY></HTML>"
Mail.IsHTML = True


To send a file attachment with the message, use the AddAttachment method. It accepts the full path to the file being attached. Call this method as many times as you have attachments.

Notice that you must not use the '= 'sign to pass a value to the method: 

** Note from Tech Support: the path below is correct for you. Make sure that you put your attachment in this directory first. Don't forget that "yourdomaincom" may be "yourdomainnet", etc., as applicable. ** 

Mail.AddAttachment "e:\html\domains\yourdomaincom\html\filename.htm"

In order to reference information from fields on a form you will need to use the following format:

"First Name: " & Request.form("FirstName") & chr(13) & chr(10) & _
"Last Name: " & Request.form("LastName") & chr(13) & chr(10) & _
"Email: " & Request.form("Email") & chr(13) & chr(10) & _


To send a message, call the Send method. The method throws exceptions in case of an error. You may choose to handle them by using the On Error Resume Next statement, as follows: 

On Error Resume Next
Mail.Send
If Err <> 0 Then
Response.Write "An error occurred: " & Err.Description
End If

HostForLIFE.eu ASPEmail Hosting
HostForLIFE.eu is European Windows Hosting Provider which focuses on Windows Platform only. We deliver on-demand hosting solutions including Shared hosting, Reseller Hosting, Cloud Hosting, Dedicated Servers, and IT as a Service for companies of all sizes. We have customers from around the globe, spread across every continent. We serve the hosting needs of the business and professional, government and nonprofit, entertainment and personal use market segments.


ASP.NET 4.6 Hosting - HostForLIFE.eu :: How to Use jQuery to Show Row's Number in ASP.NET GridView

clock August 21, 2015 06:17 by author Rebecca

In this article, I will explain how to get the total count of the number of rows in ASP.NET GridView and also how to get the count of the number of all rows except the First (Header) row in ASP.Net GridView using jQuery.

HTML Markup

 The following HTML Markup consists of an ASP.NET GridView with three BoundField columns and a Button to get count (number) of rows in ASP.NET GridView using jQuery:

<asp:GridView ID="GridView1" runat="server" AutoGenerateColumns="false">
    <Columns>
        <asp:BoundField DataField="Id" HeaderText="Customer Id" ItemStyle-Width="90" />
        <asp:BoundField DataField="Name" HeaderText="Name" ItemStyle-Width="120" />
        <asp:BoundField DataField="Country" HeaderText="Country" ItemStyle-Width="100" />
    </Columns>
</asp:GridView>
<br />
<br />

<asp:Button ID="btnGetCount" Text="Count Rows" runat="server" />

NameSpaces

You will need to import the following namespace.

C#
using System.Data;
 
VB.Net
Imports System.Data

Binding the ASP.NET GridView Control

The GridView is populated with a dynamic DataTable with some dummy data inside the Page Load event.

C#

protected void Page_Load(object sender, EventArgs e)
{
    if (!this.IsPostBack)
    {
        DataTable dt = new DataTable();
        dt.Columns.AddRange(new DataColumn[3] { new DataColumn("Id"), new DataColumn("Name"), new DataColumn("Country") });
        dt.Rows.Add(1, "1", "United States");
        dt.Rows.Add(2, "2", "India");
        dt.Rows.Add(3, "3", "France");
        dt.Rows.Add(4, "4r", "Russia");
        GridView1.DataSource = dt;
        GridView1.DataBind();
    }

VB.Net

Protected Sub Page_Load(sender As Object, e As EventArgs) Handles Me.Load
    If Not Me.IsPostBack Then
        Dim dt As New DataTable()
        dt.Columns.AddRange(New DataColumn(2) {New DataColumn("Id"), New DataColumn("Name"), New DataColumn("Country")})
        dt.Rows.Add(1, "1", "United States")
        dt.Rows.Add(2, "2", "India")
        dt.Rows.Add(3, "3", "France")
        dt.Rows.Add(4, "4", "Russia")
        GridView1.DataSource = dt
        GridView1.DataBind()
    End If
End Sub

How to Get Row's Number in ASP.NET Gridview using jQuery

Inside the document ready event handler, the Button has been assigned a jQuery click event handler. When the Button is clicked, the total count of the number of rows and the count of the number of all rows except the First (Header) row in ASP.NET GridView is determined using jQuery.

The total count of the number of rows in ASP.NET GridView is determined by selecting all the HTML TR elements using jQuery. he count of the number of all rows except the First (Header) row in ASP.NET GridView is determined by selecting only those HTML TR elements which contain HTML TD (Cell) element and skipping all the HTML TR elements which contain HTML TH (Header Cell) element.

<script type="text/javascript" src="http://ajax.googleapis.com/ajax/libs/jquery/1.8.3/jquery.min.js"></script>
<script type="text/javascript">
    $(function () {
        $("[id*=btnGetCount]").click(function () {
            var totalRowCount = $("[id*=GridView1] tr").length;
            var rowCount = $("[id*=GridView1] td").closest("tr").length;
            var message = "Total Row Count: " + totalRowCount;
            message += "\nRow Count: " + rowCount;
            alert(message);
            return false;
        });
    });
</script>

HostForLIFE.eu ASP.NET 4.6 Hosting
HostForLIFE.eu is European Windows Hosting Provider which focuses on Windows Platform only. We deliver on-demand hosting solutions including Shared hosting, Reseller Hosting, Cloud Hosting, Dedicated Servers, and IT as a Service for companies of all sizes. We have customers from around the globe, spread across every continent. We serve the hosting needs of the business and professional, government and nonprofit, entertainment and personal use market segments.


HostForLIFE.eu Launches Umbraco 7.2.8 Hosting

clock August 19, 2015 06:53 by author Peter

HostForLIFE.eu, a leading web hosting provider, has leveraged its gold partner status with Microsoft to launch its latest Umbraco 7.2.8 Hosting support

HostForLIFE.eu, a leading Windows web hosting provider with innovative technology solutions and a dedicated professional services team, today announced the support for Umbraco 7.2.8 hosting plan due to high demand of Umbraco users in Europe. The company has managed to build a strong client base in a very short period of time. It is known for offering ultra-fast, fully-managed and secured services in the competitive market.

HostForLIFE.eu hosts its servers in top class data centers that is located in Amsterdam (NL), London (UK), Paris (FR), Frankfurt (DE) and Seattle (US) to guarantee 99.9% network uptime. All data center feature redundancies in network connectivity, power, HVAC, security and fire suppression. All hosting plans from HostForLIFE.eu include 24×7 support and 30 days money back guarantee. HostForLIFE Umbraco hosting plan starts from just as low as €3.00/month only and this plan has supported ASP.NET 4.5, ASP.NET MVC 5/6 and SQL Server 2012/2014.

Umbraco 7.2.8 is a fully-featured open source content management system with the flexibility to run anything from small campaign or brochure sites right through to complex applications for Fortune 500's and some of the largest media sites in the world. Umbraco was sometimes unable to read the umbraco.config file, making Umbraco think it had no content and showing a blank page instead (issue U4-6802), this is the main issue fixed in this release. This affects people on 7.2.5 and 7.2.6 only. 7.2.8 also fixes a conflict with Courier and some other packages.

Umbraco 7.2.8 Hosting is strongly supported by both an active and welcoming community of users around the world, and backed up by a rock-solid commercial organization providing professional support and tools. Umbraco 7.2.8 can be used in its free, open-source format with the additional option of professional tools and support if required. Not only can you publish great multilingual websites using Umbraco 7.2.8 out of the box, you can also build in your chosen language with our multilingual back office tools.

Further information and the full range of features Umbraco 7.2.8 Hosting can be viewed here: http://hostforlife.eu/European-Umbraco-728-Hosting


ASP.NET 4.6 Hosting - HostForLIFE.eu :: Best Regular Expressions to Validate Email Address

clock August 14, 2015 07:12 by author Rebecca

Email address are the means of communication with people around the world. While processing forms email address validation plays an important. Proper email validation strengthen our contact list, ban spamming and protect us from robot form filling (Form AutoFill).

Here we are going to design a regular expression pattern to validate email address which will check to make sure an e-mail address is a valid address, and in proper format means containing an username, at sign (@), and valid hostname. For example, [email protected] is valid, but SPAM@badhost is invalid. Most of email service provides limit the use of literals for email address creation. Only letters (a-z,A-Z), numbers (0-9), hyphens (-), underscore (_) and periods (.) are allowed and no special characters are accepted. You can add or remove any literals to your regular expression.

Regular Expression Pattern

^([a-zA-Z0-9_\-\.]+)@[a-z0-9-]+(\.[a-z0-9-]+)*(\.[a-z]{2,3})$
email with IP -
^([a-zA-Z0-9_\-\.]+)@(([a-z0-9-]+(\.[a-z0-9-]+)*(\.[a-z]{2,3}))|(([01]?\d\d?|2[0-4]\d|25[0-5])\.){3}([01]?\d\d?|25[0-5]|2[0-4]\d))$

A description of the regular expression:

1]: A numbered capture group. [[a-zA-Z0-9_\-\.]+]
Any character in this class: [a-zA-Z0-9_\-\.], one or more repetitions
@
Any character in this class: [a-z0-9-], one or more repetitions
[2]: A numbered capture group. [\.[a-z0-9-]+], any number of repetitions
\.[a-z0-9-]+
Literal .
Any character in this class: [a-z0-9-], one or more repetitions
[3]: A numbered capture group. [\.[a-z]{2,3}]
\.[a-z]{2,3}
Literal .
Any character in this class: [a-z], between 2 and 3 repetitions

Sucessful Matches:
[email protected]
[email protected]
[email protected]
email with IP
[email protected]
[email protected]

How It Works:
This regular expression will check for valid email address in which Only letters (a-z,A-Z), numbers (0-9), hyphens (-), underscore (_) and periods (.) are allowed and no special characters are accepted. Here we are going to search three group and @ sign.

First first group will check valid conbination of characters (a-z,A-Z), numbers (0-9), hyphens (-), underscore (_) and periods (.) followed by "@". Then we check for host name(tipsntracks,yahoo, google etc) and host type(.com, .biz, .co.in etc)

ASP.NET

<%@ Page Language="VB" AutoEventWireup="false" CodeFile="Default.aspx.vb" Inherits="_Default" %>
<!DOCTYPE html PUBLIC "-//W3C//DTD XHTML 1.0 Transitional//EN" "http://www.w3.org/TR/xhtml1/DTD/xhtml1-transitional.dtd">
<html xmlns="http://www.w3.org/1999/xhtml">
<head runat="server">
<title>U.S. Social Security Numbers</title>
</head>
<body>
<form id="form1" runat="server">
<div>
<span>Valid Format: 123-45-6789</span><br />
<asp:TextBox id="txtInput" runat="server"></asp:TextBox><br />
<asp:RegularExpressionValidator Id="vldRejex" RunAt="server" ControlToValidate="txtInput" ErrorMessage="Please enter a valid email address" ValidationExpression="^([a-zA-Z0-9_\-\.]+)@[a-z0-9-]+(\.[a-z0-9-]+)*(\.[a-z]{2,3})$">
</asp:RegularExpressionValidator><br />
<asp:Button Id="btnSubmit" RunAt="server" CausesValidation="True" Text="Submit"></asp:Button>
</div>
</form>
</body>
</html>

C#.NET

//use System.Text.RegularExpressions befour using this function
public bool vldEmail(string emlAddress)
{
//create Regular Expression Match pattern object
Regex myRegex = new Regex("^([a-zA-Z0-9_\\-\\.]+)@[a-z0-9-]+(\\.[a-z0-9-]+)*(\\.[a-z]{2,3})$");
//boolean variable to hold the status
bool isValid = false;
if (string.IsNullOrEmpty(emlAddress))
{
isValid = false;
}
else
{
isValid = myRegex.IsMatch(emlAddress);
}
//return the results
return isValid;
}

VB.NET

‘Imports System.Text.RegularExpressions befour using this function
Public Function vldEmail(ByVal emlAddress As String) As Boolean
‘create Regular Expression Match pattern object
Dim myRegex As New Regex("^([a-zA-Z0-9_\-\.]+)@[a-z0-9-]+(\.[a-z0-9-]+)*(\.[a-z]{2,3})$")
‘boolean variable to hold the status
Dim isValid As Boolean = False
If emlAddress = "" Then
isValid = False
Else
isValid = myRegex.IsMatch(emlAddress)
End If
‘return the results
Return isValid
End Function

HostForLIFE.eu ASP.NET 4.6 Hosting
HostForLIFE.eu is European Windows Hosting Provider which focuses on Windows Platform only. We deliver on-demand hosting solutions including Shared hosting, Reseller Hosting, Cloud Hosting, Dedicated Servers, and IT as a Service for companies of all sizes. We have customers from around the globe, spread across every continent. We serve the hosting needs of the business and professional, government and nonprofit, entertainment and personal use market segments.


ASP.NET 4.6 Hosting - HostForLIFE.eu :: How to Use ASP.NET and C# to Send Email with Template

clock August 12, 2015 05:55 by author Rebecca

When bulding professional web applications, there can be so many emails to be sent to users and writing the templates for each of this email inside code is not a good move. Here we can use email templates. First create a folder some where in your application directory as "MailTemplates" or some other suitable name. Now create a text file or html file for template.

In this example, we are creating a sample template named welcome.htm:

Hi, <%=name%>

This is a sample mail template for demonstrating usage of email templates in asp.net

<a href="<%=url%>">Click here to read the article</a>
<a href="<%=rooturl%>">http://example.com/</a>

Now, we are creating an email utility for preparing and sending emails:

public static void SendMail(string fromAddress, string toAddress, string subject, string body)
       {
           using (MailMessage mail = BuildMessageWith(fromAddress, toAddress.Replace(',', ';'), subject, body))
           {
               SendMail(mail);
           }
       }
       public static void SendMail(MailMessage mail)
       {
           try
           {
               SmtpClient smtp = new SmtpClient("your smtp host",port);
               smtp.Send(mail);
           }
           catch (Exception e)
           {
            
           }
       }
       //build a mail message
       private static MailMessage BuildMessageWith(string fromAddress, string toAddress, string subject, string body)
       {
           MailMessage message = new MailMessage
           {
               Sender = new MailAddress(Settings.WebMasterEmail), // on Behave of When From differs
               From = new MailAddress(fromAddress),
               Subject = subject,
               Body = body,
               IsBodyHtml = true,
           };

           string[] tos = toAddress.Split(';');

           foreach (string to in tos)
           {

               message.To.Add(new MailAddress(to));
           }

           return message;
       }
    // read the text in template file and return it as a string
       private static string ReadFileFrom(string templateName)
       {
           string filePath = System.Web.HttpContext.Current.Server.MapPath("~/MailTemplates/"+templateName);

           string body = File.ReadAllText(filePath);

           return body;
       }
       // get the template body, cache it and return the text
       private static string GetMailBodyOfTemplate(string templateName)
       {
           string cacheKey = string.Concat("mailTemplate:", templateName);
           string body;
           body = (string)System.Web.HttpContext.Current.Cache[cacheKey];
           if (string.IsNullOrEmpty(body))
           {
               //read template file text
               body = ReadFileFrom(templateName);

               if (!string.IsNullOrEmpty(body))
               {
                   System.Web.HttpContext.Current.Cache.Insert(cacheKey,body, null,DateTime.Now.AddHours(1),System.Web.Caching.Cache.NoSlidingExpiration);
               }
           }

           return body;
       }
       // replace the tokens in template body with corresponding values
       private static string PrepareMailBodyWith(string templateName, params string[] pairs)
       {
           string body = GetMailBodyOfTemplate(templateName);

           for (var i = 0; i < pairs.Length; i += 2)
           {
               body = body.Replace("<%={0}%>".FormatWith(pairs[i]), pairs[i + 1]);
           }
           return body;
       }
 public static string FormatWith(this string target, params object[] args)
        {
            return string.Format(Constants.CurrentCulture, target, args);
        }

Now let's send the email:

string subject = "Welcome";
string body = PrepareMailBodyWith("welcome.htm", "name", "Anoop", "url", "http://waytocoding.blogspot.com/","rooturl","http://waytocoding.blogspot.com/");
SendMail("[email protected]", "[email protected]", subject, body);

HostForLIFE.eu ASP.NET 4.6 Hosting
HostForLIFE.eu is European Windows Hosting Provider which focuses on Windows Platform only. We deliver on-demand hosting solutions including Shared hosting, Reseller Hosting, Cloud Hosting, Dedicated Servers, and IT as a Service for companies of all sizes. We have customers from around the globe, spread across every continent. We serve the hosting needs of the business and professional, government and nonprofit, entertainment and personal use market segments.


ASP.NET 4.6 Hosting - HostForLIFE.eu :: Consume JSON REST Service's Response from ASP.NET

clock August 10, 2015 11:53 by author Peter

Representational State Transfer (REST) isn't SOAP based Service and it exposing a public API over the internet to handle CRUD operations on information. REST is targeted on accessing named resources through one consistent interface (URL). REST uses these operations and alternative existing options of the HTTP protocol:

  • GET
  • POST
  • PUT
  • DELETE

From developer's points of view, it's not as easy as handling the object based Module which is supported after we create SOAP URL as reference or create WSDL proxy.
But .NET will have class to deal with JSON restful service. This document will only cover "how to deal JSON response as a Serialized Object for READ/WRITE &amp; convert JSON object into meanful Object".

In order to consumer JSON restful service , we'd like to do follow steps:

  1. produce the restful request URI.
  2. Post URI and get the response from “HttpWebResponse” .
  3. Convert ResponseStreem into Serialized object from “DataContractJsonSerialized” function.
  4. Get the particular results/items from Serialized Object.

This is very generic function which can be used for any rest service to post and get the response and convert in:
public static object MakeRequest(string requestUrl, object JSONRequest, string JSONmethod, string JSONContentType, Type JSONResponseType) { 
try { 
HttpWebRequest request = WebRequest.Create(requestUrl) as HttpWebRequest; 
//WebRequest WR = WebRequest.Create(requestUrl);  
string sb = JsonConvert.SerializeObject(JSONRequest); 
request.Method = JSONmethod; 
// "POST";request.ContentType = JSONContentType; // "application/json";  
Byte[] bt = Encoding.UTF8.GetBytes(sb); 
Stream st = request.GetRequestStream(); 
st.Write(bt, 0, bt.Length); 
st.Close(); 

using(HttpWebResponse response = request.GetResponse() as HttpWebResponse) { 

if (response.StatusCode != HttpStatusCode.OK) throw new Exception(String.Format( 
    "Server error (HTTP {0}: {1}).", response.StatusCode, 
response.StatusDescription)); 

// DataContractJsonSerializer jsonSerializer = new DataContractJsonSerializer(typeof(Response));// object objResponse = JsonConvert.DeserializeObject();Stream stream1 = response.GetResponseStream();  
StreamReader sr = new StreamReader(stream1); 
string strsb = sr.ReadToEnd(); 
object objResponse = JsonConvert.DeserializeObject(strsb, JSONResponseType); 

return objResponse; 

} catch (Exception e) { 

Console.WriteLine(e.Message); 
return null; 

HostForLIFE.eu ASP.NET 4.6 Hosting
HostForLIFE.eu is European Windows Hosting Provider which focuses on Windows Platform only. We deliver on-demand hosting solutions including Shared hosting, Reseller Hosting, Cloud Hosting, Dedicated Servers, and IT as a Service for companies of all sizes. We have customers from around the globe, spread across every continent. We serve the hosting needs of the business and professional, government and nonprofit, entertainment and personal use market segments.


European Entity Framework Hosting - UK :: Introduction about Entity Framework 5 and Implement it on MVC

clock August 5, 2015 09:47 by author Scott

In this article, we will introduce the Entity Framework 5.0 Code First approach in MVC applications. The ADO.NET Entity Framework is an Object Relational Mapper (ORM) included with the .NET framework. It basically generates business objects and entities according to the database tables. It provides basic CRUD operations, easily managing relationships among entities with the ability to have an inheritance relationship among entities.

When using the EF we interact with an entity model instead of the application's relational database model. This abstraction allows us to focus on business behavior and the relationships among entities. We use the Entity Framework data context to perform queries. When one of the CRUD operations is invoked, the Entity Framework will generate the necessary SQL to perform the operation.

How to Implement

To create this application we should have a basic knowledge of the DbContext class of theSystem.Data.Entity namespace. We should also be familiar with views because in this article I am not describing views for each action method so you can create a view according to action methods or you can scaffold templates to create a view for Edit, List, Create, Delete and Details.

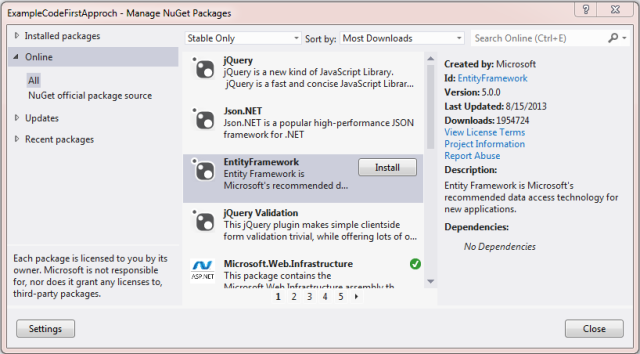
We need to install the Entity Framework Nuget package in our application. When we install the Entity Framework Nuget package, two references (System.Data.Entity and EntityFramework) are added to our application. Thereafter we can perform CRUD operations using Entity Framework.

How to Use Entity Framework

Whether you have an existing database or not, you can code your own classes and properties (aka Plain Old CLR Objects, or POCOs) that correspond to tables and columns and use them with the Entity Framework without an .edmx file. In this approach the Entity Framework does not leverage any kind of configuration file (.edmx file) to store the database schema, because the mapping API uses these conventions to generate the database schema dynamically at runtime. Currently, the Entity Framework Code First approach does not support mapping to Stored Procedures. The ExecuteSqlCommand() and SqlQuery() methods can be used to execute Stored Procedures.

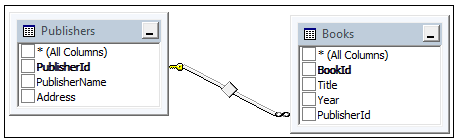
To understand the Entity Framework Code First Approach, you need to create an MVC application that has two entities, one is Publisher and another is Book. So let's see an example step-by-step. To create your MVC Application, in Visual Studio select "File" -> "New" -> "Project..." then select "MVC 4 Application" then select "Empty Application".

1. Create Modal Classes

We create classes for Publisher and Book under the Models folder, those classes are used as entities and an entities set. These classes will have mapping with a database because we are using the code first approach and these classes will create a table in a database using the DbContext class of Entity Framework. So let's see these classes one by one.
The Publisher class is in the Models folder; that file name is Publisher.cs as in the following:
using System.Collections.Generic;
namespace ExampleCodeFirstApproch.Models
{
    public class Publisher
    {
        public int PublisherId { get; set; }
        public string PublisherName { get; set; }
        public string Address { get; set; }
        public ICollection<book> Books { get; set; }
    }
}</book>


The Book class is in the Models folder; that file name is Book.cs as in the following:

namespace
ExampleCodeFirstApproch.Models

{
    public class Book
    {
        public int BookId { get; set; }
        public string Title { get; set; }
        public string Year { get; set; }
        public int PublisherId { get; set; }
        public Publisher Publisher { get; set; }
    }
}


2. Create Data Access Layer
This part of the article is the heart of the article as well as the code first approach. First of all we need a connection string so we can connect with our database by application. We create a connection in the web.configfile. I provide the connection string name as DbConnectionString, you are free to give any name to it but remember it because we will use it in our context class.

<connectionStrings>
   
<add name="DbConnectionString"
     
connectionString="Data Source=steve-PC;Initial Catalog=CodeFirst;User ID=sa;
      Password=*******" providerName="System.Data.SqlClient" />
</connectionStrings>

We have both classes, Publisher and Book, so now we will create a context class. We create aLibraryContext class under the Models folder, that file name is LibraryContext.cs. This class inherits DbContextso we can use the DbContext class methods using a LibraryContext class object as in the following:
using System.ComponentModel.DataAnnotations.Schema;
using System.Data.Entity;
namespace ExampleCodeFirstApproch.Models
{
    public class LibraryContext :DbContext
    {
        public LibraryContext()
            : base("name=DbConnectionString")
        {
        }
        public DbSet<Publisher> Publishers { get; set; }
        public DbSet<Book> Books { get; set; }
        protected override void OnModelCreating(DbModelBuilder modelBuilder)
        {                     
            modelBuilder.Entity<Publisher>().HasKey(p => p.PublisherId);
            modelBuilder.Entity<Publisher>().Property(c => c.PublisherId)
                .HasDatabaseGeneratedOption(DatabaseGeneratedOption.Identity);           
            modelBuilder.Entity<Book>().HasKey(b => b.BookId);
            modelBuilder.Entity<Book>().Property(b => b.BookId)
                .HasDatabaseGeneratedOption(DatabaseGeneratedOption.Identity);           
            modelBuilder.Entity<Book>().HasRequired(p => p.Publisher)
                .WithMany(b => b.Books).HasForeignKey(b=>b.PublisherId);           
            base.OnModelCreating(modelBuilder);
        }
    }
}

Our LibraryContext class that inherits the DbContext class is ready. The LibraryContext class has a three-part constructor, DbSet properties, and an OnModelCreating method. Let's see each one by one.

Constructor: It is an empty constructor that doesn't have any parameters, in other words it is the default constructor but it inherits the base class single string parameterized constructor. This constructor constructs a new context instance using the given string as the name (as we used) or the connection string for the database to which a connection will be made. Here DbConnectionString is the name of the connection string defined in the web.config file of the application.

public LibraryContext(): base("name=DbConnectionString")
{
}

Property: When developing with the Code First workflow you define a derived DbContext that represents the session with the database and exposes a DbSet for each type in your model. The common case shown in the Code First examples is to have a DbContext with public automatic DbSet properties for the entity types of your model.
public DbSet<Publisher> Publishers { get; set; }
public DbSet<Book> Books { get; set; }


The Dbset property represents an entity set used to perform create, read, update, and delete operations. A non-generic version of DbSet<TEntity> can be used when the type of entity is not known at build time. Here we are using the plural name of the property for an entity, that means your table will be created with this name in the database for that specific entity.

Method: The LibraryContext class has an override OnModelCreating method. This method is called when the model for a derived context has been initialized, but before the model has been locked down and used to initialize the context. The default implementation of this method does nothing, but it can be overridden in a derived class such that the model can be further configured before it is locked down. Basically in this method we configure the database table that will be created by a model or a defined relationship among those tables.
protected override void OnModelCreating(DbModelBuilder modelBuilder)
{  
   modelBuilder.Entity<Publisher>().HasKey(p => p.PublisherId);
   modelBuilder.Entity<Publisher>().Property(c => c.PublisherId)
          .HasDatabaseGeneratedOption(DatabaseGeneratedOption.Identity);
   modelBuilder.Entity<Book>().HasKey(b => b.BookId);
   modelBuilder.Entity<Book>().Property(b => b.BookId)
         .HasDatabaseGeneratedOption(DatabaseGeneratedOption.Identity);
   modelBuilder.Entity<Book>().HasRequired(p => p.Publisher)
         .WithMany(b => b.Books).HasForeignKey(b=>b.PublisherId);
   base.OnModelCreating(modelBuilder);
}

This method accepts one parameter, an object of DbModelBuilder. This DbModelBuilder class maps POCO classes to database schema. This method is called only once when the first instance of a derived context is created. The model for that context is then cached and is for all further instances of the context in the app domain. This caching can be disabled by setting the ModelCaching property on the given ModelBuidler, but this can seriously degrade performance. More control over caching is provided through use of theDbModelBuilder and DbContext classes directly.

Configure/Mapping Properties with the Fluent API
The OnModelCreating() method under the LibraryContext class uses the Fluent API to map and configure properties in the table. So let's see each method used in the OnModelCreating() method one by one.

modelBuilder.Entity<Book>().HasRequired(p => p.Publisher)
.WithMany(b => b.Books).HasForeignKey(b=>b.PublisherId);

3. Create Controller for CRUD Operations

Now we create two controllers, one for Publisher CRUD operations (PublisherController.cs) and another for Book CRUD operations (BookController.cs) under the Controllers folder in the application. So here is the code for each.

The Publisher controller in the file PublisherController.cs in the Controllers folder:
using System.Linq;
using System.Web.Mvc;
using ExampleCodeFirstApproch.Models;
namespace ExampleCodeFirstApproch.Controllers
{
    public class PublisherController : Controller
    {
        LibraryContext objContext;
        public PublisherController()
        {
            objContext = new LibraryContext();
        }
        #region List and Details Publisher
        public ActionResult Index()
        {
            var publishers = objContext.Publishers.ToList();
            return View(publishers);
        }
        public ViewResult Details(int id)
        {
            Publisher publisher =
              objContext.Publishers.Where(x=>x.PublisherId==id).SingleOrDefault();
            return View(publisher);
        }
        #endregion
        #region Create Publisher
        public ActionResult Create()
        {
            return View(new Publisher());
        }
        [HttpPost]
        public ActionResult Create(Publisher publish)
        {
            objContext.Publishers.Add(publish);
            objContext.SaveChanges();
            return RedirectToAction("Index");
        }
        #endregion
        #region edit publisher
        public ActionResult Edit(int id)
        {
            Publisher publisher = objContext.Publishers.Where(
              x => x.PublisherId == id).SingleOrDefault();
            return View(publisher);
        }
        [HttpPost]
        public ActionResult Edit(Publisher model)
        {
            Publisher publisher = objContext.Publishers.Where(
              x => x.PublisherId == model.PublisherId).SingleOrDefault();
            if (publisher != null)
            {
                objContext.Entry(publisher).CurrentValues.SetValues(model);
                objContext.SaveChanges();
                return RedirectToAction("Index");
            }             
            return View(model);
        }
       #endregion
        #region Delete Publisher
        public ActionResult Delete(int id)
        {
            Publisher publisher = objContext.Publishers.Find(id);
            //.Where(x => x.PublisherId == id).SingleOrDefault();

            return View(publisher);
        }
        [HttpPost]
        public ActionResult Delete(int id, Publisher model)
        {
           var publisher =
             objContext.Publishers.Where(x => x.PublisherId == id).SingleOrDefault();
           if (publisher != null)
            {
                objContext.Publishers.Remove(publisher);
                objContext.SaveChanges();
            }
            return RedirectToAction("Index");
        }
        #endregion
    }
}

The Book controller in the file BookController.cs in the Controllers folder:
using
System.Linq;
using System.Web.Mvc;
using ExampleCodeFirstApproch.Models;
namespace ExampleCodeFirstApproch.Controllers
{
    public class BookController : Controller
    {
       LibraryContext objContext;
       public BookController()
        {
            objContext = new LibraryContext();
        }
        #region List and Details Book
        public ActionResult Index()
        {
            var books = objContext.Books.ToList();
            return View(books);
        }
        public ViewResult Details(int id)
        {
            Book book = objContext.Books.Where(x=>x.BookId==id).SingleOrDefault();
            return View(book);
        }
        #endregion
        #region Create Publisher
        public ActionResult Create()
        {
            return View(new Book());
        }
        [HttpPost]
        public ActionResult Create(Book book)
        {
            objContext.Books.Add(book);
            objContext.SaveChanges();
            return RedirectToAction("Index");
        }
        #endregion
        #region Edit Book
        public ActionResult Edit(int id)
        {
            Book book = objContext.Books.Where(x => x.BookId == id).SingleOrDefault();
            return View(book);
        } 
        [HttpPost]
        public ActionResult Edit(Book model)
        {
            Book book = objContext.Books.Where(x => x.BookId == model.BookId).SingleOrDefault();
            if (book != null)
            {
                objContext.Entry(book).CurrentValues.SetValues(model);
                objContext.SaveChanges();
                return RedirectToAction("Index");
            }             
            return View(model);
        }
       #endregion
        #region Delete Book
        public ActionResult Delete(int id)
        {
            Book book = objContext.Books.Find(id);
            return View(book);
        }
        [HttpPost]
        public ActionResult Delete(int id, Publisher model)
        {
           var book = objContext.Books.Where(x => x.BookId == id).SingleOrDefault();
           if (book != null)
            {
                objContext.Books.Remove(book);
                objContext.SaveChanges();
            }
            return RedirectToAction("Index");
        }
        #endregion
    }
}


Both Publisher and Book controllers are ready and create a view according to the action method using a scaffold template and you can download a zip folder. Run the application and you get that your tables are created in the database with a relationship.


About HostForLIFE.eu

HostForLIFE.eu is European Windows Hosting Provider which focuses on Windows Platform only. We deliver on-demand hosting solutions including Shared hosting, Reseller Hosting, Cloud Hosting, Dedicated Servers, and IT as a Service for companies of all sizes.

We have offered the latest Windows 2016 Hosting, ASP.NET Core 2.2.1 Hosting, ASP.NET MVC 6 Hosting and SQL 2017 Hosting.


Tag cloud

Sign in