European ASP.NET 4.5 Hosting BLOG

BLOG about ASP.NET 4, ASP.NET 4.5 Hosting and Its Technology - Dedicated to European Windows Hosting Customer

ASP.NET 5 Hosting - HostForLIFE.eu :: Waiting Message in ASP.NET

clock June 23, 2016 20:54 by author Anthony

When someone calls your company and all agents are busy assisting other customers, they will be sent to the waiting queue. When they enter the waiting queue, the "Waiting Message" plays. An example of a common Waiting Message is, "All of our agents are currently busy. Please hold and we will answer your call as soon as possible."

Sometimes we need please wait message button in our website to inform the visitor that their submission still in progress. Today, we will explain about creating please wait message in the button on ASP.NET website. You can copy below code to please wait message in the button.


<%@ Page Language="C#" AutoEventWireup="true" CodeFile="PleaseWaitButton.aspx.cs"
   Inherits="PleaseWaitButton" %>

<!DOCTYPE html PUBLIC "-//W3C//DTD XHTML 1.0 Transitional//EN"
"http://www.w3.org/TR/xhtml1/DTD/xhtml1-transitional.dtd">
<html xmlns="http://www.w3.org/1999/xhtml">
<head runat="server">
   <title>Untitled Page</title>
</head>
<body>
   <form id="form1" runat="server">
       <div>
           <div>
               <asp:Button ID="Button1" runat="server" Text="Button" />
           </div>
       </div>
   </form>
</body>
</html>

using System;
using System.Data;
using System.Configuration;
using System.Collections;
using System.Web;
using System.Web.Security;
using System.Web.UI;
using System.Web.UI.WebControls;
using System.Web.UI.WebControls.WebParts;
using System.Web.UI.HtmlControls;

public partial class PleaseWaitButton : System.Web.UI.Page
{
   protected void Button1_Click(object sender, System.EventArgs e)
   {
       System.Threading.Thread.Sleep(5000);
       ClientScript.RegisterClientScriptBlock(this.GetType(), "reset",
 "document.getElementById('" + Button1.ClientID + "').disabled=false;", true);
   }

   protected void Page_Load(object sender, System.EventArgs e)
   {
       System.Threading.Thread.Sleep(5000);
       Button1.Attributes.Add("onclick", ClientScript.GetPostBackEventReference(Button1, "") + ";
this.value='Please wait...';this.disabled = true;");
   }

}


Finish, happy coding.


HostForLIFE.eu ASP.NET 4.6 Hosting
European best, cheap and reliable ASP.NET hosting with instant activation. HostForLIFE.eu is #1 Recommended Windows and ASP.NET hosting in European Continent. With 99.99% Uptime Guaranteed of Relibility, Stability and Performace. HostForLIFE.eu security team is constantly monitoring the entire network for unusual behaviour. We deliver hosting solution including Shared hosting, Cloud hosting, Reseller hosting, Dedicated Servers, and IT as Service for companies of all size.


ASP.NET 4.6 Hosting - HostForLIFE.eu :: How to Use FileUpload in ASP.NET, How to Save Image , Picture in Website Folder?

clock February 3, 2016 19:24 by author Peter

First we  craete  a  table UserImage using database test:
use test
create  table UserImage(SrNo int  primary key,Name nvarchar(50),UserImg nvarchar(max))

After than we  create  a Web from  like  this and  take  a Folder Image  in our  WebSite  for  saving  image  which are  upload  by  user.

Default.aspx
<%@ Page Language="C#" AutoEventWireup="true" CodeFile="Default.aspx.cs" Inherits="_Default" %>

<!DOCTYPE html PUBLIC "-//W3C//DTD XHTML 1.0 Transitional//EN" "http://www.w3.org/TR/xhtml1/DTD/xhtml1-transitional.dtd">

<html xmlns="http://www.w3.org/1999/xhtml">
<head runat="server">
<title></title>
<style type="text/css">
.style1 {
    width: 100%;
}
.style2
{
    width: 351px;
}
</style>
</head>
<body>

<form id="form1" runat="server">
<div>
<table class="style1">
<tr>
    <td colspan="3"><center><asp:Label ID="Label1" runat="server" Text="Save Image in Image folder and Database" Font-Bold="true"></asp:Label></center>
      
    </td>
</tr>
<tr>
    <td>
        <asp:Label ID="SrNo" runat="server" Text="SrNo"></asp:Label>
    </td>
    <td class="style2">
        <asp:TextBox ID="txtsrno" runat="server"></asp:TextBox>
    </td>
    <td rowspan="5">
        <asp:Image ID="Image1" runat="server" Height="91px" Width="99px" />
    </td>
</tr>
<tr>
    <td>
        <asp:Label ID="Label4" runat="server" Text="Name"></asp:Label>
    </td>
    <td class="style2">
        <asp:TextBox ID="txtname" runat="server"></asp:TextBox>
    </td>
</tr>
<tr>
    <td>
        <asp:Label ID="Label5" runat="server" Text="Image"></asp:Label>
    </td>
    <td class="style2">
        <asp:FileUpload ID="FileUpload1" runat="server" />
    </td>
</tr>
<tr>
    <td>
        &nbsp;</td>
    <td class="style2">

        <asp:Button ID="BSave" runat="server" onclick="BSave_Click" Text="Save" />
    <asp:Button ID="BSelect" runat="server" onclick="BSelect_Click" Text="Select" />
        <asp:Button ID="BDelete" runat="server" onclick="BDelete_Click" Text="Delete" />
&nbsp;<asp:Button ID="BUpdate" runat="server" onclick="BUpdate_Click" Text="Update" />
    </td>
</tr>
<tr>
    <td>
        &nbsp;</td>
    <td class="style2">
        <asp:Label ID="Message" runat="server" Text="Label" Visible="False"></asp:Label>
    </td>
</tr>
</table>
</div>
</form>
</body>
</html>


Now we create Connection global for Website in web.config
<configuration>
<connectionStrings>
<add name="kush" connectionString="Data Source=KUSH-PC; Initial Catalog=test;Integrated Security=True" providerName="System.Data.SqlClient"/>
</connectionStrings>
<system.web>
<compilation debug="true" targetFramework="4.0"/>
</system.web>
</configuration>


Default.aspx.cs
using System;
using System.Collections.Generic;
using System.Linq;
using System.Web;
using System.Web.UI;
using System.Web.UI.WebControls;
using System.Data.SqlClient;
using System.Configuration;

//Using this namespace for DirectoryInfo and FileInfo
using System.IO;
public partial class _Default : System.Web.UI.Page
{
protected void Page_Load(object sender, EventArgs e)
{
con = new SqlConnection(ConfigurationManager.ConnectionStrings["kush"].ConnectionString);
}
SqlConnection con;
SqlCommand cmd;
SqlDataReader dr;
//Saving image in Database and Image Folder which are exist in Website
protected void BSave_Click(object sender, EventArgs e)
{
con.Open();
cmd = new SqlCommand("insert into UserImage (SrNo,Name,UserImg) values (@SrNo,@Name,@UserImg)", con);
cmd.Parameters.AddWithValue("@SrNo", Convert.ToInt32(txtsrno.Text));
cmd.Parameters.AddWithValue("@Name", txtname.Text);
cmd.Parameters.AddWithValue("@UserImg", FileUpload1.FileName);
FileUpload1.SaveAs(Server.MapPath("~/Image/") + FileUpload1.FileName);
cmd.ExecuteNonQuery();
 Message.Visible=true;
Message.Text = "Add Successfully ";
con.Close();
txtname.Text = "";
}
//retrive image  from Database  and  Image Folder which are exist  in Website
protected void BSelect_Click(object sender, EventArgs e)
{
con.Open();
cmd = new SqlCommand("select * from UserImage where SrNo=@SrNo", con);
cmd.Parameters.AddWithValue("@SrNo", Convert.ToInt32(txtsrno.Text));
 dr=cmd.ExecuteReader();
 if (dr.Read())
 {
     txtname.Text = dr["Name"].ToString();
     Image1.ImageUrl = "~/Image/" + dr["UserImg"].ToString();
 }
con.Close();
}

//The following code is for  delete image  from  Database  and  Image Folder which are exist  in  Website
protected void BDelete_Click(object sender, EventArgs e)
{
DirectoryInfo dd = new DirectoryInfo(Server.MapPath("~/Image"));
foreach (FileInfo ff in dd.GetFiles())
{
    if (ff.Name == Path.GetFileName(Image1.ImageUrl))
        ff.Delete();
}

 con.Open();
 cmd = new SqlCommand("delete from UserImage where SrNo=@SrNo", con);
 cmd.Parameters.AddWithValue("@SrNo", Convert.ToInt32(txtsrno.Text));
 cmd.ExecuteNonQuery();
 con.Close();
 txtname.Text = "";
 Message.Visible=true;
 Message.Text="Delete Successfully Image "+"For SrNo"+"-"+txtsrno.Text+"";
}

//this  code  for  Update  image  in Database  and  Image Folder and  old  image  deleted  from Image Folder

protected void BUpdate_Click(object sender, EventArgs e)
{
try
{

    DirectoryInfo dd = new DirectoryInfo(Server.MapPath("~/Image"));
    foreach (FileInfo ff in dd.GetFiles())
    {
        if (ff.Name == Path.GetFileName(Image1.ImageUrl))
            ff.Delete();
    }

    con.Open();
    cmd = new SqlCommand("update  UserImage set Name=@Name, UserImg=@UserImg  where SrNo=@SrNo", con);
    cmd.Parameters.AddWithValue("@SrNo", Convert.ToInt32(txtsrno.Text));
    cmd.Parameters.AddWithValue("@Name", txtname.Text);
    if (FileUpload1.HasFile)
    {
        cmd.Parameters.AddWithValue("@UserImg", FileUpload1.FileName);
    }
    else
    {
        cmd.Parameters.AddWithValue("@UserImg", Image1.ImageUrl);
    }

    FileUpload1.SaveAs(Server.MapPath("~/Image/") + FileUpload1.FileName);
    cmd.ExecuteNonQuery();
    con.Close();
    txtname.Text = "";
    Message.Visible = true;
    Message.Text = "update Successfully Image " + "For SrNo" + "-" + txtsrno.Text + "";
}
catch (Exception ex)
{
    Message.Visible = true;
    Message.Text = ex.Message;
}

}
}

HostForLIFE.eu ASP.NET 4.6 Hosting
HostForLIFE.eu is European Windows Hosting Provider which focuses on Windows Platform only. We deliver on-demand hosting solutions including Shared hosting, Reseller Hosting, Cloud Hosting, Dedicated Servers, and IT as a Service for companies of all sizes. We have customers from around the globe, spread across every continent. We serve the hosting needs of the business and professional, government and nonprofit, entertainment and personal use market segments. 


ASP.NET 4.6 Hosting - HostForLIFE.eu :: How to Make a Text Chat in ASP.Net?

clock January 20, 2016 20:40 by author Peter

Now, Making Text Chat in ASP.NET Application is now easy. I am using Jaxter Chat Control. JaxterChat is an effective tool for nurturing online communities within your website. By combining the rapid response of ajax with the power and flexibility os ASP.NET, JaxterChat provides a stylish alternative to traditional Flash and Java chat clients. JaxterChat supports a rich designer interface for previewing the appearance of the control at design time. Display properties can be adjusted and the effects of these changes are reflected instantly in the Visual Studio designer view.

We are going to working with Text Chat using Jaxter Chat control in ASP.NET.  Now, write the following code:

<%@ Page Language="C#" AutoEventWireup="true" CodeFile="Default2.aspx.cs" Inherits="Default2" %> 
<%@ Register assembly="JaxterChat" namespace="WebFurbish" tagprefix="cc1" %> 
<!DOCTYPE html PUBLIC "-//W3C//DTD XHTML 1.0 Transitional//EN" "http://www.w3.org/TR/xhtml1/DTD/xhtml1-transitional.dtd"> 
<html xmlns="http://www.w3.org/1999/xhtml"> 
<head runat="server"> 
<title></title> 
</head> 
<body style="height: 316px"> 
<form id="form1" runat="server"> 
<div> 
    <cc1:JaxterChat ID="JaxterChat1" runat="server" BackColor="#A0AB9D" BackImageUrl="JaxterChat/Themes/Googleish/back_strip_4.jpg" ClearPageButtonImageUrl="JaxterChat/Images/clear_page.gif" EmoticonsButtonImageUrl="JaxterChat/Images/emoticons.gif" FontColor="MidnightBlue" FontFace="Arial, Verdana" FontSizePixels="12" FooterPanelHeightPixels="0" HeaderPanelHeightPixels="23" Height="300px" MessageInputBackColor="White" MessageInputBorderColor="DarkGray" MessageInputBorderWidthPixels="1" MessageInputFontColor="Black" MessageInputFontFace="Arial, Verdana" MessageInputFontSizePixels="12" MessageInputHeightPixels="38" MessageInputPaddingBottomPixels="1" MessageInputPaddingLeftPixels="1" MessageInputPaddingRightPixels="1" MessageInputPaddingTopPixels="1" MessageOutputBackColor="White" MessageOutputBorderColor="DarkGray" MessageOutputBorderWidthPixels="1" MessageOutputFontColor="Black" MessageOutputFontFace="Arial, Verdana" MessageOutputFontSizePixels="12" MessageOutputLinkColor="90, 128, 198" MessageOutputPaddingBottomPixels="1" MessageOutputPaddingLeftPixels="8" MessageOutputPaddingRightPixels="1" MessageOutputPaddingTopPixels="2" MessageOutputPostIconUrl="JaxterChat/Themes/Googleish/icon.gif" MessageOutputUserNameFontColor="Black" PaddingBottomPixels="5" PaddingLeftPixels="4" PaddingRightPixels="4" PaddingTopPixels="3" PopupCloseButtonImageUrl="JaxterChat/Images/popup_close.gif" PopupWindowBackColor="Gainsboro" PopupWindowContentFontColor="Black" PopupWindowContentFontFace="Arial, Verdana" PopupWindowContentFontSizePixels="10" PopupWindowTitleFontColor="Black" PopupWindowTitleFontFace="Arial, Verdana" PopupWindowTitleFontSizePixels="12" ScrollBarIE3DLightColor="White" ScrollBarIEArrowColor="LightGray" ScrollBarIEBaseColor="Silver" ScrollBarIEDarkShadowColor="Silver" ScrollBarIEFaceColor="White" ScrollBarIEHighlightColor="AliceBlue" ScrollBarIEShadowColor="Silver" ScrollBarIETrackColor="Gainsboro" SendButtonImageUrl="JaxterChat/Images/send_button.gif" ShowSendButton="False" ToggleSoundOffButtonImageUrl="JaxterChat/Images/sound_off.gif" ToggleSoundOnButtonImageUrl="JaxterChat/Images/sound_on.gif" ToolbarPanelHeightPixels="21" UserListButtonImageUrl="JaxterChat/Images/users.gif" Width="359px"> 
    </cc1:JaxterChat> 
    <br /> 
</div> 
</form> 
</body> 
</html> 

HostForLIFE.eu ASP.NET 4.6 Hosting
HostForLIFE.eu is European Windows Hosting Provider which focuses on Windows Platform only. We deliver on-demand hosting solutions including Shared hosting, Reseller Hosting, Cloud Hosting, Dedicated Servers, and IT as a Service for companies of all sizes. We have customers from around the globe, spread across every continent. We serve the hosting needs of the business and professional, government and nonprofit, entertainment and personal use market segments. 


ASP.NET 4.6 Hosting - HostForLIFE.eu :: How to Fixing the Error logging and Exception handling?

clock January 6, 2016 21:10 by author Peter

The errors and exceptions are going to be written to a text file because it is simpler to search out the reason for the error because the Error Log text file are often easily opened using the basic notepad application in Windows.

The following HTML Markup consists of an ASP.NET Button control which will raise an Exception and the exception (error) Message details will be displayed.
<asp:Button Text="Click to Raise Exception" runat="server" OnClick="RaiseException"/>

Namespaces
You will need to import the following namespace.
C#
using System.IO;

VB.Net
Imports System.IO

Creating simple Error Log Text File in ASP.NET
The following event handler is raised when the Button is clicked. An exception is raised by converting a string value to integer inside a Try-Catch block.
The raised Exception is caught in the Catch block and the LogError function is called.
Inside the LogError function, the details of the exception (error) are written to an Error Log Text file along with current date and time.


C#
protected void RaiseException(object sender, EventArgs e)
{
try
{
    int i = int.Parse("Mudassar");
}
catch (Exception ex)
{
    this.LogError(ex);
}
}

private void LogError(Exception ex)
{
string message = string.Format("Time: {0}", DateTime.Now.ToString("dd/MM/yyyy hh:mm:ss tt"));
message += Environment.NewLine;
message += "-----------------------------------------------------------";
message += Environment.NewLine;
message += string.Format("Message: {0}", ex.Message);
message += Environment.NewLine;
message += string.Format("StackTrace: {0}", ex.StackTrace);
message += Environment.NewLine;
message += string.Format("Source: {0}", ex.Source);
message += Environment.NewLine;
message += string.Format("TargetSite: {0}", ex.TargetSite.ToString());
message += Environment.NewLine;
message += "-----------------------------------------------------------";
message += Environment.NewLine;
string path = Server.MapPath("~/ErrorLog/ErrorLog.txt");
using (StreamWriter writer = new StreamWriter(path, true))
{
    writer.WriteLine(message);
    writer.Close();
}
}


VB.Net
Protected Sub RaiseException(sender As Object, e As EventArgs)
Try
    Dim i As Integer = Integer.Parse("Mudassar")
Catch ex As Exception
    Me.LogError(ex)
End Try
End Sub

Private Sub LogError(ex As Exception)
Dim message As String = String.Format("Time: {0}", DateTime.Now.ToString("dd/MM/yyyy hh:mm:ss tt"))
message += Environment.NewLine
message += "-----------------------------------------------------------"
message += Environment.NewLine
message += String.Format("Message: {0}", ex.Message)
message += Environment.NewLine
message += String.Format("StackTrace: {0}", ex.StackTrace)
message += Environment.NewLine
message += String.Format("Source: {0}", ex.Source)
message += Environment.NewLine
message += String.Format("TargetSite: {0}", ex.TargetSite.ToString())
message += Environment.NewLine
message += "-----------------------------------------------------------"
message += Environment.NewLine
Dim path As String = Server.MapPath("~/ErrorLog/ErrorLog.txt")
Using writer As New StreamWriter(path, True)
    writer.WriteLine(message)
    writer.Close()
End Using
End Sub

And here is the output:

HostForLIFE.eu ASP.NET 4.6 Hosting
HostForLIFE.eu is European Windows Hosting Provider which focuses on Windows Platform only. We deliver on-demand hosting solutions including Shared hosting, Reseller Hosting, Cloud Hosting, Dedicated Servers, and IT as a Service for companies of all sizes. We have customers from around the globe, spread across every continent. We serve the hosting needs of the business and professional, government and nonprofit, entertainment and personal use market segments. 


ASP.NET 4.6 Hosting - HostForLIFE.eu :: How to Edit value of RequiresQuestionAndAnswer in ASP.NET 4.6 Membership Provider

clock October 29, 2015 01:16 by author Peter

Let me show you how to edit value of RequiresQuestionAndAnswer in ASP.NET 4.6 Membership provider. RequiresQuestionAndAnswer is checked when ResetPassword or GetPassword is called. The provider provided with the .NET Framework throws a NotSupportedException if RequiresQuestionAndAnswer is true and the supplied password answer is null. Requiring a password question and answer provides an additional layer of security when retrieving or resetting a user's password. Users can supply a question and answer when their user name is created that they can later use to retrieve or reset a forgotten password.

A Membership Provider allows a web application to store and retrieve membership data for a user, and the standard ASP.NET Membership Provider uses pre-defined SQL Server tables.

Now you write the following example code:
MembershipUser user = Membership.GetUser();
string newPassword = "newPass";
string tempPassword = string.Empty;
if (Membership.Provider.RequiresQuestionAndAnswer)
{
var _requiresQA = Membership.Provider.GetType().GetField("_RequiresQuestionAndAnswer",
System.Reflection.BindingFlags.Instance | System.Reflection.BindingFlags.NonPublic);
//change the value in the private field
_requiresQA.SetValue(Membership.Provider, false);
//do the reset
tempPassword = user.ResetPassword();
//set it's original value
_requiresQA.SetValue(Membership.Provider, true);
}
else
{
tempPassword = user.ResetPassword();
}

HostForLIFE.eu ASP.NET 4.6 Hosting
HostForLIFE.eu is European Windows Hosting Provider which focuses on Windows Platform only. We deliver on-demand hosting solutions including Shared hosting, Reseller Hosting, Cloud Hosting, Dedicated Servers, and IT as a Service for companies of all sizes. We have customers from around the globe, spread across every continent. We serve the hosting needs of the business and professional, government and nonprofit, entertainment and personal use market segments. 


ASP.NET Hosting with Toronto Data Center - HostForLIFE.eu :: How To Convert A Password Into Complicated

clock October 27, 2015 00:22 by author Rebecca

In this tutorial, we will show you how to convert a password into complicated in ASP.NET. We will ise SHA1 or MD5 algorithm to work around for converting your password into complicated.

Follow these steps to make your password seems complicated in ASP.NET:

Step 1

Open Visual Studio and create an empty website. Give it a suitable name for example: [hashpass_demo].

Step 2

 In Solution Explorer you will get your empty website, then add a Web Form by going like this:

  • Right Click
  • Add New Item, then Web Form. Name it hashpass_demo.aspx.

Step 3

Now mcreate some design for your application by going to hashpass_demo.aspx and try the code like this:

    <%@ Page Language="C#" AutoEventWireup="true" CodeFile="Default.aspx.cs" Inherits="_Default" %> 
     
    <!DOCTYPE html PUBLIC "-//W3C//DTD XHTML 1.0 Transitional//EN" "http://www.w3.org/TR/xhtml1/DTD/xhtml1-transitional.dtd"> 
     
    <html xmlns="http://www.w3.org/1999/xhtml"> 
    <head runat="server"> 
        <title></title> 
        <style type="text/css"> 
            .style1 
            { 
                width: 258px; 
            } 
            .style2 
            { 
                width: 239px; 
            } 
        </style> 
    </head> 
    <body> 
        <form id="form1" runat="server"> 
        <div> 
         
            <table style="width:100%;"> 
                <tr> 
                    <td class="style1"> 
                        Enter Your Username:</td> 
                    <td class="style2"> 
                        <asp:TextBox ID="TextBox1" runat="server"></asp:TextBox> 
                    </td> 
                    <td> 
                        <asp:Label ID="Label2" runat="server"></asp:Label> 
                    </td> 
                </tr> 
                <tr> 
                    <td class="style1"> 
                        Enter Your Password:  
                    </td> 
                    <td class="style2"> 
                        <asp:TextBox ID="TextBox2" runat="server" TextMode="Password"></asp:TextBox> 
                    </td> 
                    <td> 
                        <asp:Label ID="Label1" runat="server"></asp:Label> 
                    </td> 
                </tr> 
                <tr> 
                    <td class="style1"> 
                         </td> 
                    <td class="style2"> 
                         </td> 
                    <td> 
                         </td> 
                </tr> 
                <tr> 
                    <td class="style1"> 
                         </td> 
                    <td class="style2"> 
                        <asp:Button ID="Button1" runat="server" onclick="Button1_Click" Text="Submit" /> 
                    </td> 
                    <td> 
                         </td> 
                </tr> 
            </table> 
         
        </div> 
        </form> 
    </body> 
    </html> 

Your design will look like following picture snippet:

Step 4

Now it’s time for server side coding so that our application starts working. Open your hashpass_demo.aspx.cs file and code it like below:

    using System; 
    using System.Collections.Generic; 
    using System.Linq; 
    using System.Web; 
    using System.Web.UI; 
    using System.Web.UI.WebControls; 
    using System.Web.Security; 
     
    public partial class _Default : System.Web.UI.Page 
    { 
        protected void Page_Load(object sender, EventArgs e) 
        { 
     
        } 
        protected void Button1_Click(object sender, EventArgs e) 
        { 
            string securepass = FormsAuthentication.HashPasswordForStoringInConfigFile(TextBox2.Text, "MD5"); 
            Label2.Text = "Your Username is-" + TextBox1.Text; 
            Label1.Text = "Your HashPassword is-" + securepass; 
            Label2.ForeColor = System.Drawing.Color.ForestGreen; 
            Label1.ForeColor = System.Drawing.Color.ForestGreen; 
       
        } 
    } 

Here is the output:

Good luck!

HostForLIFE.eu ASP.NET 4.6 Hosting
HostForLIFE.eu is European Windows Hosting Provider which focuses on Windows Platform only. We deliver on-demand hosting solutions including Shared hosting, Reseller Hosting, Cloud Hosting, Dedicated Servers, and IT as a Service for companies of all sizes. We have customers from around the globe, spread across every continent. We serve the hosting needs of the business and professional, government and nonprofit, entertainment and personal use market segments. 


ASP.NET 4.6 Hosting with Milan Data Center - HostForLIFE.eu :: How To Delete Duplicates Elements from List Using IEqualityComparer?

clock October 22, 2015 00:03 by author Peter

In this tutorial, let me show you how to delete duplicates elements from list using IEqualityComparer in ASP.NET 4.6. IEqualityComparer is implemented by classes that need to support an equality comparison for two values of the same type. Generic collections require instances of classes that implement the IEqualityComparer interface in order to provide support for custom data types. IEqualityComparer has two methods to support the comparison of objects for equality. Let us suppose that you have a Employee class that has four properties EmployeeID,FirstName,LastName and Age. Now, you need to write the following code:

public class Employee
{
public Employee()
{
}
public string EmployeeID { get; set; }
public string FirstName { get; set; }
public string LastName { get; set; }
public int Age { get; set; }
public List&lt;Employee&gt; Employees
{
    get
    {
return new List&lt;Employee&gt;()
        {
new Employee(){EmployeeID="01",FirstName="Peter",LastName="Last01",Age=31},
new Employee(){EmployeeID="02",FirstName="Scott",LastName="Last02",Age=35},
new Employee(){EmployeeID="03",FirstName="Rebecca",LastName="Last03",Age=36},
new Employee(){EmployeeID="01",FirstName="Paul",LastName="Last01",Age=31},
new Employee(){EmployeeID="01",FirstName="Richard",LastName="Last01",Age=31},
        };
    }
}
}

In the above class I have added some dummy records which have duplicates elements. Now,let's remove the duplicate elements from the above class using IEqualityComparer interface.  For this right click on the project and add a new class named EmployeeEquality and inherit this class with IEqualityComparer and write the below code:
public class EmployeeEquality : IEqualityComparer<Employee>
{
public bool Equals(Employee x, Employee y)
{
if (x.EmployeeID == y.EmployeeID && x.FirstName == y.FirstName && x.LastName == y.LastName && x.Age == y.Age)
return true;
return false;
}
public int GetHashCode(Employee obj)
{
//For shake of simplicity
return obj.FirstName.GetHashCode();
}
}


Now,let's display the record on UI. First, right click on the project and add new page,and add the below code:
<%@ Page Language="C#" AutoEventWireup="true" CodeFile="Default.aspx.cs" Inherits="_Default" %>
<!DOCTYPE html PUBLIC "-//W3C//DTD XHTML 1.0 Transitional//EN" "http://www.w3.org/TR/xhtml1/DTD/xhtml1-transitional.dtd">
<html xmlns="http://www.w3.org/1999/xhtml">
<head runat="server">
<title></title>
</head>
<body>
<form id="form1" runat="server">
<div>
</div>
<asp:GridView ID="GridView1" runat="server">
</asp:GridView>
<asp:Button ID="btnUnSorted" runat="server" OnClick="btnUnSorted_Click" Text="Duplicates" />
<asp:Button ID="btnWDuplicate" runat="server" OnClick="btnWDuplicate_Click" Text="Without Duplicate" />
</form>
</body>
</html>

In the code behind add following code
using System;
using System.Collections.Generic;
using System.Linq;
using System.Web;
using System.Web.UI;
using System.Web.UI.WebControls;
public partial class _Default : System.Web.UI.Page
{
protected void Page_Load(object sender, EventArgs e)
{
}
protected void btnUnSorted_Click(object sender, EventArgs e)
{
    Employee employee = new Employee();
    GridView1.DataSource = employee.Employees;
    GridView1.DataBind();
}
protected void btnWDuplicate_Click(object sender, EventArgs e)
{
    Employee employee = new Employee();
    List<Employee> list = employee.Employees;
    var distinctEmployee = list.Distinct(new EmployeeEquality());
    GridView1.DataSource = distinctEmployee;
    GridView1.DataBind();
}
}

HostForLIFE.eu ASP.NET 4.6 Hosting
HostForLIFE.eu is European Windows Hosting Provider which focuses on Windows Platform only. We deliver on-demand hosting solutions including Shared hosting, Reseller Hosting, Cloud Hosting, Dedicated Servers, and IT as a Service for companies of all sizes. We have customers from around the globe, spread across every continent. We serve the hosting needs of the business and professional, government and nonprofit, entertainment and personal use market segments. 


ASP.NET 4.6 Hosting Germany - HostForLIFE.eu :: How to Use C# to Track an IP Address

clock October 5, 2015 18:25 by author Rebecca

In this tutorial, you will learn how to track an IP address in ASP.NET using C#.

In ASP.NET it is also very easy to find IP address no matter whether user is behind the proxy or not, you can easily track the user in ASP.NET. So let's have a look over the following code:

    //To get the ip address of the machine and not the proxy use the following code      
                string strIPAddress = Request.UserHostAddress.ToString(); 
                strIPAddress = Request.ServerVariables["HTTP_X_FORWARDED_FOR"]; 
     
                if (strIPAddress == null || strIPAddress == "") 
                { 
                    strIPAddress = Request.ServerVariables["REMOTE_ADDR"].ToString(); 
                } 

That's it! Easy right?

HostForLIFE.eu ASP.NET 4.6 Hosting
HostForLIFE.eu is European Windows Hosting Provider which focuses on Windows Platform only. We deliver on-demand hosting solutions including Shared hosting, Reseller Hosting, Cloud Hosting, Dedicated Servers, and IT as a Service for companies of all sizes. We have customers from around the globe, spread across every continent. We serve the hosting needs of the business and professional, government and nonprofit, entertainment and personal use market segments. 


ASP.NET 4.6 Hosting Portugal - HostForLIFE.eu :: How to Use Script to Disable Auto Fill TextBoxes in Some Browsers

clock September 26, 2015 12:59 by author Rebecca

Recent's browsers like Chrome, Firefox, Internet Explorer and Safari has functionality of auto complete values in TextBoxes. If you have enabled this features in browser, every time you start to enter value in TextBox you get a drop down of prefilled values in that TextBox. This feature of browser can be disabled by the programming for a specific web form like payment form and other confidential information form of a web application.

In chrome browser, you can enable auto-fill as shown below:

Step 1

Then you will have a below form for online payment of product by credit card or debit card then it is mandatory to stop auto complete functionality of browser so that browser doesn’t save the confidential information of a customer’s credit card or debit card.


Step 2


Then, you can turn off auto-fill for your complete form by setting autocomplete attribute value to off as shown below:

<form id="Form1" method="post" runat="server" autocomplete="off">

 .

 .

</form>

Step 3

You can also turn off auto-fill for a particular TextBox by setting autocomplete attribute value to off as shown below:

<asp:TextBox Runat="server" ID="txtConfidential" autocomplete="off"></asp:TextBox>

Step 4

And you can also do this from code behind also like as:

txtConfidential.Attributes.Add("autocomplete", "off");

After doing one of above code you will see that there is no auto-fill.


HostForLIFE.eu ASP.NET 4.6 Hosting
HostForLIFE.eu is European Windows Hosting Provider which focuses on Windows Platform only. We deliver on-demand hosting solutions including Shared hosting, Reseller Hosting, Cloud Hosting, Dedicated Servers, and IT as a Service for companies of all sizes. We have customers from around the globe, spread across every continent. We serve the hosting needs of the business and professional, government and nonprofit, entertainment and personal use market segments.


ASP.NET 4.6 Hosting UK - HostForLIFE.eu :: How to Use ASP.NET to Populate AJAX Control

clock September 17, 2015 12:03 by author Rebecca

The DynamicPopulate Control in the ASP.NET AJAX can call a page method and fill the resulting value in the target control on the page without a page refresh. The method call returns a form of  HTML string that is inserted as a child of the target element. The AJAX controls  work automatically. While it's possible to call (_doPostBack()) from JavaScript to trigger for a partial update. When  we use the ASP.NET DropDownList control, ASP.NET will verify that the items in the list are the same items the list contained when the page was rendered. Since we are adding items on the client side, a postback results in an ASP.NET validation error. This postback validation is designed to prevent users from editing your web pages and trying to submit invalid data. You can disable this validation but, for our purposes, it's simpler just to use a <select> tag.

Step 1

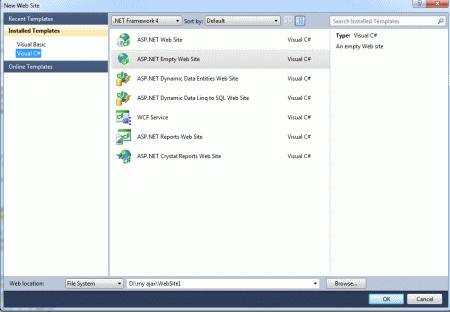
Open Visual Studio, Go to File->New->WebSite and Select ASP.NET Empty WebSite:

Step 2

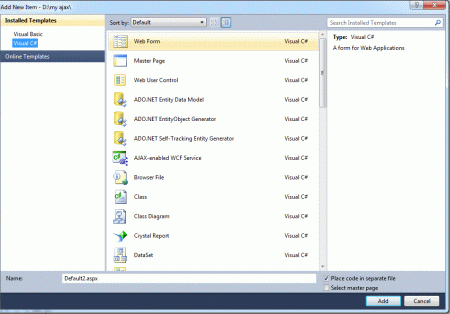
  • Go to Solution Explorer and right-click.
  • Select Add->New Item.
  • Select WebForm.
  • Default.aspx page open

Step 3

Go to Default.aspx page and click on the [Design] option and drag control from Toolbox. Then, drag Panel control, Label, Button, Drop List control, ScriptManager control.

Step 4

The page contain a button with the ID PopList. The onclick attribute of this attribute calls the PopulateList() JavaScript function.

JavaScript Function

<title>my ajax application</title>
<style type="text/css">
        body
        {
            font-family: @BatangChe
            font-size: small;
            color: #555555;
        }
    </style>
    <script type="text/javascript">
        function PopulateList() {
            PageMethods.GetListData(1, OnPopulateList);
        }
        function OnPopulateList(list) {
            var dropList = document.getElementById('DropList');
            for (i = 1; i < 10; i++) {
                var option = document.createElement('OPTION');
                option.text = list[i].text;
                option.value = list[i].value;
                dropList.options.add(option);
            }
        }
    </script>

Step 5

Go to Default.aspx[Source] option and define the condition EnablePageMethod is "True" with ScriptManager and write a code:

<form id="form1" runat="server" style="background-color: #330D1E">
    <div>
        <asp:ScriptManager ID="ScriptManager1" runat="server" EnablePageMethods="True">
        </asp:ScriptManager>
        <p style="background-color: #2FC8D0">
        </p>
        <p style="background-color: #C0D1AF">
           How to populate control in ajax
        </p>
        <p style="background-color: #B8C9C9">
            <input id="PopList" type="button" value="Populate List"
                onclick="PopulateList();" style="background-color: #A5DCBD" />
        </p>
        <p style="background-color: #784847">
            <select id="DropList" name="DropListName"
                style="width: 200px; background-color: #B3CEC6;">
            </select>
        </p>
        <p style="background-color: #808080">
            <asp:Button ID="btnSubmit" runat="server" Text="Submit" />
        </p>
        <p style="background-color: #9A96E9">
            <asp:Label ID="lblSubmitValue" runat="server" BackColor="#FFFFCC"
                BorderWidth="15px"></asp:Label>
        </p>
    </div>
    </form>

Step 6

Now we create List Data Class. The data returns a list of objects for this class. The class consist two member Text, Value.

public class ListData
        {
            public string text { get; set; }
            public int value { get; set; }
        }

Step 7

Now we define the method for Client Side JavaScript and method return the data (List Data object):

public static IEnumerable<ListData> GetListData(int arg)
        {
            List<ListData> list = new List<ListData>();
            for (int i = 0; i < 100; i++)
                list.Add(new ListData()
                {
                    text = String.Format("List Item {0}", i),
                    value = i
                });
            return list;
        }

Step 8

The collection represents the raw values being posted to the page of List Data Items. Then these data items consist of the following namespace are use it.

using System.Collections.Generic;

Step 9

Now go to the Default.aspx.cs file; write code for the method to be called from client-side JavaScript:

using System;
using System.Collections.Generic;
using System.Linq;
using System.Web;
using System.Web.UI;
using System.Web.UI.WebControls;
public partial class _Default : System.Web.UI.Page
{
        protected void Page_Load(object sender, EventArgs e)
        {
            if (Request.Form["DropListName"] != null)
                lblSubmitValue.Text = String.Format("Submitted Value: \"{0}\"",
                    Request.Form["DropListName"]);
        }
        public class ListData
        {
            public string text { get; set; }
            public int value { get; set; }
        }
        [System.Web.Services.WebMethod]
        [System.Web.Script.Services.ScriptMethod]
        public static IEnumerable<ListData> GetListData(int arg)
        {
            List<ListData> list = new List<ListData>();
            for (int i = 0; i < 100; i++)
                list.Add(new ListData()
                {
                    text = String.Format("List Item {0}", i),
                    value = i
                });
            return list;
        }
    }

Step 10

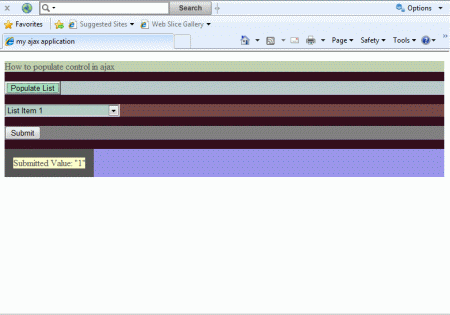
Now run the application pressing F5.

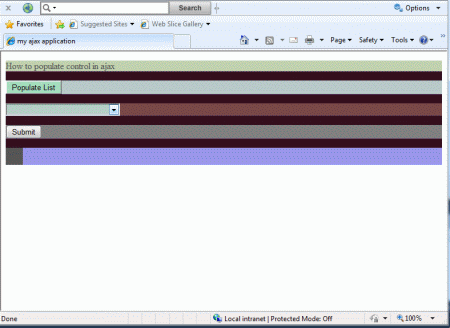
This page demonstrate how to dynamically populate a control using AJAX.

Step 11

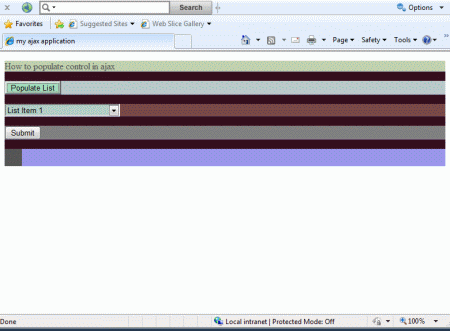
Click on the populate list button to populate the dropdown list.

Step 12

Now click on the Submit button to submit the selected value back to the server.

Step 13

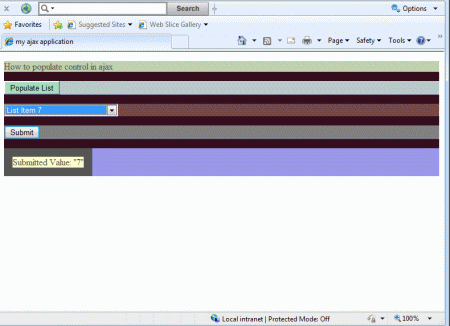
Now, you will change the dropdown list item and click on the submit button to again submit the selected value back to the server.

HostForLIFE.eu ASP.NET 4.6 Hosting
HostForLIFE.eu is European Windows Hosting Provider which focuses on Windows Platform only. We deliver on-demand hosting solutions including Shared hosting, Reseller Hosting, Cloud Hosting, Dedicated Servers, and IT as a Service for companies of all sizes. We have customers from around the globe, spread across every continent. We serve the hosting needs of the business and professional, government and nonprofit, entertainment and personal use market segments.


About HostForLIFE.eu

HostForLIFE.eu is European Windows Hosting Provider which focuses on Windows Platform only. We deliver on-demand hosting solutions including Shared hosting, Reseller Hosting, Cloud Hosting, Dedicated Servers, and IT as a Service for companies of all sizes.

We have offered the latest Windows 2016 Hosting, ASP.NET Core 2.2.1 Hosting, ASP.NET MVC 6 Hosting and SQL 2017 Hosting.


Tag cloud

Sign in