In this article, I will demonstrate how to utilise the.Page control is executed using NetCore Identity Framework, with a concentration on the UserManager and RoleManager classes. The involved web application is a.NET Core Razor Pages application, and the database is an Entity Framework Core-managed MSSQL database.

Imagine you are a member of the HR department responsible for administering the internal website of your company. Your organisation consists of three kinds of employees:
- Only personnel of the IT Department are granted access to IT-related pages.
- Only personnel of the Sales Department are permitted access to finance-related pages.
- The chief executive officer has access to all pages, including CEO-only pages.
Final Resolution Summary
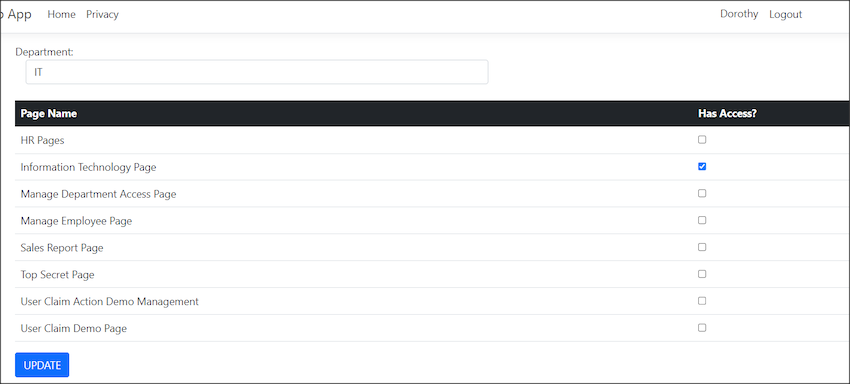
(This is how it looks when HR configure which page/s are allowed to access by IT Department in Page Access Management Page.)
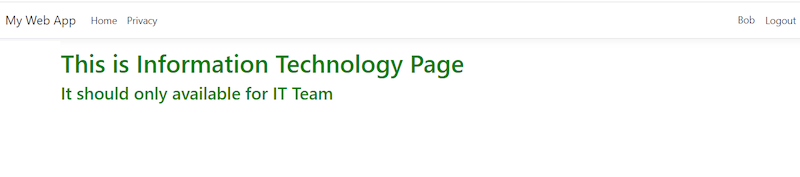
(This is how it looks like when Bob from the IT department acesss IT page)

(This is how it looks like when Bob from IT department access to view the Sales Team page)
Programming
First, I create two projects.
1. A website named "WebApp1"
A .Net Core Razor Web App and called it "WebApp1"
A Library and project named "DataLibray"
In the appsetting.json of my WebApp1, I configure the database connection
"ConnectionStrings": {
"MyDBContextConnection": "Server=.\\SQLEXPRESS;Database=WebApp1;Integrated Security=True; TrustServerCertificate=True;"
}
In my DataLibrary project, I have created a class named "MyDbContext.cs" that looks like the following:
public class MyDbContext : IdentityDbContext<IdentityUser, IdentityRole, string,
IdentityUserClaim<string>, IdentityUserRole<string>, IdentityUserLogin<string>,
IdentityRoleClaim<string>, IdentityUserToken<string>>
{
public MyDbContext() : base()
{
....//omitted code
Take note of IdentityUser, IdentityRole, and IdentityRoleClaim. These three classes are integral to nearly all sections of my code.
This is what I registered in the program.cs
var connectionString = builder.Configuration.GetConnectionString("MyDBContextConnection")
?? throw new InvalidOperationException("Connection string 'MyDBContextConnection' not found.");
builder.Services.AddDbContext<MyDbContext>(options =>
options.UseSqlServer(connectionString, b => b.MigrationsAssembly("WebApp1")));
builder.Services.AddIdentity<IdentityUser, IdentityRole>(options =>
{
options.SignIn.RequireConfirmedAccount = false;
options.User.RequireUniqueEmail = false;
options.Password.RequireDigit = false;
options.Password.RequireLowercase = false;
options.Password.RequireUppercase = false;
options.Password.RequireNonAlphanumeric = false;
options.Password.RequiredLength = 0;
options.Password.RequiredUniqueChars = 0;
}).AddEntityFrameworkStores<MyDbContext>().AddDefaultTokenProviders();
From the code snippet in my Program.cs, it is evident that I have disabled the requirement for users to have an email as their account and have also disabled the password policy. I made these modifications to simplify the development process, as I prefer not to repeatedly enter email addresses and complex passwords during development.
By the way, ensure both projects are set to target framework .Net 7.0.

Also, ensure that both initiatives adhere to the target framework.Net 7.0.
Once all required configurations are in place, the Entity Framework (EF) commands can be executed to establish the database. In my instance, these are the commands I use:
After the first command completes successfully and returns no error, add-migration FirstTimeCreateDB updates the database.
If everything is in order, the following tables will be added to the "WebApp1" database:
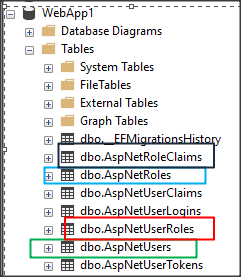
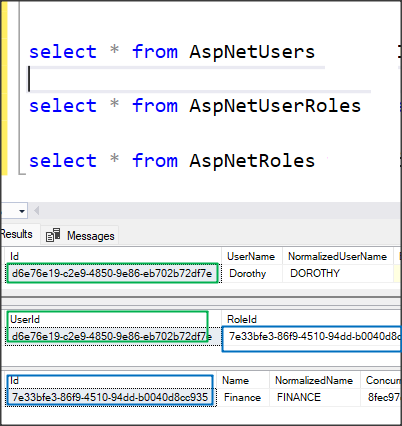
AspNetUsers is the table that stores all the user information.
AspNetRoles is the table that stores all the roles (in my case, it is the Department)
AspNetUserRoles is the table that stores the relationship between the user and role (in my case, it is the Employee and the Department)
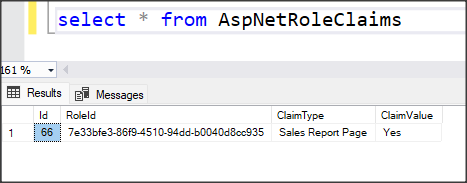
AspNetRoleClaims is the table to store the claims of each department (in my case, it is the info that what pages can each department can access)
.NET Core provides Scaffold Identity, which offers the convenience of auto-generating user interface components such as Register, Login, Logout, and Forgot Password. However, considering the specific focus of my demo project on showcasing the functionalities of the User Manager and Role Manager, and the specific responsibilities of the HR department in this scenario, certain pages like Register and Forgot Password are not required.
Department Page
First, I establish a Department Page to create departments. It appears as follows:
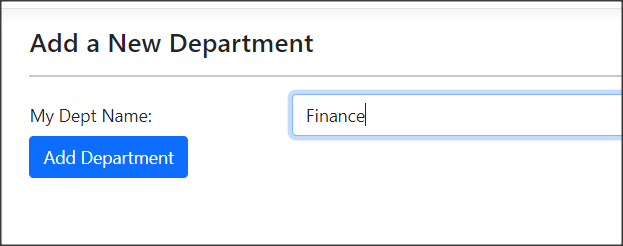
The source code for this task is very straightforward. It primarily involves the use of RoleManager. To begin, declare the RoleManager, then inject it via the constructor, and finally, invoke the CreateAsync() method.
private readonly RoleManager<IdentityRole> _roleManager;
public DepartmentManagementModel( RoleManager<IdentityRole> rolemanager)
{
_roleManager = rolemanager;
}
public async Task<IActionResult> OnPostAsync()
{
IdentityRole IdentityRole = new IdentityRole();
IdentityRole.Name = this.IdentityRole.NormalizedName;
IdentityRole.NormalizedName = this.IdentityRole.NormalizedName;
await _roleManager.CreateAsync(IdentityRole);
}
If the creation is successful, you’ll be able to see the newly created role in the AspNetRoles table.
Employee Page
Next, Create an Employee Page to create Employee.

Employee Page
Next, Create an Employee Page to create Employee.
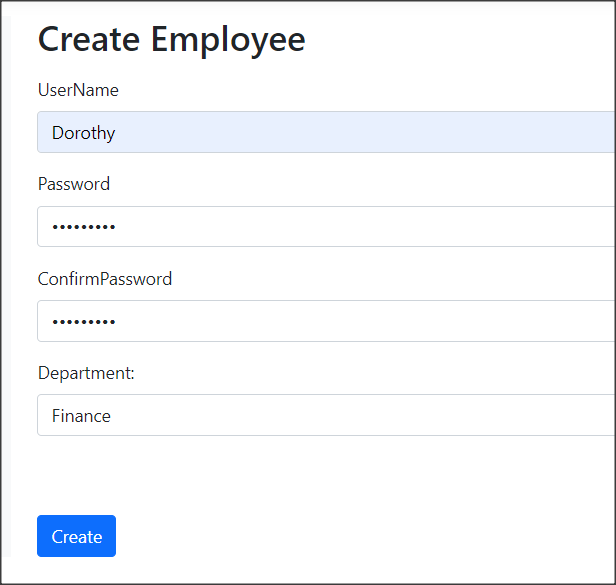
This page contains a drop-down box to store all the Departments. We use Role Manager to get all the roles (Department):
DepartmentOptions = _roleManager.Roles
.Select(r => new SelectListItem
{
Text = r.Name,
Value = r.Id
}).ToList();
The source code for creating an employee is straightforward and primarily utilizes the UserManager. First, declare the UserManager, then inject it via the constructor, and finally, invoke the CreateAsync() method.
private readonly UserManager<IdentityUser> _userManager;
public CreateEmployeeModel(UserManager<IdentityUser> userManager,
RoleManager<IdentityRole> rolemanager, UrlEncoder urlencoder, IWebHostEnvironment env)
{
_userManager = userManager;
_roleManager = rolemanager;
}
public async Task<IActionResult> OnPostAsync()
{
var user = new IdentityUser { UserName = Input.UserName };
var result = await _userManager.CreateAsync(user, Input.Password);
}
The source code of add a role to the department is
await _userManager.AddToRoleAsync(user, Groupname);
Page Access Management Page
Then, we can see in table AspNetUsers and AspNetUserRoles that a User with the role she belongs has been added.
Next is the Page Access Management Page. First, I created a Class called PageNameConfiguration to configure the page name that we will control access.
public static class PageNameConfiguration
{
public static IServiceCollection ConfigurPageNameFunction(this IServiceCollection services)
{
PageNameDictionary.Instance.Add("Sales Report Page", PagesNameConst.SalesReport);
PageNameDictionary.Instance.Add("Information Technology Page", PagesNameConst.IT);
//...omitted codes
return services;
}
public static void AddPageAccessPolicy(this AuthorizationOptions options)
{
options.AddPolicy(PagesNameConst.SalesReport,
policy => policy.RequireClaim(PagesNameConst.SalesReport, "Yes"));
options.AddPolicy(PagesNameConst.IT,
policy => policy.RequireClaim(PagesNameConst.IT, "Yes"));
//...omitted code
The AddPageAccessPolicy method is used to establish the Access Policy. Here, ‘claims’ refer to the names of each page, with the assigned value of "Yes". The value could be anything; you can use "Yes" or "True" to indicate that the page can be accessed by a certain user.
To ensure the functionality of the AddPageAccessPolicy method, it must be registered within the Program.cs file.
builder.Services.AddAuthorization(options =>
{
options.AddPageAccessPolicy();
});
This is the page that manages page access. It features a dropdown menu containing all the departments. Listed below are the page names. I utilize checkboxes to control which pages can be accessed by the selected department.
Once selected, click the update button, and the claims will be updated. The code behind of update claim to the role is
await _roleManager.AddClaimAsync(role, new Claim(pagename.ClaimType, "Yes"));
Please note that I have hard-coded the value of ‘claims’ to "Yes". This is because, in the AddPageAccessPolicy method, I specified that the value must be set to "Yes". Consequently, in the AspNetRoleClaims table, the Claim Type is now associated with the page name, and the Claim Value is designated as "Yes".
Authorize Attribute Set Policy
To set up the page to be viewable only with certain claims, it is imperative to set the policy attribute directly on the page itself. For instance, take my SalesReport Page as an example, where I’ve implemented the policy attribute at the class level.
[Authorize(Policy = PagesNameConst.SalesReport)]
public class SalesReportModel : PageModel
{
public void OnGet()
{
}
}
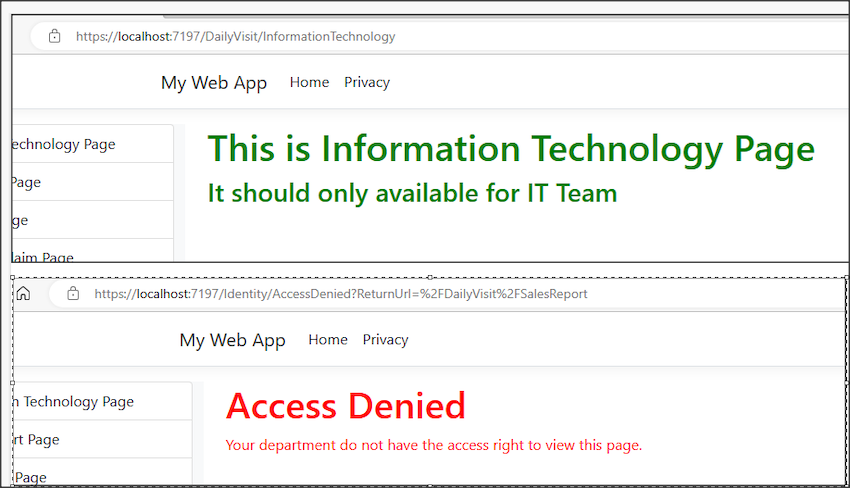
Access Denied Page
I have created an ‘Access Denied’ page. This page will be displayed when an employee attempts to access a page for which they do not have the necessary authorization. Like the login page, the AccessDenied page needed to be registered in Program.cs we well.
builder.Services.ConfigureApplicationCookie(options =>
{
options.LoginPath = "/Identity/Login";
options.AccessDeniedPath = "/Identity/AccessDenied";
});
Now, we are done. I created a Employee named ‘Bob’, which is from IT Department; he can access IT page but not the Sales Report page.
2FA with Sign In Manager
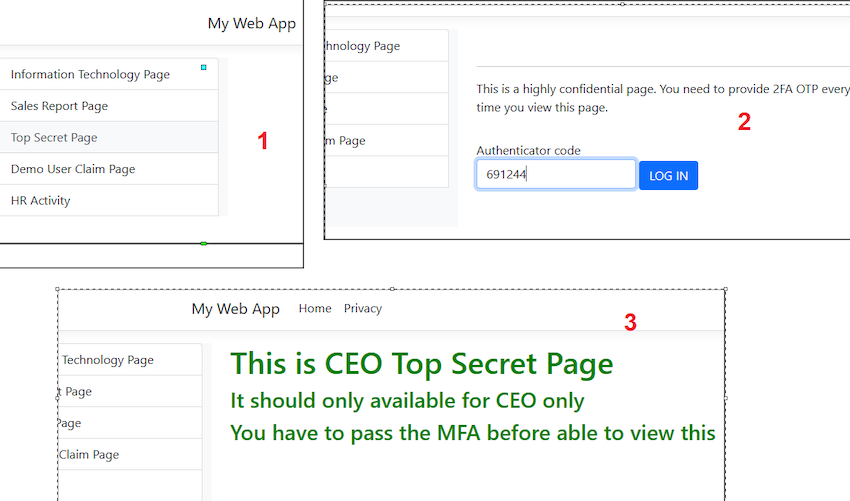
Now, let’s take this a step further. Imagine there’s a page named "TopSecretCEOOnly", which can only be accessed by the CEO. Since this page holds the company’s top secrets, a standard username and password combination isn’t secure enough. Management has requested an additional layer of security: Two-Factor Authentication (2FA).
This added security can be accomplished by creating a 2FA verification page. I have developed a page called VerifyWith2FA.cshtml (note that this page can also be auto-generated using identity scaffolding).
Then, I implemented a redirect to the 2FA page in my "TopSecretCEOOnly" page. This ensures that before a user can view this page, they must successfully pass the 2FA verification.
[Authorize(Policy = PagesNameConst.TopSecret)]
public class TopSecretCEOOnlyModel : PageModel
{
public IActionResult OnGet()
{
if (HttpContext.Session.GetString("Passed2FA") != "true")
{
TempData["ReturnUrl"] = "/DailyVisit/TopSecretCEOOnly";
return RedirectToPage("/Identity/VerifyWith2FA");
}
HttpContext.Session.Remove("Passed2FA");
return Page();
}
}
In my VerifyWith2FA page, I’m using the UserManager, method VerifyTwoFactorTokenAsync to verify the 2FA OTP code.
var authenticatorCode = Input.TwoFactorCode.Replace(" ", string.Empty).Replace("-", string.Empty);
bool isOTPValid = await _userManager.VerifyTwoFactorTokenAsync(user, _userManager.Options.Tokens.AuthenticatorTokenProvider, authenticatorCode);
Please take note that I have created TWO 2FA pages for verification
- LoginWith2FA.cshtml - This is for 2FA DURING login; it use SigninManager to verify user sign in using OTP
- VerifyWith2FA.cshtml - This is for 2FA verification AFTER login. To visit certain sensitive page, it uses UserManager to verify the user
So, to access the "Top Secret" page, one must input an OTP (One-Time Password). Once this OTP has been successfully verified, only then will the page's contents be displayed.
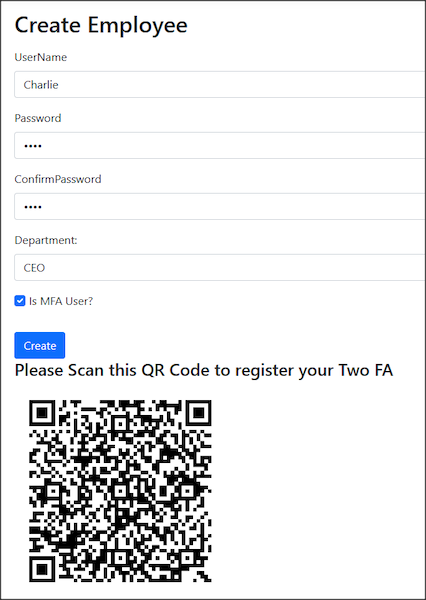
Since I am using 2FA to login/verify, I updated my create Employee UI to allow users to select whether this user will have 2FA or not. This 2D QR code needs to use Google Authenticator App to scan and store the OTP.
Reset Password
I have a page to reset password. You can use ResetPasswordAsync from User Manager to reset the password.
var token = await _userManager.GeneratePasswordResetTokenAsync(user);
var password = GeneratePassword();
var resetResult = await _userManager.ResetPasswordAsync(user, token, password);
If it is a 2FA user, you need to GenerateNewTwoFactorRecoveryCodesAsync.
await _userManager.SetAuthenticationTokenAsync(user, "Google", "secret", null);
await _userManager.GenerateNewTwoFactorRecoveryCodesAsync(user, 1);
Personal Level Claim
So far, I just discussed the claim at the group level; how about claim at the PERSONAL user level?
I have created a page named UserClaimActionManagement.cshtml. This page is designed to control the number of actions a user is permitted to perform. For instance, Bob has been granted both the right to view and edit a document.
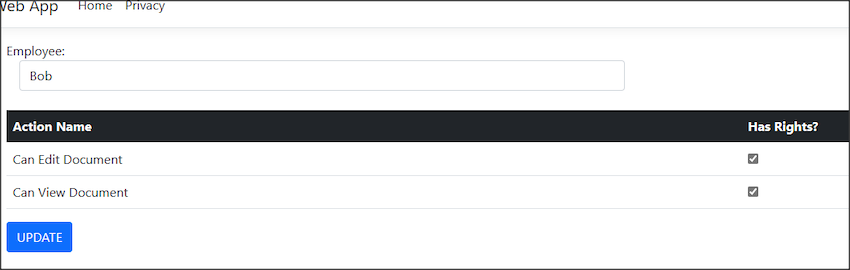
The underlying code for associating a claim with a user involves using the _userManager.AddClaimAsync() method. As you can see, if the claim is at the personal level, we use the UserManager and invoke the AddClaim method. In the previous example, the claim was at the role level, which is why we used RoleManager.
await _userManager.AddClaimAsync(user, new Claim(actionname.ClaimType, "Yes"));
For the demo, I got another page named DemoUserClaim.cshtml. In OnGet() method, I get the claim from the user and decide what they can do.
public async Task OnGet()
{
var user = await _userManager.GetUserAsync(User);
var userClaims = await _userManager.GetClaimsAsync(user);
CanViewDocument = userClaims.Any(c => c.Type == DemoUserClaimConst.CanViewDocument && c.Value == "Yes");
CanEditDocument = userClaims.Any(c => c.Type == DemoUserClaimConst.CanEditDocument && c.Value == "Yes");
}
With the claim, I can control the user’s rights, either in view or in the backend. Either user without "CanEditDocument" claims unable to view the edit part, or we blocked the edit method being called in the backend code.
@if(Model.CanViewDocument)
{
<h3>You can see me means you have the claims for <span style="color:orange;">Can View document</span></h3>
}
@if (Model.CanEditDocument)
{
<h3>You can see me means you have the claims for <span style="color: green;">Can Edit document</span></h3>
<form method="post">
<input type="submit" value="Edit Document" />
</form>
}
Markup
public async Task OnPost()
{
if (!CanEditDocument)
{
//sorry you are not allowed to Edit Documet
return;
}
else
{
//proceed with edit document
}
}
Generate Navigation Bar Contents By Claims
Naturally, a more effective and refined approach would be to generate the web navigation bar based on claims. This way, when users log in, they will only see menu options corresponding to their respective claims. The following code snippet demonstrates how I utilize "User.HasClaim" in the _NavigationBar to dictate access to the IT Page and Sales Report Page respectively.
if (User.HasClaim(x => x.Type == Constant.PagesNameConst.IT))
{
<a href="/DailyVisit/InformationTechnology" class="list-group-item list-group-item-action">
Information Technology Page
</a>
}
if (User.HasClaim(x => x.Type == Constant.PagesNameConst.IT))
{
<a href="/DailyVisit/SalesReport" class="list-group-item list-group-item-action">
Sales Report Page
</a>
}
//and so on...
However, it’s still necessary to apply the authorization policy to individual pages. Relying on navigation bar control alone isn’t secure enough; without the policy, users could still attempt to access a page if they have the URL, even if it isn’t displayed in the navigation bar.
Customized User Manager or Role Manager
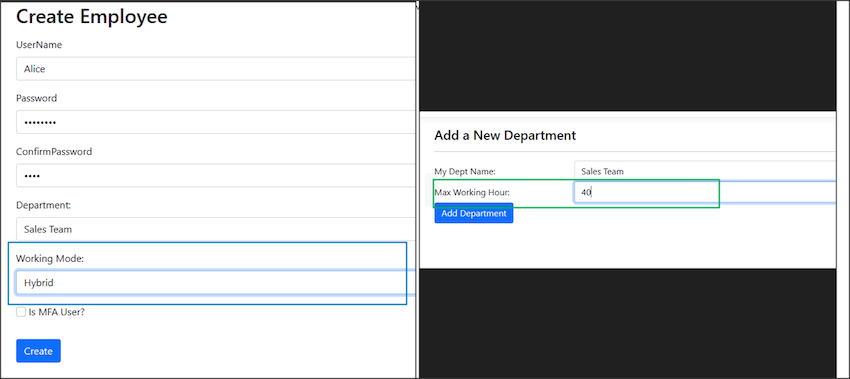
Imagine you need extra information; say the employee has an extra information called the mode of work, either working in an office, WFH, or hybrid. Or the department needs to set maximum working hours every week. The existing AspNetUsers and AspNetRoles do not have such columns; then, you may use inheritance in C# to customize it.
To solve this, I created another project (new Data Library and New Web App and DB) similar to the previous one but slightly modified.
For the employee, I now created a customized class named "MyEmployee", which inherits IdentityUser, and added the work mode customized new field.
public class MyEmployee : IdentityUser
{
public WorkMode EmployeeWorkMode { get; set; }
//... omitted code
The same thing goes for Role. I created a customized class named "MyDepartment", which inherits IdentityRole, and added the Max Working Hours customized new field.
public class MyDepartment : IdentityRole
{
public int MaxWorkingHours{ get; set; }
//... omitted code
The same thing goes for claims.
public class MyDepartmentClaim : IdentityRoleClaim<string>
{
//... omitted code
public class MyEmployeeDepartment : IdentityUserRole<string>
{
//... omitted code
For my DB Context configuration, I now created a CreateMyOwnIdentity method to rename those identity tables.
public class MyDbContext : IdentityDbContext<MyEmployee, MyDepartment, string,
IdentityUserClaim<string>, MyEmployeeDepartment, IdentityUserLogin<string>,
MyDepartmentClaim, IdentityUserToken<string>>
{
....
protected override void OnModelCreating(ModelBuilder modelBuilder)
{
base.OnModelCreating(modelBuilder);
modelBuilder.CreateMyOwnIdentity();
}
Following is how I renamed the tables (not necessary, but I did it for demo purposes)
public static class IdentityModelBuilderExtensions
{
public static void CreateMyOwnIdentity(this ModelBuilder builder)
{
builder.Entity<MyEmployee>(b =>
{
b.ToTable("MyEmployee");
});
builder.Entity<MyDepartment>(b =>
{
b.ToTable("MyDepartment");
b.HasMany(e => e.MyDepartmentClaim)
.WithOne(e => e.MyDepartment)
.HasForeignKey(rc => rc.RoleId)
.IsRequired();
});
builder.Entity<MyDepartmentClaim>(b =>
{
b.ToTable("MyDepartmentClaim");
});
builder.Entity<MyEmployeeDepartment>(b =>
{
b.ToTable("MyEmployeeDepartment");
});
}
}
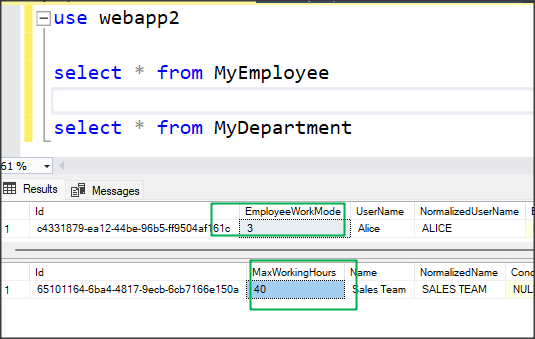
After executing the EF create migration and update DB commands, I have the new tables with new names.

The rest are pretty much the same, just add an extra column during Create Employee and Create Department.
The data will be updated in the database as well.
Further enhancements and notes
- I do not do input validation for most of my UI.
- Some pages can be grouped more tidily. For example, the manage employee and reset employee pages can be mixed into one page. I separate it for demo purposes.
- I used QRCoder v1.4.1 to create a 2D QR Code for this project. My code for QR Code creation will not work if you use the latest version, v1.4.3. You may also use other QR Coder libraries.
Conclusion
When I first started developing this project using .Net Core Identity, I encountered a myriad of questions and issues, especially when it came to navigating IdentityManager, RoleManager, and claims. I hope this article can serve as a useful guide for others using .Net Core Identity to develop their own applications.