European ASP.NET 4.5 Hosting BLOG

BLOG about ASP.NET 4, ASP.NET 4.5 Hosting and Its Technology - Dedicated to European Windows Hosting Customer

European ASP.NET Core Hosting :: File Upload in Angular 7

clock September 20, 2019 10:52 by author Scott

In this article, we will see how to upload a file into the database using the Angular 7 app in an ASP.NET project. Let us create a new project in Visual Studio 2017. We are using ASP.NET Core 2 and Angular 7 for this project.

Prerequisites:

  • Node JS must be installed
  • Angular CLI must be installed
  • Basic knowledge of Angular

Let’s get started.

Create a new project and name it as FileUploadInAngular7

Select a new project with Angular in .NET Core and uncheck the configure HTTPS

Your project will be created. Left click on ClientApp and open it in file explorer

Type cmd as shown in the picture.

Type npm install in the cmd

Now it will take time and all the node_modules will be installed in the project.

Create a Web API controller as UploadController.

Add the following code in it.

using System.IO;
using System.Net.Http.Headers;
using Microsoft.AspNetCore.Hosting;
using Microsoft.AspNetCore.Mvc;
namespace FileUploadInAngular7.Controllers
{
    [Produces("application/json")]
    [Route("api/[controller]")]
    public class UploadController : Controller
    {
        private IHostingEnvironment _hostingEnvironment;
        public UploadController(IHostingEnvironment hostingEnvironment)
        {
            _hostingEnvironment = hostingEnvironment;
        }
        [HttpPost, DisableRequestSizeLimit]
        public ActionResult UploadFile()
        {
            try
            {
                var file = Request.Form.Files[0];
                string folderName = "Upload";
                string webRootPath = _hostingEnvironment.WebRootPath;
                string newPath = Path.Combine(webRootPath, folderName);
                if (!Directory.Exists(newPath))
                {
                    Directory.CreateDirectory(newPath);
                }
                if (file.Length > 0)
                {
                    string fileName = ContentDispositionHeaderValue.Parse(file.ContentDisposition).FileName.Trim('"');
                    string fullPath = Path.Combine(newPath, fileName);
                    using (var stream = new FileStream(fullPath, FileMode.Create))
                    {
                        file.CopyTo(stream);
                    }
                }
                return Json("Upload Successful.");
            }
            catch (System.Exception ex)
            {
                return Json("Upload Failed: " + ex.Message);
            }
        }
    }
}

Navigate to the following path and open both the files.

In home.component.html write the following code.

<h1>File Upload Using Angular 7 and ASP.NET Core Web API</h1>
<input #file type="file" multiple (change)="upload(file.files)" />
<br />
<span style="font-weight:bold;color:green;" *ngIf="progress > 0 && progress < 100">
  {{progress}}%
</span>
<span style="font-weight:bold;color:green;" *ngIf="message">
  {{message}}
</span>

In home.component.ts file write the following code in it.

import { Component, OnInit } from '@angular/core';
import { HttpClient, HttpRequest, HttpEventType, HttpResponse } from '@angular/common/http';
@Component({
  selector: 'app-home',
  templateUrl: './home.component.html',
})
export class HomeComponent {
  public progress: number;
  public message: string;
  constructor(private http: HttpClient) { }
  upload(files) {
    if (files.length === 0)
      return;
    const formData = new FormData();
    for (let file of files)
      formData.append(file.name, file);
    const uploadReq = new HttpRequest('POST', `api/upload`, formData, {
      reportProgress: true,
    });
    this.http.request(uploadReq).subscribe(event => {
      if (event.type === HttpEventType.UploadProgress)
        this.progress = Math.round(100 * event.loaded / event.total);
      else if (event.type === HttpEventType.Response)
        this.message = event.body.toString();
    });
  }
}

Run the project and you will see the following output.


European ASP.NET Core Hosting :: InProcess and OutOfProcess Hosting Model In ASP.NET Core

clock September 17, 2019 11:37 by author Scott

Once you finish developing an ASP.NET Core web application, you need to deploy it on a server so that end users can start using it. When it comes to deployment to IIS, ASP.NET Core offers two hosting models namely InProcess and OutOfProcess. In this article you learn about these hosting models and how to configure them.

When you deploy your web application to IIS, various requests to the application are handled by what is known as ASP.NET Core Module. Under default settings the hosting model for your application is InProcess. This means ASP.NET Core Module forwards the requests to IIS HTTP Server (IISHttpServer). The IIS HTTP Server is a server that runs in-process with IIS. This results in great performance as compared to Out Of Process model. In-process models bypasses built-in Kestrel web server of ASP.NET Core.

If you decide to use Out-Of-Process hosting model then IIS HTTP Server won't be used. Instead Kestrel web server is used to process your requests. So, ASP.NET Core Module forwards your requests to Kestrel web server. This communication is out-of-process communication and is therefore slower than the in-process model.

Now that you have some basic idea about the in-process and out-of-process hosting models let's see how to configure them.

In order to understand the hosting models discussed in this article you first need to create an ASP.NET Core web application using Visual Studio. So, go ahead and do so based on any of the web application project templates. Make sure to use ASP.NET Core version 2.2 or later.

Once you create the project, click on the Build > Publish menu and Web Deploy the output (or manually copy to IIS) to IIS. Once you finish deploying the application locate the web.config file generated during the deployment process. In this web.config you will find a section like this:

<system.webServer>
  <handlers>
    <add name="aspNetCore" path="*" verb="*"
modules="AspNetCoreModuleV2" />
  </handlers>
  <aspNetCore processPath="dotnet"
              arguments=".\MyWebApp.dll"  
              stdoutLogEnabled="false"
              stdoutLogFile=".\logs\stdout"
              hostingModel="inprocess" />
</system.webServer>

As you can see the <aspNetCore> tag has hostingModel attribute that is set to inprocess by default.

Now, run the application from the browser with this default setting in place and observe the HTTP headers. The following figure shows one such sample run of the application.

As you can see the Server is Microsoft IIS.

Now, change the hostingModel attribute from inprocess to outofprocess. Run the application again. This time you will get the following output:

As you can see the Server is now Kestrel indicating that Out-Of-Process model is active.

In the preceding example you change the hosting model in the web.config generated during the publish operation. You can also specify the hosting model in project's .csproj file. Consider the following markup from .csproj file that does that.

<PropertyGroup>
    <TargetFramework>netcoreapp2.2</TargetFramework>
    <AspNetCoreHostingModel>InProcess</AspNetCoreHostingModel>
</PropertyGroup>

The <AspNetCoreHostingModel> element sets the hosting model to InProcess. To set it to Out-Of-Process you need to set it like this:

<AspNetCoreHostingModel>OutOfProcess</AspNetCoreHostingModel>

Run the application with these settings and confirm whether you get the outcome as before.

That's it for now! Keep coding!!


ASP.NET Hosting HostForLIFE.eu :: Centralized Exception Handling Without Using Try Catch Block In .Net Core 2.2 Web API

clock September 3, 2019 12:00 by author Peter

Rather than writing try catch block for each method, throwing exceptions manually and handling them, here we will use the power of .Net Core middleware to handle the exceptions at one single place, so that when an exception occurs anywhere in the code, the appropriate action can be taken. We will use UseExceptionHandler extension method that will add a middleware to the pipeline, and it will catch exceptions, log them, reset the request path, and re-execute the request if response has not already started.

Developer can customize the response format as well.

To achive this in .NetCore 2.2, this code snippet is very simple and it's just a matter of adding a few lines in your Startup.cs.

Simply go in Configure method and add the below code,
if (env.IsDevelopment()) {  
    app.UseDeveloperExceptionPage();  
} else {  
    app.UseExceptionHandler(errorApp => errorApp.Run(async context => {  
        // use Exception handler path feature to catch the exception details   
        var exceptionHandlerPathFeature = context.Features.Get < IExceptionHandlerPathFeature > ();  
        // log errors using above exceptionHandlerPathFeature object   
        Console.WriteLine(exceptionHandlerPathFeature ? .Error);  
        // Write a custom response message to API Users   
        context.Response.StatusCode = "500";  
        // Set a response format    
        context.Response.ContentType = "application/json";  
        await context.Response.WriteAsync("Some error occured.");  
    }));  
}  


The Console.WriteLine() is for demonstration purposes only. Here a developer can log the exceptions using any tool/package getting used in their project.

When any exceptions are thrown in the application this code will be executed and will produce the desired custom response in non-development environments (as in a development env we are using UseDeveloperExceptionPage() as a middleware).

HostForLIFE.eu ASP.NET 4.8 Hosting
HostForLIFE.eu is European Windows Hosting Provider which focuses on Windows Platform only. We deliver on-demand hosting solutions including Shared hosting, Reseller Hosting, Cloud Hosting, Dedicated Servers, and IT as a Service for companies of all sizes. We have customers from around the globe, spread across every continent. We serve the hosting needs of the business and professional, government and nonprofit, entertainment and personal use market segments.


European ASP.NET Core Hosting :: Rotate Ads Without Refreshing the Page Using AdRotator in ASP.NET

clock August 20, 2019 12:18 by author Peter

This article explains the concept of the AdRotator control without the user refreshing the page and rotates the ads on a certain time interval. This article also gives a tip to fetch ad information from an XML file. The AdRotator Control presents ad images each time a user enters or refreshes a webpage. When the ads are clicked, it will navigate to a new web location. However the ads are rotated only when the user refreshes the page. In this article, we will explore how you can easily rotate ads at regular intervals, without the user refreshing the page. First of all start Visual Studio .NET And make a new ASP.NET web site using Visual Studio 2010.
 
Now you have to create a web site.
Go to Visual Studio 2010
New-> Select a website application
Click OK

Now add a new page to the website.

    Go to the Solution Explorer
    Right-click on the Project name
    Select add new item
    Add new web page and give it a name
    Click OK

We create an images folder in the application which contains some images to rotate in the AdRotator control. Now add a XML file. To do so, right-click the App_Data folder > Add New Item > 'XML File' > Rename it to adXMLFile.xml and click Add. Put this code in the .XML File.

    <?xml version="1.0" encoding="utf-8" ?> 
    <Advertisements> 
    <Ad> 
    <ImageUrl>~/Images/image1.gif</ImageUrl> 
    <NavigateUrl>http://www.c-sharpcorner.com/</NavigateUrl> 
    <AlternateText>C-sharpcorner Home Page</AlternateText> 
    <Impressions>3</Impressions> 
    <Keyword>small</Keyword> 
    </Ad> 
    <Ad> 
    <ImageUrl>~/images/forest_wood.JPG</ImageUrl> 
    <NavigateUrl>http://www.c-sharpcorner.com/</NavigateUrl> 
    <AlternateText>C-sharpcorner Home Page</AlternateText> 
    <Impressions>2</Impressions> 
    <Keyword>small</Keyword> 
    </Ad> 
    <Ad> 
    <ImageUrl>~/images/image2.gif</ImageUrl> 
    <Width>300</Width> 
    <Height>50</Height> 
    <NavigateUrl>http://www.c-sharpcorner.com/</NavigateUrl> 
    <AlternateText>C-sharpcorner Home Page</AlternateText> 
    <Impressions>3</Impressions> 
    <Keyword>small</Keyword> 
    </Ad> 
    </Advertisements> 


XML file elements

  • Here is a list and a description of the <Ad> tag items.
  • ImageUrl - The URL of the image to display.
  • NavigateUrl - The URL where the page will go after AdRotator image is clicked.
  • AlternateText - Text to display if the image is unavailable.
  • Keyword - Category of the ad, which can be used to filter for specific ads.
  • Impressions - Frequency of ad to be displayed. This number is used when you want some ads to be displayed more frequently than others.
  • Height - Height of the ad in pixels.
  • Width - Width of the ad in pixel.

Now drag and drop an AdRotator control from the toolbox to the .aspx and bind it to the advertisement file. To bind the AdRotator to our XML file, we will make use of the "AdvertisementFile" property of the AdRotator control as shown below:
    <asp:AdRotator 
    id="AdRotator1" 
    AdvertisementFile="~/adXMLFile.xml" 
    KeywordFilter="small" 
    Runat="server" /> 


To rotate the ads without refreshing the page, we will add some AJAX code to the page.
    <Triggers> 
    <asp:AsyncPostBackTrigger ControlID="Timer1" EventName="Tick" /> 
    </Triggers> 


The .aspx code will be as shown below.
 
Now drag and drop an UpdatePanel and add an AdRotator control into it. The DataList code looks like this:
    <%@ Page Language="C#" AutoEventWireup="true" CodeFile="adrotator.aspx.cs" Inherits="adrotator" %> 
    <!DOCTYPE html PUBLIC "-//W3C//DTD XHTML 1.0 Transitional//EN" "http://www.w3.org/TR/xhtml1/DTD/xhtml1-transitional.dtd"> 
    <html xmlns="http://www.w3.org/1999/xhtml"> 
    <head runat="server"> 
    <title></title> 
    </head> 
    <body> 
    <form id="form1" runat="server"> 
    <div> 
    <asp:ScriptManager ID="ScriptManager1" runat="server" /> 
    <asp:Timer ID="Timer1" Interval="1000" runat="server" /> 
    <asp:UpdatePanel ID="up1" runat="server"> 
    <Triggers> 
    <asp:AsyncPostBackTrigger ControlID="Timer1" EventName="Tick" /> 
    </Triggers> 
    <ContentTemplate> 
    <asp:AdRotator ID="AdRotator1" AdvertisementFile="~/adXMLFile.xml" KeywordFilter="small" 
    runat="server" /> 
    </ContentTemplate> 
    </asp:UpdatePanel> 
    </div> 
    </form> 
    </body> 
    </html> 


Now run the application and test it. The AdRotator control rotates the ads without the user refreshing the page and rotates the ads on a certain time interval


European ASP.NET Core Hosting :: Session Wrapper Design Pattern For ASP.NET Core

clock August 14, 2019 11:11 by author Peter

In this article, we will learn to access the Session data in a Typed manner by getting IntelliSense support. We learned how to use Session in ASP.NET Core. In this article, we'll learn about Session Wrapper design pattern to ease the access of Session. In short, we'll make our access of session "Typed". Also, we may apply any validation or constraint in this wrapper class.

Step 1 - Create a Session Manager class

In this example, we are going to store two items in Session (i.e. ID & LoginName).
We are injecting IHttpContextAccessor so that we can access the Session variable.
We are creating properties which are actually accessing Session variable and returning the data or writing the data to Session.
We have added one helping property "IsLoggedIn" which is using other properties to make a decision. We may have more such helping/wrapper properties.
using Microsoft.AspNetCore.Http;

public class SessionManager 

    private readonly ISession _session; 
    private const String ID_KEY = "_ID"; 
    private const String LOGIN_KEY = "_LoginName"; 
    public SessionManager(IHttpContextAccessor httpContextAccessor) 
    { 
        _session = httpContextAccessor.HttpContext.Session; 
    } 

    public int ID 
    { 
        get 
        { 
            var v = _session.GetInt32(ID_KEY); 
            if (v.HasValue) 
                return v.Value; 
            else 
                return 0; 
        } 
        set 
        { 
            _session.SetInt32(ID_KEY, value); 
        } 
    } 
    public String LoginName 
    { 
        get 
        { 
            return _session.GetString(LOGIN_KEY); 
        } 
        set 
        { 
            _session.SetString(LOGIN_KEY, value); 
        } 
    } 
    public Boolean IsLoggedIn 
    { 
        get 
        { 
            if (ID > 0) 
                return true; 
            else 
                return false; 
        } 
    } 
}
 

Step 2
Registering IHttpContextAccessor and SessionManager in Startup file.
services.AddSingleton<IHttpContextAccessor, HttpContextAccessor>(); 
services.AddScoped<SessionManager>(); 


Step 3
Injecting SessionManager in your classes. Here is an example of Controller class but in the same way, it can be injected in non-controller classes too.
private readonly SessionManager _sessionManager; 
public HomeController(SessionManager sessionManager) 

  _sessionManager = sessionManager; 


Step 4
Using SessionManager to access Session Data,
_sessionManager.ID = 1; 
_sessionManager.LoginName = dto.Login; 

if(_sessionManager.IsLoggedIn == true) 

ViewBag.Login = _sessionManager.LoginName; 
return View(); 


Conclusion
This wrapper pattern helps using Session without worrying about KeyNames & Makes access easier. It also helps you apply different conditioning and constraints in a wrapper class.


European ASP.NET Core Hosting :: How to Use Serilog with ASP.NET Core 2

clock August 7, 2019 08:48 by author Scott

Today, I will discuss about Serilog. What is Serilog? Serilog is an open source event library for .NET. Serilog gives you two important components: loggers and sinks (outputs). Most applications will have a single static logger and several sinks, so in this example I’ll use two: the console and a rolling file sink.

Starting with a new ASP.NET Core 2.0 Web Application running on .NET Framework (as in the image to the right), begin by grabbing a few packages off NuGet:

  • Serilog
  • Serilog.AspNetCore
  • Serilog.Settings.Configuration
  • Serilog.Sinks.Console
  • Serilog.Sinks.RollingFile

Next, you will need to modify some files.

Startup.cs

Startup constructor

Create the static Log.Logger by reading from the configuration (see appsettings.json below). The constructor should now look like this:

public Startup(IConfiguration configuration)
{
   Log.Logger = new LoggerConfiguration().ReadFrom.Configuration(configuration).CreateLogger();
Configuration = configuration;
}

BuildWebHost method

Next, add the .UseSerilog() extension to the BuildWebHost method. It should now look like this:

public static IWebHost BuildWebHost(string[] args) =>
WebHost.CreateDefaultBuilder(args)
.UseStartup<Startup>()
.UseSerilog() // <-- Add this line
.Build();

The BuildWebHost method might look strange because the body of this method is called an expression body rather than a traditional method with a statement body.

Configure method

At the start of the configure method, add one line at the top to enable the Serilog middleware. You can optionally remove the other loggers as this point as well. Your Configure method should start like this:

public void Configure(IApplicationBuilder app, IHostingEnvironment env, ILoggerFactory loggerFactory)
{
     loggerFactory.AddSerilog(); // <-- Add this line
     ...

appsettings.json

At the root level of the appsettings.json (or one of the environment-specific settings files), add something like this:

"Serilog": {
     "Using": [ "Serilog.Sinks.Console" ],
     "MinimumLevel": "Debug",
     "WriteTo": [
            { "Name": "Console" },
            {
                    "Name": "RollingFile",
                    "Args": {
                          "pathFormat": "logs\\log-{Date}.txt",
                          "outputTemplate": "{Timestamp:yyyy-MM-dd HH:mm:ss.fff zzz} [{Level}] {Message}{NewLine}{Exception}"
                    }
            }
     ],
     "Enrich": [ "FromLogContext", "WithMachineName", "WithThreadId" ],
     "Properties": {
     "Application": "My Application"
            }
}

If you’re wondering about the pathFormat and what other parameters you can use, there aren’t that many. {Date} is the only “switch” you can use with this particular sink. But you can use any environment variable (things like %TEMP%), allowing for a pathFormat of:

"%TEMP%\\logs\\log-{Date}.txt"

The outputTemplate has a LOT of options that I won’t get into here because the official documentation does a great job of explaining it.

As for the event levels, I’ve copied the list below from the official documentation for reference.

  1. Verbose – tracing information and debugging minutiae; generally only switched on in unusual situations
  2. Debug – internal control flow and diagnostic state dumps to facilitate pinpointing of recognised problems
  3. Information – events of interest or that have relevance to outside observers; the default enabled minimum logging level
  4. Warning – indicators of possible issues or service/functionality degradation
  5. Error – indicating a failure within the application or connected system
  6. Fatal – critical errors causing complete failure of the application

You’ll also notice in the above JSON that the “Using” property is set to an array containing “Serilog.Sinks.Console” but not “Serilog.Sinks.RollingFile”. Everything appears to work, so I am not sure what impact this property has.  


European ASP.NET Core Hosting :: Dynamically Check And Uncheck Checkbox Based On DB Value In Gridview

clock July 23, 2019 12:23 by author Peter

This code will help the developers to check and uncheck the gridview checkbox based on the value from the database.
Create a GridView with checkbox.

<asp:GridView ID="Gridview" runat="server" Font-Size="8pt" 
        PageSize="200" Width="880px" AutoGenerateColumns="False"> 
        <Columns> 
            <asp:TemplateField> 
                <HeaderTemplate> 
                    <asp:CheckBox ID="chkHeader" Text="Select All" runat="server" /> 
                </HeaderTemplate> 
                <ItemTemplate> 
                    <asp:CheckBox ID="chkChild" runat="server"  Checked='<%# Eval("PROCESSED").ToString().Equals("1") %>' Enabled='<%# !Eval("PROCESSED").ToString().Equals("1") %>'/> 
                </ItemTemplate> 
            </asp:TemplateField>            
        </Columns> 
    </asp:GridView> 


Get the data from the database, the field from the database to check the checkbox should be 1 or 0.

DB Table data

PROCESSED (HEADER)
1
1
0

DataField "PROCESSED" should be 1 or 0 (boolean),

Checked='<%# Eval("PROCESSED").ToString().Equals("1") %>' 

The above GridView code will check the checkbox if the value from the PROCESSED field in DB is 1 else if the PROCESSED value is other than 1 the checkbox will be unchecked,

Enabled='<%# !Eval("PROCESSED").ToString().Equals("1") %>' 

This code will help us to enable or disable the text box. In the above mentioned code, if the PROCESSED is 1, checkbox will be disabled else the checkboc will be enable.

HostForLIFE.eu ASP.NET 4.8 Hosting

European best, cheap and reliable ASP.NET hosting with instant activation. HostForLIFE.eu is #1 Recommended Windows and ASP.NET hosting in European Continent. With 99.99% Uptime Guaranteed of Relibility, Stability and Performace. HostForLIFE.eu security team is constantly monitoring the entire network for unusual behaviour. We deliver hosting solution including Shared hosting, Cloud hosting, Reseller hosting, Dedicated Servers, and IT as Service for companies of all size.


European ASP.NET Core Hosting :: A Quick And Simple Look Into .NET Core And Comparison To .NET Standard

clock July 16, 2019 11:54 by author Peter
First, as Microsoft simply described, .NET Core is an open-source, general-purpose development platform maintained by Microsoft and the .NET community on GitHub. .NET is cross-platform which supports Windows, macOS, and Linux and can be used to implement devices, cloud, and IoT applications. Historically, the .NET Framework had only worked on Windows devices. The Xamarin and Mono projects worked to bring .NET to mobile devices, macOS, and Linux. .NET Core provides a standard base library that can now be used across Windows, Linux, macOS, and mobile devices, still via Xamarin.

.NET Core has multiple characteristics such as cross-platform programming for Windows, Linux, MacOS, as well as consistency across architectures. It runs your code with the same behavior on multiple architectures, including x64, x86, and ARM. .NET Core provides flexible deployment, can be included in your app or installed side-by-side such as user-wide or system-wide installations, and can be used with Docker containers.

.NET Core makes it simpler for developers to build microservice architecture systems promptly. As such, systems include several independent and dynamic microservices, the developers can focus on specific microservices. .NET Core enables programmers to develop custom microservices by using varying programming languages, technologies, and frameworks. Likewise, the developers can build a robust system by combining multiple microservices flawlessly.

PROGRAMMING LANGUAGE SUPPORT
From a programming point of view C#, Visual Basic, and F# languages can be used to write applications and libraries for .NET Core. Additionally, with .NET Core 3.0 C# 8.0 will be supported. Currently, VB.NET compiles and runs on .NET Core, but the separate Visual Basic Runtime is not implemented. Microsoft announced that .NET Core 3 would include the Visual Basic Runtime.

GENERAL SUPPORTED FEATURES
.NET Core supports four cross-platform scenarios: ASP.NET Core web apps, command-line apps, libraries, and Universal Windows Platform apps. However, it does not presently apply Windows Forms or WPF which render the standard GUI for desktop software on Windows. Also, .NET Core 3 supports desktop technologies WinForms, WPF and UWP. Besides these, .NET Core supports the use of NuGet packages. Differently than before like .NET Framework, which is serviced using Windows Update, .NET Core depends on its package manager to get updates.

.NET Core consists of CoreCLR, a whole runtime implementation of the Common Language Runtime, which created at Microsoft as the virtual machine for handling execution of .NET programs and includes a just-in-time compiler called RyuJIT. Moreover, .NET Core also contains CoreRT, the .NET Native runtime enhanced to be integrated into AOT compiled native binaries.

.NET Core also includes CoreFX, which is a partial branch of .NET Framework standard libraries. While .NET Core shares a subset of .NET Framework APIs and comes with its own API that is not a subset of .NET Framework. Also, a variant of the .NET Core library is used for UWP.

.NET Core's command-line interface provides an execution entry point for operating systems and gives developer services similar compilation and package management.

Use .NET Core when

  • You want to build cross-platform applications
  • If the new application (web or service) needs to run on multiple platforms- Windows, Linux, macOS, choose .NET Core over .NET Framework. Visual Studio Code and third-party editors such as Sublime, Emacs, VI support .NET Core for cross-platform development.
  • The need is to build high-performance and scalable systems
  • When a performance-oriented and scalable system is on the list, it is better to prefer .NET Core over the .NET Framework. Reason being, .NET Core offers high-performance server runtime for Linux and Windows Server.
  • When you are using microservices or Docker containers
  • For applications or services that use microservices or Docker containers, opting .NET Core makes more sense. Reasons include,
    • .NET Core facilitates mixing microservices or services developed with Ruby, Java, .NET Framework, or other monolithic technologies.
    • Containers usually work in conjugation with microservices architecture. With .NET Framework, there is a limitation to work with Windows containers only. Moreover, while creating and deploying a container, the image size is smaller with .NET Core vs .NET Framework.
  • You need side-by-side .NET versions per application
  • For applications that may have a dependency on different versions of .NET for installation, opt for .NET Core. .NET Core offers side by side installation of multiple versions for .NET Core runtime on the same machine.

Use the .NET Framework when:

  • The app is using .NET technologies that are not available for .NET Core.
  • Several .NET technologies are not available for .NET Core. For example, ASP.NET web pages applications or workflow related services (WCF Data Services, Windows Workflow Foundation) are not included in. NET Core.
  • The existing app uses a platform that .NET Core does not support.
  • Some of the Microsoft or third-party services/platforms do not offer support to .NET Core. For example, Azure’s Service Fabric Stateful Reliable Services programming model does not support .NET Core and is available for.NET Framework.

Finally, the .NET Framework supports Windows and web applications. .NET Core is the new open-source and cross-platform framework to build applications for all operating systems including Windows, Mac, and Linux. .NET Core supports UWP and ASP.NET Core only.

HostForLIFE.eu ASP.NET 4.8 Hosting

European best, cheap and reliable ASP.NET hosting with instant activation. HostForLIFE.eu is #1 Recommended Windows and ASP.NET hosting in European Continent. With 99.99% Uptime Guaranteed of Relibility, Stability and Performace. HostForLIFE.eu security team is constantly monitoring the entire network for unusual behaviour. We deliver hosting solution including Shared hosting, Cloud hosting, Reseller hosting, Dedicated Servers, and IT as Service for companies of all size.


European ASP.NET Core Hosting :: Register And Use Multiple Implementations Of A Dependency In ASP.NET Core Dependency Injection

clock July 12, 2019 12:13 by author Peter

There can be situations where you need to register multiple implementations of the same dependency for your applications. For example, if you want to add features to your application without changing the existing code, a good way to do it is to add a new implementation for that. Your application needs to be written in a certain way to do this correctly. We have a really simple example that demonstrates this in this article. But when you eventually need to do this, ASP.Net Core built-in Dependency Injection providers capabilities to achieve this. In this article, we will look at how to do this with an example.
Registering Multiple Implementations of a Dependency

As an example, let’s take an online e-commerce website. This site gives Discounts to the customers on certain occasions and when certain conditions are met. I have an interface called IDiscount where it defines a discount and the logic to calculate it. For each type of discount, you want to provide in your e-commerce application, you can have an implementation of the IDiscount interface. Then I have an interface called IDiscountProcessor where the implementation of this interface handles calling all the implementations of IDiscount to calculate the final discount for a given Order.

You have a couple of ways to register multiple implementations of a dependency in ASP.Net Core. One way is to just use the provided extension methods on IServiceCollection to register your implementations with the desired lifetime.
    services.AddScoped<IDiscountProcessor, OrderDiscountProcessor>(); 
    services.AddScoped<IDiscount, SeasonalDiscount>(); 
    services.AddScoped<IDiscount, LargeOrderDiscount>(); 
    services.AddScoped<IDiscount, ThreeOrModeDiscount>();  


Here, I have registered the OrderDiscountProcessor implementation of IDiscountProcessor and 3 implementations of IDiscount interface.

This will work fine when we eventually resolve all the implementations of IDiscount interface we can calculate the total discount. But the problem comes when you have multiple registrations of the same implementation. For example, let’s say one of the developers accidentally registered SeasonalDiscount implementation twice. What will happen is that the Seasonal discount will be applied twice for all the orders, costing the organization money.

A better way of registering multiple implementations is to use TryAddEnumerable extension method given in the Microsoft.Extensions.DependencyInjection.Extensions namespace. This will not register any duplicate implementations making multiple implementation registration safe. The registration is a bit different where you need to use ServiceDescriptors to register the dependency. The modified implementation looks like this.
    services.AddScoped<IDiscountProcessor, OrderDiscountProcessor>(); 
    services.TryAddEnumerable(new[] 
    { 
        ServiceDescriptor.Scoped<IDiscount, SeasonalDiscount>(), 
        ServiceDescriptor.Scoped<IDiscount, LargeOrderDiscount>(), 
        ServiceDescriptor.Scoped<IDiscount, ThreeOrModeDiscount>() 
    }); 


Injecting and Using Multiple Implementations of a Dependency

Once your implementations are registered with the Dependency Injection container, they are ready to be used. To inject all the registered implementations, you need to use IEnumerable<> of the implementation type in your constructor. So, your constructor would look something like this. This is our OrderDiscountProcessor implementation.
    public class OrderDiscountProcessor : IDiscountProcessor 
    { 
        private readonly IEnumerable<IDiscount> _discounts; 
     
        public OrderDiscountProcessor(IEnumerable<IDiscount> discounts) 
        { 
            _discounts = discounts; 
        } 
        // ... 
    } 


Here I am injecting IEnumerable<IDiscount> where it injects all the registered implementations to my class. Then in my ProcessDiscount() method I can use the implementations like this.
    public (double, List<string>) ProcessDiscount(OrderViewModel order) 
    { 
        var discountDiscroptoons = new List<string>(); 
        var totalDiscount = 0.0; 
     
        foreach (var discount in _discounts) 
        { 
            var addedDiscount = discount.CalculateDiscount(order); 
            if (addedDiscount > 0) 
            { 
                 discountDiscroptoons.Add(discount.Description); 
            } 
            totalDiscount += addedDiscount; 
        } 
     
        return (totalDiscount, discountDiscroptoons); 
     } 


I can now iterate through all the implementations of IDiscount interface and call its CalculateDiscount() method to calculate the discount for the given Order.

Note that you can only use IEnumerable<> for your injections of multiple implementations. Any other type like IList<>, ICollection<> will not work in this case.
Summary

In this article, we looked into the process of how to register multiple implementations of the same dependency in ASP.NET Core and how to use these dependencies in our classes by injecting them. The simple sample application used to demonstrate this usage is available for download with this article or you can find the source code on GitHub under the following repository

HostForLIFE.eu ASP.NET 4.8 Hosting

European best, cheap and reliable ASP.NET hosting with instant activation. HostForLIFE.eu is #1 Recommended Windows and ASP.NET hosting in European Continent. With 99.99% Uptime Guaranteed of Relibility, Stability and Performace. HostForLIFE.eu security team is constantly monitoring the entire network for unusual behaviour. We deliver hosting solution including Shared hosting, Cloud hosting, Reseller hosting, Dedicated Servers, and IT as Service for companies of all size.


European ASP.NET Core Hosting :: How to Host ASP.NET Core Application as a Windows Service

clock July 4, 2019 08:38 by author Scott

I recently came across the need to host a .NET Core web app as a Windows Service. In this case, it was because each machine needed to locally be running an API. But it’s actually pretty common to have a web interface to manage an application on a PC without needing to set up IIS. For example if you install a build/release management tool such as Jenkins or TeamCity, it has a web interface to manage the builds and this is able to be done without the need for installing and configuring an additional web server on the machine.

Luckily .NET Core actually has some really good tools for accomplishing all of this (And even some really awesome stuff for being able to run a .NET Core web server by double clicking an EXE if that’s your thing).

A Standalone .NET Core Website/Web Server

The first step actually has nothing to do with Windows Services. If you think about it, all a Windows Service is, is a managed application that’s hidden in the background, will restart on a machine reboot, and if required, will also restart on erroring. That’s it! So realistically what we first want to do is build a .NET Core webserver that can be run like an application, and then later on we can work out the services part.

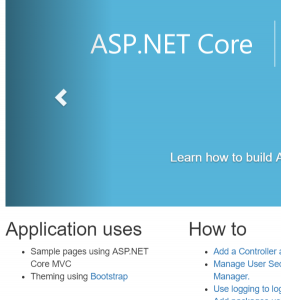
For the purpose of this tutorial, I’m just going to be using the default template for an ASP.net Core website. The one that looks like this:

We first need to head to the csproj file of our project and add in a specific runtime (Or multiple), and an output type. So overall my csproj file ends up looking like:

<Project Sdk="Microsoft.NET.Sdk.Web">
  <PropertyGroup>
    <TargetFramework>netcoreapp2.1</TargetFramework>
    <RuntimeIdentifiers>win10-x64;</RuntimeIdentifiers>
    <OutputType>Exe</OutputType>
  </PropertyGroup> 

  <ItemGroup>
    <PackageReference Include="Microsoft.AspNetCore.App" />
  </ItemGroup>
</Project>

Our RuntimeIdentifiers (And importantly notice the “s” on the end there) specifies the runtimes our application can be built for. In my case I’m building only for Windows 10, but you could specify other runtime monkiers if required.

Ontop of this, we specify that we want an outputtype of exe, this is so we can have a nice complete exe to run rather than using the “dotnet run” command to start our application. I’m not 100% sure, but the exe output that comes out of this I think is simply a wrapper to boot up the actual application dll. I noticed this because when you change code and recompile, the exe doesn’t change at all, but the dll does.

Now we need to be able to publish the app as a standalone application. Why standalone? Because then it means any target machine doesn’t have to have the .NET Core runtime installed to get everything running. Ontop of that, there is no “what version do you have installed?” type talk. It’s just double click and run.

To publish a .NET Core app as standalone, you need to run the following command from the project directory in a command prompt/powershell:

dotnet publish --configuration Release --self-contained -r win10-x64

It should be rather self explanatory. We are doing a publish, using the release configuration, we pass through the self contained flag, and we pass through that the runtime we are building for is Windows 10 – 64 Bit.

From your project directory, you can head to:  \bin\Release\netcoreapp2.1\win10-x64\publish

This contains your application exe as well as all framework DLL’s to run without the need for a runtime to be installed on the machine. It’s important to note that you should be inside the Publish folder. One level up is also an exe but this is not standalone and relies on the runtime being installed.

From your publish folder, try double clicking yourapplication.exe.

Hosting environment: Production
Content root path: \bin\Release\netcoreapp2.1\win10-x64\publish
Now listening on:
http://localhost:5000
Now listening on: https://localhost:5001
Application started. Press Ctrl+C to shut down.

In your browser head to http://localhost:5000 and you now have your website running from an executable. You can copy and paste this publish folder onto any Windows 10 machine, even a fresh install, and have it spin up a webserver hosting your website. Pretty impressive!

Installing As A Window Service

So the next part of this tutorial is actually kinda straight forward. Now that you have an executable that hosts your website, installing it as a service is exactly the same as setting up any regular application as a service. But we will try and have some niceties to go along with it.

First we need to do a couple of code changes for our app to run both as a service, and still be OK running as an executable (Both for debugging purposes, and in case we want to run in a console window and not as a service).

We need to install the following from your package manager console:

Install-Package Microsoft.AspNetCore.Hosting.WindowsServices

Next we need to go into our program.exe and make your main method look like the following:

public static void Main(string[] args)
{
 var isService = !(Debugger.IsAttached || args.Contains("--console"));
 var builder = CreateWebHostBuilder(args.Where(arg => arg != "--console").ToArray()); 

 if (isService)
 {

 var pathToExe = Process.GetCurrentProcess().MainModule.FileName;
 var pathToContentRoot = Path.GetDirectoryName(pathToExe);
 builder.UseContentRoot(pathToContentRoot);
 

 var host = builder.Build(); 

 if (isService)
 {
 host.RunAsService();
 }
 else
 {
 host.Run();
 }
}

This does a couple of things :

  • It checks whether we are using the debugger, or if we have a console argument of “–console” passed in.
  • If neither of the above are true, it sets the content root manually back to where the exe is running. This is specifically for the service runtime.
  • Next if we are a service, we use a special “RunAsService()” method that .NET Core gives us
  • Otherwise we just do a “Run()” as normal.

Obviously the main point of this is that if the debugger is attached (e.g. we are running from visual studio), or we run from a command prompt with the flag “–console”, it’s going to run exactly the same as before. Back in the day we used to have to run the service with a 10 second sleep at the start of the app, and quickly try and attach the debugger to the process before it kicked off to be able to set breakpoints etc. Now it’s just so much easier.

Now let’s actually get this thing installed!

In your project in Visual Studio (Or your favourite editor) add a file called install.bat to your project. The contents of this file should be:

sc create MyService binPath= %~dp0MyService.exe
sc failure MyService actions= restart/60000/restart/60000/""/60000 reset= 86400
sc start MyService
sc config MyService start=auto

Obviously replace MyService with the name of your service, and be sure to rename the exe to the actual name of your applications exe. Leave the %~dp0 part as this refers to the current batch path (Allowing you to just double click the batch file when you want to install).

The install file creates the service, sets up failure restarts (Although these won’t really be needed), starts the service, and sets the service to auto start in the future if the machine reboots for any reason.

Go ahead and create an uninstall.bat file in your project. This should look like:

sc stop MyService
timeout /t 5 /nobreak > NUL
sc delete MyService

Why the timeout? I sometimes found that it took a while to stop the service, and so giving it a little bit of a break inbetween stopping and deleting helped it along it’s way.

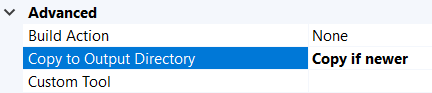
Important! For both of these files, be sure to set them up so they copy to the output directory in Visual Studio. Without this, your bat files won’t output to your publish directory.

Go ahead and publish your application again using our command from earlier:

dotnet publish --configuration Release --self-contained -r win10-x64

Now in your publish directory, you will find your install and uninstall bat files. You will need to run both of these as Administrator for them to work as installing Windows Services requires elevated access. A good idea is that the first time you run these, you run them from a command prompt so you can catch any errors that happen.

Once installed, you should be able to browse to http://localhost:5000 and see your website running silently in the background. And again, the best part is when you restart your machine, it starts automatically. Perfect!


About HostForLIFE.eu

HostForLIFE.eu is European Windows Hosting Provider which focuses on Windows Platform only. We deliver on-demand hosting solutions including Shared hosting, Reseller Hosting, Cloud Hosting, Dedicated Servers, and IT as a Service for companies of all sizes.

We have offered the latest Windows 2016 Hosting, ASP.NET Core 2.2.1 Hosting, ASP.NET MVC 6 Hosting and SQL 2017 Hosting.


Tag cloud

Sign in