European ASP.NET 4.5 Hosting BLOG

BLOG about ASP.NET 4, ASP.NET 4.5 Hosting and Its Technology - Dedicated to European Windows Hosting Customer

ASP.NET 5 Hosting - HostForLIFE.eu :: Anti Forgery Tokens with AngularJS and ASP.NET 5

clock March 23, 2015 12:10 by author Peter

In this post, I will tell you about Anti Forgery Tokens with AngularJS and ASP.NET 5. Single Page Applications utilizing AngularJS with ASP.NET by default leave our Web API methods open to forgery abuse. A couple of straightforward steps will permit you to include hostile to phony security. The primary step will be to make a custom activity channel ascribe to test our answer which you can use to finish web programming interface classes or individual activities.


using System;
using System.Linq;
using System.Net.Http;
using System.Web.Helpers;
using System.Web.Http.Filters;
namespace antiforgery
{
    public sealed class ValidateCustomAntiForgeryTokenAttribute : ActionFilterAttribute
    {
        public override void OnActionExecuting(System.Web.Http.Controllers.HttpActionContext actionContext)
       {
           if (actionContext == null)
            {
                throw new ArgumentNullException("actionContext");
            }
            var headers = actionContext.Request.Headers;
            var cookie = headers
                .GetCookies()
                .Select(c => c[AntiForgeryConfig.CookieName])
                .FirstOrDefault();
            var tokenFromHeader = headers.GetValues("X-XSRF-Token").FirstOrDefault();
            AntiForgery.Validate(cookie != null ? cookie.Value : null, tokenFromHeader);
            base.OnActionExecuting(actionContext);
        }
    }
}


The web API classes or methods will need decorating appropriately to ensure this code is run, i.e.
[ValidateCustomAntiForgeryTokenAttribute]

The following step is to verify ASP.NET includes its standard forgery token cookie and hidden field in the markup. Include the accompanying line into the markup.
@Html.AntiForgeryToken();

Presently, we have to redesign our AngularJS code to pass anti forgery token back in the header with all our web API calls. The most straightforward approach to do this is to situated a default up in the run system for the AngularJS application module, e.g.
.run(function($http) {
    $http.defaults.headers.common['X-XSRF-Token'] =      

angular.element('input[name="__RequestVerificationToken"]').attr('value');
})

HostForLIFE.eu ASP.NET 5 Hosting
HostForLIFE.eu is European Windows Hosting Provider which focuses on Windows Platform only. We deliver on-demand hosting solutions including Shared hosting, Reseller Hosting, Cloud Hosting, Dedicated Servers, and IT as a Service for companies of all sizes. We have customers from around the globe, spread across every continent. We serve the hosting needs of the business and professional, government and nonprofit, entertainment and personal use market segments.


ASP.NET 5 Hosting - HostForLIFE.eu :: Custom Config Section in ASP.NET

clock March 20, 2015 08:18 by author Peter

In this post, I will tell you how to extend ASP.NET 5 configuration settings with XML configuration elements of your own. To do this, you make a custom configuration section handler. The handler must be a .NET Framework class that inherits from the System.Configuration.ConfigurationSection class. The area handler translates and forms the settings that are characterized in XML design components in a particular area of a Web.config file. You can read and write these settings through the handler's properties.

And now, write the following code:
using System;
using System.Collections.Generic;
using System.Configuration;
using System.Linq;
using System.Web;
namespace CustomConfigSection
{
    public class LoginRedirectByRoleSection : ConfigurationSection
    {
        [ConfigurationProperty("roleRedirects")]
    public RoleRedirectCollection RoleRedirects
        {
    get
            {
    return (RoleRedirectCollection)this["roleRedirects"];
            }
    set
            {
    this["roleRedirects"] = value;
            }
        }
    }
    public class RoleRedirect : ConfigurationElement
   {
       [ConfigurationProperty("role", IsRequired = true)]
    public string Role
        {
    get
            {
    return (string)this["role"];
            }
    set
            {
    this["role"] = value;
            }
        }
        [ConfigurationProperty("url", IsRequired = true)]
    public string Url
        {
    get
            {
    return (string)this["url"];
            }
    set
            {
    this["url"] = value;
            }
        }
    }
    public class RoleRedirectCollection : ConfigurationElementCollection
    {
    public RoleRedirect this[int index]
        {
    get
            {
    return (RoleRedirect)BaseGet(index);
            }
        }
    public RoleRedirect this[object key]
        {
    get
            {
    return (RoleRedirect)BaseGet(key);
            }
        }
    protected override ConfigurationElement CreateNewElement()
        {
    return new RoleRedirect();
        }
    protected override object GetElementKey(ConfigurationElement element)
        {
    return ((RoleRedirect)element).Role;
        }
    }
}
<configSections>
    <section name="loginRedirectByRole" type="CustomConfigSection.LoginRedirectByRoleSection,CustomConfigSection" allowLocation="true" allowDefinition="Everywhere" />
   </configSections>
    <loginRedirectByRole>
    <roleRedirects>
    <add role="Administrator" url="~/Admin/Default.aspx" />
    <add role="User" url="~/User/Default.aspx" />
    </roleRedirects>
    </loginRedirectByRole>

using System;
using System.Collections.Generic;
using System.Configuration;
using System.Linq;
using System.Web;
using System.Web.Security;
using System.Web.UI;
using System.Web.UI.WebControls;
using CustomConfigSection;
namespace CustomConfigSection
{
    public partial class WebForm1 : System.Web.UI.Page
    {
    protected void Page_Load(object sender, EventArgs e)
        {
           LoginRedirectByRoleSection roleRedirectSection = (LoginRedirectByRoleSection)ConfigurationManager.GetSection("loginRedirectByRole");
    foreach (RoleRedirect roleRedirect in roleRedirectSection.RoleRedirects)
           {
    if (Roles.IsUserInRole("", roleRedirect.Role))
               {
                    Response.Redirect(roleRedirect.Url);
                }
            }
        }
   }
}

HostForLIFE.eu ASP.NET 5 Hosting
HostForLIFE.eu is European Windows Hosting Provider which focuses on Windows Platform only. We deliver on-demand hosting solutions including Shared hosting, Reseller Hosting, Cloud Hosting, Dedicated Servers, and IT as a Service for companies of all sizes. We have customers from around the globe, spread across every continent. We serve the hosting needs of the business and professional, government and nonprofit, entertainment and personal use market segments.


ASP.NET 5 Hosting UK - HostForLIFE.eu :: How to Capture Screenshot Image of Website in ASP.NET 5?

clock March 16, 2015 07:42 by author Peter

In this short article, I will tell you about How to Capture Screenshot Image of Website in ASP.NET 5. To catch the screenshot of page, I am making utilization of WebBrowser control of Windows Forms Application. Since the WebBrowser is a Windows Forms controls, so as to utilize it as a part of ASP.NET Web Projects, we will need to add reference to the accompanying libraries.

And here is the code that I used:

ASP.NET
<html xmlns="http://www.w3.org/1999/xhtml">
<head>
    <title> How to Capture Screenshot in ASP.NET</title>
</head>
<body>
    <form id="form1" runat="server">
    <table>
        <tr>
            <td>
                <b>Enter WebSite Url:</b>
            </td>
            <td>
                <asp:TextBox ID="txtUrl" runat="server" />
            </td>
        </tr>
        <tr>
            <td>
            </td>
            <td>
                <asp:Button ID="btnCapture" Text="Capture" runat="server" OnClick="btnCapture_click" />
            </td>
        </tr>
    </table>
    <br />
    <asp:Image ID="imgScreenshot" runat="server" Visible="false" Height="800" Width="800" />
    </form>
</body>
</html>

Code for C#
using System.IO;
using System.Drawing;
using System.Threading;
using System.Windows.Forms;
public partial class CaptureWebsite : System.Web.UI.Page
{
    protected void btnCapture_click(object sender, EventArgs e)
   {
        string url = txtUrl.Text.Trim();
        Thread thread = new Thread(delegate()
       {
            using (WebBrowser browser = new WebBrowser())
            {
                browser.ScrollBarsEnabled = false;
                browser.AllowNavigation = true;
                browser.Navigate(url);
                browser.Width = 1024;
                browser.Height = 768;
                browser.DocumentCompleted += new WebBrowserDocumentCompletedEventHandler(webbrowse_DocumentCompleted);
                while (browser.ReadyState != WebBrowserReadyState.Complete)
                {
                    System.Windows.Forms.Application.DoEvents();
                }
            }
        });
        thread.SetApartmentState(ApartmentState.STA);
        thread.Start();
        thread.Join();
    }
    private void webbrowse_DocumentCompleted(object sender, WebBrowserDocumentCompletedEventArgs e)
    {
        WebBrowser webrowse = sender as WebBrowser;
        Bitmap bitmap = new Bitmap(webrowse.Width, webrowse.Height);
        webrowse.DrawToBitmap(bitmap, webrowse.Bounds);
        MemoryStream stream = new MemoryStream();
        bitmap.Save(stream, System.Drawing.Imaging.ImageFormat.Jpeg);
        byte[] strbytes = stream.ToArray();
        imgScreenshot.Visible = true;
        imgScreenshot.ImageUrl = "data:image/jpeg;base64," + Convert.ToBase64String(strbytes);
    }
}


Code for VB.NET

Imports System.IO
Imports System.Drawing
Imports System.Threading
Imports System.Windows.Forms
Partial Public Class CaptureWebsite
    Inherits System.Web.UI.Page
    Protected Sub btnCapture_click(sender As Object, e As EventArgs)
        Dim url As String = txtUrl.Text.Trim()
                   Dim thread As New Thread(Sub() Using browser As New WebBrowser()
        browser.ScrollBarsEnabled = False
        browser.AllowNavigation = True
        browser.Navigate(url)
        browser.Width = 1024
        browser.Height = 768
        browser.DocumentCompleted += New WebBrowserDocumentCompletedEventHandler(AddressOf webbrowse_DocumentCompleted)
        While browser.ReadyState <> WebBrowserReadyState.Complete            System.Windows.Forms.Application.DoEvents()
        End While
                   End Using)
        thread.SetApartmentState(ApartmentState.STA)
        thread.Start()
        thread.Join()
    End Sub   
Private Sub webbrowse_DocumentCompleted(sender As Object, e As WebBrowserDocumentCompletedEventArgs)
        Dim webrowse As WebBrowser = TryCast(sender, WebBrowser)
        Dim bitmap As New Bitmap(webrowse.Width, webrowse.Height)
        webrowse.DrawToBitmap(bitmap, webrowse.Bounds)
        Dim stream As New MemoryStream()
        bitmap.Save(stream, System.Drawing.Imaging.ImageFormat.Jpeg)
        Dim strbytes As Byte() = stream.ToArray()
        imgScreenshot.Visible = True
        imgScreenshot.ImageUrl = "data:image/jpeg;base64," + Convert.ToBase64String(strbytes)
    End Sub
End Class

HostForLIFE.eu ASP.NET 5 Hosting
HostForLIFE.eu is European Windows Hosting Provider which focuses on Windows Platform only. We deliver on-demand hosting solutions including Shared hosting, Reseller Hosting, Cloud Hosting, Dedicated Servers, and IT as a Service for companies of all sizes. We have customers from around the globe, spread across every continent. We serve the hosting needs of the business and professional, government and nonprofit, entertainment and personal use market segments.


ASP.NET 5 Hosting Belgium - HostForLIFE.eu :: Pass Multiple Values to Command Argument in ASP.NET

clock March 13, 2015 06:05 by author Peter

In this post I will show you how to Pass Multiple Values to Command Argument in ASP.NET. First, you should create a new project and write the following code:

<%@ Page Language="C#" AutoEventWireup="true" CodeFile="MultipleCommandArgument.aspx.cs"   Inherits="MultipleCommandArgument" %>
<!DOCTYPE html PUBLIC "-//W3C//DTD XHTML 1.0 Transitional//EN" "http://www.w3.org/TR/xhtml1/DTD/xhtml1-transitional.dtd">
<html xmlns="http://www.w3.org/1999/xhtml">
<head runat="server">
   <title>Untitled Page</title>
</head>
<body>
   <form id="form1" runat="server">
       <div>
           <asp:GridView ID="GridView1" runat="Server" AutoGenerateColumns="False" OnRowCommand="GridView1_RowCommand">
               <Columns>
                  <asp:BoundField DataField="carid" HeaderText="Card Id" />
                   <asp:BoundField DataField="Year" HeaderText="year" />
                   <asp:TemplateField>
                       <ItemTemplate>
                           <asp:Button ID="btnTest" runat="Server" CommandName="Test" Text="Select" CommandArgument='<%#Eval("carid") + ","+Eval("year") %>' />
                       </ItemTemplate>
                   </asp:TemplateField>
               </Columns>
           </asp:GridView>
           <asp:Label ID="Label2" runat="server" Text="Label"></asp:Label><br />
           <asp:Label ID="Label1" runat="server" Text="Label"></asp:Label></div>
   </form>
</body>
</html>

using System;
using System.Data;
using System.Configuration;
using System.Collections;
using System.Web;
using System.Web.Security;
using System.Web.UI;
using System.Web.UI.WebControls;
using System.Web.UI.WebControls.WebParts;
using System.Web.UI.HtmlControls;
public partial class MultipleCommandArgument : System.Web.UI.Page
{
    protected void Page_Load(object sender, EventArgs e)
    {
        if (!IsPostBack)
        {
            GridView1.DataSource = GetData();
            GridView1.DataBind();
        }     
    } 
    DataTable data;
    DataTable GetData()
    {
        data = Session["data"] as DataTable;
        if (data != null)
        {
            return data;
        }
        data = new DataTable();
        DataColumn primaryColumn
        = new DataColumn("carid", typeof(Int32));
        data.Columns.Add(primaryColumn);
        data.Columns.Add(new DataColumn("year", typeof(Int32)));
        data.Columns.Add(new DataColumn("make", typeof(string)));
        data.Columns.Add(new DataColumn("model", typeof(string)));
        DataRow dr;
        dr = data.NewRow();
        dr[0] = 1;
        dr[1] = 1998;
        dr[2] = "Isuzu";
        dr[3] = "Trooper";
        data.Rows.Add(dr);
        dr = data.NewRow();
        dr[0] = 2;
        dr[1] = 2000;
        dr[2] = "Honda";
        dr[3] = "Civic";
        data.Rows.Add(dr);
        dr = data.NewRow();
        dr[0] = 3;
        dr[1] = 2000;
        dr[2] = "BMW";
        dr[3] = "GM";
        data.Rows.Add(dr);
        dr = data.NewRow();
        dr[0] = 4;
        dr[1] = 2000;
        dr[2] = "Swift";
        dr[3] = "Tata";
        data.Rows.Add(dr);
        DataColumn[] primaryColumns = new DataColumn[1];
        primaryColumns[0] = primaryColumn;
        data.PrimaryKey = primaryColumns;
        Session["data"] = data;
        return data;
    }
    protected void GridView1_RowCommand(object sender, GridViewCommandEventArgs e)
    {
        if (e.CommandName == "Test")
        {
            string[] commandArgs = e.CommandArgument.ToString().Split(new char[] { ',' });
       Label1.Text= commandArgs[0];
       Label2.Text = commandArgs[1];
        }
    }
}

HostForLIFE.eu ASP.NET 5 Hosting
HostForLIFE.eu is European Windows Hosting Provider which focuses on Windows Platform only. We deliver on-demand hosting solutions including Shared hosting, Reseller Hosting, Cloud Hosting, Dedicated Servers, and IT as a Service for companies of all sizes. We have customers from around the globe, spread across every continent. We serve the hosting needs of the business and professional, government and nonprofit, entertainment and personal use market segments.


ASP.NET 5 Hosting Russia - HostForLIFE.eu :: Submit Form Without Page Refresh in ASP.NET with Ajax and jQuery

clock March 9, 2015 08:06 by author Peter

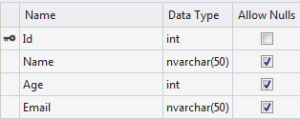
In this short tutorial, I will tell you about submit form without page refresh in ASP.NET with Ajax and jQuery. First step, make a Employee table as shown on the picture below:

Now, make a new WebSite then add a new WebForm name as Index.aspx. Write the following code to the page.

<%@ Page Language="C#" AutoEventWireup="true" CodeFile="Index.aspx.cs" Inherits="Index" %> 
<!DOCTYPE html> 
<html xmlns="http://www.w3.org/1999/xhtml">
<head runat="server">
    <title></title>
    <script src="Script/jquery-2.1.1.min.js"></script>
    <script src="Script/Myjs.js"></script>
</head>
<body>
    <form id="form1" runat="server">
    <div>
        <table>
            <tr>
                <td>Name</td>
                <td>
                    <input type="text" id="txtName" />
                </td>
            </tr>
           <tr>
                <td>Age</td>
                <td>
                    <input type="text" id="txtAge" />
                </td>
            </tr>
            <tr>
                <td>Email</td>
                <td>
                    <input type="text" id="txtEmail" />
                </td>
            </tr>
            <tr>
                <td>
                    <input type="button" id="btnSubmit" value="Save" />
                </td>
            </tr>
        </table>
        <label id="lblResult" ></label>
    </div>
    </form>
</body>
</html>


Now, Open file Index.aspx.cs and write the following code:
using System;
using System.Web.Services;
using System.Data.SqlClient;
public partial class Index : System.Web.UI.Page
{
    protected void Page_Load(object sender, EventArgs e)
    {
     }
     [WebMethod]
    public static string SaveRecord(string Name,int Age, string Email)
    {
        string messageResult = string.Empty;
        string strConnection = @"Data Source=(LocalDB)\v11.0;AttachDbFilename=C:\Users\Peter\TestDB.mdf;Integrated Security=True;Connect Timeout=30";
        SqlConnection con = new SqlConnection(strConnection);
        con.Open();
        SqlCommand cmd = new SqlCommand("insert into Employee (Name,Age,Email) values (@name,@age,@email)",con);
        cmd.Parameters.AddWithValue("@name", Name);
        cmd.Parameters.AddWithValue("@age",Age);
        cmd.Parameters.AddWithValue("@email", Email);
        int result = cmd.ExecuteNonQuery();
        con.Close();
        if(result == 1)
        {
            messageResult = "Record Inserted";
        }
        else
        {
            messageResult="Unable to Save Record";
        }
        return messageResult;
    }
}

Above you can see, I have included a attribute [WebMethod]. What is WebMethod ?  A WebMethod Attribute Enable a system to be called through the WebServices. Now, include another JS record. Compose the accompanying code in your JS document.
$(document).ready(function () {
    $('#btnSubmit').on('click', function () {
        var getName = $('#txtName').val();
        var getAge = parseInt($('#txtAge').val());
        var getEmail = $('#txtEmail').val();
        $.ajax(
            {
                type: "POST",
                contentType: "application/json; charset=utf-8",
                url: "Index.aspx/SaveRecord",
                data: "{'Name':'" + getName + "','Age':" + getAge + ",'Email':'" + getEmail + "'}",
                dataType: "json",
                success:function(data)
                {
                    $('#lblResult').text(data.d);
                    $('#txtName').val('');
                    $('#txtAge').val('');
                    $('#txtEmail').val(''); 
                },
                error:function(data)
                {
                    alert(data);
               }
            });

    });
});

And here is the output:

HostForLIFE.eu ASP.NET 5 Hosting
HostForLIFE.eu is European Windows Hosting Provider which focuses on Windows Platform only. We deliver on-demand hosting solutions including Shared hosting, Reseller Hosting, Cloud Hosting, Dedicated Servers, and IT as a Service for companies of all sizes. We have customers from around the globe, spread across every continent. We serve the hosting needs of the business and professional, government and nonprofit, entertainment and personal use market segments.


ASP.NET 5 Hosting - HostForLIFE.eu :: Create Web API, Run Outside IIS Application

clock March 6, 2015 06:22 by author Peter

Today, In this article I will tell you about Create Web API with ASP.NET 5, run outside IIS application. First step, open visual studio and then make a console application as you can see on the picture below:

Create the Web API & OWIN Packages
Go to Tools menu, choose Library Package Manager, then select Package Manager Console. In the Package Manager Console window, enter the following code:

Install-Package Microsoft.AspNet.WebApi.OwinSelfHost

Then, right click the project. Create new class named Startup.cs and add the following code:
public class Startup
   {
        // This code configures Web API. The Startup class is specified as a type
        // parameter in the WebApp.Start method.
        public void Configuration(IAppBuilder appBuilder)
        {
            // Configure Web API for self-host.
           HttpConfiguration config = new HttpConfiguration();
            config.Routes.MapHttpRoute(
                name: "DefaultApi",
                routeTemplate: "api/{controller}/{id}",
                defaults: new { id = RouteParameter.Optional }
            );
             appBuilder.UseWebApi(config);
        }
    }

Now create a Web API controller class. In Solution Explorer, right click the project & choose Add / Class to add a new class. I named it: HelloController. Then write the following code:
using System;
using System.Collections.Generic;
using System.Linq;
using System.Text;
using System.Threading.Tasks;
using System.Web.Http;
namespace SelfHostWebApi
{
    public class HelloController : ApiController
    {
        // GET api/values/5
        public string Get(int id)
        {
            return "Hello API";
        }
    }
}


Open Program.cs and add write the code below, inside main method:
using Microsoft.Owin.Hosting;
using System;
using System.Collections.Generic;
using System.Linq;
using System.Net.Http;
using System.Text;
using System.Threading.Tasks;
namespace SelfHostWebApi
{
    class Program
    {
        static void Main(string[] args)
        {
            string baseAddress = "http://localhost:9000/";
            // Start OWIN host
            using (WebApp.Start<Startup>(url: baseAddress))
            {
                // Create HttpCient and make a request to api/values
                HttpClient client = new HttpClient();
                var response = client.GetAsync(baseAddress + "api/hello").Result;
                Console.WriteLine(response);                
                Console.WriteLine(response.Content.ReadAsStringAsync().Result);
            }
            Console.ReadLine();
        }    }
}


Finally, your self hosted Web API is ready. You will see the output like the picture below when you Run it.

HostForLIFE.eu ASP.NET 5 Hosting
HostForLIFE.eu is European Windows Hosting Provider which focuses on Windows Platform only. We deliver on-demand hosting solutions including Shared hosting, Reseller Hosting, Cloud Hosting, Dedicated Servers, and IT as a Service for companies of all sizes. We have customers from around the globe, spread across every continent. We serve the hosting needs of the business and professional, government and nonprofit, entertainment and personal use market segments.


ASP.NET 5 Hosting - HostForLIFE.eu :: Selecting or Deselect All Checkbox in Gridview using JQuery

clock February 27, 2015 06:16 by author Peter

In this post I will tell you about select or deselect all checkbox inside gridview using jquery in ASP.NET 5. First, create a new project and then write the following code:

<%@ Page Language="C#" AutoEventWireup="true" CodeFile="GridViewSelectAll.aspx.cs"
    Inherits="GridViewSelectAll" %>
<!DOCTYPE html PUBLIC "-//W3C//DTD XHTML 1.0 Transitional//EN" "http://www.w3.org/TR/xhtml1/DTD/xhtml1-transitional.dtd">
<html xmlns="http://www.w3.org/1999/xhtml">
<head runat="server">
    <title></title>
    <script src="Scripts/jquery-1.4.1.js" type="text/javascript"></script>
    <script type="text/javascript">
        $(document).ready(function () {
            $("#<%=gvProducts.ClientID%> input[id$='chkAll']:checkbox").click(function () {
                $("#<%=gvProducts.ClientID%> input[id*='chkSelected']:checkbox").attr('checked', $(this).is(':checked'));
            });
        });
    </script>
</head>
<body>
    <form id="form1" runat="server">
    <div>
        <asp:GridView runat="server" ID="gvProducts" AutoGenerateColumns="false">
            <Columns>
                <asp:TemplateField>
                    <HeaderTemplate>
                        <input type="checkbox" id="chkAll" runat="server" value='<%#Eval("ProductID") %>' />
                    </HeaderTemplate>
                    <ItemTemplate>
                        <input type="checkbox" id="chkSelected" runat="server" />
                    </ItemTemplate>
                </asp:TemplateField>
                <asp:BoundField DataField="ProductName" HeaderText="ProductName" />        

<asp:BoundField DataField="Description" HeaderText="Description" />
            </Columns>
        </asp:GridView>
    </div>
    </form>
</body>
</html>

using System;
using System.Collections.Generic;
using System.Linq;
using System.Web;
using System.Web.UI;
using System.Web.UI.WebControls;
public partial class GridViewSelectAll : System.Web.UI.Page
{
    protected void Page_Load(object sender, EventArgs e)
   {
        gvProducts.DataSource = ProductDAL.GetProducts();
        gvProducts.DataBind();
    }
}
public class Product
{
    public int ProductID { get; set; }
    public string ProductName { get; set; }
    public string Description { get; set; }
}
public class ProductDAL
{
    public static List<Product> GetProducts()
    {
        return new List<Product>()
                   {
                       new Product() {ProductID = 1, ProductName = "Product01", Description = "Example01"},
                       new Product() {ProductID = 2, ProductName = "Product02", Description = "Example02"},
                       new Product() {ProductID = 3, ProductName = "Product03", Description = "Example03"},
                       new Product() {ProductID = 4, ProductName = "Product04", Description = "Example04"},
                       new Product() {ProductID = 5, ProductName = "Product05", Description = "Example05"},
                   };
    }
}

HostForLIFE.eu ASP.NET 5 Hosting
HostForLIFE.eu is European Windows Hosting Provider which focuses on Windows Platform only. We deliver on-demand hosting solutions including Shared hosting, Reseller Hosting, Cloud Hosting, Dedicated Servers, and IT as a Service for companies of all sizes. We have customers from around the globe, spread across every continent. We serve the hosting needs of the business and professional, government and nonprofit, entertainment and personal use market segments.


European ASP.NET 5 Hosting - HostForLIFE.eu :: How to Create Form Validation in ASP.NET using AngularJs ?

clock February 16, 2015 06:48 by author Peter

In this article, I will tell you how to create form validation in AngularJs and ASP.NET 5. In most of Web Apps, we require user to register on the application. I need to do some action like Form validation , so that user can not submit a Invalid form. There are too many way to validate a form in Client side.

Here we are using AngularJs for the form validation. AngularJs Provide many form Validation Directives, We will use then to validate our form. Now, let’s create new project.  First, Add a Employee class and write the code below:
namespace FormValidationInAj.Models
{
    public class Employee
    {
        public int Id { get; set; }
        public string FirstName { get; set; }
        public string LastName { get; set; }
        public string Email { get; set; }
        public int Age { get; set; }   
 }
}

Create an Empty Home Controller
using System.Web.Mvc;
namespace FormValidationInAj.Controllers
{
    public class HomeController : Controller
    {
        public ActionResult Index()
        {
            return View();
        }
    }
}


Add Index view corresponding to Index action with this code:
@model FormValidationInAj.Models.Employee
<div ng-controller="myCntrl" class="divForm">
    <form name="registerForm" novalidate ng-submit="Save(registerForm.$valid)">
        @Html.AntiForgeryToken()
         <fieldset>
            <legend>Employee</legend>
             <div class="editor-label">
                @Html.LabelFor(model => model.FirstName)
            </div>
            <div class="editor-field form-group">
                <input type="text" ng-model="firstName" name="firstName" ng-required="true" />
                <p ng-show="registerForm.firstName.$error.required && !registerForm.firstName.$pristine" class=" error">First Name Required</p>
            </div>
            <div class="editor-label">
                @Html.LabelFor(model => model.LastName)
            </div>
            <div class="editor-field form-group">
                <input type="text" ng-model="lastName" name="lastName" />
            </div>
            <div class="editor-label">
                @Html.LabelFor(model => model.Email)
            </div>
            <div class="editor-field form-group">
                <input type="email" ng-model="Email" name="Email" ng-required="true" />
                <p ng-show="registerForm.Email.$error.required && !registerForm.Email.$pristine" class="error">Email Required</p>
                <p ng-show="registerForm.Email.$error.email && !registerForm.Email.$pristine" class="error">Invalid Email</p>
            </div>
            <div class="editor-label">
                @Html.LabelFor(model => model.Age)
            </div>
            <div class="editor-field form-group">
                <input type="number" ng-model="Age" name="Age" ng-required="true" />
                <p ng-show="registerForm.Age.$error.required && !registerForm.Age.$pristine" class="error">Age Required</p>
                <p ng-show="registerForm.Age.$error.number && !registerForm.Age.$pristine" class="error">Invalid Age </p>
            </div>
            <p>
                <input type="submit" value="Create" class="btn btn-primary" />
           </p>
        </fieldset>
    </form>
</div>

Above I even have used AngularJs directives for form validation.

  1. Required :using ng-required="true", validated a input field that's required.
  2. Email : using Type="email" property of input field, validate Email address.
  3. Number : using Type="number" property of input field, validate number field.

There are several form validation directives in AngularJs.

  • To show the error message, I even have used Error Name of AngularJs.
  • To show error message only if used has been interacted with form, unless Error message are going to be hidden, I even have used $pristine. $pristine : it'll be true If user has not interacted with form yet.

Now, Add 2 new Js file.
module.js
var app = angular.module("myApp", []);

Controller.js
app.controller("myCntrl", function ($scope, $http) {
    $scope.Save = function (Valid) {
        if (!Valid) {
            alert("Invalid form");
            return;
        } else {
            alert("It's Great. Form Submitted");
        }
    }
});

Modilfy your _Layout.cshtml file. I have included required Js file for angularJs.
<!DOCTYPE html>
<html ng-app="myApp">
<head>
    <meta charset="utf-8" />
    <meta name="viewport" content="width=device-width" />
    <title>@ViewBag.Title</title>
    @Styles.Render("~/Content/css")
     <link href="~/Content/bootstrap.min.css" rel="stylesheet" />
    <script src="~/Scripts/angular.min.js"></script>
    <script src="~/Scripts/Angular/Module.js"></script>
    <script src="~/Scripts/Angular/Controller.js"></script>
    <style>
        .divForm{
           margin: 15px 50px;
           padding: 0;
           width: 30%;
         }
    </style>
</head>
<body>
    @RenderBody()

    @Scripts.Render("~/bundles/jquery")
    @RenderSection("scripts", required: false)
</body>
</html>

Output:

HostForLIFE.eu ASP.NET 5 Hosting
HostForLIFE.eu is European Windows Hosting Provider which focuses on Windows Platform only. We deliver on-demand hosting solutions including Shared hosting, Reseller Hosting, Cloud Hosting, Dedicated Servers, and IT as a Service for companies of all sizes. We have customers from around the globe, spread across every continent. We serve the hosting needs of the business and professional, government and nonprofit, entertainment and personal use market segments.


ASP.NET 5 Hosting Italy - HostForLIFE.eu :: Creating Custom Config Section in ASP.NET

clock February 13, 2015 05:55 by author Peter

In this tutorial, I will show you how to create custom config section in ASP.NET 5. You can extend ASP.NET configuration settings with XML configuration elements of your own. To do this, you create a custom configuration section handler.

The handler should be a ASP.NET Framework class that inherits from the System.Configuration.ConfigurationSection class. The section handler interprets and processes the settings that are defined in XML configuration elements in a specific section of a web.config file. You'll read and write these settings through the handler's properties.
using System;
using System.Collections.Generic;
using System.Configuration;
using System.Linq;
using System.Web;
namespace CustomConfigSection
{
    public class LoginRedirectByRoleSection : ConfigurationSection
    {
        [ConfigurationProperty("roleRedirects")]
    public RoleRedirectCollection RoleRedirects
        {
    get
            {
    return (RoleRedirectCollection)this["roleRedirects"];
            }
    set
            {
    this["roleRedirects"] = value;
            }
        }
    }
    public class RoleRedirect : ConfigurationElement
    {
        [ConfigurationProperty("role", IsRequired = true)]
    public string Role
        {
    get
            {
    return (string)this["role"];
            }
    set
            {
    this["role"] = value;
            }
        }
        [ConfigurationProperty("url", IsRequired = true)]
    public string Url
        {
    get
            {
    return (string)this["url"];
            }
    set
            {
    this["url"] = value;
            }
        }
    }
    public class RoleRedirectCollection : ConfigurationElementCollection
    {
    public RoleRedirect this[int index]
        {
    get
            {
    return (RoleRedirect)BaseGet(index);
            }
        }
    public RoleRedirect this[object key]
        {
    get
            {
    return (RoleRedirect)BaseGet(key);
            }
        }
    protected override ConfigurationElement CreateNewElement()
        {
    return new RoleRedirect();
        }
    protected override object GetElementKey(ConfigurationElement element)
        {
    return ((RoleRedirect)element).Role;
        }
    }
}


<configSections>
    <section name="loginRedirectByRole" type="CustomConfigSection.LoginRedirectByRoleSection,CustomConfigSection" allowLocation="true" allowDefinition="Everywhere" />
    </configSections>
    <loginRedirectByRole>
    <roleRedirects>
    <add role="Administrator" url="~/Admin/Default.aspx" />
    <add role="User" url="~/User/Default.aspx" />
    </roleRedirects>
   </loginRedirectByRole>


using System;
using System.Collections.Generic;
using System.Configuration;
using System.Linq;
using System.Web;
using System.Web.Security;
using System.Web.UI;
using System.Web.UI.WebControls;
using CustomConfigSection;
namespace CustomConfigSection
{
    public partial class WebForm1 : System.Web.UI.Page
    {
    protected void Page_Load(object sender, EventArgs e)
        {
           LoginRedirectByRoleSection roleRedirectSection = (LoginRedirectByRoleSection)ConfigurationManager.GetSection("loginRedirectByRole");
    foreach (RoleRedirect roleRedirect in roleRedirectSection.RoleRedirects)
            {
    if (Roles.IsUserInRole("", roleRedirect.Role))
                {
                    Response.Redirect(roleRedirect.Url);
                }
            }
        }
    }
}

HostForLIFE.eu ASP.NET 5 Hosting
HostForLIFE.eu is European Windows Hosting Provider which focuses on Windows Platform only. We deliver on-demand hosting solutions including Shared hosting, Reseller Hosting, Cloud Hosting, Dedicated Servers, and IT as a Service for companies of all sizes. We have customers from around the globe, spread across every continent. We serve the hosting needs of the business and professional, government and nonprofit, entertainment and personal use market segments.


ASP.NET 5 Hosting Russia - HostForLIFE.eu :: Reading PDF Document Properties in ASP.NET

clock February 9, 2015 09:39 by author Peter

With this article, I will tell you about how to to read pdf document properties in  ASP.NET 5. We know that there is no- such  in-built class in .NET framework that read the pdf document. In this example,I will used third-party library iTextSharp. And here is the code that I used for this article:


<%@ Page Language="C#" AutoEventWireup="true" CodeFile="PdfPropertiesReader.aspx.cs"    Inherits="PdfPropertiesReader" %>
<!DOCTYPE html PUBLIC "-//W3C//DTD XHTML 1.0 Transitional//EN" "http://www.w3.org/TR/xhtml1/DTD/xhtml1-transitional.dtd">
<html xmlns="http://www.w3.org/1999/xhtml">
<head runat="server">
    <title></title>
</head>
<body>
    <form id="form1" runat="server">
    <div>
        <div id="pdfProperties" runat="server">
        </div>
    </div>
    <asp:Button ID="Button1" runat="server" OnClick="Button1_Click" Text="Read Pdf Properties" />    </form>
</body>
</html>


using System;
using System.Collections;
using System.Collections.Generic;
using iTextSharp.text;
using iTextSharp.text.pdf;
using System.Text;
public partial class PdfPropertiesReader : System.Web.UI.Page
{
    private const string FileNmae = @"C:\\temp\\asp.pdf";
    protected void Page_Load(object sender, EventArgs e)
    {
    }
    protected void Button1_Click(object sender, EventArgs e)
    {
        try
        {
            StringBuilder stringBuilder = new StringBuilder();
            // create a reader (constructor overloaded for path to local file or URL)
            PdfReader reader = new PdfReader(FileNmae);
            // total number of pages
            int n = reader.NumberOfPages;
            // size of the first page
            Rectangle psize = reader.GetPageSize(1);
            float width = psize.Width;
            float height = psize.Height;
            Console.WriteLine("Size of page 1 of {0} => {1} × {2}", n, width, height);
            // file properties
            Hashtable infodict = reader.Info;
            foreach (DictionaryEntry kvp in infodict)
            {
                stringBuilder.Append(kvp.Key + "=>" + kvp.Value + "</br>");
            }
            pdfProperties.InnerHtml = stringBuilder.ToString();
        }
        catch (Exception exception)
        {
            Response.Write(exception.Message);
        }
    }
}

HostForLIFE.eu ASP.NET 5 Hosting
HostForLIFE.eu is European Windows Hosting Provider which focuses on Windows Platform only. We deliver on-demand hosting solutions including Shared hosting, Reseller Hosting, Cloud Hosting, Dedicated Servers, and IT as a Service for companies of all sizes. We have customers from around the globe, spread across every continent. We serve the hosting needs of the business and professional, government and nonprofit, entertainment and personal use market segments.


About HostForLIFE.eu

HostForLIFE.eu is European Windows Hosting Provider which focuses on Windows Platform only. We deliver on-demand hosting solutions including Shared hosting, Reseller Hosting, Cloud Hosting, Dedicated Servers, and IT as a Service for companies of all sizes.

We have offered the latest Windows 2016 Hosting, ASP.NET Core 2.2.1 Hosting, ASP.NET MVC 6 Hosting and SQL 2017 Hosting.


Tag cloud

Sign in