European ASP.NET 4.5 Hosting BLOG

BLOG about ASP.NET 4, ASP.NET 4.5 Hosting and Its Technology - Dedicated to European Windows Hosting Customer

European ASP.NET Hosting - Amsterdam :: Adding AjaxControltoolkit to Visual Studio 2012

clock September 6, 2013 07:20 by author Scott

Ajax control toolkit contains rich set of controls which are used build highly responsive and interactive web applications. Ajax Control toolkit contains more than 40 controls to choose from which includes ColorPicker, AutoComplete, Calender, Accordion, Watermark, etc. Ajax Control Toolkit’s recently updated version came in September 2012. 

Now if you want to add Ajax Control toolkit to your asp.net project in Visual Studio 2012, you have two options.

1. Using NuGet Package Manager

This is very simple way to add AjaxControlToolkit to your asp.net project. Just right click on your project under Solution Explorer > Manage NuGet Packages > Online and then select AjaxControlToolkit and then install it.

2. Add Manually

First, you need to download it. Please go to http://ajaxcontroltoolkit.codeplex.com > Downloads > Click on Ajax Control Toolkit 4 > Download.

Then Extract the file. Right Click Zip file > Properties > Unblock > Extract files

The third step is add toolkit to Visual Studio. Right Click on your Toolbox Menus > Click on add tab > Name it as “AjaxControlToolkit” > Right Click on newly added tab > Choose Items > Browse > Select extracted AjaxControlToolkit.dll > Hit ok and there you go.

Select the way which suits you add AjaxControlToolkit to your toolbox and enjoy making a responsive, interactive web applications.


European ASP.NET Hosting - Amsterdam :: Tips Using FileUpload Control to Upload Your FIle

clock September 2, 2013 08:48 by author Scott

OK, I will talk again about FileUpload Control. Last week I have discussed about how to fix FileUpload Control that not work in Update Panel. FileUpload Control really help us to accepting file uploads from users. It is very easy now. Please see the example below. However, please notice that there are security concerns to to consider when accepting files from users! Here is the markup required:

<form id="form1" runat="server">
    <asp:FileUpload id="FileUploadControl" runat="server" />
    <asp:Button runat="server" id="UploadButton" text="Upload" onclick="UploadButton_Click" />
    <br /><br />
    <asp:Label runat="server" id="StatusLabel" text="Upload status: " />
</form>

And here is the CodeBehind code required to handle the upload:

protected void UploadButton_Click(object sender, EventArgs e)
{
   
if(FileUploadControl.HasFile)
    {
       
try
        {
           
string filename = Path.GetFileName(FileUploadControl.FileName);
            FileUploadControl.SaveAs(Server.MapPath(
"~/") + filename);
            StatusLabel.Text
= "Upload status: File uploaded!";
        }
       
catch(Exception ex)
        {
            StatusLabel.Text
= "Upload status: The file could not be uploaded. The following error occured: " + ex.Message;
        }
    }
}

As you can see, it's all relatively simple. Once the UploadButton is clicked, we check to see if a file has been specified in the upload control. If it has, we use the FileUpload controls SaveAs method to save the file. We use the root of our project (we use the MapPath method to get this) as well as the name part of the path which the user specified. If everything goes okay, we notify the user by setting the Text property of the StatusLabel - if not, an exception will be thrown, and we notify the user as well.

This example will get the job done, but as you can see, nothing is checked. The user can upload any kind of file, and the size of the file is only limited by the server configuration. A more robust example could look like this:

protected void UploadButton_Click(object sender, EventArgs e)
{
   
if(FileUploadControl.HasFile)
    {
       
try
        {
           
if(FileUploadControl.PostedFile.ContentType == "image/jpeg")
            {
               
if(FileUploadControl.PostedFile.ContentLength < 102400)
                {
                   
string filename = Path.GetFileName(FileUploadControl.FileName);
                    FileUploadControl.SaveAs(Server.MapPath(
"~/") +
filename);
                    StatusLabel.Text
= "Upload status: File uploaded!";
                }
               
else
                    StatusLabel.Text
= "Upload status: The file has to be less than 100 kb!";
            }
           
else
                StatusLabel.Text
= "Upload status: Only JPEG files are accepted!";
        }
       
catch(Exception ex)
        {
            StatusLabel.Text
= "Upload status: The file could not be uploaded. The following error occured: " + ex.Message;
        }
    }
}

Here we use the two properties, ContentLength and ContentType, to do some basic checking of the file which the user is trying to upload. The status messages should clearly indicate what they are all about, and you can change them to fit your needs.


European ASP.NET Hosting - Amsterdam :: Tips to Fix FileUpload Control is not Working in UpdatePanel

clock August 30, 2013 11:50 by author Scott

In this article I will explain with example how to upload Image/ file through File Upload Control that is placed inside Update Panel in asp.net Ajax using both C# and VB.Net languages. Many of the developers face a very common problem i.e. “FileUpload control is not working in update panel in asp.net”. I will also explain the reason and solution of this problem.

The FileUpload control doesn’t work for uploading image using Asynchronous postback when placed in the Update Panel since FileUpload control required full postback to get the image. If you check FileUpload1.HasFile method or FileUpload1.FileName property then it is null. That is because the update panel does not retain the file inside the FileUpoad control.

To solve the issue we need to set the Button that is uploading the image to be PostBackTrigger instead of AsyncPostBackTrigger. By doing so the upload button will cause the full post back and get and retain the image in the FileUpload control whenever clicked on.

So set it as:

<Triggers>
       <asp:PostBackTrigger ControlID="btnUpload" />
</Triggers>

How it works:

- In the <Form> tag of the design page (.aspx) places a FileUpload Control and a Button control from the standard category of the visual studio’s toolbox. Also place ScriptManager from the AJAX Extension category.

- Also create a folder in the root directory of your project and give it name “Images”. We will store our uploaded image in this folder. Uploaded images will be prefixed with a random unique name using the Guid.NewGuid() to avoid the duplicate name problem

<div>
    <fieldset style="width:250px;">
    <legend>Upload file example in asp.net</legend>
    <asp:ScriptManager ID="ScriptManager1" runat="server">
        </asp:ScriptManager>
    <table>
    <tr>
    <td>
        <asp:UpdatePanel ID="UpdatePanel1" runat="server">
        <ContentTemplate>
            <asp:FileUpload ID="FileUpload1" runat="server" />
            <asp:Button ID="btnUpload" runat="server" Text="Upload"
                onclick="btnUpload_Click" /><br />         
            <asp:Image ID="imgShow" runat="server" Width="150px" />
        </ContentTemplate>
       <Triggers>
       <asp:PostBackTrigger ControlID="btnUpload" />
       </Triggers>
        </asp:UpdatePanel>
    </td>
    </tr>
    </table>
    </fieldset>       
    </div>

C#.Net Code to upload image through FileUpload Control in Update Panel using Asp.Net

- In the code behind file(.aspx.cs) write the code on the upload button’s click event as:

protected void btnUpload_Click(object sender, EventArgs e)
    {
        if (FileUpload1.HasFile)
        {
            string ImgPath = Server.MapPath("~/Images/" + Guid.NewGuid() +  FileUpload1.FileName);
            FileUpload1.SaveAs(ImgPath);
            string ShowImgPath = ImgPath.Substring(ImgPath.LastIndexOf("\\"));
            imgShow.ImageUrl = "~/Images" + ShowImgPath;
        }
        else
        {
            ScriptManager.RegisterStartupScript(this, this.GetType(), "Message", "alert('Please select the image to upload');", true);                     
        }
    }

VB.Net Code to upload image through FileUpload Control in Update Panel using Asp.Net

- First design the page as mentioned in the source code above but replace the line

<asp:Button ID="btnUpload" runat="server" Text="Upload" onclick="btnUpload_Click" /> with the line  <asp:Button ID="btnUpload" runat="server" Text="Upload"/>

- In the code behind file(.aspx.vb) write the code on the upload button’s click event as

Protected Sub btnUpload_Click(sender As Object, e As System.EventArgs) Handles btnUpload.Click
        If FileUpload1.HasFile Then
            Dim ImgPath As String = Server.MapPath(("~/Images/" & Convert.ToString(Guid.NewGuid())) + FileUpload1.FileName)
            FileUpload1.SaveAs(ImgPath)
            Dim ShowImgPath As String = ImgPath.Substring(ImgPath.LastIndexOf("\"))
            imgShow.ImageUrl = "~/Images" & ShowImgPath
        Else
            ScriptManager.RegisterStartupScript(Me, Me.[GetType](), "Message", "alert('Please select the image to upload');", True)
        End If
    End Sub


Press Release :: European HostForLIFE.eu Proudly Launches ASP.NET MVC 5 Hosting

clock August 28, 2013 10:35 by author Ronny

European Windows and ASP.NET hosting specialist, HostForLIFE.eu, has announced the availability of new hosting plans that are optimized for the latest update of the Microsoft ASP.NET Model View Controller (MVC) technology. The MVC web application framework facilitates the development of dynamic, data-driven websites.

The latest update to Microsoft’s popular MVC (Model-View-Controller) technology,  ASP.NET MVC 5 adds sophisticated features like single page applications, mobile optimization, adaptive rendering, and more. Here are some new features of ASP.NET MVC 5:

- ASP.NET Identity
- Bootstrap in the MVC template
- Authentication Filters
- Filter overrides

HostForLIFE.eu is Microsoft’s number one Recommended Windows and ASP.NET Spotlight Hosting Partner in Europe for its support of Microsoft technologies that include WebMatrix, WebDeploy, Visual Studio 2012, ASP.NET 4.5, ASP.NET MVC 4.0, Silverlight 5, and Visual Studio Lightswitch.

HostForLIFE.eu hosts its servers in top class data centers that is located in Amsterdam to guarantee 99.9% network uptime. All data center feature redundancies in network connectivity, power, HVAC, security, and fire suppression.

In addition to shared web hosting, shared cloud hosting, and cloud server hosting, HostForLIFE.eu offers reseller hosting packages and specialized hosting for Microsoft SharePoint 2010 and 2013. All hosting plans from HostForLIFE.eu include 24×7 support and 30 days money back guarantee.

For more information about this new product, please visit http://www.HostForLIFE.eu

About HostForLIFE.eu:

HostForLIFE.eu is Microsoft No #1 Recommended Windows and ASP.NET Hosting in European Continent. HostForLIFE.eu service is ranked the highest top #1 spot in several European countries, such as: Germany, Italy, Netherlands, France, Belgium, United Kingdom, Sweden, Finland, Switzerland and many top European countries.

HostForLIFE.eu number one goal is constant uptime. HostForLIFE.eu data center uses cutting edge technology, processes, and equipment. HostForLIFE.eu has one of the best up time reputations in the industry.

HostForLIFE.eu second goal is providing excellent customer service. HostForLIFE.eu technical management structure is headed by professionals who have been in the industry since it's inception. HostForLIFE.eu has customers from around the globe, spread across every continent. HostForLIFE.eu serve the hosting needs of the business and professional, government and nonprofit, entertainment and personal use market segments.


European ASP.NET 4.5 Hosting - Amsterdam :: Web API. VB.NET Example ASP.NET 4.5

clock August 15, 2013 08:55 by author Scott

The new feature that appeals to me is the new “Web API” which eases the development of REST and AJAX APIs (API is the new Microsoft jargon for a web service!)

Wanting to have a play with this new feature, I fired up Visual Studio Express 2012 and created a standard web application in vb.net. Although many examples on the web are showing the Web API with MVC, it can be used in any .net application.


Using the new “Web API”  requires two parts.

1. Setup the controller class that will perform the logic.

2. Setup up route tables in your global.asax.vb file, to correctly “route” the client request to the correct controller class.

So down to code. The examples below assume a GET request to the Web API Server.

1. Create a standard web application, remembering to specify .net 4.5 as the target framework.

2. Create a new folder within the application called “Controllers”. See Picture below.
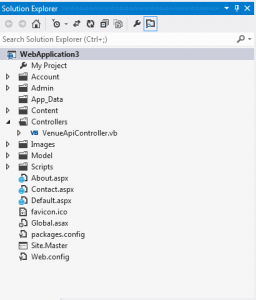
3. Within this folder, create a new “Web API Controller Class”, by right clicking on the Controllers folder and clicking Add. Then choose “Web API Controller Class” from the list as shown below
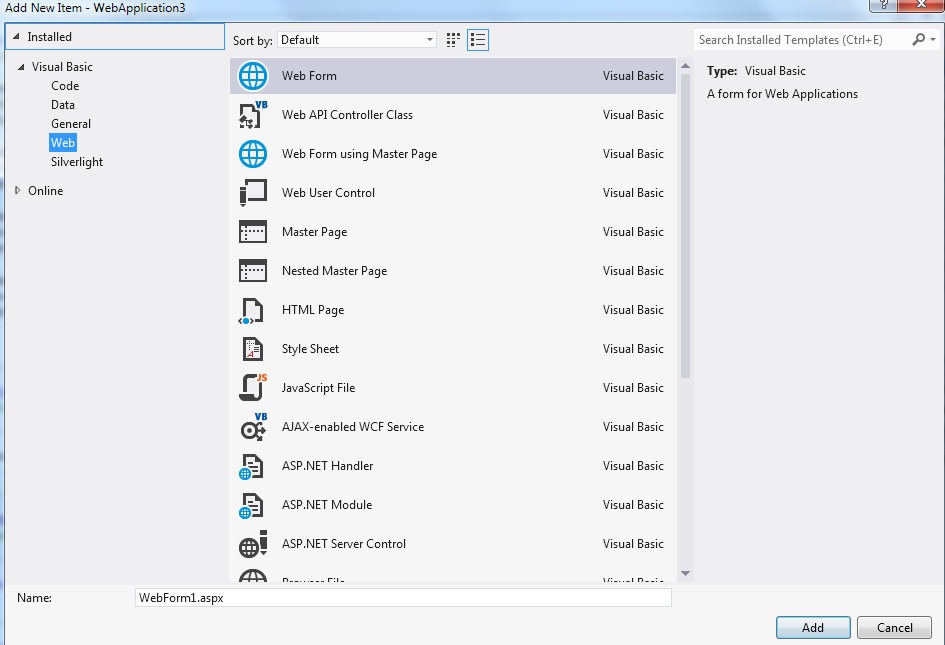
4. When naming this new controller class, remember to leave the word controller at the end of the name, otherwise the routing won’t work! As you can see below, I called my class VenueApiController.vb

5. When you open this new class, you will see some get, post,delete functions already filled in. I just created new functions to suit my client data requirements.

The sample data that I am using is for a project we have been working on call nejola.com. This allows local businesses to “push” their deals to Android smartphone users in the locality.

We have some test data in the SQL Server, so used this to try the Web API out.

The first function that I created returned a full list of the test venues available. I named this function GetVenues. No search data was needed to be passed to the function and I wanted the result fetched as a dataset to the client. The beauty of the “Web API” is the data is then presented to the client depending upon the headers of the calling client. For example an ajax call will return the data in a json format

Public Function GetVenues() As DataSet

Try

                Using sqlConn As New
SqlConnection(ConfigurationManager.ConnectionStrings("DefaultConnection").ConnectionString)
                    Dim sqlComm As SqlCommand = New SqlCommand
                    sqlComm.Connection = sqlConn
                    sqlComm.CommandText = "SELECT * From df_Locations"
                    Dim sqlDataAdapt As SqlDataAdapter = New SqlDataAdapter(sqlComm)
                    Dim ds As DataSet = New DataSet
                    sqlDataAdapt.Fill(ds)
                    sqlDataAdapt.Dispose() : sqlComm.Dispose() : sqlConn.Close() : sqlConn.Dispose()
                    ds.DataSetName = "VenueData"
                    ds.Tables(0).TableName = "exgVenuesData"
                    Return ds
                End Using

            Catch ex As Exception

                Return Nothing

            End Try

And that’s it for the data logic ! Nothing too fancy here, just perform some SQL on the SQL server and return the dataset. I would normally call a stored procedure for but this purpose used the commandtext

The function below requires a parameter to be passed, in this case the town name as a string.

Public Function GetVenueByTown(ByVal town As String) As DataSet
Dim sqlConn As SqlConnection = New SqlConnection("Connection info here")
sqlConn.Open()
Dim sqlComm As SqlCommand = New SqlCommand()
sqlComm.Connection = sqlConn
sqlComm.CommandText = "SELECT * From df_Locations WHERE VenueTown = '" & town & "'"
Dim sqlDataAdapt As SqlDataAdapter = New SqlDataAdapter(sqlComm)
Dim ds As DataSet = New DataSet
sqlDataAdapt.Fill(ds)
sqlDataAdapt.Dispose() : sqlComm.Dispose() : sqlConn.Close() : sqlConn.Dispose()
ds.DataSetName = "VenueTownData"
ds.Tables(0).TableName = "EXGTownData"
Return ds
End Function

Now that we have two working functions within the API Class, we need to add routing to call the functions. Users Of Microsoft MVC should be aware of routing and controllers, however for VB.net users this is new with .net 4.5

What the routing and controllers allows us to do is present the URL’s called by the clients  in a nice format. For example to call the GetVenues function above, the client can call :

http://domain.com/venues

To call the GetVenueByTown function and pass the town parameter the client can use :

http://domain.com/venues/town/townname

Ok, so now we need to setup the routing for this to work !

1. Open the global.asax.vb file and look for the sub

Sub Application_Start(ByVal sender As Object, ByVal e As EventArgs)

End sub

2. At the top of the page add :

Imports System.Web.Routing

Imports System.Web.Http

3. Here is the code for the GetVenues Function which is the default function called. Add this to the Application_Start Sub.

RouteTable.Routes.MapHttpRoute(name:="Venue", _
routeTemplate:="venues", _
defaults:=New With {.symbol = RouteParameter.Optional, .controller = "VenueApi"})

To break down the above, here is what is happening. This example is the default call, with no parameters being passed to the function.

name:=”Venue” –> This is the name given to this routetable. Each routetable has a different name.

routeTemplate:=”venues” –> This is the actual name that the client will call. In this example http://domain.com/venues.

.controller = “VenueApi” –> This MUST match the name that you gave your controller class without the controller part.

The route code to call the GetVenueByTown function that requires a town parameter to be passed is as follows :

RouteTable.Routes.MapHttpRoute(name:="VenueTowns", _
routeTemplate:="venues/town/{town}", _
defaults:=New With {.symbol = RouteParameter.Optional, .controller = "VenueApi"})

Again a break down of the code is as follows :

name:=”VenueTowns” –> Unique name of the routetable.

routeTemplate:=”venues/town/{town}” –> This is the path that will be entered by the client to get to the correct function. Note we have added the /town/ path and the parameter {town}. This parameter name must match that of the function otherwise the routing won’t work correctly.

controller = “VenueApi” –> This is the same as before and is the controller class without the controller part.


European ASP.NET 4.5 Hosting - Amsterdam :: Using Model Binding ASP.NET 4.5 to Display Data

clock July 29, 2013 08:17 by author Scott

As I have previously written, ASP.NET 4.5 has introduced many new features. One of them is model binding in ASP.NET 4.5. Now, I will give implementation how to use model binding with ASP.NET Forms 4.5.

Sample data

Before going on with examples let’s create some test data too. Let’s define class Product as follows.

1.public class Product
2.{
3.   public int Id { get; set; }
4.   public string Name { get; set; }
5.   public decimal Price { get; set; }
6.}

We need more than one product and to avoid creating database or doing other complex things we define simple method that returns us list of products.

01.private IList<Product> GetProductList()
02.{
03.   return new[]{
04.      new Product { Id=1, Name="Heineken", Price=0.88m },
05.      new Product { Id=2, Name="Skopsko", Price=0.97m },
06.      new Product { Id=3, Name="Gambrinus", Price=0.63m },
07.      new Product { Id=4, Name="Lapin Kulta", Price=0.92m },
08.      new Product { Id=5, Name="Rock", Price=1.1m }
09.   };
10.}

That’s enough for preparation work. You can use this method also as static method of Product class.

Strongly typed controls

Previous versions of ASP.NET Forms used reflection on data source objects to read values from objects they were bound to. Web is full of examples about how to bind DataTable to GridView or Repeater and so on. With strongly typed controls ASP.NET Forms makes step closer to object orientation in presentation layer.

Let’s define strongly typed Repeater that shows us list of products.

01.<asp:Repeater
02.      runat="server" ID="Repeater1"
03.      ModelType="WebApplication45.Product"
04.      SelectMethod="GetProducts">
05.   <HeaderTemplate>
06.      <table>
07.      <tr>
08.      <th>ID</th>
09.      <th>Name</th>
10.      <th>Price</th>
11.      </tr>
12.   </HeaderTemplate>
13.   <ItemTemplate>
14.      <tr>
15.      <td><%# Item.Id %></td>
16.      <td><%# Item.Name %></td>
17.      <td><%# Item.Price %></td>
18.      </tr>
19.   </ItemTemplate>
20.   <FooterTemplate>
21.      </table>
22.   </FooterTemplate>
23.</asp:Repeater>

Note the following things:

1. There is new ModelType property we can use to specify type of data item.
2. There is new SelectMethod property that specifies the method to call when repeater wants to load data.
3. To show data in different templates we can use Item property that is strongly typed and – of course – IntelliSense is also supported. You can see IntelliSense in action on screenshot on below.

Now let’s see how SelectMethod works.

Select method

Select method is expected to return us result of type IQueryable<ModelType>. If our data source returns something else we can usually use LINQ extension methods to convert our source data to IQueryable. In our case GetProducts() method is defined as follows.

1.public IQueryable<Product> GetProducts()
2.{
3.   return GetProductList().AsQueryable();
4.}

SelectMethod allows us to do much more but for this example it is enough.

After running our ASP.NET Forms solution we will see product table like this.

Conclusion

Repeater is not the only strongly typed control available in ASP.NET 4.5 – there are many other familiar controls that have support for strongly typed data. In this posting we saw that defining strongly typed web controls is easy. It is also easy to provide data to these controls using data selecting method. SelectMethod is more powerful than you can see here but this is the topic of some other (hopefully interesting) posting.


European ASP.NET Hosting - Amsterdam :: Tips to Populate Or Bind DropDownList With JQuery And XML In Asp.Net

clock July 8, 2013 11:32 by author Scott

In this example i'm explaining How To Populate Or Bind DropDownList With JQuery And XML In Asp.Net.

Add jquery library reference in head section and place one dropdown on the page.

Add one list item with select as it's value.

   1:  <asp:DropDownList ID="DropDownList1" runat="server">
   2:  <asp:ListItem>Select</asp:ListItem>
   3:  </asp:DropDownList>
   4:   
   5:  <asp:Label ID="Label1" runat="server" Text=""/>


Following is the Cities.xml file i'm using to bind dropdownlist using jquery.

01<!--?xml version="1.0" encoding="utf-8" ?-->
02<cities>
03  <city>
04    <name>New York</name>
05    <id>1</id>
06  </city>
07    <city>
08    <name>Washington</name>
09      <id>2</id>
10  </city>
11  <city>
12    <name>Chicago</name>
13    <id>3</id>
14  </city>
15  <city>
16    <name>Seattle</name>
17    <id>4</id>
18  </city>
19</cities>

Add this script in head section of page.

01<script src="jquery-1.7.2.min.js" type="text/javascript"></script>  
02<script type="text/javascript">
03$(document).ready(function()
04{
05  $.ajax(
06  {
07    type: "GET",
08    url: "Cities.xml",
09    dataType: "xml",
10    success: function(xml)
11    {
12      var dropDown = $('#<%=DropDownList1.ClientID %>');
13      $(xml).find('City').each(function()
14      {
15        var name = $(this).find('name').text();
16        var id = $(this).find('id').text();
17        dropDown.append($("<option></option>").val(id).html(name));
18      });
19      dropDown.children(":first").text("--Select--").attr("selected", true);
20    }
21  });
22  $('#<%=DropDownList1.ClientID %>').change(function()
23  {
24  var ddl = $('#<%=DropDownList1.ClientID %>');
25  var selectedText = $('#<%=DropDownList1.ClientID %> option:selected').text();
26  var selectedValue = $('#<%=DropDownList1.ClientID %>').val();
27  document.getElementById('Label1').innerHTML = "You selected " + selectedText + " With id " + selectedValue;
28  });
29});
30</script>

Build and run the code.


European ASP.NET 4.5 Hosting - Amsterdam :: Change Session Timeout in ASP.NET

clock July 1, 2013 11:53 by author Scott

You’re trying to increase session timeout on your ASP.NET site? In this tutorial, I will gonna talk about this issue. But, if you use shared hosting, you cant use session as it will impact to other clients site.

ASP.NET

Usually, the first and easiest thing to do is just change the configuration/system.web/sessionState@timeout value to something like “90″.  This should mean that you’d like your users’ sessions to be persisted until a 90 minute window of idle time has elapsed.

<configuration>
  <system.web>
  ...
   <sessionState timeout="90" />
  ...
 </system.web>
</configuration>

Hmm… Not only about change on your code, but please check this application pool timeout on your IIS setting.

Ensure this value is set to the timeout of your session, at a minimum, to ensure that all sessions persist for the entire session timeout period.

The reason that these two values are dependent on one another is because the session information is actually stored within the worker process of the application pool. That is to say, if the worker process is shutdown or killed for any reason, the session information will be lost.

Session Storage Mode

There are the modes of storing the session information:

  • InProc (or In Process) – Default – Stores session information within the IIS worker process
  • StateServer – Stores session information in a separate process (the ASP.NET state service)
  • SQLServer – Stores session information in a SQL database

The only mode that is vulnerable to losing session information on a worker process is when the state is stored in the worker process. Both StateServer and SQLServer modes are not affected by worker process resets. Likewise, StateServer and SQLServer modes are the only options when it is necessary to share session state across more than a single IIS server.

For more information about these modes, check out MSDN.

ASP

There’s two ways to change the session timeout when you’re dealing with classic ASP.

You can set it at the application level, or programmatically, which means that the value can be different within the application.

Since it doesn’t specifically state that the setting is for classic ASP, it may be confusing to know that the value is in: Application Properties -> Configuration… -> Options -> Enable session state.

It’s as simple as updating this value, and the session timeout for your entire classic ASP application is changed!

Programmatically

You can also use modify the Session.Timeout property at runtime to affect the timeout period of the session. One popular location to put this piece of code is in the global.asa file.

<script language="VBScript" runat="Server">
Sub Session_OnStart
 Session.Timeout = 90
End Sub
</SCRIPT>

Hope this tutorial helpful. 


European ASP.NET 4.5 Hosting - Amsterdam :: ASP.Net 4.5 Strongly Typed Data Controls and Visual Studio 2012

clock June 25, 2013 06:46 by author Scott

In this post I will show you one of great features in ASP.NET 4.5, it is called Strongly Typed Data controls in ASP.NET 4.5.

I will be demonstrating with a hands-on example on Strongly Typed Data controls and how we can have Intellisense and compile type checking using this new feature.

I assume you have downloaded VS 2012 (Express edition will do).I have also downloaded and installed AdventureWorksLT2012 database.You can download this database from the codeplex website.

I will be creating a simple website without using this feature. Then I will show you what the problem is without using this feature.

1) Launch VS 2012. Create a new ASP.Net Web Forms Site. Choose C# as the development language.Give an appropriate name to your site.

2) Now we will add a data access layer to our site in order to fetch some data to the user interface.I will use EF database first approach.

3) Add a new item in your project, an ADO.Net Entity Data Model. I have named it AdventureWorksLT.edmx.Then we will create the model from the database and click Next.Create a new connection by specifying the SQL Server instance and the database name and click OK.Then click Next in the wizard.In the next screen of the wizard select only the Customer table from the database and hit Finish.You will see the Customer entity in the Entity Designer. 

4) Add a new web form to your site.Name is Customer.aspx.We will add a new web server control a GridView that will get the data from the database through EF.

This is the code for the web server control.I am using the Bind syntax.We are using strings to represent the property names (FirstName,LastName).

<asp:GridView ID="GridView1" runat="server" AutoGenerateColumns="false">

            <Columns>
                <asp:TemplateField HeaderText="FirstName">
                   
                    <ItemTemplate>
                        <asp:Label ID="lblName" runat="server" Text='<%# Bind("FirstName") %>'></asp:Label>
                    </ItemTemplate>
               
               </asp:TemplateField>
               
               <asp:TemplateField HeaderText="LastName">
                   

                     <ItemTemplate>
    <asp:Label ID="lbName" runat="server" Text='<%# Bind("LastName")
%>'></asp:Label>
                    </ItemTemplate>

                </asp:TemplateField>

            </Columns>

        </asp:GridView>

5) In the Page_Load event handling routine of the Customer.aspx page type the following code

        AdventureWorks2012Entities ctx = new AdventureWorks2012Entities();

        var query = from cust in ctx.Customers
     
        select new {cust.FirstName,cust.LastName};

        GridView1.DataSource = query.ToList();

        GridView1.DataBind();

6)  Build and Run the application. You will see the data appearing on the page.

7) Now let's do a simple typo.Replace the following line

<asp:Label ID="lbName" runat="server" Text='<%# Bind("LastName") %>'></asp:Label>

with this

<asp:Label ID="lbName" runat="server" Text='<%# Bind("LLastName") %>'></asp:Label>

Build your site. It will compile. The compiler does not know anything . Guess where you will get the exception, at runtime.Run your site and you will get an exception.

8) Let's rewrite the code in the Customers.aspx page.

        <asp:GridView ID="GridView1" runat="server" AutoGenerateColumns="false" ItemType="AdventureWorks2012Entities.Customer">

            <Columns>
                <asp:TemplateField HeaderText="FirstName">

                    <ItemTemplate>
                        <asp:Label ID="lblName" runat="server" Text='<%# Item.FirstName %>'></asp:Label>
                    </ItemTemplate>

                </asp:TemplateField>
                <asp:TemplateField HeaderText="LastName">

                    <ItemTemplate>
                        <asp:Label ID="lbName" runat="server" Text='<%# Item.LastName %>'></asp:Label>
                    </ItemTemplate>

                </asp:TemplateField>

            </Columns>

        </asp:GridView>

Now we can tell our application what type of data the control will be bound to using the ItemType 

ItemType="AdventureWorks2012Entities.Customer"

Now we need to alter the code in the template. Have a look at those 2 lines 

  <asp:Label ID="lblName" runat="server" Text='<%# Item.FirstName %>'></asp:Label>
  <asp:Label ID="lbName" runat="server" Text='<%# Item.LastName %>'></asp:Label> 

Now we have compile type checking and Intellisense in our sample application.As we type the compiler informs us if it recognizes the property. This is a great enhancement since I do not want to face exceptions on runtime because of typos. 

9) Build and run your application again. The sample application works fine.


European ASP.NET 4.5 Hosting - Amsterdam :: Creating Security System for ASP.NET 4.5

clock June 18, 2013 06:23 by author Scott

First, you noticed you were assigning users to roles that gave them more access than they needed. So you started tailoring roles more specifically and ended up with roles with one user in them. (And at that point, why bother with roles at all?) Finally, you started creating very targeted roles and assigning multiple roles to each user.

That final strategy is moving you to claims-based security: each role really represents a kind of claim. One role says the user is a manager, another that the user is in the Western division, a third that the user can authorize expenditures up to $10,000. The Microsoft .NET Framework 4.5 supports claims-based security directly, but you can create an equivalent system in ASP.NET 4 (either in MVC, Web Forms or Web API) without much trouble.

The first step is to create an object that implements the IPrincipal interface and has properties for the data (claims) that you'll use to authorize requests. A class that implements IPrincipal has to have a property called Identity that returns a GenericIdentity object (which provides the user's name) and a method called IsInRole method that returns True if a user is assigned to a specific role. The user object in Listing 1 does all of that and adds three additional properties (Division, Job and ApprovalLevel).

Listing 1. A custom user object.

Public Class PHVUser
  Implements IPrincipal

  Dim _gi As GenericIdentity
  Dim _roles As New List(Of String)

  Public Sub New(Name As String, Optional Roles As String = "")
    _gi = New GenericIdentity(Name)
    If Roles <> "" And Roles <> String.Empty Then
      For Each rol In Roles.Split(",").
        Select(Function(r) r.Trim()).ToArray
        _roles.Add(rol)
      Next
    End If

  End Sub

  Public Property Division As String
  Public Property Job As String
  Public Property ApprovalLevel As Integer

  Public ReadOnly Property Identity _
    As IIdentity Implements IPrincipal.Identity
    Get
      Return _gi
    End Get
  End Property

  Public Function IsInRole(role As String) _
    As Boolean Implements IPrincipal.IsInRole
    If _roles.Contains(role) Then
      Return True
    Else
      Return False
    End If
  End Function
End Class

To create a user object for a user named "Peter" who's assigned to the roles manager and clerk, you'd use this code:

usr = New PHVUser("Scott", "manager, clark")

Replacing the User

Now you have to get ASP.NET to use your security object. ASP.NET looks for its IPrincipal object in the CurrentPrincipal object of the Thread class and the User property of HttpContext.Current. If you put your object in there, ASP.NET will use it for its default user name and roles authorization.

To get your IPrincipal object into those two spots, you need to create an HTTP module (a class that implements the IHttpModule and IDisposable events) and add it to your site's processing pipeline. ASP.NET will fire the PostAuthenticateRequest event on your module whenever a request comes in to your site. You need to wire up a method to that event in your module's Init event to create and insert your object.

The class begins like this (I've omitted some code that implements the IDisposable interface that Visual Studio will generate for you):

Public Class PHVAuthHttp
  Implements IHttpModule, IDisposable

  Public Sub Init(context As HttpApplication) _
    Implements IHttpModule.Init
    AddHandler context.PostAuthenticateRequest,
      New EventHandler(AddressOf ReplaceUser)
  End Sub

In your method, you need to find out who the current user is so you can create your IPrincipal object for that user. When a user successfully gets through Forms Authentication, they're given a cookie with their name (and some other information) encrypted inside of it. You can grab that cookie and decrypt it like this:

Private Shared Sub ReplaceUser(sender As Object,
                               e As EventArgs)
  Dim authCookie As HttpCookie
  authCookie = HttpContext.Current.Request.Cookies.
               Get(FormsAuthentication.FormsCookieName)
  If authCookie IsNot Nothing Then
    Dim tkt As FormsAuthenticationTicket
    tkt = FormsAuthentication.Decrypt(authCookie.Value)

After you check that everything has worked, you can use the user's name to retrieve information about the user, and create your IPrincipal object and set your properties on it before putting it where ASP.NET will look for it:

If tkt.Name IsNot Nothing AndAlso
   tkt.Name <> String.Empty AndAlso
   tkt.Name <> "" Then
     // ... Retrieve user information into a variable called emp ...
     Threading.Thread.CurrentPrincipal = New PHVUser(tkt.Name) With
                        {.Region = emp.Region,
                         .Job = emp.Job,
                         .ApprovalLevel = 10000}
     HttpContext.Current.User = Threading.Thread.CurrentPrincipal
End If

Because you're doing this on every request, it would be a good idea to put the user's information (my emp variable in the previous example) in ASP.NET Cache and look for it there before going to the database to retrieve it.

Finally, you need to get ASP.NET to use your HTTP module by adding a modules element to your web.config file inside the system.webServer element. Inside the modules element put an add tag. You can set the name attribute to anything you want, but the type attribute must be set to the full name for your class (namespace and class name) followed by the name of the DLL it's in:

<modules>
  <add name="PHVAuth" type="PHVProj.PHVAuthHttp, PHVProj" />
</modules>

Testing Authorization

You can now test for your user's claims in your own code:

Dim usr As PHVUser = TryCast(HttpContext.Current.User, PHVUser)
If usr IsNot Nothing AndAlso
   usr.Region = "West" AndAlso
   usr.ApprovalLevel = 10000 Then

If you're working in ASP.NET MVC you can also create a custom Authorize filter that checks your user. Listing 2 shows an Authorize filter that checks a user's Region and works well in an asynchronous world. You could add it to a method like this:

<DivisionAuthAttribute(Region="West")>

Listing 2. An Authorize filter that checks a user's Region.

<AttributeUsage(AttributeTargets.Class Or AttributeTargets.Method)>
Public Class DivisionAuthAttribute
  Inherits AuthorizeAttribute

  Private Const IS_AUTHORIZED As String = "isAuthorized"
  Private RedirectUrl As String = "~/Error/Unauthorized"

  Public Property Division As String

  Protected Overrides Function AuthorizeCore(
    httpContext As Web.HttpContextBase) As Boolean
    Dim IsAuthorized As Boolean = False
    Dim us As UserSecurity = TryCast(httpContext.User, PHVUser)
    If us IsNot Nothing AndAlso
      Me.Division <> String.Empty AndAlso
      us.Division = Me.Division Then
        httpContext.Items.Add(IS_AUTHORIZED, IsAuthorized)
        Return True
    End If

    httpContext.Items.Add(IS_AUTHORIZED, IsAuthorized)
    Return False
  End Function

  Public Overrides Sub OnAuthorization(
    filterContext As Web.Mvc.AuthorizationContext)
    MyBase.OnAuthorization(filterContext)
    Dim IsAuthorized As Boolean
    If filterContext.HttpContext.Items(IS_AUTHORIZED) _
      IsNot Nothing Then
      IsAuthorized = Convert.ToBoolean(
        filterContext.HttpContext.Items(IS_AUTHORIZED))
    Else
      IsAuthorized = False
    End If
    If IsAuthorized = False AndAlso
       filterContext.RequestContext.HttpContext.
         User.Identity.IsAuthenticated Then
      filterContext.Result = New RedirectResult(RedirectUrl)
    End If
  End Sub
End Class

You can now extend your user object to encompass any information about your user that you need to authorize requests.


About HostForLIFE.eu

HostForLIFE.eu is European Windows Hosting Provider which focuses on Windows Platform only. We deliver on-demand hosting solutions including Shared hosting, Reseller Hosting, Cloud Hosting, Dedicated Servers, and IT as a Service for companies of all sizes.

We have offered the latest Windows 2016 Hosting, ASP.NET Core 2.2.1 Hosting, ASP.NET MVC 6 Hosting and SQL 2017 Hosting.


Tag cloud

Sign in