European ASP.NET 4.5 Hosting BLOG

BLOG about ASP.NET 4, ASP.NET 4.5 Hosting and Its Technology - Dedicated to European Windows Hosting Customer

European ASP.NET 4.5 Hosting - Amsterdam :: Model Binding with Dropdown List in ASP.NET 4.5

clock December 20, 2013 05:32 by author Administrator

ASP.NET 4.5 Preview introduces new model binding for  ASP.NET web forms. The concept of model binding was first introduced with ASP.NET MVC and now it has incorporated with ASP.NET Web Forms. You can easily perform any CURD operation with any sort of data controls using any data access technology like Entity Framework,  ADO.NET, LINQ to SQL Etc.  In this post I am going talk about how you can bind the data with ASP.NET DropdownList using new Model Binding features.

Let’s say we have a speaker database and we wants to bind the name of the speakers with the DropDownList.  First placed an ASP.NET Dropdown control with the page  and set the “DataTextField” and “DataValueField” properties.

We can set the  ddlName.DataSource to specifying the data source from the code behind and bind the data with dropdpwnlist, but  in this case from the code behind to providing the data source.

Now, instead of specifying the DataSource, we will be setting the Dropdownlists SelectMethod property to point a method GetSpeakerNames() within the code-behind file.

Select method is expected to return us result of type IQueryable<TYPE>. Here is GetSpeakerName() method is defined as follows.

So, Instead of specifying the data source we are specifying the SelectMethod, which return the IQueryable type of Speaker object. Run the application, you will find the names binded with dropdown list. Hope this helps !


European ASP.NET 4.5 Hosting - Amsterdam :: Tutorial Customize ASP.NET 4.5 Membership

clock December 17, 2013 10:29 by author Patrick

The ASP.NET MVC 4 Internet template adds some new, very useful features which are built on top of SimpleMembership. These changes add some great features, like a much simpler and extensible membership API and support for OAuth. However, the new account management features require SimpleMembership and won't work against existing ASP.NET Membership Providers. I'll start with a summary of top things you need to know, then dig into a lot more detail.

Summary:

  • SimpleMembership has been designed as a replacement for the previous ASP.NET Role and Membership provider system
  • SimpleMembership solves common problems developers ran into with the Membership provider system and was designed for modern user / membership / storage need
  • SimpleMembership integrates with the previous membership system, but you can't use a MembershipProvider with SimpleMembership
  • The new ASP.NET MVC 4 Internet application template AccountController requires SimpleMembership and is not compatible with previous MembershipProviders
  • You can continue to use existing ASP.NET Role and Membership providers in ASP.NET 4.5 and ASP.NET MVC 4 - just not with the ASP.NET MVC 4 AccountController
  • The existing ASP.NET Role and Membership provider system remains supported, as it is part of the ASP.NET core
  • ASP.NET 4.5 Web Forms does not use SimpleMembership; it implements OAuth on top of ASP.NET Membership
  • The ASP.NET Web Site Administration Tool (WSAT) is not compatible with SimpleMembership

The following is the result of a few conversations with Erik Porter (PM for ASP.NET MVC) to make sure I had some the overall details straight, combined with a lot of time digging around in ILSpy and Visual Studio's assembly browsing tools.

SimpleMembership: The future of membership for ASP.NET
The ASP.NET Membership system was introduced with ASP.NET 2.0 back in 2005. It was designed to solve common site membership requirements at the time, which generally involved username / password based registration and profile storage in SQL Server. It was designed with a few extensibility mechanisms - notably a provider system (which allowed you override some specifics like backing storage) and the ability to store additional profile information (although the additional  profile information was packed into a single column which usually required access through the API). While it's sometimes frustrating to work with, it's held up for seven years - probably since it handles the main use case (username / password based membership in a SQL Server database) smoothly and can be adapted to most other needs (again, often frustrating, but it can work).

The ASP.NET Web Pages and WebMatrix efforts allowed the team an opportunity to take a new look at a lot of things - e.g. the Razor syntax started with ASP.NET Web Pages, not ASP.NET MVC. The ASP.NET Web Pages team designed SimpleMembership to (wait for it) simplify the task of dealing with membership. As Matthew Osborn said in his post Using SimpleMembership With ASP.NET WebPages:
With the introduction of ASP.NET WebPages and the WebMatrix stack our team has really be focusing on making things simpler for the developer. Based on a lot of customer feedback one of the areas that we wanted to improve was the built in security in ASP.NET. So with this release we took that time to create a new built in (and default for ASP.NET WebPages) security provider. I say provider because the new stuff is still built on the existing ASP.NET framework. So what do we call this new hotness that we have created? Well, none other than SimpleMembership. SimpleMembership is an umbrella term for both SimpleMembership and SimpleRoles.

Part of simplifying membership involved fixing some common problems with ASP.NET Membership.

Problems with ASP.NET Membership
ASP.NET Membership was very obviously designed around a set of assumptions:

  • Users and user information would most likely be stored in a full SQL Server database or in Active Directory
  • User and profile information would be optimized around a set of common attributes (UserName, Password, IsApproved, CreationDate, Comment, Role membership...) and other user profile information would be accessed through a profile provider

Some problems fall out of these assumptions.
Requires Full SQL Server for default case
The default, and most fully featured providers ASP.NET Membership providers (SQL Membership Provider, SQL Role Provider, SQL Profile Provider) require full SQL Server. They depend on stored procedure support, and they rely on SQL Server cache dependencies, they depend on agents for clean up and maintenance. So the main SQL Server based providers don't work well on SQL Server CE, won't work out of the box on SQL Azure, etc.

Custom Membership Providers have to work with a SQL-Server-centric API
If you want to work with another database or other membership storage system, you need to to inherit from the provider base classes and override a bunch of methods which are tightly focused on storing a MembershipUser in a relational database. It can be done (and you can often find pretty good ones that have already been written), but it's a good amount of work and often leaves you with ugly code that has a bunch of System.NotImplementedException fun since there are a lot of methods that just don't apply.

Designed around a specific view of users, roles and profilesThe existing providers are focused on traditional membership - a user has a username and a password, some specific roles on the site (e.g. administrator, premium user), and may have some additional "nice to have" optional information that can be accessed via an API in your application.
This doesn't fit well with some modern usage patterns:

  • In OAuth and OpenID, the user doesn't have a password
  • Often these kinds of scenarios map better to user claims or rights instead of monolithic user roles
  • For many sites, profile or other non-traditional information is very important and needs to come from somewhere other than an API call that maps to a database blob

What would work a lot better here is a system in which you were able to define your users, rights, and other attributes however you wanted and the membership system worked with your model - not the other way around.

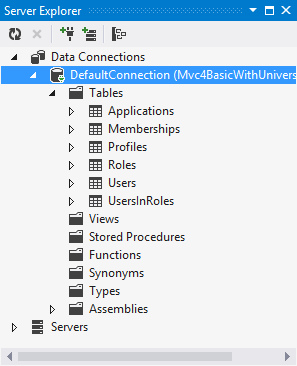
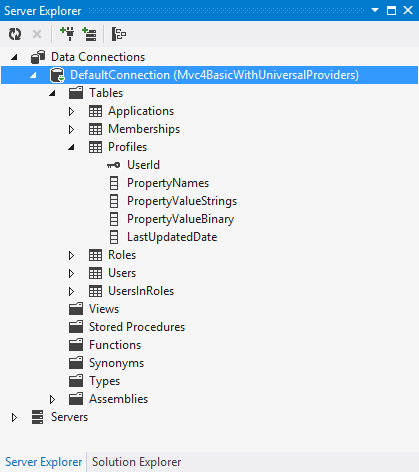
Requires specific schema, overflow in blob columns


Update: This schema has been improved a lot with Universal Providers. The views and stored procedures have been removed, and the tables are simplified.

SimpleMembership as a better membership system
As you might have guessed, SimpleMembership was designed to address the above problems.

Then we point SimpleMemberhip at that table with a one-liner:
WebSecurity.InitializeDatabaseFile("SecurityDemo.sdf", "Users", "UserID", "Username", true);

Broaden database support to the whole SQL Server family
While SimpleMembership is not database agnostic, it works across the SQL Server family. It continues to support full SQL Server, but it also works with SQL Azure, SQL Server CE, SQL Server Express, and LocalDB. Everything's implemented as SQL calls rather than requiring stored procedures, views, agents, and change notifications.

Note that SimpleMembership still requires some flavor of SQL Server - it won't work with MySQL, NoSQL databases, etc. You can take a look at the code in WebMatrix.WebData.dll using a tool like ILSpy if you'd like to see why - there are places where SQL Server specific SQL statements are being executed, especially when creating and initializing tables. It seems like you might be able to work with another database if you created the tables separately, but I haven't tried it and it's not supported at this point.

Easy to with Entity Framework Code First
The problem with with ASP.NET Membership's system for storing additional account information is that it's the gate keeper. That means you're stuck with its schema and accessing profile information through its API.

SimpleMembership flips that around by allowing you to use any table as a user store. That means you're in control of the user profile information, and you can access it however you'd like - it's just data. Let's look at a practical based on the AccountModel.cs class in an ASP.NET MVC 4 Internet project. Here I'm adding a Birthday property to the UserProfile class.

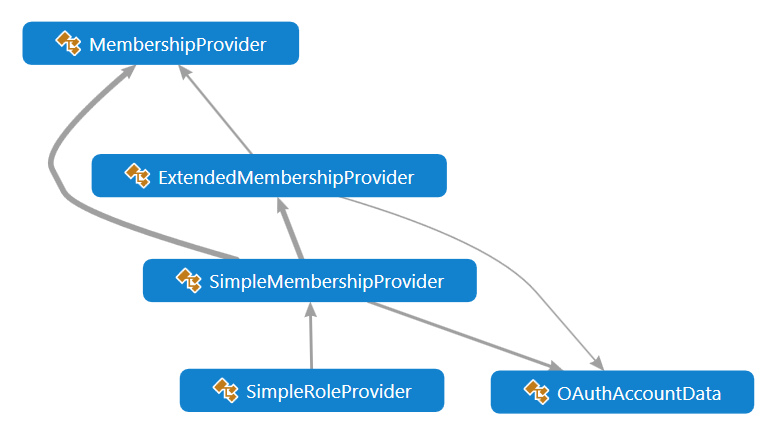
How SimpleMembership integrates with ASP.NET MembershipOkay, enough sales pitch (and hopefully background) on why things have changed. How does this affect you? Let's start with a diagram to show the relationship (note: I've simplified by removing a few classes to show the important relationships):
So SimpleMembershipProvider is an implementaiton of an ExtendedMembershipProvider, which inherits from MembershipProvider and adds some other account / OAuth related things. Here's what ExtendedMembershipProvider adds to MembershipProvider:

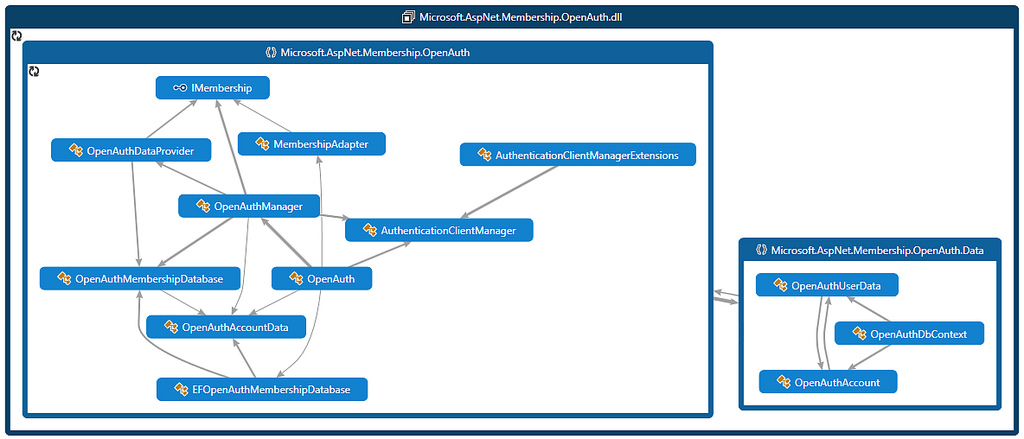
Membership in the ASP.NET 4.5 project template
ASP.NET 4.5 Web Forms took a different approach which builds off ASP.NET Membership. Instead of using the WebMatrix security assemblies, Web Forms uses Microsoft.AspNet.Membership.OpenAuth assembly. I'm no expert on this, but from a bit of time in ILSpy and Visual Studio's (very pretty) dependency graphs, this uses a Membership Adapter to save OAuth data into an EF managed database while still running on top of ASP.NET Membership.

How does this fit in with Universal Providers (System.Web.Providers)?
Just to summarize:

  • Universal Providers are intended for cases where you have an existing ASP.NET Membership Provider and you want to use it with another SQL Server database backend (other than SQL Server). It doesn't require agents to handle expired session cleanup and other background tasks, it piggybacks these tasks on other calls.
  • Universal Providers are not really, strictly speaking, universal - at least to my way of thinking. They only work with databases in the SQL Server family.
  • Universal Providers do not work with Simple Membership.
  • The Universal Providers packages include some web config transforms which you would normally want when you're using them.


HostForLIFE.eu Proudly Launches Scalable Enterprise Email Hosting

clock December 17, 2013 09:22 by author Patrick

HostForLIFE.eu, a leading Windows web hosting provider with innovative technology solutions and a dedicated professional services team proudly announces Enterprise Email Hosting for all costumer. HostForLIFE.eu aim to help you grow your bottom line whether it is driving direct sales from emails, driving website traffic or delivering outstanding service.

Enterprise Email is a great tool for communicating to existing customers, or individuals who know your organization well enough and have interest in opting-in to receive your e-mail. Your promotions, sales and offers get their attention, meet a need, and encourage them to do more business with you.  What e-mail marketing typically doesn’t do very effectively is attract the attention of new customers.

Robert Junior and Sophia Levine from HostForLIFE.eu say:
"Once a business has secured a domain name, we setup an email hosting account for them and they can choose any email account they wish.  Most popular email accounts for small business are sales, info and accounts, although it can be virtually anything once you own your own domain name." Robert says.

"I would expect that once more small business owners had the flexibility to mange their own email hosting, they would save money on their monthly internet costs because there are always cheaper deals being promoted. Of course email hosting does not replace your internet service, but it enables you to switch to a cheaper plan and not loose contact with your customers."  Sophia says.

"Our clients have found that they are able to save money on their internet services because once they no longer rely to manage their email, they can shop around for a better deal, save some money and take their Email Hosting with them.  Having your own domain name and email hosting also improves your business image far more that an ISP account or hotmail email address." Robert says.

"What many small business owners often struggle with is continuing to pay high internet service costs to keep their allocated ISP email address if they use their ISP email for their business.  What people do not realise is that if they were to purchase their own .com or etc domain name they have a unique email address like '[email protected]'.  It means they can move to a cheaper ISP if they find a better deal and not risk losing contact with their business contacts." Sophia Says.

HostForLIFE.eu provides a full suite of self-service marketing solutions with the following features: Total Bulk Email up to 10.000 emails/month with total maibox is 5, users receive 2 GB mailbox quota, a platform fully support Blackberry, SPF/DKIM/TXT, WebMail Access, and POP/SMTP/IMAP.

Are you sending direct mails to your customers just once a month or every three days? Simply choose the plan that suits you the most. All price plans are based on actual use of the system - from 10,000 e-mails sent out in a month starting at €8.00!

Further information and the full range of features Enterprise Email Hosting can be viewed here http://www.hostforlife.eu.


European ASP.NET 4.5 Hosting :: Key HTML Editor Features ASP.NET 4.5

clock December 12, 2013 07:32 by author Patrick

We will be go through the key HTML editor features introduced in ASP.NET 4.5. Automatic Renaming of the matching tag. In ASP.NET 4.5, we have a very productive feature where matching tags are automatically renamed when we change the opening tag.

Consider the following code in HTML side

Now in earlier versions of ASP.NET if I had to make a change in the starting tag then I had to manually update the end tag too. However, with ASP.NET 4.5, you will see that if you update the starting tag then the end tag will also update automatically.

Please see the following image for more details.

Extract to User Control

The ASP.NET 4.5 desiners have developed a very unique and productive feature where at any point of time, we can change code present in a web form to a user control.
Consider I have a web form containing TextBoxes for userName and Password for authentication. While working on this page, we found that we need this user name and password authentication in various modules of the project.


With this said, ASP.NET 4.5 provides us the great feature where we must simply select the code and we can change that selected code to a User Control; see:

Smart Task in HTML Editor

One of the productive features added to ASP.NET a few years back was the addition of a smart task. On the click of the smart available on the control, you can accomplish some of the common tasks on that control.


Now with ASP.NET 4.5, we have the same feature while working on the HTML side. Hence, we don't need to go to design mode to use this feature.

If you click on the line present under "a" , this would open up the smart task for that control.

You will see that you can perform all the common tasks for that control.

Code Snippets in HTML

With ASP.NET 4.5, we have code snippets available in HTML. If you want to add audio or video to you page then you simply must type video on HTML and press TAB twice. You will see that full audio / video control is available, mentioning all the common properties.

Event Handler generation

Before the release of ASP.NET 4.5, if we must create any event handler for any control then we either must double-click on that control, that will generate an event for that control or define the event in the properties of that control. However, with ASP.NET 4.56 we have a new property added in the control, where we can generate an event for the control at the HTML side and we don't need to switch to design mode.

Clicking on "Create New Event" will create a default event for that control; however we can provide any name of that event and you would see that Visual Studio will then automatically generate the appropriate server side event handler within your code behind file for you.

Hope this article of mine has been helpful in giving some knowledge of the new features of ASP.NET 4.5.


European ASP.NET Hosting Tips :: How to Consume Web API OData From .NET And JavaScript Client Applications

clock December 5, 2013 06:25 by author Scott

In this post, we will consume the service from a .NET client and a web page.

Consuming Web API OData using a .NET client:

A Web API OData service can be consumed using WCF Data Services client. If you gave already worked with WCF Data Services, you already know about consuming Web API OData Service as well.

Right click on a .NET project and choose the option Add Service Reference. In the dialog, enter the OData service URL and click the Go button.

The dialog parses the metadata received from the server and shows the available entities under container as shown in the screenshot. As we created just one entity in the service, we see the entity Employee alone. Name the namespace as you wish and hit OK. Visual Studio generates some classes for the client application based on the metadata.

The generated code contains the following:

  • A Container class, which is responsible for communicating with the service. It holds DataServiceQuery<TEntity> type properties for each EntitySet on the server
  • A class for every entity type. This class contains all properties mapped on the server, information about key of the entity

A Container is much like a DbContext in Entity Framework. It handles all the operations. Container is responsible for building OData URLs and sending requests to the service for any operation that client asks for. Let’s start by creating a Container. Constructor of the container accepts a URI, which is base address of the Web API OData service.

Container container = new Container(new Uri("http://localhost:1908/odata"));

To fetch details of all employees, we need to invoke the Corresponding DataServiceQuery property.

var employees = container.Employees;

Although the statement looks like an in-memory operation, it generates the corresponding URL internally and calls the server. Similarly, to get details of an employee with a given Id, we can write a LINQ query as shown:

var employee = container.Employees.Where(e => e.Id == 3).FirstOrDefault();

The above query makes a call to the Get method accepting key in the Web API Controller.

To create a new employee, we need to create an object of the Employee class, add it and ask Container to save it. Following snippet demonstrates this:

Employee emp = new Employee() { Id = 0, Name = "Hari", Salary = 10000 };
container.AddToEmployees(emp);
container.SaveChanges();

Performing update is also much similar. The difference is with calling the SaveChanges method.

emp = container.Employees.Where(e => e.Id == 3).FirstOrDefault();
emp.Name = "Stacy";
container.UpdateObject(emp);
container.SaveChanges(SaveChangesOptions.ReplaceOnUpdate);

If SaveChanges is called with SaveChangesOptions.ReplaceOnUpdate, it performs PUT operation on the resource. If SaveChangesOptions.PatchOnUpdate is passed, it performs PATCH operation on the resource.

To delete an entry, we need to pass an object to DeleteObject method and just like earlier cases; we need to call the SaveChanges method on the Container.

container.DeleteObject(container.Employees.Where(e => e.Id == 3).FirstOrDefault());
container.SaveChanges();

Consuming Web API OData using JavaScript client:

To consume the Web API OData service from a web page, the service has to be called using AJAX. The client can send an AJAX request to the URL of the OData service by specifying an HTTP verb to operate on the resource. To make our life easier, let’s use jQuery for AJAX calls.

To get details of all employees, we need to send a GET request to the OData URL. Values of entries in the collection are stored in a property named value in the object received as response. Fetching details of an employee with a given Id also follows similar approach. Following snippet demonstrates this:

$.getJSON(“/odata/Employees”, function(data){
    $.each(data.value, function(){
        //Modify UI accordingly
    });
}); 

$.getJSON(“/odata/Employees(3)”, function(data){
        //Modify UI accordingly
});

To add a new employee, we need to send the new object to $.post along with the URL.

var employee = {
    "Id": 0,
    "Name": “Ravi”,
    "Salary": 10000
}; 

$.post(“/odata/Employees”, employee).done(function(data){
    //Modify UI accordingly
});

Unfortunately, jQuery doesn’t have a shorthand method for PUT. But it is quite easy with $.ajax as well. To perform PUT on the resource, the request should be sent to the specific address with an ID and the modified object should be passed with the request.

var employee = {
    "Id": 3,
    "Name": “Ravi”,
    "Salary": 10000
}; 

$.ajax({
url: "/odata/Employees(" + employee.Id + ")",
       type: "PUT",
       data: employee
});

Building request for DELETE is similar to put, we just don’t need to pass the object.

$.ajax({
url: "/odata/Employees(" + id + ")",
type: "DELETE"
});


European ASP.NET 4.5 Hosting - HostForLIFE.eu :: Friendly URLs in ASP.NET 4.5 Web Forms

clock November 27, 2013 06:10 by author Scott

In the recent update of ASP.NET, Microsoft released support for Friendly URLs in ASP.NET Web Forms. It is based on the concept of Routing. But, we don’t need to deal with route table to manually add the routes to be mapped. URLs of the site will be automatically made friendly after invoking when the application starts.

To get started using the Friendly URLs, we need to install the NuGet Package Microsoft.AspNet.FriendlyUrls. The package is not stable yet, so we need to search it in pre-release packages.

This package adds following files to the web application:

  • Microsoft.AspNet.FriendlyUrls assembly – Contains required set of classes and interfaces
  • Site.Mobile.Master – Master page for mobile devices
  • ViewSwitcher.ascx – A user control that can be used to switch views from desktop view to Mobile view and vice versa

Once Visual Studio finishes installing the NuGet package, a read me file will be popped up. This file contains the steps to be followed to enable Friendly URLs on your site. All you have to do is, call the EnableFriendlyUrls extension method of RouteTable in RegisterRoutes method of RouteConfig class. This method is defined in Microsoft.AspNet.FriendlyUrls namespace.

routes.EnableFriendlyUrls();

And make sure that the RegisterRoutes method is called in Application_Start event of Global.asax:

RouteConfig.RegisterRoutes(RouteTable.Routes);

Now run the application and check URL on the address bar of your browser.

And the magic happened! As we see here, the URL doesn’t contain extension of the page.

Note: You don’t have to install NuGet package and apply the above settings if you have installed ASP.NET and Web Tools 2012.2. These changes are built into the ASP.NET web application template in the new template.

If you are using default ASP.NET 4.5 Web application template, you can invoke the Login (which resides in Account folder) page using:

http://mysite/Account/Login

You can link any page that resides in a folder using the same convention.

Hyperlinks to the pages can be replaced with the friendly convention.

<a id="loginLink" runat="server" href="~/Account/Login">Log in</a>

Data can be passed to a page using segments. Href method of FriendlyUrl class can be used for this purpose:

<a href="<%: FriendlyUrl.Href("~/BookDetails","AspNet") %>">ASP.NET</a>

This hyperlink forms the following URL:

http://mysite/BookDetails/AspNet

This data can be displayed on the page in any mark-up element. To display the topic of book sent through the above URL in a span element, we have to get the value from the segment as shown below:

<span><%: Request.GetFriendlyUrlSegments()[0].ToString() %></span>

Also, this value can be passed as a parameter to a method used for Model Binding as shown below:

public IQueryable<Customer> GetBooks([FriendlyUrlSegments]string topic)
{
    var selectedBooks = context.Books.Where(c => c.BookName.Contains(topic));
    return selectedBooks;
}

Remember that, if you are navigating to the page ListBooks.aspx with following URL,

http://mysite/ListBooks/Book/AspNet

then the parameter marked with FriendlyUrlSegments will hold the value Book/AspNet. So, this should be handled with care.


European ASP.NET 4.5 Hosting - HostForLIFE.eu :: Websockets with ASP.NET 4.5 and Visual Studio 2012

clock November 14, 2013 07:09 by author Scott

Web applications are becoming increasingly sophisticated and it is common to need to communicate with various services.

There are a number of options to accomplish this task with probably the most popular being to continually poll a server with XHR requests. Other alternatives exist that delay disconnections. These can be tricky to implement and don’t scale well (sometimes worse than polling as they keep a connection open) so aren’t used as much.

HTTP isn’t really an ideal protocol for performing frequent requests as:

- It’s not optimized for speed
- It utilizes a lot of bandwidth for every request with various headers etc sent with every request
- To keep an application up to date many requests must be sent
- Provides limited cross domain support (relying on workarounds such as JSONP
- Firewalls & proxys sometimes buffer streaming/long polling solutions increasing latency
- Long polling & streaming solutions are not very scalable

WebSockets are a new technology that attempts to resolve some of these limitations by:

- Sending the minimum amount of data necessary
- Making more efficient usage of bandwidth
- Providing cross domain support
- Still operating over HTTP so it can transverse firewalls and proxies
- Works with some load balancers (TCP l4)
- Provides support for binary data (note some JavaScript implementations don’t currently support this)

When would web sockets be a suitable protocol for your application?

You might want to consider using web sockets in the following scenarios:

- Games
- Real time data
- Chat applications
- News tickers

There is a nice set of demos at: http://www.html5rocks.com/en/tutorials/websockets/basics/ and an interesting article that compares a Web Sockets and polling solution in terms of latency & throughput at http://websocket.org/quantum.html.

Websockets pitfalls

Websockets is a relatively new protocol that has already undergone a number of versions as various issues are addressed. This is important as support across browsers varies.

At the time of writing Websockets (in some form) can be used by the following browsers (check caniuse.com for the most up to date info):

- IE10
- Chrome 13+
- Firefox 7
- Safari 5+
- Opera 11+

Earlier implementations of websockets had some security issues so your connections may work but are not secure (Firefox disabled support in Firefox 4 & 5 for this reason).

The other issue that you may encounter is that some older proxy servers don’t support the http upgrade system that websockets uses to connect so some clients may be unable to connect.

.net 4.5 Web Socket Support

.net 4.5 introduces a number of APIs for working with web sockets. If you find you need more control than the ASP.net API’s offers then look into WCF as that has also been updated.

Before we begin there are a couple of requirements for using ASP.net web sockets API:

- Application must be hosted on IIS 8 (available only with some version of Windows 8 – please note currently IIS Express currently does not work)
- Web Sockets protocol feature installed (IIS option)
- .net 4.5
- A compatible browser on the client (IE10 or Chrome will 18 work fine at time of writing)
- It would help if your Chinese birth animal was the horse

Currently Microsoft have no plans to release Websockets support for earlier versions of IIS so if you plan to run it on Windows Server 2008 then you are going to have to look at other options such ashttp://superwebsocket.codeplex.com/.

You could also look at the SignalR library from Microsoft which is designed for developing async applications and provides WebSockets (and fallback) support: https://github.com/SignalR/SignalR/wiki/WebSockets.

Example

Ok I am going to assume that you are already working with some version of Windows 8 that has IIS & ASP.net 4.5 installed. The other thing we are going to need to do is make sure IIS has the Web Sockets Protocol feature installed (this is in the add/remove programs bit):

First create a new empty ASP.net project called WebSockets

Add the Nuget package Microsoft.Websockets

Pull down the latest jQuery library and put it in a scripts directory (I am using 1.7.2) – note jQuery isn’t necessary it just saves a bit of tedious event and manipulation code.

Now add a file called index.htm and enter the following code:

<!doctype html>
<head>
<script src="Scripts/jquery-1.7.2.min.js" type="text/javascript"></script>
<script type="text/javascript">
$(document).ready(function () {
var name = prompt('what is your name?:');
var url = 'ws://' + window.location.hostname + window.location.pathname.replace('index.htm', 'ws.ashx') + '?name=' + name;
alert('Connecting to: ' + url);
ws = new WebSocket(url);
ws.onopen = function () {
$('#messages').prepend('Connected <br/>');
$('#cmdSend').click(function () {
ws.send($('#txtMessage').val());
$('#txtMessage').val('');
});
}
ws.onmessage = function (e) {
$('#chatMessages').prepend(e.data + '<br/>');
};
$('#cmdLeave').click(function () {
ws.close();
});
ws.onclose = function () {
$('#chatMessages').prepend('Closed <br/>');
};
ws.onerror = function (e) {
$('#chatMessages').prepend('Oops something went wront <br/>');
};
});
</script>
</head>
<body>
<input id="txtMessage" />
<input id="cmdSend" type="button" value="Send" />
<input id="cmdLeave" type="button" value="Leave" />
<br />
<div id="chatMessages" />
</body>
</html>

We need to create an http handler so add a new generic handler to the project called ws.ashx and enter the following code:

using System;
using System.Collections.Generic;
using System.Linq;
using System.Web;
using Microsoft.Web.WebSockets;
namespace WebSockets
{
public class WSHttpHandler : IHttpHandler
{
public void ProcessRequest(HttpContext context)
{
if (context.IsWebSocketRequest)
context.AcceptWebSocketRequest(new TestWebSocketHandler());
}
public bool IsReusable
{
get
{
return false;
}
}
}
}

Finally we need to create something to handle the websocket connection (TestWebSocketHandler that is created in the AcceptWebSocketRequest method).

Create a new class called TestWebSocketHandler and enter the following code:

using System;
using System.Collections.Generic;
using System.Linq;
using System.Threading;
using System.Web;
using Microsoft.Web.WebSockets;
namespace WebSockets
{
public class TestWebSocketHandler : WebSocketHandler
{
private static WebSocketCollection clients = new WebSocketCollection();
private string name;
public override void OnOpen()
{
this.name = this.WebSocketContext.QueryString["name"];
clients.Add(this);
clients.Broadcast(name + " has connected.");
}
public override void OnMessage(string message)
{
clients.Broadcast(string.Format("{0} said: {1}", name, message));
}
public override void OnClose()
{
clients.Remove(this);
clients.Broadcast(string.Format("{0} has gone away.", name));
}
}
}

That’s all you need so now compile the project and run it in a compatible browser (IE10 or the latest Chrome will do fine) making sure you are hosting your project from IIS (project properties if you are not).

Once you have run it up you will be prompted to provide a name, then an alert box will indicate the end point of your application (ws://localhost/.. – note the secure https version is wss://).

Now open up a different browser and you should find you can via websockets!


European ASP.NET 4.5 Hosting - Amsterdam :: Windows Identity Foundation 4.5 in NET 4.5

clock October 16, 2013 12:03 by author Scott

Windows Identity Foundation 4.5 (WIF) is a framework for building identity-aware and more specifically claims-aware applications. It furthermore provides an abstraction  to the underlying protocols (ex: WS-Trust, WS-Federation, etc …) and therefore encapsulates and standardizes application security.

Developers do not need to know how to exactly implement and use those protocols anymore. Instead they may use API calls to the WIF Toolkit for implementing secure applications, thus resulting in applications which are loosely coupled to their security implementations. Tokens issued from a large scale of different security providers (including  ADFS 2.0, ACS and custom Security Token Services) can be handled.

The default configuration and behavior works great and with ease you will be able to implement it in no time. But the best of all : the WIF Toolkit is highly customizable. You may completely override and customize the default behavior on some or on all the step of the process (Protocol Module, Session Module, Claims Authorization Module, Token, STS, etc..).

WIF in its first version (1.0) is available as a runtime and as an external SDK for .NET 3.5 and .NET 4.0. You have to install it separately for being able to using it in your applications. The WIF Training Kit contains everything necessary to start with claims based security (explication, tutorials, examples, etc…).

WIF 4.5 and .NET 4.5

So what’s new in WIF 4.5 ? Well first of all WIF is now part of the .NET framework. You do not need to install it manually anymore. It is shipped and installed with .NET 4.5, which means that it is now an integral part of the framework ! Most of the classes and methods are now part of Mscorlib.dll !

Also it is now much easier and straightforward use WIF and to query for claims. Let me show this in the following example.

Create a new web application, right click on your project in the Solution Explorer and select "Identity and Access…” from the list.

You will see a new configuration wizard, which will guide you through the process of setting up a STS reference. You may either use a development STS, a business provider based on ADFS2 or Windows Azure Access Control Service (ACS).

For the example I use the development STS :

You may now run your web application and the development STS gets started automatically. When you see the little icon in the tray area you know that everything working correctly.

Now lets see how to query for a claim by using the ClaimsPrincipal in the System.Security.Claims namespace and calling its FindFirst(…) method.

Where you had to write at least 3 lines of code and do casting operations in WIF 1.0, you now have everything in a single line ! Much easier to implement, to understand, to maintain and also to extend !

Note that there are a variety of other utility methods to aid you in working with claims (FindAll, FindFirst, HasClaim, etc…) and that you have access to almost everything just by using the  ClaimsPrincipal.

Another improvement is the seamless integration of WCF 4.5 and WIF 4.5. You now can use both together much more easily. Custom service host factories or federation behaviors are not needed anymore. This can be achieved via the useIdentityConfiguration switch.

WIF 4.5 and WebFarms

Great news for all developers using WIF in a WebFarms environment. With .NET 4.5 it is finally possible to use WIF without implementing complicated and time consuming workarounds to encrypt your WIF cookies with a single encryption key.

You just configure a new MachineSessionSecurityHandler by setting it in your Web.config file and it will work without any further changes ! This has even been added to the wizard as a checkbox! How easy is that compared to the old way of resolving this problem !

WIF 4.5 and Windows Server 2012

Windows Server 2012 Domain Controllers are going to support the claims based model and provide extra claims via Kerberos (User Claims and Device Claims), which you may then query for within your WIF 4.5 implementations. This is actually a quite interesting feature.

WIF 4.5 and Visual Studio 2012

The integration of WIF tools has been completely re-designed, as you saw in my quick example above. This has been done to simplify the whole process and to render it much more comprehensive. So it is now easier to understand with less steps and quicker configuration.

As you saw above the new tools contain a local development STS which simulates a real STS (comparable to the development fabric within the Windows Azure SDK). The development STS is by the way completely configurable (Token format, port, test claims, etc..).

Furthermore, the WIF 4.5 tools and all samples are now distributed as VSIX via the Visual Studio Extensions Gallery.

Conclusion

As you can see WIF 4.5 has been greatly enhanced and industrialized. It will become the the primary choice when working with application security. Come on and give it at try,  test all these new features by downloading the Windows Identity Foundation Tools for Visual Studio 2012 RC.


European ASP.NET 4.5 Hosting - Amsterdam :: How to Upload Multiple Files Using FileUpload Control in ASP.NET 4.5

clock October 1, 2013 10:42 by author Scott

Here I will discuss with you one of them, the feature of new the FileUpload control in ASP.NET 4.5. The FileUpload control in ASP.NET extends it's functionality by supporting the upload of multiple files at once.

Prior to this latest version, the FileUpload control only supported a single file at a time, but version ASP.NET version 4.5 solves this issue very well.

Now, the FileUpload control is built to support HTML 5, therefore it is only supported in browsers supporting HTML5. For other browsers it will work like a normal file upload control in ASP.NET.


A new attribute that comes with the ASP.NET 4.5 FileUplaod control is that:

AllowMultiple: It takes either true or false.

In order to support multiple file uploads, set AllowMulitple="true" other than false.

This attribute is for the browsers that support multiple files to be uploaded and for this purpose it renders the necessary HTML5 attribute.

In addition to this control, some new properties have been included to support code-behind coding.

HasFiles: Check whether FileUpload control has multiple files or not.

PostedFiles: Basically used to get all the files from the FileUpload control in the iteration.

Both properties will help to work with the mulitple selected files in Code-Behind coding (C#).

After the preceding overview of the theory, let's proceed to implement this cool feature in an application.

First, in the ASPX page declare a FileUpload control.

Remember: Set the AllowMultiple attribute to "true" to enable the multiple file upload feature.

<asp:FileUpload runat="server" ID="UploadImages" AllowMultiple="true" />

Now, the following HTML is rendered in the browser:

<input type="file" multiple="multiple" name="FileUpload1" id="FileUpload1" />

The AllowMultiple attribute renders multiple attributes in the HTML 5.

The complete code for .aspx file will looks like:

<div>
    <asp:FileUpload runat="server" ID="UploadImages" AllowMultiple="true" />
    <asp:Button runat="server" ID="uploadedFile" Text="Upload" OnClick="uploadFile_Click" />
    <asp:Label ID="listofuploadedfiles" runat="server" />
</div>

You will see that I have attached a button's click event. So, now start to write C# for this.

In the following code I will use HasFiles and PostedFiles properties that we will see in the preceding section.

protected void uploadFile_Click(object sender, EventArgs e)
{
   if (UploadImages.HasFiles)
   {
       foreach (HttpPostedFile uploadedFile in UploadImages.PostedFiles)
       {
           uploadedFile.SaveAs(System.IO.Path.Combine(Server.MapPath("~/Images/"),
           uploadedFile.FileName)); listofuploadedfiles.Text += String.Format("{0}<br />", uploadedFile.FileName);
       }
   }

In the code above I have saved each image in the Images folder of the web application from the PostedFiles collection.

Now, run the application and see the output.

Select multiple files and click on the Upload button and it will show you the list of files that have been uploaded.


European ASP.NET Hosting - Amsterdam :: Tips to Send Email in ASP.NET 2.0 with Authentication

clock September 12, 2013 11:07 by author Scott

This is simple code how to send email in ASP.NET 2 with Authentication. In the following tutorial, I will show you how you can authenticate smtp client when sending emails in ASP.NET 2.0.

You need to import System.Net.Mail and System.Net namespaces to test following code.

C#

string mailFrom = "FromEmailAddressHere";
string mailTo = "ToEmailAddressHere";

string subject = "ASP.NET Test Email";


string messageBody = "This email is send to you from ASP.NET";

//  Create Mail Message Object
MailMessage message = new MailMessage(mailFrom, mailTo, subject, messageBody);

// Create SmtpClient class to Send Message
SmtpClient client = new SmtpClient();

// Here you specify your smtp host address such as smtp.myserver.com
client.Host = "localhost";

// Specify that you dont want to use default credentials
client.UseDefaultCredentials = false;

// Create user credentials by using NetworkCredential class


NetworkCredential credential = new NetworkCredential();
credential.UserName = "waqas";
credential.Password = "secret";
client.Credentials = credential;
client.Send(message);

VB.NET

Dim mailFrom As String = "FromEmailAddressHere"
Dim mailTo As String = "ToEmailAddressHere"

Dim subject As String = "ASP.NET Test Email"

Dim messageBody As String = "This email is send to you from ASP.NET"


' Create Mail Message Object
Dim message As New MailMessage(mailFrom, mailTo, subject, messageBody)


' Create SmtpClient class to Send Message
Dim client As New SmtpClient()


' Here you specify your smtp host address such as smtp.myserver.com
client.Host = "localhost"


' Specify that you dont want to use default credentials
client.UseDefaultCredentials = False


' Create user credentials by using NetworkCredential class

Dim credential As New NetworkCredential()
credential.UserName = "waqas"
credential.Password = "secret"
client.Credentials = credential

client.Send(message)


About HostForLIFE.eu

HostForLIFE.eu is European Windows Hosting Provider which focuses on Windows Platform only. We deliver on-demand hosting solutions including Shared hosting, Reseller Hosting, Cloud Hosting, Dedicated Servers, and IT as a Service for companies of all sizes.

We have offered the latest Windows 2016 Hosting, ASP.NET Core 2.2.1 Hosting, ASP.NET MVC 6 Hosting and SQL 2017 Hosting.


Tag cloud

Sign in