European ASP.NET 4.5 Hosting BLOG

BLOG about ASP.NET 4, ASP.NET 4.5 Hosting and Its Technology - Dedicated to European Windows Hosting Customer

European ASP.NET Core 3 Hosting :: Simple Steps to Migrate Your ASP.NET Core 2 to ASP.NET Core 3

clock October 25, 2019 07:18 by author Scott

.NET Core always interesting. In the past few months, we have just launched ASP.NET Core 2.2 on our hosting environment, and now Microsoft has support latest ASP.NET Core 3. This post will be taking the Contacts project used in the ASP.NET Basics series and migrating it from .NET Core 2.2 to .NET Core 3.0.

Installation

If you are a Visual Studio user you can get .NET Core 3.0 by installing at least Visual Studio 16.3. For those not using Visual Studio, you can download and install .NET Core 3.0 SDK from here. As with previous versions, the SDK is available for Windows, Linux, and Mac.

After installation is complete you can runt the following command from a command prompt to see all the versions of the .NET Core SDK you have installed.

dotnet --list-sdks

You should see 3.0.100 listed. If you are like me you might also see a few preview versions of the SDK that can be uninstalled at this point.

Project File Changes

Right-click on the project and select Edit projectName.csproj.

Change the TargetFramework to netcoreapp3.0.

Before:
<TargetFramework>netcoreapp2.2</TargetFramework>

After:
<TargetFramework>netcoreapp3.0</TargetFramework>

The packages section has a lot of changes. Microsoft.AspNetCore.App is now gone and part of .NET Core without needing a specific reference. The other thing to note is that Entity Framework Core is no longer “in the box” so you will see a lot of references add to make Entity Framework Core usable.

Before:
<PackageReference Include="Microsoft.AspNetCore.App" />
<PackageReference Include="Microsoft.VisualStudio.Web.CodeGeneration.Design" Version="2.2.0" PrivateAssets="All" />
<PackageReference Include="Swashbuckle.AspNetCore" Version="4.0.1" />

After:
<PackageReference Include="Microsoft.EntityFrameworkCore" Version="3.0.0" />
<PackageReference Include="Microsoft.AspNetCore.Diagnostics.EntityFrameworkCore" Version="3.0.0" />
<PackageReference Include="Microsoft.AspNetCore.Identity.EntityFrameworkCore" Version="3.0.0" />
<PackageReference Include="Microsoft.AspNetCore.Identity.UI" Version="3.0.0" />
<PackageReference Include="Microsoft.EntityFrameworkCore.SqlServer" Version="3.0.0" />
<PackageReference Include="Microsoft.EntityFrameworkCore.Tools" Version="3.0.0" />
<PackageReference Include="Microsoft.VisualStudio.Web.CodeGeneration.Design" Version="3.0.0" PrivateAssets="All" />
<PackageReference Include="Swashbuckle.AspNetCore" Version="5.0.0-rc4" />

The last thing to note is that Swashbuckle doesn’t have a final version ready for .NET Core 3 so you will have to make sure you are using version 5 rc2 at a minimum.

The following is my full project file for reference.

<Project Sdk="Microsoft.NET.Sdk.Web">
  <PropertyGroup>
    <TargetFramework>netcoreapp3.0</TargetFramework>
    <AspNetCoreHostingModel>InProcess</AspNetCoreHostingModel>
    <UserSecretsId>aspnet-Contacts-cd2c7b27-e79c-43c7-b3ef-1ecb04374b70</UserSecretsId>
  </PropertyGroup>
  <ItemGroup>
    <PackageReference Include="Microsoft.EntityFrameworkCore" Version="3.0.0" />
    <PackageReference Include="Microsoft.AspNetCore.Diagnostics.EntityFrameworkCore" Version="3.0.0" />
    <PackageReference Include="Microsoft.AspNetCore.Identity.EntityFrameworkCore" Version="3.0.0" />
    <PackageReference Include="Microsoft.AspNetCore.Identity.UI" Version="3.0.0" />
    <PackageReference Include="Microsoft.EntityFrameworkCore.SqlServer" Version="3.0.0" />
    <PackageReference Include="Microsoft.EntityFrameworkCore.Tools" Version="3.0.0" />
    <PackageReference Include="Microsoft.VisualStudio.Web.CodeGeneration.Design" Version="3.0.0" PrivateAssets="All" />
    <PackageReference Include="Swashbuckle.AspNetCore" Version="5.0.0-rc4" />
  </ItemGroup>
</Project>

Program Changes

In Program.cs some changes to the way the host is constructed. The over version may or may not have worked, but I created a new app and pulled this out of it just to make sure I’m using the current set up.

using Microsoft.AspNetCore.Hosting;
using Microsoft.Extensions.Hosting;
namespace Contacts
{
    public class Program
    {
        public static void Main(string[] args)
        {
            CreateHostBuilder(args).Build().Run();
        }
        public static IHostBuilder CreateHostBuilder(string[] args) =>
            Host.CreateDefaultBuilder(args)
                .ConfigureWebHostDefaults(webBuilder =>
                                          {
                                              webBuilder.UseStartup<Startup>();
                                          });
    }
}

Startup Changes

In Startup.cs we have quite a few changes to make. As long as you haven’t do any customization in the constructor you can replace it with the following.

public Startup(IConfiguration configuration)
{
        Configuration = configuration;
}

Next, they type on the configuration property changed from IConfigurationRoot to IConfiguration.

Before:
public IConfigurationRoot Configuration { get; }

After:
public IConfiguration Configuration { get; }

Moving on to the ConfigureServices function has a couple of changes to make. The first is a result of updating to the newer version of the Swagger package where the Info class has been replaced with OpenApiInfo.

Before:
services.AddSwaggerGen(c =>
{
        c.SwaggerDoc("v1", new Info { Title = "Contacts API", Version = "v1"});
});

After:
services.AddSwaggerGen(c =>
{
        c.SwaggerDoc("v1", new OpenApiInfo { Title = "Contacts API", Version = "v1" })
});

Next, we are going to move from using UserMvc to the new AddControllersWithViews which is one of the new more targeted ways to add just the bits of the framework you need.

Before:
services.AddMvc().SetCompatibilityVersion(CompatibilityVersion.Version_2_2);

After:
services.AddControllersWithViews();

Now in the Configure function, the function signature needs to be updated and the logging factory bits removed. If you do need to configure logging that should be handled as part of the HostBuilder.

Before:
public void Configure(IApplicationBuilder app, IHostingEnvironment env, ILoggerFactory loggerFactory)
{
loggerFactory.AddConsole(Configuration.GetSection("Logging"));
      loggerFactory.AddDebug();

After:
public void Configure(IApplicationBuilder app, IWebHostEnvironment env)
{

For the next set of changes, I’m just going to show the result and not the before. The UseCors may or may not apply but the addition of UserRouting and the replacement of UseMvc with UserEndpoint will if you want to use the new endpoint routing features.

app.UseStaticFiles();
app.UseRouting();
app.UseCors(builder =>
            {
                builder.AllowAnyHeader();
                builder.AllowAnyMethod();
                builder.AllowAnyOrigin();
            }
           );
app.UseAuthentication();
app.UseAuthorization();
app.UseEndpoints(endpoints =>
                 {
                     endpoints.MapControllerRoute(
                                                  name: "default",
                                                  pattern: "{controller=Home}/{action=Index}/{id?}");
                     endpoints.MapRazorPages();
                 });

Other Miscellaneous Changes

The only other change I had was the removal of @using Microsoft.AspNetCore.Http.Authentication in a few cshtml files related to login.


ASP.NET Core Hosting :: How to Upload File using C# | SFTP Server

clock March 4, 2019 07:56 by author Scott

Although there are many Graphical Tools available for sending files to a server using SFTP. But as a developer, we may have a scenario where we need to upload a file to SFTP Serverfrom our Code.

A few days ago a job assigned to me was to develop a Task Scheduler for generating XML files daily on a specific time of the day & send these files on a Remote Server using File Transfer Protocol in a secure way.

In .Net Framework there are many Libraries available for uploading files to another machine using File Transfer Protocol but most of the libraries don’t work with .Net Core. In this Tutorial, we will develop a very simple SFTP client using C# for .Net Core.

Before start let’s have a quick look at SFTP.

What is SFTP?

SFTP stands for SSH File Transfer Protocol or Secure File Transfer Protocol. It is a protocol used to transfer files between remote machines over a secure shell.


In almost all cases, SFTP is preferable over FTP because of security features. FTP is not a secure protocol & it should only be used on a trusted network.

Choosing Library for C#

A lot of search & after testing many libraries I finally met with SSH.NET which was working perfectly with .Net Core 2.2 project & the good thing was that It does its job in a very few lines of Code.

So we’ll use SSH.NET

What is SSH.NET?

SSH.NET is an open-source library available at Nuget for .NET to work over SFTP. It is also optimized for parallelism to achieve the best possible performance. It was inspired by Sharp.SSH library which was ported from Java. This library is a complete rewrite using .Net, without any third party dependencies.

Here are the features of SSH.NET: 

Creating Project

I’m in love with VS Code right after its first release so I’m going to use VS Code for creating project to upload/transfer a file to a remote server using SFTP.

Create a console application using this command

dotnet new console

Installing SSH.NET

I won’t recommend you to install the latest version of SSH.NET. It has a bug, it can be stuck on transferring the file to the remote location.

version 2016.0.0 is perfect. 

run this command to install the library from NuGet

using package manager

Install-Package SSH.NET -Version 2016.0.0

or using .Net CLI

dotnet add package SSH.NET --version 2016.0.0

Code

Finally, It’s time to create a class for SFTP Client Code.

Create a file with the name as “SendFileToServer” & add the below code

using Renci.SshNet

public static class SendFileToServer
{
// Enter your host name or IP here
private static string host = "127.0.0.1";

// Enter your sftp username here
private static string username = "sftp";

// Enter your sftp password here
private static string password = "12345";
public static int Send(string fileName)
{
var connectionInfo = new ConnectionInfo(host, "sftp", new PasswordAuthenticationMethod(username, password));

// Upload File
using (var sftp = new SftpClient(connectionInfo)){

sftp.Connect();
//sftp.ChangeDirectory("/MyFolder");
using (var uplfileStream = System.IO.File.OpenRead(fileName)){
sftp.UploadFile(uplfileStream, fileName, true);
}
sftp.Disconnect();
}
return 0;
}
}

Now you can call this Method to transfer a file to SFTP Server like this

SendFileToServer.Send("myFile.txt");

“myFile.txt” is the name of the file which should be located in your project root directory. 


European ASP.NET Core Hosting :: How to Use HTTP-REPL tool to test WEB API in ASP.NET Core 2.2

clock February 26, 2019 07:37 by author Scott

Today there are no tools built into Visual Studio to test WEB API. Using browsers, one can only test http GET requests. You need to use third-party tools like PostmanSoapUIFiddler or Swagger to perform a complete testing of the WEB API. In ASP.NET Core 2.2, a CLI based new dotnet core global tool named “http-repl” is introduced to interact with API endpoints. It’s a CLI based tool which can list down all the routes and execute all HTTP verbs. In this post, let’s find out how to use HTTP-REPL tool to test WEB API in ASP.NET Core 2.2.

HTTP-REPL Tool to test WEB API in ASP.NET Core 2.2

The “http-repl” is a dotnet core global tool and to install this tool, run the following command. At the time of writing this post, the http-repl tool is in preview stage
and available for download at 
dotnet.myget.org

dotnet tool install -g dotnet-httprepl --version 2.2.0-* --add-source https://dotnet.myget.org/F/dotnet-core/api/v3/index.json

Once installed, you can verify the installation using the following command.

dotnet tool list -g


Now the tool is installed, let’s see how we can test the WEB API. For this tool to work properly, the prerequisite here is that your services will have Swagger/OpenAPI available that describes the service.

We need to add this tool to web browser list so that we can browse the API with this tool. To do that, follow the steps given in the below image.


The location of HTTP-REPL tool executable is "C:\Users\<username>\.dotnet\tools". Once added, you can verify it in the browser list.

Run the app (make sure HTTP REPL is selected in browser list) and you should see a command prompt window. As mentioned earlier, it’s a CLI based experience so you can use commands like dir, ls, cdand cls. Below is an example run where I start-up a Web API.

You can use all the HTTP Verbs, and when using the POST verb, you should set a default text editor to supply the JSON. You can set Visual Studio Code as default text editor using the following command.

pref set editor.command.default "C:\Program Files (x86)\Microsoft VS Code\Code.exe"

Once the default editor is set, and you fire POST verb, it will launch the editor with the JSON written for you. See below GIF.

You can also navigate to the Swagger UI from the command prompt via executing ui command. Like,

Similarly, you can also execute the DELETE and PUT. In case of PUT command, you should use following syntax and in the default code editor, supply the updated data.

> delete 2 //This would delete the record with id 2.
>
> put 2010 -h "Content-Type: application/json"

When you fire PUT command, the behavior is same as the POST verb. The text editor will open with the JSON written for you, just supply the updated value to execute PUT command.

Pros and Cons

Pros

  • Helps in debugging WEB API
  • Fast and quickly switch between API endpoints
  • Descriptive error response shown

Cons:

  • Dependency on Swagger/Open API specification
  • Not as informative as UI tools

After playing with this for a while, I strongly feel it’s command line version of the Swagger UI and it would be very handy when there are many API endpoints. You can easily navigate or switch between the APIs and execute it. 


European ASP.NET Core Hosting :: How to Measure and Report the Response Time of ASP.NET Core

clock November 8, 2018 09:57 by author Scott

Performance is a buzzword for APIs. One of the most important and measurable parameters of the API performance is the response time. In this article, we will understand how to add code to measure the response time of an API and then return the response time data to the end client.

What is the need for this?

So, let's take a moment to think why we would ever need such a feature to measure the Response time of an API. Following are some of the points that have been the inspiration for writing code to Capture response time.

  • You need to define the SLA (Service Level Agreements) for your API with your clients. The clients need to understand how much time  the API takes to respond back. The response time data over time can help us decide on an SLA for our API.
  • Management is interested in reports as to how fast or slow the application is. You need to have data to corroborate your claims. It is worth it to have reports on the performance of the application and to share it with Stakeholders.
  • The client needs to have the information of the Response time of the API so that they can track how much time is spent on the client and the Server.

You might also have encountered similar requests in your project and it is worthwhile looking at an approach to capture the response time for the API.

Where to add the code?

Let's explore a couple of approaches to capture the response time of our API focusing mostly on capturing the time spent in our API. Our objective is to calculate the time elapsed in milliseconds from the time the request is received by the Asp.net core runtime to the time the response is processed and sent back from the Server.

What factors are we ignoring?

It's important to understand that this discussion doesn't include the time spent in N/W, Time spent in IIS and Application Pool Startup. If the Application Pool wasn't up and running, then the first request can affect the overall response time of the API. There is an Application Initialization Module which we can make use of but that is out of scope for this article.

First Attempt

One very naive approach to capturing the response time of an API would be to add code to every API method at the start and end and then measure the delta to calculate the response time as shown 

// GET api/values/5   
[HttpGet]  
public IActionResult Get() {  
    // Start the watch   
    var watch = new Stopwatch();  
    watch.Start();  
    // Your actual Business logic   
    // End the watch  
    watch.Stop();  
    var responseTimeForCompleteRequest = watch.ElapsedMilliseconds;  
} 

This code should be able to calculate the time spent in an operation. But this doesn't seem to be the right approach for the following reasons.

If an API has a lot of operations, then we need to add this code to multiple places which are not good for maintainability.

This code measures the time spent in the method only, it doesn't measure the time spent on other activities like middleware, filters, Controller selection, action method selection, Model binding etc.

Second Attempt

Let's try to improve the above code by centralizing the code in one place so that it is easier to maintain. We need to execute the response time calculation code before and after a method is getting executed. If you have worked with earlier versions of Asp.net Web API, you would be familiar with concepts of Filter. Filters allow you to run code before or after specific stages in the request processing pipeline.

We will implement a filter for calculating the Response time as shown below. We will create a Filter and use the OnActionExecuting to start the timer and then stop the timer in method OnActionExecuted, thus calculating the response time of the API.

public class ResponseTimeActionFilter: IActionFilter { 
    private const string ResponseTimeKey = "ResponseTimeKey"; 
    public void OnActionExecuting(ActionExecutingContext context) { 
        // Start the timer  
        context.HttpContext.Items[ResponseTimeKey] = Stopwatch.StartNew(); 
    } 
    public void OnActionExecuted(ActionExecutedContext context) { 
        Stopwatch stopwatch = (Stopwatch) context.HttpContext.Items[ResponseTimeKey]; 
        // Calculate the time elapsed  
        var timeElapsed = stopwatch.Elapsed; 
    } 
}  

This code is not a reliable technique for calculating the response time as it doesn't address the issue of calculating the time spent in execution of middleware, controller selection, action method selection, model binding etc. The filter pipeline runs after the MVC selects the action to execute. So, it effectively doesn't instrument the time spent in the Other Asp.net pipeline. 

Third Attempt

We will use the Asp.net Core Middleware to Calculate the Response time of the API.

So, what is Middleware?

Basically, Middleware are software components which handle the Request/Response. Middleware is assembled into an application pipeline and serves in the incoming request. Each component does the following operations.

  • Chooses whether to pass the request to the next component in the pipeline. 
  • Can perform work before and after the next component in the pipeline is invoked.

If you have worked with HTTPModules or HTTPHandlers in ASP.NET, then you can think of Middleware as a replacement in ASP.NET Core. Some of the examples of middleware are -

  • MVC Middleware
  • Authentication
  • Static File Serving
  • Caching
  • CORS


We want to add code to start the timer once the request enters the ASP.NET Core pipeline and stop the timer once the response is processed by the Pipeline. Custom Middleware at the start of the request pipeline seems to be the best approach for getting the access to the request as early as possible and access until the last step is executed in the pipeline.

We will build a Response Time Middleware which we will add as the first Middleware to the request Pipeline so that we can start the timer as soon the request enters the Asp.net core pipeline.

What to do with the Response time data?

Once we capture the response time data we can process data in the following ways.

  1. Add the Response time data to a Reporting database or an analytics solution.
  2. Write the Response time data to a log file.
  3. Pass the response time data to a message queue which can further be processed by another application for reporting and analytics.
  4. Send the Response time information to the client applications consuming our Rest API using the Response headers.
  5. There may be other useful ways of using the response time data. Please leave a comment and tell me how you process the response time data in your application.

Let's write the code

We will write the code considering the following points.

  • Calculating the response time data for the API
  • Reporting the data back to client applications by passing the data in the Response headers.

Full code snippet for the ResponseTimeMiddleware is shown below.

public class ResponseTimeMiddleware { 
    // Name of the Response Header, Custom Headers starts with "X-"
 
    private const string RESPONSE_HEADER_RESPONSE_TIME = "X-Response-Time-ms";
 
    // Handle to the next Middleware in the pipeline
 
    private readonly RequestDelegate _next;
 
    public ResponseTimeMiddleware(RequestDelegate next) {
 
        _next = next;
 
    }
 
    public Task InvokeAsync(HttpContext context) {
 
        // Start the Timer using Stopwatch
 
        var watch = new Stopwatch();
 
        watch.Start();
 
        context.Response.OnStarting(() => {
 
            // Stop the timer information and calculate the time
  
            watch.Stop();
 
            var responseTimeForCompleteRequest = watch.ElapsedMilliseconds;
 
            // Add the Response time information in the Response headers.
  
            context.Response.Headers[RESPONSE_HEADER_RESPONSE_TIME] = responseTimeForCompleteRequest.ToString();
 
            return Task.CompletedTask;
 
        });
 
        // Call the next delegate/middleware in the pipeline
  
        return this._next(context);
 
    }
 
}

Explanation of the code

The interesting part happens in the InvokeAsync method, We use Stopwatch class to start the stopwatch once the requests enter into the first middleware of the request and then stop the stopwatch once the request has been processed and the response is ready to be sent back to the client. OnStarting method provides an opportunity to write a custom code to add a delegate to be invoked just before response headers will be sent to the client.

Lastly, we add the Response time information in a Custom Header. We use the X-Response-Time-msheader as a Response Header. As a convention, the Custom Header starts with an X.

Conclusion

In this article, we understood how to leverage ASP.NET middleware to manage cross-cutting concerns like measuring the response time of the APIs. There are various other useful use cases of using middleware which can help to reuse code and improve the maintainability of the application.

/p>


European ASP.NET Core Hosting - HostForLIFE.eu :: How to Find and Use ASP.NET Core Session

clock February 24, 2017 06:41 by author Scott

I'm building a tutorial (hopefully soon to be a post) and in that tutorial I needed to use Session for some quick-and-dirty data storage. Unfortunately when I tried to use Session in my default project, it was nowhere to be found, and I was sent down a small rabbit hole trying to find it. This post will walk through a reminder of what Session is, where to find it in ASP.NET Core 1.0, an overview of the new extension methods available, and building our own custom extension method. Let's get started!

What is Session?

If you're just starting to develop in ASP.NET, you may not have encountered Session before. Session is a serialized collection of objects that are related to the current user's session. The values are usually stored on the local server memory, but there are alternate architectures where the values can be stored in a SQL database or other distributed storage solutions, especially when your servers are part of a server farm.

You can store any data you like in Session, however any data you store will only be available to the current user as long as the session is active. This means that if that user logs out, the Session data is lost; if you need to keep this data you have to find another way to store it.

Finding the Session

ASP.NET Core 1.0 has been written from the ground up to be a modular, choose-what-you-need framework. What this means is that you must explicitly include any packages you want to use in your project.

This allows us developers to maintain tight control over what functionality our ASP.NET Core projects actually need, and exclude anything that is not necessary.

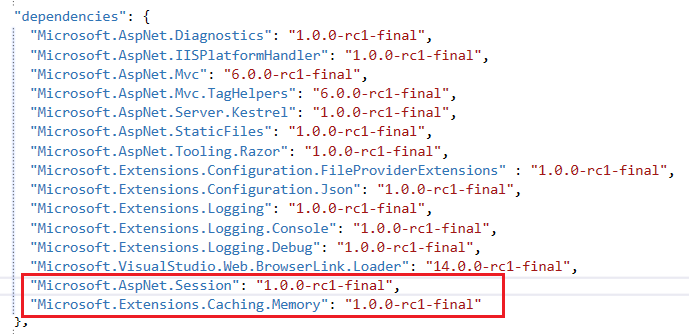
In our case, Session is considered to be one of these "additional" packages. In order to include that package we need to add a reference to Microsoft.AspNet.Session in the project.json file. If we wanted to use memory as our caching backend, we would also include Microsoft.Extensions.Caching.Memory.

Once we've got the package included in our project, we need to make it available to the Services layer by modifying the ConfigureServices()method in the Startup file, like so:

public void ConfigureServices(IServiceCollection services) 
{
    ...
    services.AddMemoryCache();
    services.AddSession(options =>
    {
        options.IdleTimeout = TimeSpan.FromMinutes(60);
        options.CookieName = ".MyCoreApp";
    });
    ...
}

With all of these steps completed, you can now use Session in your projects just like in any other ASP.NET application. If you wanted to use a different cache backend (rather than memory) you could grab a different NuGet package like Redis or SqlServer. Don't forget to check NuGet if you can't find the functionality you need; it is probably there and you just need to download it.

How to Use Session

ASP.NET Core 1.0 has introduced some new extension methods that we can use for accessing and storing Session values. The odd thing is that these extensions are not in Microsoft.AspNet.Session; rather, they are in Microsoft.AspNet.Http, and so we will need to add that package.

Once we've got that package included, we can start using the extension methods:

[HttpGet]
public IActionResult Index() 
{
    var userID = Context.Session.GetInt("UserID");
    var userName = Context.Session.GetString("UserName");
    return View();
}

[HttpGet]
public IActionResult Default() 
{
    Context.Session.SetInt("UserID", 5);
    Context.Session.SetString("UserName", "John Smith");
    return View();
}

The new extension methods are:

  • Get: Returns a byte array for the specified Session object.
  • GetInt: Returns an integer value for the specified Session object.
  • GetString: Returns a string value for the specified Session object.
  • Set: Sets a byte array for the specified Session object.
  • SetInt: Sets an integer value for the specified Session object.
  • SetString: Sets a string value for the specified Session object.

Why do only these extensions exist, and not GetDouble, GetDateTime, etc? I'm really not sure. If I had to guess I'd say it is to ensure that the values are serializable, but don't quote me on that. If anybody knows the real reason, I'd love to hear it!

Creating Extension Methods

I'm not completely satisfied with these extensions; they don't have enough functionality for my tastes, and so I'm gonna build some more. Specifically, I want to build extensions that will store a DateTime in session and retrieve it.

Here's the method signatures for these extensions:

public static DateTime? GetDateTime(this ISessionCollection collection, string key) 
{

}

public static void SetDateTime(this ISessionCollection collection, string key, DateTime value) 
{

}

The ISessionCollection interface is exactly what it sounds like: a collection of items stored in Session.

Let's tackle the SetDateTime() method first. DateTimes are weird because they are not inherently serializable, but they can be converted to a serializable type: long. So, we must convert the given DateTime value to a long before it can be stored.

public static void SetDateTime(this ISessionCollection collection, string key, DateTime value) 
{
    collection.Set(key, BitConverter.GetBytes(value.Ticks));
}

The BitConverter class allows us to convert byte arrays into other types easily.

Now we can tackle the GetDateTime() method. There are two things we need to keep in mind when building this extension. First, it is entirely possible that there will be no value in Session for the specified key; if this happens, we should return null. Second, we are storing the DateTime as a long, and therefore we need to serialize it back into a DateTime type; luckily the DateTime constructor makes this really easy. The final code for the method looks like this:

public static DateTime? GetDateTime(this ISessionCollection collection, string key) 
{
    var data = collection.Get(key);
    if(data == null)
    {
        return null;
    }

    long dateInt = BitConverter.ToInt64(data, 0);
    return new DateTime(dateInt);
}

Now we can use these extensions in addition to the ones already defined.

Now we've seen Session in action, including what package to use from NuGet, what extension methods are available, and even how to build our own extension method. Let me know if this helped you out in the comments!

Happy Coding!


HostForLIFE.eu Proudly Announces Microsoft SQL Server 2014 Hosting

clock April 7, 2014 09:58 by author Peter
HostForLIFE.eu was established to cater to an under served market in the hosting industry; web hosting for customers who want excellent service. HostForLIFE.eu a worldwide provider of hosting has announced the latest release of Microsoft's widely-used SQL relational database management system SQL Server Server 2014. You can take advantage of the powerful SQL Server Server 2014 technology in all Windows Shared Hosting, Windows Reseller Hosting and Windows Cloud Hosting Packages! In addition, SQL Server 2014 Hosting provides customers to build mission-critical applications and Big Data solutions using high-performance, in-memory technology across OLTP, data warehousing, business intelligence and analytics workloads without having to buy expensive add-ons or high-end appliances. 

SQL Server 2014 accelerates reliable, mission critical applications with a new in-memory OLTP engine that can deliver on average 10x, and up to 30x transactional performance gains. For Data Warehousing, the new updatable in-memory column store can query 100x faster than legacy solutions. The first new option is Microsoft SQL Server 2014 Hosting, which is available to customers from today. With the public release just last week of Microsoft’s latest version of their premier database product, HostForLIFE has been quick to respond with updated their shared server configurations.For more information about this new product, please visit http://hostforlife.eu/European-SQL-Server-2014-Hosting

About Us:
HostForLIFE.eu is awarded Top No#1 SPOTLIGHT Recommended Hosting Partner by Microsoft (see http://www.microsoft.com/web/hosting/HostingProvider/Details/953). Our service is ranked the highest top #1 spot in several European countries, such as: Germany, Italy, Netherlands, France, Belgium, United Kingdom, Sweden, Finland, Switzerland and other European countries. Besides this award, we have also won several awards from reputable organizations in the hosting industry and the detail can be found on our official website.


Press Release - Wordpress 3.8 Hosting with HostForLIFE.eu from Only €3.00/month

clock January 23, 2014 10:40 by author Scott

HostForLIFE.eu proudly launches the support of WordPress 3.8 on all their newest Windows Server environment. HostForLIFE.eu WordPress 3.8 Hosting plan starts from just as low as €3.00/month only.

WordPress is a flexible platform which helps to create your new websites with the CMS (content management system). There are lots of benefits in using the WordPress blogging platform like quick installation, self updating, open source platform, lots of plug-ins on the database and more options for website themes and the latest version is 3.8 with lots of awesome features.

WordPress 3.8 was released in December 2013, which introduces a brand new, completely updated admin design: with a fresh, uncluttered aesthetic that embraces clarity and simplicity; new typography (Open Sans) that’s optimized for both desktop and mobile viewing; and superior contrast that makes the whole dashboard better looking and easier to navigate.

HostForLIFE.eu is a popular online WordPress hosting service provider catering to those people who face such issues. The company has managed to build a strong client base in a very short period of time. It is known for offering ultra-fast, fully-managed and secured services in the competitive market.

Another wonderful feature of WordPress 3.8 is that it uses vector-based icons in the admin dashboard. This eliminates the need for pixel-based icons. With vector-based icons, the admin dashboard loads faster and the icons look sharper. No matter what device you use – whether it’s a smartphone, tablet, or a laptop computer, the icons actually scale to fit your screen.

WordPress 3.8 is a great platform to build your web presence with. HostForLIFE.eu can help customize any web software that company wishes to utilize. Further information and the full range of features WordPress 3.8 Hosting can be viewed here http://www.hostforlife.eu.


European ASP.NET Hosting - Nederland :: How to Solve System.Net.Mail: The specified string is not in the form required for a subject

clock January 21, 2014 08:59 by author Scott

Sometimes you’ll see this error on your site and it is really annoying. I post this issue as I see many people on forums experiencing on this issue. This is an error message:

“ArgumentException: The specified string is not in the form required for a subject“.

So what is exactly “the form required for a subject”? Googling for this error message returns a lot of junk and misinformed forum posts. It turns out that setting the Subject on a System.Net.Mail.Message internally calls MailBnfHelper.HasCROrLF (thank you Reflector) which does exactly what it says on the tin. Therefore one forum poster’s solution of subject.Replace("\r\n", " ") isn’t going to work when you have either a carriage returnor line feed in there.

The solution is like this:

message.Subject = subject.Replace('\r', ' ').Replace('\n', ' ');

Personally, I think that the MailMessage should to this for you or at least Microsoft should document what actually constitutes a “form required for a subject” in MSDN or, even better, in the actual error message itself!


Press Release - European HostForLIFE.eu Proudly Launches DotNetNuke 7.1 Hosting

clock January 7, 2014 07:19 by author Scott

HostForLIFE.eu proudly launches the support of DotNetNuke 7.1 on all our newest Windows Server 2012 environment. Our European DotNetNuke 7.1 Hosting plan starts from just as low as €3.00/month only and this plan has supported ASP.NET 4.5, ASP.NET MVC 4 and SQL Server 2012.

DotNetNuke (DNN) has evolved to become one of the most recognizable open source Content Management systems. Basically it is based on the Microsoft platform, i.e. ASP.NET, C#, SQL, jQuery etc. As a web development platform, DotNetNuke provides a solid base platform.

HostForLIFE.eu clients are specialized in providing supports for DotNetNuke CMS for many years. We are glad to provide support for European DotNetNuke CMS hosting users with advices and troubleshooting for our clients website when necessary.

DNN 7.1 provides intuitive drag-n-drop design feature, streamlined interface, built in social authentication providers, fully integrated SEO (Search Engine Optimization), membership system, granular access control, and many other features. In fact DNN 7 is all in one web development and content management system. No longer is the site design realm of just technically inclined, DNN 7 delivers advanced features and capabilities that are not matched by other CMS systems. In fact it is most well rounded CMS system available to date.

DotNetNuke 7.1 is a great platform to build your web presence with. HostForLIFE.eu can help customize any web software that company wishes to utilize. Further information and the full range of features DotNetNuke 7.1 Hosting can be viewed here http://hostforlife.eu/European-DotNetNuke-71-Hosting.


European ASP.NET 4.5 Hosting - Amsterdam :: New Feature Multicore JIT in .NET Framework 4.5

clock December 30, 2013 07:45 by author Scott

This articles describe one of the newest runtime features in ASP.NET 4.5. I will describe about Muticore Just-In-Compiler (JIT) in the .NET framework 4.5.

Multicore Just-in-Time (JIT) 

In the .NET framework 4.5, Microsoft has introduced an enhancement of the pervious JIT compiler by making it a Multicore JIT compiler, that runs on the two cores and supports parallelism in the compilation process in order to improve the launch performance during application startup.

From the developer point of view the Multicore JIT is a very cool runtime feature in .NET Framework 4.5 to improve their productivity and speed up the overall performance of an application. Now the developer can benefit from multicore processors to speed up the application compilation process.

The Multicore JIT compiler works in parallel with two cores. Because of the two cores, Multicore JIT can make your application start the process faster at startup. Multicore JIT provides significant improvements to Web based applications as well as Desktop Windows Presentation Foundation (WPF) applications.

Working of Multicore JIT

Nowadays, every PC has at least two cores, so the JIT compiler is built to make the investment worthwhile. Using the Multicore JIT, methods are compiled on two CPUs so that the application is able to reach the end of its startup execution quickly.

The compilation process is done in two cores that run in parallel executing the Multicore JIT compiler. The more effective Multicore JIT will reduce the startup time of an .NET application. 

Multicore JIT uses the two modes of operation.

Recording mode: It is the first mode, when JIT compiles the entire program and creates a JIT profile using a profile optimization class and saves the profile that was executed to a given folder to disk.

Playback mode: This mode is used when the application is launched subsequently. Playback mode is used to load the profile that was saved during the Recording mode from the disk using the background JIT thread in order to support the main thread.

The feature works by the JIT compiling the methods likely to be executed based on profiles created during previous compilations, that will runs on a separate processor core taking care of the JIT Compilation while the main execution thread runs on a different core.

In the ideal case, the second core quickly gets ahead of the mainline execution of the application, so whenever a method is required it is already compiled. As a result, the main thread doesn't need to do as much compilation, and your application launches faster.

In order to know which methods to compile, the feature generates profile data in the Recording mode that keeps track of the methods that are executed. Then the next time the application runs the call will look for that profile and when it finds it then it plays back; that means it starts compiling all the methods that was saved for that profile.

Note: MultiCore JIT requires a multicore machine to take advantage of its algorithms otherwise the CLR will ignore it on single core machines.

How to enable Multicore JIT in an .NET 4.5 application.

You can use this feature of the runtime to significantly improve the startup times of both client applications and Web sites in .NET framework 4.5.

Since ASP.NET applications run in a hosted environment, this feature is turned on for these applications automatically. Therefore JIT compiling using multiple cores is enabled by default in ASP.NET 4.5 and Silverlight 5.

But, if you want to disable this feature in your ASP.NET 4.5 applications then write the following code in the web.config file.

<system.web>
  <compilation profileGuidedOptimizations="None" />
</system.web>

But in a Windows based application, you will need to enable Multicore JIT feature explicitly.

Let's see how.

It is simple to use Multicore JIT, there is a class in the .NET Framework named "System.Runtime.ProfileOptimization" that you can use to start profiling at the entry point of your application. 

Optimization Profilers

The ProfileOptimization is a new type introduced in .Net 4.5 to improve the startup performance of application domains in applications that require the just-in-time (JIT) compiler by performing background compilation of methods that are likely to be executed, based on profiles created during previous compilations.

See the MSDN documentation for more information.

http://msdn.microsoft.com/en-IN/library/system.runtime.profileoptimization.aspx

The two methods that you can call at the entry point of your application.

SetProfileRoot: This method is used to specify the root path, where to save the JIT profile compiled information for optimization.

StartProfile: This method is used to start Multcore just in-time compilation.

You must write the following code in your application constructor in order to enable Multicore JIT.

public App()
{

 ProfileOptimization.SetProfileRoot(@"C:\MyAppFolder");
 ProfileOptimization.StartProfile("Startup.Profile");

}

Now that's all to enable the Multicore feature in your application; the rest of the work will be handled by the CLR automatically.


About HostForLIFE.eu

HostForLIFE.eu is European Windows Hosting Provider which focuses on Windows Platform only. We deliver on-demand hosting solutions including Shared hosting, Reseller Hosting, Cloud Hosting, Dedicated Servers, and IT as a Service for companies of all sizes.

We have offered the latest Windows 2016 Hosting, ASP.NET Core 2.2.1 Hosting, ASP.NET MVC 6 Hosting and SQL 2017 Hosting.


Tag cloud

Sign in