European ASP.NET 4.5 Hosting BLOG

BLOG about ASP.NET 4, ASP.NET 4.5 Hosting and Its Technology - Dedicated to European Windows Hosting Customer

European ASP.NET Core Hosting :: How to Fix “An error occurred while starting the application” in ASP.NET Core on IIS

clock July 5, 2019 07:33 by author Scott

.NET Core is the latest Microsoft product and Microsoft always keep update their technologies. We have written tutorial about how to publish ASP.NET Core on IIS server, but we know that some of you sometimes receive error when deploying your ASP.NET Core. Feel frustrated to fix the issue? Yeah, not only you have headache, but some of our clients also experience same problem like you. That’s why we write this tutorial and hope it can help to fix your issue!

Anyone see this error? Have problem to solve it? We want to help you here!

The Problem


It basically means something bad happened with your application. Things you need to check

  • You might not have the correct .NET Core version installed on the server.
  • You might be missing DLL’s
  • Something went wrong in your Program.cs or Startup.cs before any exception handling kicked in

If you use Windows Server, then I believe that you can’t find anything on your Event Viewer too. You’ll notice that there is no error on your Event Viewer log. Why? This is because Event Logging must be wired up explicitly and you’ll need to use the Microsoft.Extensions.Logging.EventLog package, and depending on the error, you might not have a chance to even catch it to log to the Event Viewer.

How to Fix it?

So, how to fix error above? The followings are the steps to fix the error:

1. Open your web.config

2. Change stdoutLogEnabled=true

3. Create a logs folder

  • Unfortunately, the AspNetCoreModule doesn’t create the folder for you by default
  • If you forget to create the logs folder, an error will be logged to the Event Viewer that says: Warning: Could not create stdoutLogFile \\?\YourPath\logs\stdout_timestamp.log, ErrorCode = -2147024893.
  • The “stdout” part of  the value “.\logs\stdout” actually references the filename not the folder.  Which is a bit confusing.

4. Run your request again, then open the \logs\stdout_*.log file

Note – you will want to turn this off after you’re done troubleshooting, as it is a performance hit.

So your web.config’s aspNetCore element should look something like this

 <aspNetCore processPath=”.\YourProjectName.exe” stdoutLogEnabled=”true” stdoutLogFile=”.\logs\stdout” />

Doing this will log all the requests out to this file and when the exception occurs, it will give you the full stack trace of what happened in the \logs\stdout_*.log file


Hope this helps!

Looking for ASP.NET Core hosting with affordable cost?

We know it is quite hard to find reliable hosting that support ASP.NET Core. We believe that some of you have signed up for 1 hosting, but they are below your expectation. Maybe they don’t support latest ASP.NET Core or they might support .NET Core but their support are not competent. We are here to help you. If you are looking for cheap, reliable with best ASP.NET Core hosting support, then you can visit our site at https://www.hostforlife.eu.


European ASP.NET Core Hosting :: Integration Test ASP.NET Core

clock June 25, 2019 09:19 by author Scott

Writing integration tests for ASP.NET Core controller actions used for file uploads is not a rare need. It is fully supported by ASP.NET Core integration tests system. This post shows how to write integration tests for single and multiple file uploads.

Getting started

Suppose we have controller action for file upload that supports multiple files. It uses complex composite command for image file analysis and saving. Command is injected to action by framework-level dependency injection using controller action injection.

[HttpPost]
[Authorize(Roles = "Admin")]
public async Task<IActionResult> Upload(IList<IFormFile> files, int? parentFolderId,
                                        [FromServices]SavePhotoCommand savePhotoCommand)
{
    foreach(var file in files)
    {
        var model = new PhotoEditModel();
        model.FileName = Path.GetFileName(file.FileName);
        model.Thumbnail = Path.GetFileName(file.FileName);
        model.ParentFolderId = parentFolderId;
        model.File = file;
 
        list.AddRange(savePhotoCommand.Validate(model));
 
        await savePhotoCommand.Execute(model);
    }
 
    ViewBag.Messages = savePhotoCommand.Messages;
 
    return View();
}

We want to write integration tests for this action but we need to upload at least one file to make sure that command doesn’t fail.

Making files available for integration tests

It’s good practice to have files for testing available no matter where tests are run. It’s specially true when writing code in team or using continuous integration server to run integration tests. If we don’t have many files and the files are not large then we can include those files in project.

Important thing is to specify in Visual Studio that these files are copied to output folder.

Same way it’s possible to use also other types of files and nobody stops us creating multiple folders or folder trees if we want to organize files better.

Uploading files in integration tests

Here is integration tests class for controller mentioned above. Right now there’s only one test and it is testing Upload action. Notice how image files are loaded from TestPhotos folder to file streams and how form data object is built using the file streams.

public class PhotosControllerTests : IClassFixture<WebApplicationFactory<Startup>>
{
    private readonly WebApplicationFactory<Startup> _factory;
 
    public PhotosControllerTests(WebApplicationFactory<Startup> factory)
    {
        _factory = factory;
    }
 
    [Fact]
    public async Task Upload_SavesPhotoAndReturnSuccess()
    {
        // Arrange
        var expectedContentType = "text/html; charset=utf-8";
        var url = "Photos/Upload";
        var options = new WebApplicationFactoryClientOptions { AllowAutoRedirect = false };
        var client = _factory.CreateClient(options);
 
        // Act
        HttpResponseMessage response;
 
        using (var file1 = File.OpenRead(@"TestPhotos\rt-n66u.jpg.webp"))
        using (var content1 = new StreamContent(file1))
        using (var file2 = File.OpenRead(@"TestPhotos\speedtest.png.webp"))
        using (var content2 = new StreamContent(file2))
        using (var formData = new MultipartFormDataContent())
        {
            // Add file (file, field name, file name)
            formData.Add(content1, "files", "rt-n66u.jpg.webp");
            formData.Add(content2, "files", "speedtest.png.webp");
 
            response = await client.PostAsync(url, formData);
        }
 
        // Assert
        response.EnsureSuccessStatusCode();
        var responseString = await response.Content.ReadAsStringAsync();
 
        Assert.NotEmpty(responseString);
        Assert.Equal(expectedContentType, response.Content.Headers.ContentType.ToString());
 
        response.Dispose();
        client.Dispose();
    }
}

For actions that accept only one file we need only one call to Add() method of formData.

Wrapping up

Integration tests mechanism in ASP.NET Core is flexible enough to support also more advanced scenarios like file uploads in tests. It’s not very straightforward and we can’t just call few methods of HTTP client to do it but it’s still easy enough once we know the tricks. If we keep test files in integration tests project then we don’t have to worry about getting files to machine where integration tests are running.


European ASP.NET Core Hosting :: How to Measure and Report the Response Time of ASP.NET Core

clock November 8, 2018 09:57 by author Scott

Performance is a buzzword for APIs. One of the most important and measurable parameters of the API performance is the response time. In this article, we will understand how to add code to measure the response time of an API and then return the response time data to the end client.

What is the need for this?

So, let's take a moment to think why we would ever need such a feature to measure the Response time of an API. Following are some of the points that have been the inspiration for writing code to Capture response time.

  • You need to define the SLA (Service Level Agreements) for your API with your clients. The clients need to understand how much time  the API takes to respond back. The response time data over time can help us decide on an SLA for our API.
  • Management is interested in reports as to how fast or slow the application is. You need to have data to corroborate your claims. It is worth it to have reports on the performance of the application and to share it with Stakeholders.
  • The client needs to have the information of the Response time of the API so that they can track how much time is spent on the client and the Server.

You might also have encountered similar requests in your project and it is worthwhile looking at an approach to capture the response time for the API.

Where to add the code?

Let's explore a couple of approaches to capture the response time of our API focusing mostly on capturing the time spent in our API. Our objective is to calculate the time elapsed in milliseconds from the time the request is received by the Asp.net core runtime to the time the response is processed and sent back from the Server.

What factors are we ignoring?

It's important to understand that this discussion doesn't include the time spent in N/W, Time spent in IIS and Application Pool Startup. If the Application Pool wasn't up and running, then the first request can affect the overall response time of the API. There is an Application Initialization Module which we can make use of but that is out of scope for this article.

First Attempt

One very naive approach to capturing the response time of an API would be to add code to every API method at the start and end and then measure the delta to calculate the response time as shown 

// GET api/values/5   
[HttpGet]  
public IActionResult Get() {  
    // Start the watch   
    var watch = new Stopwatch();  
    watch.Start();  
    // Your actual Business logic   
    // End the watch  
    watch.Stop();  
    var responseTimeForCompleteRequest = watch.ElapsedMilliseconds;  
} 

This code should be able to calculate the time spent in an operation. But this doesn't seem to be the right approach for the following reasons.

If an API has a lot of operations, then we need to add this code to multiple places which are not good for maintainability.

This code measures the time spent in the method only, it doesn't measure the time spent on other activities like middleware, filters, Controller selection, action method selection, Model binding etc.

Second Attempt

Let's try to improve the above code by centralizing the code in one place so that it is easier to maintain. We need to execute the response time calculation code before and after a method is getting executed. If you have worked with earlier versions of Asp.net Web API, you would be familiar with concepts of Filter. Filters allow you to run code before or after specific stages in the request processing pipeline.

We will implement a filter for calculating the Response time as shown below. We will create a Filter and use the OnActionExecuting to start the timer and then stop the timer in method OnActionExecuted, thus calculating the response time of the API.

public class ResponseTimeActionFilter: IActionFilter { 
    private const string ResponseTimeKey = "ResponseTimeKey"; 
    public void OnActionExecuting(ActionExecutingContext context) { 
        // Start the timer  
        context.HttpContext.Items[ResponseTimeKey] = Stopwatch.StartNew(); 
    } 
    public void OnActionExecuted(ActionExecutedContext context) { 
        Stopwatch stopwatch = (Stopwatch) context.HttpContext.Items[ResponseTimeKey]; 
        // Calculate the time elapsed  
        var timeElapsed = stopwatch.Elapsed; 
    } 
}  

This code is not a reliable technique for calculating the response time as it doesn't address the issue of calculating the time spent in execution of middleware, controller selection, action method selection, model binding etc. The filter pipeline runs after the MVC selects the action to execute. So, it effectively doesn't instrument the time spent in the Other Asp.net pipeline. 

Third Attempt

We will use the Asp.net Core Middleware to Calculate the Response time of the API.

So, what is Middleware?

Basically, Middleware are software components which handle the Request/Response. Middleware is assembled into an application pipeline and serves in the incoming request. Each component does the following operations.

  • Chooses whether to pass the request to the next component in the pipeline. 
  • Can perform work before and after the next component in the pipeline is invoked.

If you have worked with HTTPModules or HTTPHandlers in ASP.NET, then you can think of Middleware as a replacement in ASP.NET Core. Some of the examples of middleware are -

  • MVC Middleware
  • Authentication
  • Static File Serving
  • Caching
  • CORS


We want to add code to start the timer once the request enters the ASP.NET Core pipeline and stop the timer once the response is processed by the Pipeline. Custom Middleware at the start of the request pipeline seems to be the best approach for getting the access to the request as early as possible and access until the last step is executed in the pipeline.

We will build a Response Time Middleware which we will add as the first Middleware to the request Pipeline so that we can start the timer as soon the request enters the Asp.net core pipeline.

What to do with the Response time data?

Once we capture the response time data we can process data in the following ways.

  1. Add the Response time data to a Reporting database or an analytics solution.
  2. Write the Response time data to a log file.
  3. Pass the response time data to a message queue which can further be processed by another application for reporting and analytics.
  4. Send the Response time information to the client applications consuming our Rest API using the Response headers.
  5. There may be other useful ways of using the response time data. Please leave a comment and tell me how you process the response time data in your application.

Let's write the code

We will write the code considering the following points.

  • Calculating the response time data for the API
  • Reporting the data back to client applications by passing the data in the Response headers.

Full code snippet for the ResponseTimeMiddleware is shown below.

public class ResponseTimeMiddleware { 
    // Name of the Response Header, Custom Headers starts with "X-"
 
    private const string RESPONSE_HEADER_RESPONSE_TIME = "X-Response-Time-ms";
 
    // Handle to the next Middleware in the pipeline
 
    private readonly RequestDelegate _next;
 
    public ResponseTimeMiddleware(RequestDelegate next) {
 
        _next = next;
 
    }
 
    public Task InvokeAsync(HttpContext context) {
 
        // Start the Timer using Stopwatch
 
        var watch = new Stopwatch();
 
        watch.Start();
 
        context.Response.OnStarting(() => {
 
            // Stop the timer information and calculate the time
  
            watch.Stop();
 
            var responseTimeForCompleteRequest = watch.ElapsedMilliseconds;
 
            // Add the Response time information in the Response headers.
  
            context.Response.Headers[RESPONSE_HEADER_RESPONSE_TIME] = responseTimeForCompleteRequest.ToString();
 
            return Task.CompletedTask;
 
        });
 
        // Call the next delegate/middleware in the pipeline
  
        return this._next(context);
 
    }
 
}

Explanation of the code

The interesting part happens in the InvokeAsync method, We use Stopwatch class to start the stopwatch once the requests enter into the first middleware of the request and then stop the stopwatch once the request has been processed and the response is ready to be sent back to the client. OnStarting method provides an opportunity to write a custom code to add a delegate to be invoked just before response headers will be sent to the client.

Lastly, we add the Response time information in a Custom Header. We use the X-Response-Time-msheader as a Response Header. As a convention, the Custom Header starts with an X.

Conclusion

In this article, we understood how to leverage ASP.NET middleware to manage cross-cutting concerns like measuring the response time of the APIs. There are various other useful use cases of using middleware which can help to reuse code and improve the maintainability of the application.

/p>


European ASP.NET Core Hosting - HostForLIFE.eu :: How to Find and Use ASP.NET Core Session

clock February 24, 2017 06:41 by author Scott

I'm building a tutorial (hopefully soon to be a post) and in that tutorial I needed to use Session for some quick-and-dirty data storage. Unfortunately when I tried to use Session in my default project, it was nowhere to be found, and I was sent down a small rabbit hole trying to find it. This post will walk through a reminder of what Session is, where to find it in ASP.NET Core 1.0, an overview of the new extension methods available, and building our own custom extension method. Let's get started!

What is Session?

If you're just starting to develop in ASP.NET, you may not have encountered Session before. Session is a serialized collection of objects that are related to the current user's session. The values are usually stored on the local server memory, but there are alternate architectures where the values can be stored in a SQL database or other distributed storage solutions, especially when your servers are part of a server farm.

You can store any data you like in Session, however any data you store will only be available to the current user as long as the session is active. This means that if that user logs out, the Session data is lost; if you need to keep this data you have to find another way to store it.

Finding the Session

ASP.NET Core 1.0 has been written from the ground up to be a modular, choose-what-you-need framework. What this means is that you must explicitly include any packages you want to use in your project.

This allows us developers to maintain tight control over what functionality our ASP.NET Core projects actually need, and exclude anything that is not necessary.

In our case, Session is considered to be one of these "additional" packages. In order to include that package we need to add a reference to Microsoft.AspNet.Session in the project.json file. If we wanted to use memory as our caching backend, we would also include Microsoft.Extensions.Caching.Memory.

Once we've got the package included in our project, we need to make it available to the Services layer by modifying the ConfigureServices()method in the Startup file, like so:

public void ConfigureServices(IServiceCollection services) 
{
    ...
    services.AddMemoryCache();
    services.AddSession(options =>
    {
        options.IdleTimeout = TimeSpan.FromMinutes(60);
        options.CookieName = ".MyCoreApp";
    });
    ...
}

With all of these steps completed, you can now use Session in your projects just like in any other ASP.NET application. If you wanted to use a different cache backend (rather than memory) you could grab a different NuGet package like Redis or SqlServer. Don't forget to check NuGet if you can't find the functionality you need; it is probably there and you just need to download it.

How to Use Session

ASP.NET Core 1.0 has introduced some new extension methods that we can use for accessing and storing Session values. The odd thing is that these extensions are not in Microsoft.AspNet.Session; rather, they are in Microsoft.AspNet.Http, and so we will need to add that package.

Once we've got that package included, we can start using the extension methods:

[HttpGet]
public IActionResult Index() 
{
    var userID = Context.Session.GetInt("UserID");
    var userName = Context.Session.GetString("UserName");
    return View();
}

[HttpGet]
public IActionResult Default() 
{
    Context.Session.SetInt("UserID", 5);
    Context.Session.SetString("UserName", "John Smith");
    return View();
}

The new extension methods are:

  • Get: Returns a byte array for the specified Session object.
  • GetInt: Returns an integer value for the specified Session object.
  • GetString: Returns a string value for the specified Session object.
  • Set: Sets a byte array for the specified Session object.
  • SetInt: Sets an integer value for the specified Session object.
  • SetString: Sets a string value for the specified Session object.

Why do only these extensions exist, and not GetDouble, GetDateTime, etc? I'm really not sure. If I had to guess I'd say it is to ensure that the values are serializable, but don't quote me on that. If anybody knows the real reason, I'd love to hear it!

Creating Extension Methods

I'm not completely satisfied with these extensions; they don't have enough functionality for my tastes, and so I'm gonna build some more. Specifically, I want to build extensions that will store a DateTime in session and retrieve it.

Here's the method signatures for these extensions:

public static DateTime? GetDateTime(this ISessionCollection collection, string key) 
{

}

public static void SetDateTime(this ISessionCollection collection, string key, DateTime value) 
{

}

The ISessionCollection interface is exactly what it sounds like: a collection of items stored in Session.

Let's tackle the SetDateTime() method first. DateTimes are weird because they are not inherently serializable, but they can be converted to a serializable type: long. So, we must convert the given DateTime value to a long before it can be stored.

public static void SetDateTime(this ISessionCollection collection, string key, DateTime value) 
{
    collection.Set(key, BitConverter.GetBytes(value.Ticks));
}

The BitConverter class allows us to convert byte arrays into other types easily.

Now we can tackle the GetDateTime() method. There are two things we need to keep in mind when building this extension. First, it is entirely possible that there will be no value in Session for the specified key; if this happens, we should return null. Second, we are storing the DateTime as a long, and therefore we need to serialize it back into a DateTime type; luckily the DateTime constructor makes this really easy. The final code for the method looks like this:

public static DateTime? GetDateTime(this ISessionCollection collection, string key) 
{
    var data = collection.Get(key);
    if(data == null)
    {
        return null;
    }

    long dateInt = BitConverter.ToInt64(data, 0);
    return new DateTime(dateInt);
}

Now we can use these extensions in addition to the ones already defined.

Now we've seen Session in action, including what package to use from NuGet, what extension methods are available, and even how to build our own extension method. Let me know if this helped you out in the comments!

Happy Coding!


European ASP.NET Core 1.0 Hosting - HostForLIFE.eu :: How to Publish Your ASP.NET Core in IIS

clock November 3, 2016 09:27 by author Scott

When you build ASP.NET Core applications and you plan on running your applications on IIS you'll find that the way that Core applications work in IIS is radically different than in previous versions of ASP.NET.

In this post I'll explain how ASP.NET Core runs in the context of IIS and how you can deploy your ASP.NET Core application to IIS.

Setting Up Your IIS and ASP.NET Core

The most important thing to understand about hosting ASP.NET Core is that it runs as a standalone, out of process Console application. It's not hosted inside of IIS and it doesn't need IIS to run. ASP.NET Core applications have their own self-hosted Web server and process requests internally using this self-hosted server instance.

You can however run IIS as a front end proxy for ASP.NET Core applications, because Kestrel is a raw Web server that doesn't support all features a full server like IIS supports. This is actually a recommended practice on Windows in order to provide port 80/443 forwarding which kestrel doesn't support directly. For Windows IIS (or another reverse proxy) will continue to be an important part of the server even with ASP.NET Core applications.

Run Your ASP.NET Core Site

To run your ASP.NET Core site, it is quite different with your previous ASP.NET version. ASP.NET Core runs its own web server using Kestrel component. Kestrel is a .NET Web Server implementation that has been heavily optimized for throughput performance. It's fast and functional in getting network requests into your application, but it's 'just' a raw Web server. It does not include Web management services as a full featured server like IIS does.

If you run on Windows you will likely want to run Kestrel behind IIS to gain infrastructure features like port 80/443 forwarding via Host Headers, process lifetime management and certificate management to name a few.

ASP.NET Core applications are standalone Console applications invoked through the dotnet runtime command. They are not loaded into an IIS worker process, but rather loaded through a native IIS module called AspNetCoreModule that executes the external Console application.

Once you've installed the hosting bundle (or you install the .NET Core SDK on your Dev machine) the AspNetCoreModule is available in the IIS native module list:

The AspNetCoreModule is a native IIS module that hooks into the IIS pipeline very early in the request cycle and immediately redirects all traffic to the backend ASP.NET Core application. All requests - even those mapped to top level Handlers like ASPX bypass the IIS pipeline and are forwarded to the ASP.NET Core process. This means you can't easily mix ASP.NET Core and other frameworks in the same Site/Virtual directory, which feels a bit like a step back given that you could easily mix frameworks before in IIS.

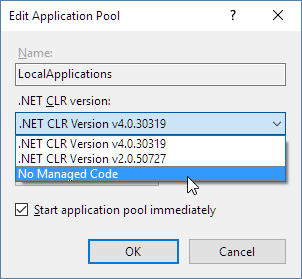
While the IIS Site/Virtual still needs an IIS Application Pool to run in, the Application Pool should be set to use No Managed Code. Since the App Pool acts merely as a proxy to forward requests, there's no need to have it instantiate a .NET runtime.

The AspNetCoreModule's job is to ensure that your application gets loaded when the first request comes in and that the process stays loaded if for some reason the application crashes. You essentially get the same behavior as classic ASP.NET applications that are managed by WAS (Windows Activation Service).

Once running, incoming Http requests are handled by this module and then routed to your ASP.NET Core application.

So, requests come in from the Web and int the kernel mode http.sys driver which routes into IIS on the primary port (80) or SSL port (443). The request is then forwarded to your ASP.NET Core application on the HTTP port configured for your application which is not port 80/443. In essence, IIS acts a reverse proxy simply forwarding requests to your ASP.NET Core Web running the Kestrel Web server on a different port.

Kestrel picks up the request and pushes it into the ASP.NET Core middleware pipeline which then handles your request and passes it on to your application logic. The resulting HTTP output is then passed back to IIS which then pushes it back out over the Internet to the HTTP client that initiated the request - a browser, mobile client or application.

The AspNetCoreModule is configured via the web.config file found in the application's root, which points a the startup command (dotnet) and argument (your application's main dll) which are used to launch the .NET Core application. The configuration in the web.config file points the module at your application's root folder and the startup DLL that needs to be launched.

Here's what the web.config looks like:

<?xml version="1.0" encoding="utf-8"?>
<configuration>
  <!--
    Configure your application settings in appsettings.json. Learn more at http://go.microsoft.com/fwlink/?LinkId=786380
  -->
  <system.webServer>
    <handlers>
      <add name="aspNetCore" path="*" verb="*"
        modules="AspNetCoreModule" resourceType="Unspecified" />
    </handlers>
    <aspNetCore processPath="dotnet"
                arguments=".\AlbumViewerNetCore.dll"
                stdoutLogEnabled="false"
                stdoutLogFile=".\logs\stdout"
                forwardWindowsAuthToken="false" />
  </system.webServer>
</configuration>

You can see that module references dotnetexe and the compiled entry point DLL that holds your Main method in your .NET Core application.

IIS is Recommended!

We've already discussed that when running ASP.NET Core on Windows, it's recommended you use IIS as a front end proxy. While it's possible to directly access Kestrel via an IP Address and available port, there are number of reasons why you don't want to expose your application directly this way in production environments.

First and foremost, if you want to have multiple applications running on a single server that all share port 80 and port 443 you can't run Kestrel directly. Kestrel doesn't support host header routing which is required to allow multiple port 80 bindings on a single IP address. Without IIS (or http.sys actually) you currently can't do this using Kestrel alone (and I think this is not planned either).

The AspNetCoreModule running through IIS also provides the necessary process management to ensure that your application gets loaded on the first access, ensures that it stays up and running and is restarted if it crashes. The AspNetCoreModule provides the required process management to ensure that your AspNetCore application is always available even after a crash.

It's also a good idea to run secure SSL requests through IIS proper by setting up certificates through the IIS certificate store and letting IIS handle the SSL authentication. The backplane HTTP request from IIS can then simply fire a non-secure HTTP request to your application. This means only a the front end IIS server needs a certificate even if you have multiple servers on the backplane serving the actual HTTP content.

IIS can also provide static file serving, gzip compression of static content, static file caching, Url Rewriting and a host of other features that IIS provides natively. IIS is really good and efficient at processing non-application requests, so it's worthwhile to take advantage of that. You can let IIS handle the tasks that it's really good at, and leave the dynamic tasks to pass through to your ASP.NET Core application.

The bottom line for all of this is if you are hosting on Windows you'll want to use IIS and the AspNetCoreModule.

How to Publish ASP.NET Core in IIS

In order to run an application with IIS you have to first publish it. There are two ways to that you can do this today:

1. Use dotnet publish

Using dotnet publish builds your application and copies a runnable, self-contained version of the project to a new location on disk. You specify an output folder where all the files are published. This is not so different from classic ASP.NET which ran Web sites out of temp folders. With ASP.NET Core you explicitly publish an application into a location of your choice - the files are no longer hidden away and magically copied around.

A typical publish command may look like this:

dotnet publish
      --framework netcoreapp1.0
      --output "c:\temp\AlbumViewerWeb"
      --configuration Release

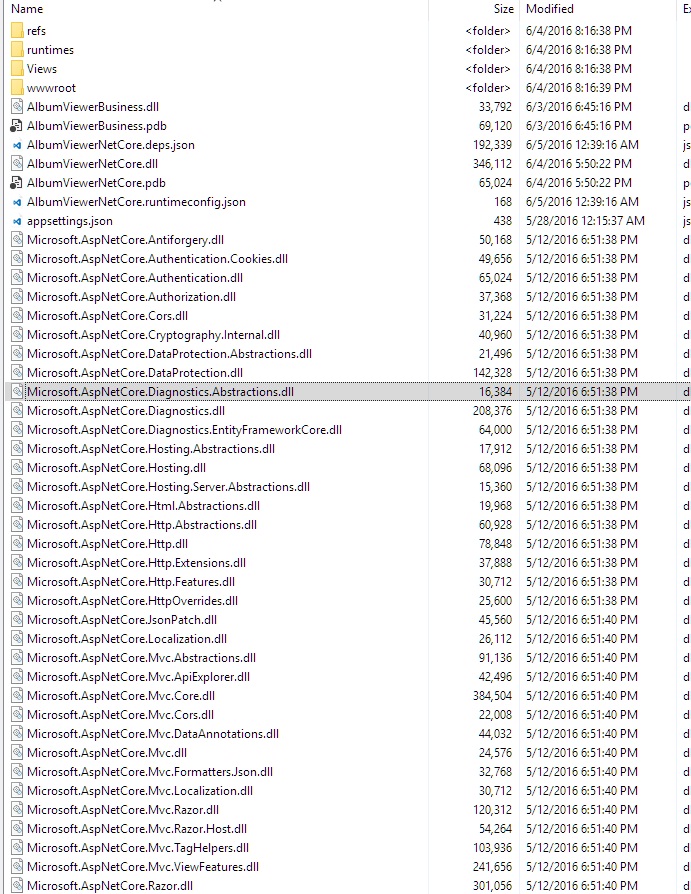
If you open this folder you'll find that it contains your original application structure plus all the nuget dependency assemblies dumped into the root folder:

Once you've published your application and you've moved it to your server (via FTP or other mechanism) we can then hook up IIS to the folder.

After that, please just make sure you setup .NET Runtime to No Managed Code as shown above.

And that's really all that needs to happen. You should be able to now navigate to your site or Virtual and the application just runs.

You can now take this locally deployed Web site, copy it to a Web Server (via FTP or direct file copy or other publishing solution), set up a Site or Virtual and you are off to the races.

2. Publish Using Visual Studio

The dotnet publish step works to copy the entire project to a folder, but it doesn't actually publish your project to a Web site (currently - this is likely coming at a later point).

In order to get incremental publishing to work, which is really quite crucial for ASP.NET Core applications because there are so many dependencies, you need to use MsDeploy which is available as part of Visual Studio's Web Publishing features.

Currently the Visual Studio Tooling UI is very incomplete, but the underlying functionality is supported. I'll point out a few tweaks that you can use to get this to work today.

When you go into Visual Studio in the RC2 Web tooling and the Publish dialog, you'll find that you can't create a publish profile that points at IIS. There are options for file and Azure publishing but there's no way through the UI to create a new Web site publish.

However, you can cheat by creating your own .pubxml file and putting it into the \Properties\PublishProfilesfolder in your project.

To create a 'manual profile' in your ASP.NET Core Web project:

  • Create a folder \Properties\PublishProfiles
  • Create a file <MyProfile>.pubxml

You can copy an existing .pubxml from a non-ASP.NET Core project or create one. Here's an example of a profile that works with IIS:

<Project ToolsVersion="4.0" xmlns="http://schemas.microsoft.com/developer/msbuild/2003">
  <PropertyGroup>
    <WebPublishMethod>MSDeploy</WebPublishMethod>
    <LastUsedBuildConfiguration>Release</LastUsedBuildConfiguration>
    <LastUsedPlatform>Any CPU</LastUsedPlatform>
    <SiteUrlToLaunchAfterPublish>http://samples.west-wind.com/AlbumViewerCore/index.html</SiteUrlToLaunchAfterPublish>
    <LaunchSiteAfterPublish>True</LaunchSiteAfterPublish>
    <ExcludeApp_Data>False</ExcludeApp_Data>
    <PublishFramework>netcoreapp1.0</PublishFramework>
    <UsePowerShell>True</UsePowerShell>
    <EnableMSDeployAppOffline>True</EnableMSDeployAppOffline>
    <MSDeployServiceURL>https://publish.west-wind.com</MSDeployServiceURL>
    <DeployIisAppPath>samples site/albumviewercore</DeployIisAppPath>
    <RemoteSitePhysicalPath />
    <SkipExtraFilesOnServer>True</SkipExtraFilesOnServer>
    <MSDeployPublishMethod>RemoteAgent</MSDeployPublishMethod>
    <EnableMSDeployBackup>False</EnableMSDeployBackup>
    <UserName>username</UserName>
    <_SavePWD>True</_SavePWD>
    <ADUsesOwinOrOpenIdConnect>False</ADUsesOwinOrOpenIdConnect>
    <AuthType>NTLM</AuthType>
  </PropertyGroup>
</Project>

Once you've created a .pubxml file you can now open the publish dialog in Visual Studio with this Profile selected:

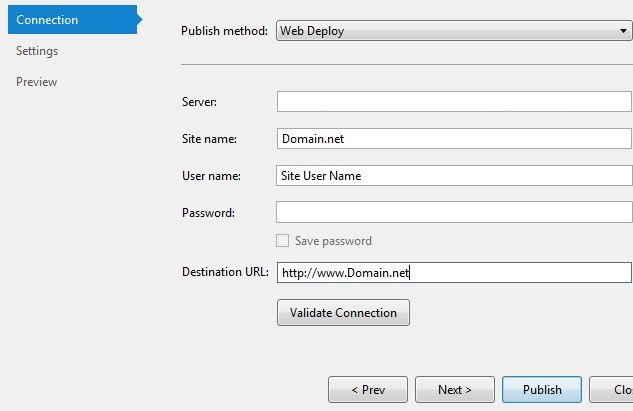
At this point you should be able to publish your site to IIS on a remote server and use incremental updates with your content.

#And it's a Wrap Currently IIS hosting and publishing is not particularly well documented and there are some rough edges around the publishing process. Microsoft knows of these issues and this will get fixed by RTM of ASP.NET Core.

In the meantime I hope this post has provided the information you need to understand how IIS hosting works and a few tweaks that let you use the publishing tools available to get your IIS applications running on your Windows Server.


European ASP.NET Core Hosting - HostForLIFE.eu :: How to Fix Error 502.5 - Process Failure in ASP.NET Core

clock October 4, 2016 19:35 by author Scott

This is an issue that sometimes you face when you deploying your ASP.NET Core on shared hosting environment.

Problem

HTTP Error 502.5 - Process Failure

Common causes of this issue:

* The application process failed to start
* The application process started but then stopped
* The application process started but failed to listen on the configured port

Although your hosting provider have setup .net core for you, you can face error above. So, how to fix this problems?

Solution

There are 2 issues that cause the above error

#1. Difference ASP.NET Core Version

1. The difference ASP.NET Core version. Microsoft just released newest ASP.NET Core 1.0.1. Maybe you are still using ASP.NET Core 1.0. So, you must upgrade your .net Core version.

2. When you upgraded your app, make sure that your ‘Microsoft.NETCoreApp’ setting in your project.json was changed to:

"Microsoft.NETCore.App": "1.0.1",

3. Fixing your App ‘type’

"Microsoft.NETCore.App": { "version": "1.0.1", "type": "platform" },

#2. Set path to dotnet.exe in the web.config

Here is example to change your web.config file:

<?xml version="1.0" encoding="utf-8"?>
<configuration>
  <!--
    Configure your application settings in appsettings.json. Learn more at https://go.microsoft.com/fwlink/?LinkId=786380
  -->
  <system.webServer>
    <handlers>
      <add name="aspNetCore" path="*" verb="*" modules="AspNetCoreModule" resourceType="Unspecified" />
    </handlers>
    <aspNetCore processPath="C:\Program Files\dotnet\dotnet.exe" arguments=".\CustomersApp.dll" stdoutLogEnabled="true" stdoutLogFile=".\logs\stdout" forwardWindowsAuthToken="false" />
  </system.webServer>
</configuration>

Conclusion

We hope above tutorial can help you to fix ASP.NET Core problem. This is only our experience to solve above error and hope that will help you. If you need ASP.NET Core hosting, you can visit our site at http://www.hostforlife.eu. We have supported the latest ASP.NET Core 1.0.1 hosting on our hosting environment and we can make sure that it is working fine.


About HostForLIFE.eu

HostForLIFE.eu is European Windows Hosting Provider which focuses on Windows Platform only. We deliver on-demand hosting solutions including Shared hosting, Reseller Hosting, Cloud Hosting, Dedicated Servers, and IT as a Service for companies of all sizes.

We have offered the latest Windows 2016 Hosting, ASP.NET Core 2.2.1 Hosting, ASP.NET MVC 6 Hosting and SQL 2017 Hosting.


Tag cloud

Sign in