European ASP.NET 4.5 Hosting BLOG

BLOG about ASP.NET 4, ASP.NET 4.5 Hosting and Its Technology - Dedicated to European Windows Hosting Customer

European ASP.NET Core 8.0.1 Hosting - HostForLIFE :: Using Identity for NET API Login and Registration

clock April 2, 2024 08:18 by author Peter

Creating reliable and secure online apps requires careful consideration of authentication and authorization. Microsoft Identity offers a strong foundation for implementing authorization and authentication features with ease in the.NET ecosystem. In this post, we'll look at how to use Microsoft Identity in conjunction with controllers to efficiently handle user registration and login functions in a.NET API.

Required conditions

Make sure you have installed the following prerequisites before continuing:

  • The.NET SDK (at least version 5)
  • Visual Studio Code (optional) or Visual Studio


Establishing the Project
Let's start by making a new.NET Web API project:

dotnet new webapi -n YourProjectName
cd YourProjectName


Adding Identity to the Project
To add Identity to your project, run the following commands:
dotnet add package Microsoft.AspNetCore.Identity.EntityFrameworkCore
dotnet add package Microsoft.EntityFrameworkCore.SqlServer

This adds the necessary packages to your project for using Identity and Entity Framework Core with SQL Server.

Scaffold Identity

Next, scaffold Identity into your project:
dotnet aspnet-codegenerator identity -dc YourDbContext

Replace YourDbContext with the name of your application's DbContext.
Implementing Registration and Login Controllers:

Now, let's implement controllers for user registration and login.

1. Registration Controller

using Microsoft.AspNetCore.Identity;
using Microsoft.AspNetCore.Mvc;
using System.Threading.Tasks;
using YourProjectName.Models;

namespace YourProjectName.Controllers
{
    [Route("api/[controller]")]
    [ApiController]
    public class RegisterController : ControllerBase
    {
        private readonly UserManager<ApplicationUser> _userManager;

        public RegisterController(UserManager<ApplicationUser> userManager)
        {
            _userManager = userManager;
        }

        [HttpPost]
        public async Task<IActionResult> Register(RegisterModel model)
        {
            var user = new ApplicationUser { UserName = model.Email, Email = model.Email };
            var result = await _userManager.CreateAsync(user, model.Password);
            if (result.Succeeded)
            {
                return Ok("Registration successful");
            }
            return BadRequest(result.Errors);
        }
    }
}

2. Login Controller
using Microsoft.AspNetCore.Identity;
using Microsoft.AspNetCore.Mvc;
using System.Threading.Tasks;
using YourProjectName.Models;

namespace YourProjectName.Controllers
{
    [Route("api/[controller]")]
    [ApiController]
    public class LoginController : ControllerBase
    {
        private readonly SignInManager<ApplicationUser> _signInManager;

        public LoginController(SignInManager<ApplicationUser> signInManager)
        {
            _signInManager = signInManager;
        }

        [HttpPost]
        public async Task<IActionResult> Login(LoginModel model)
        {
            var result = await _signInManager.PasswordSignInAsync(model.Email, model.Password, false, false);
            if (result.Succeeded)
            {
                return Ok("Login successful");
            }
            return Unauthorized("Invalid email or password");
        }
    }
}

Models
Ensure you have the necessary models for registration and login:
namespace YourProjectName.Models
{
    public class RegisterModel
    {
        public string Email { get; set; }
        public string Password { get; set; }
    }

    public class LoginModel
    {
        public string Email { get; set; }
        public string Password { get; set; }
    }
}


Configuring Startup
Finally, add Identity services to the ConfigureServices method in Startup.cs:
services.AddIdentity<ApplicationUser, IdentityRole>()
    .AddEntityFrameworkStores<YourDbContext>()
    .AddDefaultTokenProviders();

Happy coding!


ASP.NET Core 8 Hosting - HostForLIFE.eu :: Third-party API Integration in the ASP.NET Core Web API

clock February 28, 2024 07:16 by author Peter

ASP.NET Core is a sophisticated framework for developing online APIs that enables developers to build strong and scalable applications. One of the most important aspects of current web development is the use of third-party APIs, which give access to external services and data.

Create a Model

using System.Text.Json.Serialization;

namespace _1_3rdAPIIntegrationInAspNetCoreWebAPI.Models
{
    public class Product
    {
        public int Id { get; set; }
        public string Title { get; set; }
        public string Description { get; set; }
        public decimal Price { get; set; }
        public double DiscountPercentage { get; set; }
        public double Rating { get; set; }
        public int Stock { get; set; }
        public string Brand { get; set; }
        public string Category { get; set; }
        public string Thumbnail { get; set; }
        public List<string> Images { get; set; }
    }
}

Here's a breakdown of each property.

  • ID: An integer representing the unique identifier of the product.
  • Title: A string representing the title or name of the product.
  • Description: A string representing the description or details of the product.
  • Price: A decimal representing the price of the product.
  • DiscountPercentage: A double representing the discount percentage applied to the product.
  • Rating: A double representing the rating of the product (e.g., star rating).
  • Stock: An integer representing the available quantity of the product in stock.
  • Brand: A string representing the brand or manufacturer of the product.
  • Category: A string representing the category or type of the product.
  • Thumbnail: A string representing the URL or path to the thumbnail image of the product.
  • Images: A list of strings representing the URLs or paths to additional images of the product.


Create the Interface for the Product Service
using _1_3rdAPIIntegrationInAspNetCoreWebAPI.Models;

namespace _1_3rdAPIIntegrationInAspNetCoreWebAPI.Interfaces
{
public interface IProducts
{
    Task<List<ProductsResponse>> GetProductsAsync();
}
}


GetProductsAsync: This function returns a Task<List<ProductsResponse>>. It indicates that implementing classes will enable the asynchronous retrieval of a list of products. The List<ProductsResponse> contains product responses, including IDs, titles, descriptions, and pricing. The method is asynchronous, as shown by the Task return type, which means that it can be anticipated for asynchronous execution.

Create the service for the products
using _1_3rdAPIIntegrationInAspNetCoreWebAPI.Interfaces;
using _1_3rdAPIIntegrationInAspNetCoreWebAPI.Models;
using System.Net;
using System.Text.Json;

namespace _1_3rdAPIIntegrationInAspNetCoreWebAPI.Services
{
public class ProductService : IProducts
{
    private static readonly HttpClient httpClient;

    static ProductService()
    {
        httpClient = new HttpClient()
        {
            BaseAddress = new Uri("https://dummyjson.com/")
        };

    }

    public async Task<List<ProductsResponse>> GetProductsAsync()
    {
        try
        {
            var url = string.Format("products");
            var result = new List<ProductsResponse>();
            var response = await httpClient.GetAsync(url);

            if (response.IsSuccessStatusCode)
            {
                var stringResponse = await response.Content.ReadAsStringAsync();
                var productsResponse = JsonSerializer.Deserialize<ProductsResponse>(stringResponse, new JsonSerializerOptions()
                {
                    PropertyNamingPolicy = JsonNamingPolicy.CamelCase
                });

                // Add the deserialized ProductsResponse to the result list
                result.Add(productsResponse);
            }
            else
            {
                if (response.StatusCode == HttpStatusCode.NotFound)
                {
                    throw new Exception("Products not found.");
                }
                else
                {
                    throw new Exception("Failed to fetch data from the server. Status code: " + response.StatusCode);
                }
            }

            return result;

        }
        catch (HttpRequestException ex)
        {
            throw new Exception("HTTP request failed: " + ex.Message);
        }
        catch (JsonException ex)
        {
            throw new Exception("JSON deserialization failed: " + ex.Message);
        }
        catch (Exception ex)
        {
            throw new Exception("An unexpected error occurred: " + ex.Message);
        }
    }
}
}

Create the Controller for the Products
using _1_3rdAPIIntegrationInAspNetCoreWebAPI.Interfaces;
using _1_3rdAPIIntegrationInAspNetCoreWebAPI.Models;
using Microsoft.AspNetCore.Http;
using Microsoft.AspNetCore.Mvc;

namespace _1_3rdAPIIntegrationInAspNetCoreWebAPI.Controllers
{
[Route("api/[controller]/[action]")]
[ApiController]
public class ProductsController : ControllerBase
{
    private readonly IProducts _productService;

    public ProductsController(IProducts productService)
    {
        _productService = productService;
    }

    [HttpGet]
    public async Task<IEnumerable<ProductsResponse>> GetProducts()
    {
        return await _productService.GetProductsAsync();
    }
}
}


Register the Services in IOC Container

using _1_3rdAPIIntegrationInAspNetCoreWebAPI.Interfaces;
using _1_3rdAPIIntegrationInAspNetCoreWebAPI.Services;

var builder = WebApplication.CreateBuilder(args);

// Add services to the container.
builder.Services.AddSingleton<IProducts, ProductService>();

builder.Services.AddControllers();
// Learn more about configuring Swagger/OpenAPI at https://aka.ms/aspnetcore/swashbuckle
builder.Services.AddEndpointsApiExplorer();
builder.Services.AddSwaggerGen();

var app = builder.Build();

// Configure the HTTP request pipeline.
if (app.Environment.IsDevelopment())
{
app.UseSwagger();
app.UseSwaggerUI();
}

app.UseHttpsRedirection();

app.UseAuthorization();

app.MapControllers();

app.Run();

Output


ASP.NET Core 8 Hosting - HostForLIFE.eu :: Describe the.NET 8 Keyed Services

clock February 13, 2024 07:19 by author Peter

Keyed services are a major improvement to the built-in dependency injection (DI) framework of.NET 8. This functionality, which has long been a part of third-party DI frameworks like Autofac and StructureMap, gives developers more freedom and control over how dependencies are delivered to their applications. Now let's explore keyed services in more detail: Understanding Keyed Services


In the past,.NET DI registered services exclusively on the basis of their kind. Although this worked well in most cases, it became less successful when there were several implementations of the same interface. This is mitigated by keyed services, which enable us to link a special "key" to every service registration. An enum, string, or any other item that specifically defines the intended implementation can be used as this key.

Advantages of Services with Keys

  • Flexibility: You can inject particular implementations according to runtime circumstances, configuration settings, or dynamic conditions.
  • Decoupling: Implement different versions of the same interface for distinct uses to keep concerns apart.
  • Maintainability: Clearly name and reference desired dependencies in your code to improve readability.
  • Configurability: Apply several implementations according to configuration files or environment variables.

Consider a scenario where an application requires data storage because of configuration settings or user preferences. We have two implementations of the IDataStore interface: LocalStorage and CloudStorage.

1. Explain interfaces
public interface IDataStore
{
    void SaveData(string data);
}

public class LocalStorage : IDataStore
{
    public void SaveData(string data)
    {
        // Implementation to save data locally
        Console.WriteLine($"Saving data locally: {data}");
    }
}

public class CloudStorage : IDataStore
{
    public void SaveData(string data)
    {
        // Implementation to save data in the cloud
        Console.WriteLine($"Saving data in the cloud: {data}");
    }
}

2. Register Services with Keys
// In Startup.cs

public void ConfigureServices(IServiceCollection services)
{
    services.AddSingleton<IDataStore, LocalStorage>(key: "local");
    services.AddSingleton<IDataStore, CloudStorage>(key: "cloud");
}


3. Inject and Use Keyed Service
public class MyService
{
    private readonly IKeyedServiceProvider _provider;
    private readonly IConfiguration _configuration;

    public MyService(IKeyedServiceProvider provider, IConfiguration configuration)
    {
        _provider = provider;
        _configuration = configuration;
    }

    public void DoSomething()
    {
        string storageType = _configuration["StorageType"]; // e.g., "local" or "cloud"

        IDataStore store = _provider.GetKeyedService<IDataStore>(storageType);
        store.SaveData("This data will be saved based on the configuration.");
    }
}


4. Run the Application
// Program.cs
public static void Main(string[] args)
{
    var builder = WebApplication.CreateBuilder(args);

    // Configure services and app...

    var app = builder.Build();

    // Run the app...
}

With their more sophisticated and adaptable approach to dependency injection, keyed services are a great addition to the.NET 8 DI architecture. You can gain more authority and clarity over the design of your program by comprehending their advantages, usage trends, and sophisticated applications. Learn about, play with, and take use of keyed services to create more flexible, dynamic, and organized.NET applications!


ASP.NET Core 8 Hosting - HostForLIFE.eu :: .NET MAUI Dev Express Charts

clock February 6, 2024 05:49 by author Peter

Use Devexpress Charts to give your.NET MAUI projects a boost! This blog post will walk you through the process of utilizing the free lifetime plugin Dev Express to implement the chart in.NET MAUI projects. With so many customization options, this plugin will jump straight to the implementation section.

Establishing the Project
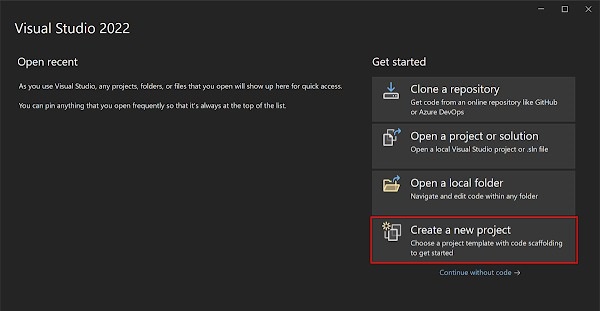
To create a new project, launch Visual Studio 2022 and select Create a new project from the Start box.
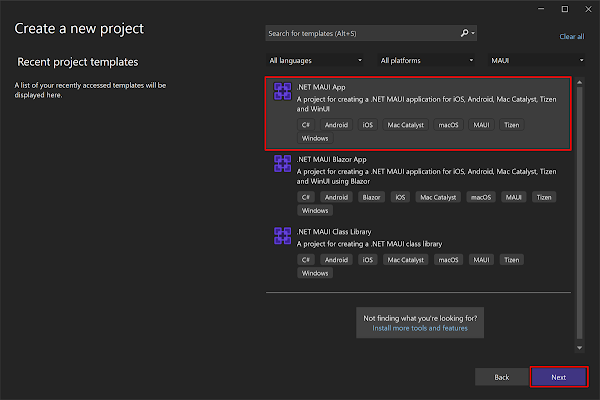
Click the Next button after choosing the.NET MAUI App template and MAUI from the All project types drop-down menu in the Create a new project box.
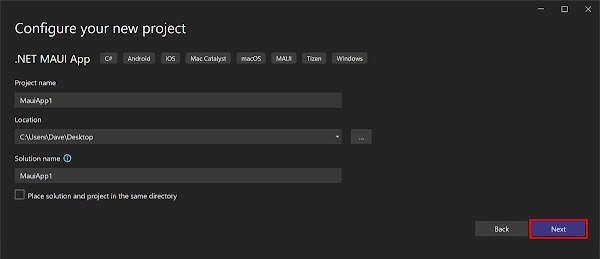
Click the Next button after giving your project a name and selecting an appropriate location in the Configure your new project window.
Click the Create button located in the Additional Information window.
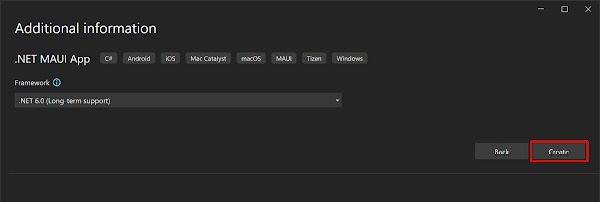
Once the project is created, we can able to see the Android, iOS, Windows, and other running options in the toolbar. Press the emulator or run button to build and run the app.

Install Plugin

  • Library Requirement: The Dev Express's Nuget link should be mapped as a package source and we need to install "DevExpress.Maui.Charts" into our project.
  • Installation via NuGet: Obtain the Charts library by searching for "DevExpress.Maui.Charts" in the NuGet Package Manager.
  • User Interface Guidance: Open the NuGet Package Manager interface to facilitate the installation process.
  • Visual Confirmation: The library, once searched, should appear as "DevExpress.Maui.Charts" in the NuGet interface.

Implementation
First, we need to open "MauiProgram.cs" and include the following namespace and line to allow the app to use the Chart Library.

using DevExpress.Maui;

.UseDevExpress()

Open the MainPage.xaml file and add the following namespace. (the page will be replaced according to you).
xmlns:dxc="clr-namespace:DevExpress.Maui.Charts;assembly=DevExpress.Maui.Charts"

Then, remove the default content and add an instance of the ChartView class to the page.

<ContentPage xmlns="http://schemas.microsoft.com/dotnet/2021/maui"
             xmlns:x="http://schemas.microsoft.com/winfx/2009/xaml"
             xmlns:dxc="clr-namespace:DevExpress.Maui.Charts;assembly=DevExpress.Maui.Charts"
             x:Class="ScatterChartGetStarted.MainPage">
    <dxc:ChartView/>
</ContentPage>


Consider removing the event handlers from the code behind the default content. It is advisable to eliminate default styles (such as fonts, colors, and other settings) in the App.xaml file as well.

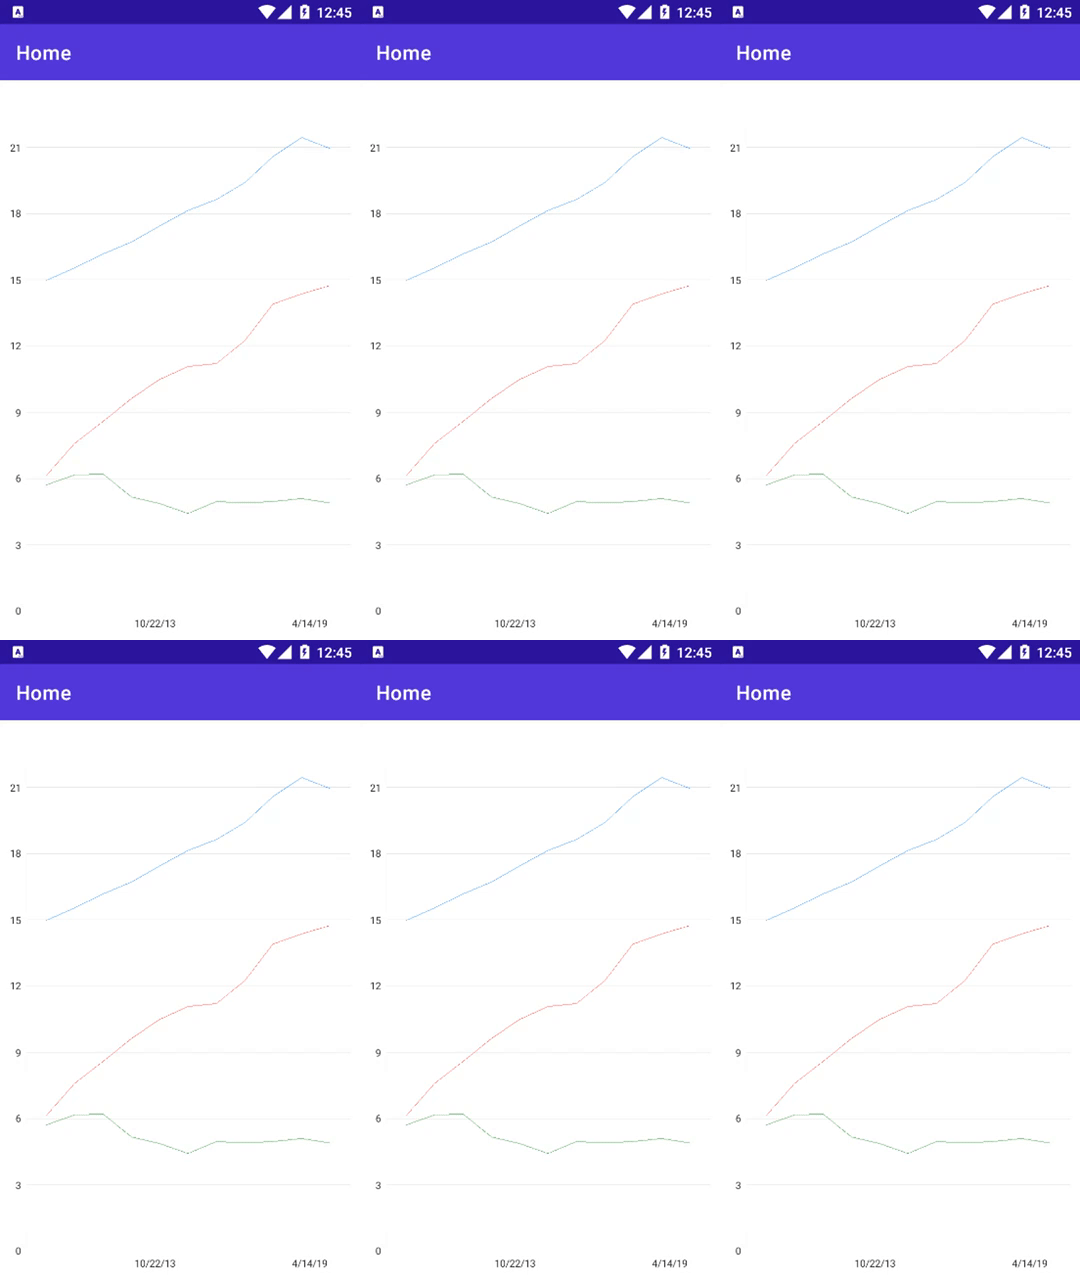
In this instance, the chart features a line series displaying the annual GDP for three countries. Generate a ViewModel.cs file that includes the following classes.
public class ViewModel {
    public CountryGdp GdpValueForUSA { get; }
    public CountryGdp GdpValueForChina { get; }
    public CountryGdp GdpValueForJapan { get; }

    public ViewModel() {
        GdpValueForUSA = new CountryGdp(
            "USA",
            new GdpValue(new DateTime(2020, 1, 1), 20.93),
            new GdpValue(new DateTime(2019, 1, 1), 21.43),
            new GdpValue(new DateTime(2018, 1, 1), 20.58),
            new GdpValue(new DateTime(2017, 1, 1), 19.391),
            new GdpValue(new DateTime(2016, 1, 1), 18.624),
            new GdpValue(new DateTime(2015, 1, 1), 18.121),
            new GdpValue(new DateTime(2014, 1, 1), 17.428),
            new GdpValue(new DateTime(2013, 1, 1), 16.692),
            new GdpValue(new DateTime(2012, 1, 1), 16.155),
            new GdpValue(new DateTime(2011, 1, 1), 15.518),
            new GdpValue(new DateTime(2010, 1, 1), 14.964)
        );
        GdpValueForChina = new CountryGdp(
            "China",
            new GdpValue(new DateTime(2020, 1, 1), 14.72),
            new GdpValue(new DateTime(2019, 1, 1), 14.34),
            new GdpValue(new DateTime(2018, 1, 1), 13.89),
            new GdpValue(new DateTime(2017, 1, 1), 12.238),
            new GdpValue(new DateTime(2016, 1, 1), 11.191),
            new GdpValue(new DateTime(2015, 1, 1), 11.065),
            new GdpValue(new DateTime(2014, 1, 1), 10.482),
            new GdpValue(new DateTime(2013, 1, 1), 9.607),
            new GdpValue(new DateTime(2012, 1, 1), 8.561),
            new GdpValue(new DateTime(2011, 1, 1), 7.573),
            new GdpValue(new DateTime(2010, 1, 1), 6.101)
        );
        GdpValueForJapan = new CountryGdp(
            "Japan",
            new GdpValue(new DateTime(2020, 1, 1), 4.888),
            new GdpValue(new DateTime(2019, 1, 1), 5.082),
            new GdpValue(new DateTime(2018, 1, 1), 4.955),
            new GdpValue(new DateTime(2017, 1, 1), 4.872),
            new GdpValue(new DateTime(2016, 1, 1), 4.949),
            new GdpValue(new DateTime(2015, 1, 1), 4.395),
            new GdpValue(new DateTime(2014, 1, 1), 4.850),
            new GdpValue(new DateTime(2013, 1, 1), 5.156),
            new GdpValue(new DateTime(2012, 1, 1), 6.203),
            new GdpValue(new DateTime(2011, 1, 1), 6.156),
            new GdpValue(new DateTime(2010, 1, 1), 5.700)
        );
    }
}

public class CountryGdp {
    public string CountryName { get; }
    public IList<GdpValue> Values { get; }

    public CountryGdp(string country, params GdpValue[] values) {
        this.CountryName = country;
        this.Values = new List<GdpValue>(values);
    }
}

public class GdpValue {
    public DateTime Year { get; }
    public double Value { get; }

    public GdpValue(DateTime year, double value) {
        this.Year = year;
        this.Value = value;
    }
}

In the MainPage.xaml file, incorporate three LineSeries objects into the ChartView.Series collection. To establish a connection between the series and data, assign each LineSeries object's Data property to a SeriesDataAdapter object. Utilize the adapter's properties to indicate the data source and fields containing arguments and values for each series.

Additionally, define a local XAML namespace referring to a CLR namespace encompassing the view model. Subsequently, employ the page's BindingContext property to link the view model with the view.
<ContentPage xmlns="http://schemas.microsoft.com/dotnet/2021/maui"
             xmlns:x="http://schemas.microsoft.com/winfx/2009/xaml"
             xmlns:dxc="clr-namespace:DevExpress.Maui.Charts;assembly=DevExpress.Maui.Charts"
             xmlns:ios="clr-namespace:Microsoft.Maui.Controls.PlatformConfiguration.iOSSpecific;assembly=Microsoft.Maui.Controls"
             ios:Page.UseSafeArea="True"
             xmlns:local="clr-namespace:MauiDevExpress"
             x:Class="MauiDevExpress.MainPage">
    <ContentPage.BindingContext>
        <local:ViewModel/>
    </ContentPage.BindingContext>
    <dxc:ChartView>
        <dxc:ChartView.Series>
            <dxc:LineSeries DisplayName="{Binding GdpValueForUSA.CountryName}">
                <dxc:LineSeries.Data>
                    <dxc:SeriesDataAdapter DataSource="{Binding GdpValueForUSA.Values}"
                                           ArgumentDataMember="Year">
                        <dxc:ValueDataMember Type="Value" Member="Value"/>
                    </dxc:SeriesDataAdapter>
                </dxc:LineSeries.Data>
            </dxc:LineSeries>

            <dxc:LineSeries DisplayName="{Binding GdpValueForChina.CountryName}">
                <dxc:LineSeries.Data>
                    <dxc:SeriesDataAdapter DataSource="{Binding GdpValueForChina.Values}"
                                           ArgumentDataMember="Year">
                        <dxc:ValueDataMember Type="Value" Member="Value"/>
                    </dxc:SeriesDataAdapter>
                </dxc:LineSeries.Data>
            </dxc:LineSeries>

            <dxc:LineSeries DisplayName="{Binding GdpValueForJapan.CountryName}">
                <dxc:LineSeries.Data>
                    <dxc:SeriesDataAdapter DataSource="{Binding GdpValueForJapan.Values}"
                                           ArgumentDataMember="Year">
                        <dxc:ValueDataMember Type="Value" Member="Value"/>
                    </dxc:SeriesDataAdapter>
                </dxc:LineSeries.Data>
            </dxc:LineSeries>
        </dxc:ChartView.Series>
    </dxc:ChartView>
</ContentPage>

Configure the X-axis to display labels for years by assigning a DateTimeAxisX object with the specified settings to the ChartView.AxisX property.
<dxc:ChartView> <dxc:ChartView.AxisX>
    <dxc:DateTimeAxisX MeasureUnit="Year" GridAlignment="Year"
    GridSpacing="2"/> </dxc:ChartView.AxisX> </dxc:ChartView>


Configure the title and labels on the Y-axis. Set the ChartView.AxisY property to a NumericAxisY object and specify this object’s Title and Label properties.
<dxc:ChartView>
<!-- The X-axis config is here. -->
    <dxc:ChartView.AxisY>
        <dxc:NumericAxisY>
            <dxc:NumericAxisY.Title>
                <dxc:AxisTitle Text="Trillions of US$">
                    <dxc:AxisTitle.Style>
                        <dxc:TitleStyle>
                            <dxc:TitleStyle.TextStyle>
                                <dxc:TextStyle Size="16"/>
                            </dxc:TitleStyle.TextStyle>
                        </dxc:TitleStyle>
                    </dxc:AxisTitle.Style>
                </dxc:AxisTitle>
            </dxc:NumericAxisY.Title>
            <dxc:NumericAxisY.Label>
                <dxc:AxisLabel TextFormat="#.#" Position="Inside"/>
            </dxc:NumericAxisY.Label>
        </dxc:NumericAxisY>
    </dxc:ChartView.AxisY>
</dxc:ChartView>

Configure the legend position and orientation. Set the ChartView.Legend property to a Legend object, and specify this object’s properties as follows.
<dxc:ChartView>
    <dxc:ChartView.Legend>
        <dxc:Legend VerticalPosition="TopOutside"
                    HorizontalPosition="Center"
                    Orientation="LeftToRight"/>
    </dxc:ChartView.Legend>
</dxc:ChartView>

Establish the chart to showcase a series point hint as a crosshair cursor by setting the ChartView.Hint property to a Hint object and assigning a CrosshairHintBehavior object to Hint.Behavior. Subsequently, define the hint's content, data format, and visibility options. Set the LineSeries.HintOptions property to a SeriesCrosshairOptions object with the specified settings.
<ContentPage.Resources>
    <dxc:SeriesCrosshairOptions x:Key="lineSeriesHintOptions"
                                PointTextPattern="{}{S}: {V}M"
                                ShowInLabel="True"
                                AxisLabelVisible="True"
                                AxisLineVisible="True"/>
</ContentPage.Resources>
<dxc:ChartView>
    <dxc:ChartView.Hint>
        <dxc:Hint>
            <dxc:Hint.Behavior>
                <dxc:CrosshairHintBehavior GroupHeaderTextPattern="{}{A$YYYY}"
                                           MaxSeriesCount="3"/>
            </dxc:Hint.Behavior>
        </dxc:Hint>
    </dxc:ChartView.Hint>

    <dxc:ChartView.Series>
        <dxc:LineSeries HintOptions="{StaticResource lineSeriesHintOptions}">
            <!--Series Data-->
        </dxc:LineSeries>
        <dxc:LineSeries HintOptions="{StaticResource lineSeriesHintOptions}">
            <!--Series Data-->
        </dxc:LineSeries>
        <dxc:LineSeries HintOptions="{StaticResource lineSeriesHintOptions}">
            <!--Series Data-->
        </dxc:LineSeries>
    </dxc:ChartView.Series>
</dxc:ChartView>


Set the LineSeries.MarkersVisible property to True to display point markers. To change the line series appearance, set the LineSeries.Style property to a LineSeriesStyle object. This object’s Stroke, StrokeThickness, MarkerSize, and MarkerStyle properties allow you to configure the appearance of the series line and point markers.
<dxc:LineSeries MarkersVisible="True">
    <!--Series Data-->
    <dxc:LineSeries.Style>
        <dxc:LineSeriesStyle Stroke="#7145a7" StrokeThickness="2" MarkerSize="8">
            <dxc:LineSeriesStyle.MarkerStyle>
                <dxc:MarkerStyle Fill="#7145a7"/>
            </dxc:LineSeriesStyle.MarkerStyle>
        </dxc:LineSeriesStyle>
    </dxc:LineSeries.Style>
</dxc:LineSeries>


ASP.NET Core 8 Hosting - HostForLIFE.eu :: Integrate Health Checks Into a.NET Core Program

clock January 25, 2024 07:05 by author Peter

The following describes how to incorporate health checks into a.NET Core application:

1. Set up the NuGet package for Health Checks
You must install Microsoft.Extensions.Diagnostics in your project.The NuGet package HealthChecks. You can accomplish this by include the package reference in your project file or by using the Package Manager Console:
dotnet add package Microsoft.Extensions.Diagnostics.HealthChecks

2. Configure Health Checks
In your Startup.cs file, configure the health checks in the ConfigureServices method:
using Microsoft.AspNetCore.Builder;
using Microsoft.Extensions.DependencyInjection;
using Microsoft.Extensions.Diagnostics.HealthChecks;

public class Startup
{
    public void ConfigureServices(IServiceCollection services)
    {
        services.AddHealthChecks();
        // Add other services...
    }

    public void Configure(IApplicationBuilder app)
    {
        app.UseRouting();

        app.UseEndpoints(endpoints =>
        {
            endpoints.MapHealthChecks("/health");
            // Map other endpoints...
        });
    }
}

A health check endpoint at /health is configured in this example.

3. Explain Health Examinations

By including checks for other components, you can define health checks. You may wish to verify the state of an external API, a database connection, or any other crucial element. These checks can be included in the ConfigureServices method:
public void ConfigureServices(IServiceCollection services)
{
    services.AddHealthChecks()
        .AddSqlServer("YourConnectionString", name: "DatabaseHealthCheck")
        .AddUrlGroup(new Uri("https://api.example.com"), name: "ApiHealthCheck");
    // Add other services...
}

4. Execute and Verify
Launch your application at this point, and go to the health check endpoint (http://localhost:5000/health, for example). A JSON response with the status of each health check ought to appear.

In summary

  • The status of each check and any further information you supply are usually included in health check responses.
  • Health checks can be modified and expanded to meet your unique needs.

It's a good idea to include health checks if you want to make sure that your.NET Core application is reliable, particularly in production scenarios where you want to keep an eye on any problems and take proactive measures to address them.


ASP.NET Core 8 Hosting - HostForLIFE.eu :: Difference between .NET 7 and .NET 8

clock January 18, 2024 06:18 by author Peter

The differences between.NET 7 and.NET 8 can be better understood by contrasting their compatibility, integration powers, performance, and diagnostic features. A thorough grasp of these frameworks can also be attained by exploring the new features added in.NET 8 and comparing them with those of.NET 7. Examining these specifics can help identify the best version of the Microsoft.NET framework.

The improvements in.NET 8 constitute a noteworthy achievement for Microsoft, offering an extensive feature set with the goals of strengthening security, enhancing performance, enabling smooth integration, and streamlining maintenance. The question of whether the new features in.NET 8 are superior to those in.NET 7 is still up for dispute.

Examining the main distinctions between.NET 7 and.NET 8 is essential to obtain understanding and make wise choices about a possible upgrade. With the clarity this article will offer, it will be possible to comprehend the advantages and improvements brought forth by.NET 8.

Despite being created by Microsoft,.NET 8 and.NET 7 differ significantly. We've divided up their differences into categories based on a number of important factors, such as integration capabilities, cross-platform compatibility, performance, diagnostics, observability, and support services. It will enable you to fully comprehend how the two differ from one another.

1. Enhancements in Performance
Performance is one of the most important factors that developers consider when assessing technology for building applications. Notably,.NET 8 exhibits better optimization than.NET 7 in terms of speed and efficiency. A JIT (Just-In-Time) compiler is used by the Microsoft.NET framework in both versions, but in.NET 8, substantial improvements have been made to speed up code processing, leading to faster process execution and shorter loading times.

Furthermore, significant improvements to the runtime environment and garbage collector in.NET 8 also add to increased efficiency. With these improvements, companies can save a great deal of resources and maintain high performance even during busy hours.

2. Development Across Platforms

When it comes to facilitating the development of cross-platform compatible applications,.NET 8 outperforms.NET 7. .NET 8 is notably more capable than.NET 7 of facilitating the creation of programs customized for different hardware intrinsics.

  • AVX-512
  • Vector 512
  • Optimized support for ARM64 and WebAssembly

These enhancements expand the accessibility of your program, making it available to a larger range of users on desktop and mobile devices, covering a variety of operating systems such as Windows, Linux, macOS, and other platforms.

3. Assistance for Platforms
For every.NET version, Microsoft offers different support durations based on two main policies: LTS (Long Term Support) and STS (Short Term Support). Long Term Support (LTS) for the.NET 8 version ensures Microsoft's assistance from November 14, 2023, to November 10, 2026. On the other hand, May 14th, 2024 is when support for the Dotnet 7 version is supposed to end. Selecting.NET 8 guarantees improved upkeep and durability for the well-being of your program.


Version Latest patch version Patch release date Release type Support phase End of support
.NET 8 8.0.0 November 14, 2023 LTS Active November 10, 2026
.NET 7 7.0.14 November 14, 2023 STS Active May 14, 2024

4. Consolidation
In contrast to.NET 7, which necessitates that developers create unique code in order to integrate with APIs and other components,.NET 8 provides more convenience. Major integrated development environments, APIs, and services are all pre-supported by default. Additionally, the debugging features have been much enhanced, enabling better process execution and problem correction with less time commitment.

New Features in.NET 8

Now that we know why.NET 8 is better than.NET 7, it's imperative that you be familiar with all of its key characteristics. Comprehending these fundamental features of.NET 8 is essential as it confirms its place as a reliable technology for application development, outperforming.NET 7.

1. An improved source generator
When it comes to earlier iterations, the source generator included in.NET 8 is a major improvement. Microsoft has made significant improvements to System.Text.Json, bringing it closer to parity with the reflection-based serializer. Among the improvements included in.NET 8 are:

  • Support for the "init" and "required" properties when using the source generator to serialize types.
  • source-generated code formatted more neatly and systematically.
  • Two new diagnoses, SYSLIB1034 and SYSLIB1039, have been added.
  • Support for JsonStringEnumConverter<TEnum> is integrated into.NET 8.

2. Original AOT
By compiling only the essential parts rather than the complete codebase,.NET 8 apps improve code use with native AOT (Ahead-of-Time) compilation.

For instance, just the code specifically responsible for the login feature will be used when a user enters in with a.NET 8 application; the rest of the codebase stays in its current configuration. Thus, there are several benefits to this strategy.

  • Elimination of the need for a Just-In-Time compiler.
  • It increased the loading speed.
  • Conservation of network and memory resources.
  • Reduced execution time and resource costs.
  • Improved user experience and satisfaction.

3. Enhanced Artificial Intelligence Skills
AI integration is now more stable, quick, and smooth with.NET 8. The AI components in.NET 8 are the outcome of multiple technologies working together, including Qdrant, Microsoft Teams, Azure OpenAI, Milvus, and Azure Cognitive Search. Together, these many technological advances enable.NET 8 applications to leverage sophisticated artificial intelligence (AI) capabilities, producing outputs that are accurate and exact.
  
4. Elevated .NET MAUI
.NET 8 brings significant enhancements to .NET MAUI. Now, a single codebase caters to API 34 and XCode 15, enabling seamless operation of your .NET MAUI application across WinUI, iOS, Android, and Mac Catalyst systems.

5. SHA-3 Hashing Primitives
Compared to .NET 7, the security enhancements in .NET 8 are notably robust. It introduces support for configuring the SHA-3 hashing algorithm, ensuring compatibility with APIs that complement SHA-3 within your .NET 8 applications. The SHA-3 cryptography algorithms available in .NET 8 include.

  • SHA3_256, SHA3_384, and SHA3_512 (for Hashing purposes)
  • HMACSHA3_256, HMACSHA3_384, and HMACSHA3_512 (for HMAC usage)
  • HashAlgorithmName.SHA3_256, HashAlgorithmName.SHA3_384, and HashAlgorithmName.SHA3_512 (for developer-configurable algorithm settings)
  • RSAEncryptionPadding.OaepSHA3_256, RSAEncryptionPadding.OaepSHA3_384, and RSAEncryptionPadding.OaepSHA3_512 (for RSA OAEP encryption)

6. HTTPS Proxy

Support: Man-in-the-middle attacks are prevented with HTTPS proxy support, which.NET 8 brings to improve the security of client connections. By creating encrypted communication channels, this function protects the confidentiality and integrity of data.

Should you upgrade from .NET 7 to .NET 8?

Considering the analysis of various factors, .NET 8 is more advanced and proficient than .NET 7. So, you should upgrade your application to .NET 8.

Conclusion

.NET 8 stands out as a remarkable software development technology by Microsoft, surpassing .NET 7 in every aspect. From performance and integration to C# code compilation, observability, and support, .NET 8 excels in every aspect when compared. Moreover, .NET experts and professionals widely endorse .NET 8 for their projects.


ASP.NET Core 8 Hosting - HostForLIFE.eu :: How Can I Make.NET Channels?

clock January 8, 2024 05:58 by author Peter

An essential feature to the asynchronous programming paradigm in.NET is channels. They offer a thread-safe method of data transfer between producers and consumers, improving application performance and scalability. The System is the foundation of channels.Threading.Namespaces and channels provide an adaptable and effective way to communicate.

How to Make a Channel in.NET?
To get started, let's develop a basic example that shows how to use and create a channel in.NET 8.0.

using System.Threading.Channels;

Console.WriteLine("Channels In .NET");

// Create an unbounded channel
var channel = Channel.CreateUnbounded<int>();

// Producer writing data to the channel
async Task ProduceAsync()
{
    for (int i = 0; i < 5; i++)
    {
        await channel.Writer.WriteAsync(i);
        Console.WriteLine($"Produced: {i}");
    }
    channel.Writer.Complete();
}

// Consumer reading data from the channel
async Task ConsumeAsync()
{
    while (await channel.Reader.WaitToReadAsync())
    {
        while (channel.Reader.TryRead(out var item))
        {
            Console.WriteLine($"Consumed: {item}");
        }
    }
}

// Run producer and consumer asynchronously
var producerTask = ProduceAsync();
var consumerTask = ConsumeAsync();

// Wait for both tasks to complete
await Task.WhenAll(producerTask, consumerTask);

Console.ReadLine();

An explanation of the example:

  • Using Channel, we construct an infinite channel of integers.ConstructUnbounded<int>().
  • As the producer, the ProduceAsync() method uses a channel to write data to the channel.Author.Use WriteAsync().
  • As the consumer, the ConsumeAsync() method uses the channel to read data from it.Peruser.TryRead().
  • Task allows both producer and consumer tasks to run asynchronously.WhenAll() to await their finish

Channel Properties in.NET
There are various options available with.NET Channels to manage data flow:

  • Boundary and Non-Boundary Channels: You can decide whether to let an infinite amount of objects through or restrict the capacity of the channel.
  • Completion: Use the channel to indicate that the channel is finished.Author.To indicate that the data stream has ended, use Complete().
  • Cancellation: To manage the channel activities lifetime, use cancellation tokens.
  • numerous Writers/Readers: Use channels to properly support numerous writers or readers.


ASP.NET Core 8 Hosting - HostForLIFE.eu :: Beginning Your NodaTime Journey

clock December 11, 2023 06:52 by author Peter

A more complete and reliable substitute for the built-in DateTime and DateTimeOffset classes in the.NET Framework is the date and time management library NodaTime. It is intended to handle typical problems and intricacies related to changing dates and times.

Important aspects of NodaTime

  • Immutable Types: NodaTime represents dates, times, and durations using immutable types. This encourages the development of a more consistent and thread-safe programming model and aids in the prevention of accidental object change.
  • Rich number of Types: NodaTime offers a rich number of types, such as ZonedDateTime (a date and time in a particular time zone), LocalDate (a date without a time), Instant (a point on the timeline), and LocalTime (a time without a date).
  • Time Zones: NodaTime provides extensive time zone support, enabling developers to operate across time zones, carry out conversions, and manage changes in daylight saving time.
  • Duration and Period: To handle time spans and calendar discrepancies, respectively, more expressively and precisely, NodaTime provides the Duration and Period types.
  • Compatibility with.NET Platforms: NodaTime is made to function with the.NET Framework,.NET Core, and.NET 5/6, among other.NET platforms.
  • Improved Thread Safety: Reasoning about concurrent programs requiring date and time operations is made easier by the usage of immutable types.
  • NodaTime's extensibility enables developers to specify their own calendar systems and, if necessary, provide more time zone data.
  • Testing Support: NodaTime comes with features to make testing easier, like a FakeClock to manage time in unit tests.
NodaTime was developed to provide a more reliable and developer-friendly method of handling date and time in.NET programs by addressing some of the shortcomings and difficulties related to the DateTime and DateTimeOffset classes. When handling situations where exact control over time and time zones is necessary, it is quite helpful.

Noda Time aims for.NET Standard 1.3 and.NET 4.5. We don't utilize dynamic typing in the distributable libraries for optimal compatibility, although we do use it periodically in testing. Noda Time users do not require a current C# compiler, but we usually make advantage of language features as soon as they are made available in stable beta and general release. Although we make every effort to avoid adding external dependencies, using C# 7 tuples is currently not possible since System.ValueTuple would add another dependence.

How Do I Begin Using NodaTime?
1) Use the package manager console to perform the following command or install the NodaTime package/library from the Manage NuGet package. This is NodaTime's core library.
Install-Package NodaTime

2) Install the NodaTime Serialization package/library as below in the package manager console. This library is useful when serializing the NodaTime type.
Install-Package NodaTime.Serialization.JsonNet

3) Install the NodaTime Testing library for building the Unit test project.
Install-Package NodaTime.Testing

NodaTime properties
Instant

In NodaTime, Instant is a fundamental type representing an instantaneous point on the timeline. It is similar to DateTimeOffset in the .NET Framework but provides a more precise representation of time, particularly in scenarios where high precision is required.Install-Package NodaTime

2) Install the NodaTime Serialization package/library as below in the package manager console. This library is useful when serializing the NodaTime type.
Install-Package NodaTime.Serialization.JsonNet

3) Install the NodaTime Testing library for building the Unit test project.
Install-Package NodaTime.Testing

NodaTime properties
Instant

In NodaTime, Instant is a fundamental type representing an instantaneous point on the timeline. It is similar to DateTimeOffset in the .NET Framework but provides a more precise representation of time, particularly in scenarios where high precision is required.
Instant instant = SystemClock.Instance.GetCurrentInstant();
Console.WriteLine($"NodaTime Instant : {instant}");

Output. NodaTime Instant: 2023-12-08T05:22:05Z

Converting Instant type into UTC time.
Instant convertedToUtc = instant.InUtc().ToInstant();
Console.WriteLine($"NodaTime in UTC : {convertedToUtc}");

Output.
NodaTime in UTC: 2023-12-08T05:22:05Z

Getting Instant type with TimeZone specified.
Instant convertedToEastern = instant.InZone(DateTimeZoneProviders.Tzdb["America/New_York"]).ToInstant();
Console.WriteLine($"NodaTime in Zone : {convertedToEastern}");

Output. NodaTime in Zone: 2023-12-08T05:22:05Z

ZonedDateTime
'ZonedDateTime in NodaTime is a type that represents a specific date and time with an associated time zone. This is particularly useful for handling time-related information in a way that considers different time zones and daylight saving time changes.
ZonedDateTime zonedDateTime = instant.InZone(DateTimeZoneProviders.Tzdb["Europe/Berlin"]); //US/Pacific
Console.WriteLine($"NodaTime ZonedDateTime : {zonedDateTime}");


Output. NodaTime ZonedDateTime : 2023-12-08T06:22:05 Europe/Berlin (+01)

OffsetDateTime
'OffsetDateTime in NodaTime represents a date and time along with an offset from UTC (Coordinated Universal Time). This type is useful when you want to work with an absolute point in time while considering the offset from UTC.
OffsetDateTime offsetDateTime = OffsetDateTime.FromDateTimeOffset(dateTimeOffset);
Console.WriteLine($"NodaTime offsetDateTime : {offsetDateTime}");


Output. NodaTime offsetDateTime : 2023-12-08T10:52:05+05:30

LocalDateTime
'LocalDateTime in NodaTime represents a date and time without any specific time zone or offset from UTC. It's a combination of a LocalDate and a LocalTime. This type is suitable for situations where you want to work with a date and time without considering time zone-related adjustments.
LocalDateTime localDateTime = zonedDateTime.LocalDateTime;
Console.WriteLine($"NodaTime LocalDateTime : {localDateTime}");

Output. NodaTime LocalDateTime : 12/8/2023 6:22:05 AM

LocalDate
'LocalDate in NodaTime represents a date without considering any time zone or offset from UTC. It only consists of the year, month, and day components. This type is suitable for situations where you need to work with dates independently of time zones or daylight-saving time changes.
LocalDate LD = new LocalDate(1992, 05, 08);
Console.WriteLine($"LocalDate : {LD}");


Output. LocalDate : Friday, May 8, 1992

LocalTime

'LocalTime in NodaTime represents a time of day without any association with a specific time zone or offset from UTC. It captures the hour, minute, second, and fractional seconds of a given time, allowing you to work with time-related operations without considering time zone changes.
LocalTime LT = new LocalTime(8, 0, 0);
Console.WriteLine($"LocalTime : {LT}");


Output. LocalTime : 8:00:00 AM

Summary
NodaTime offers a robust and flexible solution for handling date and time in .NET applications, addressing many of the limitations and ambiguities present in the standard DateTime types.


ASP.NET Core 8 Hosting - HostForLIFE.eu :: C# Date and Time Formatting

clock November 28, 2023 06:29 by author Peter

DateTime Fundamentals in C#
Before we go into formatting, let's go over the fundamentals of working with DateTime in C#. The DateTime structure represents dates and times and provides methods for modifying and comparing dates. DateTime can be used to get the current date and time.DateTime can now be used to denote a specific date.DateTime or Parse.ParseExact.


DateTime Object Formatting
When it comes to turning DateTime objects into human-readable strings, the ToString method is the major player. To produce the desired output, you can use standard format specifiers or custom format strings.
Specifiers of Standard Format

You can use the ToString function with a set of standard format specifiers provided by C#.

C# provides a set of standard format specifiers that you can use with the ToString method.

    "d": Short date pattern
    "t": Short time pattern
    "f": Full date/time pattern (short time)
    "g": General date/time pattern (short time)
    "s": Sortable date/time pattern (ISO 8601)
    "u": Universal sortable date/time pattern (UTC)

DateTime now = DateTime.Now; string shortDate = now.ToString("d"); string fullDateTime = now.ToString("f");


Custom Format Strings
For more control over the formatting, you can use custom format strings.
    "yyyy": Four-digit year
    "MM": Two-digit month
    "dd": Two-digit day
    "HH": Two-digit hour (24-hour clock)
    "mm": Two-digit minute
    "ss": Two-digit second

DateTime now = DateTime.Now; string customFormat = now.ToString("yyyy-MM-dd HH:mm:ss");

Handling Time Zones
Dealing with time zones is a common challenge in programming. You can use the DateTime methods ToUniversalTime and ToLocalTime to convert between UTC and local time.
DateTime utcNow = DateTime.UtcNow; DateTime localTime = utcNow.ToLocalTime();

Example 1. Using Standard Format Specifiers
using System;

class Program
{
    static void Main()
    {
        DateTime now = DateTime.Now;

        // Short date pattern
        string shortDate = now.ToString("d");
        Console.WriteLine("Short Date: " + shortDate);

        // Full date/time pattern (short time)
        string fullDateTime = now.ToString("f");
        Console.WriteLine("Full Date/Time: " + fullDateTime);

        // Sortable date/time pattern (ISO 8601)
        string sortableDateTime = now.ToString("s");
        Console.WriteLine("Sortable Date/Time: " + sortableDateTime);
    }
}

Output
Short Date: 11/25/2023 Full Date/Time: Sunday, November 25, 2023 3:23 PM Sortable Date/Time: 2023-11-25T15:23:45
Example 2. Using Custom Format Strings
using System;

class Program
{
    static void Main()
    {
        DateTime now = DateTime.Now;

        // Custom format: yyyy-MM-dd HH:mm:ss
        string customFormat = now.ToString("yyyy-MM-dd HH:mm:ss");
        Console.WriteLine("Custom Format: " + customFormat);

        // Custom format: ddd, MMM dd yyyy
        string customFormat2 = now.ToString("ddd, MMM dd yyyy");
        Console.WriteLine("Custom Format 2: " + customFormat2);
    }
}

Output

Custom Format: 2023-11-25 15:23:45
Custom Format 2: Sun, Nov 25 2023

Experiment with various format strings and tailor them to your specific needs and tastes. Customizing the format enables you to display dates and times in the manner that is most appropriate for your application or user interface.

Conclusion

Date and time formatting in C# is an essential skill for any developer. Understanding the subtleties of DateTime formatting is critical whether you're presenting dates in a user interface, logging events, or dealing with time-sensitive data. Experiment with alternative format specifiers, develop custom formats, and take time zone differences into account to guarantee your apps handle dates and times correctly and logically. You're well-equipped to tackle the problems of managing temporal data in C# with these skills in your toolbox. Have fun coding!


ASP.NET Core 8 Hosting - HostForLIFE.eu :: Using Rebus and RabbitMQ to Implement the Saga Pattern

clock November 24, 2023 07:08 by author Peter

Maintaining consistency across numerous processes can be difficult in the world of distributed systems and microservices architecture. The Saga pattern saves the day by managing a series of distributed transactions to ensure data consistency without relying on a two-phase commit process. In this post, we'll look at how to implement the Saga pattern with Rebus, a versatile.NET messaging package, and RabbitMQ, a sophisticated message broker.

What exactly is the Saga Pattern?
The Saga pattern, at its core, maintains a chain of local transactions, with each step representing a transaction involving distinct services or components. If any step fails, compensating actions are taken to ensure overall consistency.

Sagas ensure that either all operations within the sequence succeed or, in the case of failure, the system reverts to a consistent state by executing compensating actions.
Using Rebus and RabbitMQ

Setting Up Rebus and RabbitMQ

To begin, install the necessary packages using NuGet.
Install-Package Rebus
Install-Package Rebus.RabbitMQ

Next, configure Rebus and RabbitMQ:
var configurer = Configure.With(...)
    .Transport(t => t.UseRabbitMq("amqp://localhost", "saga-example"))
    .Start();


Implementing a Saga
Let's consider a hypothetical e-commerce scenario where a customer places an order consisting of multiple steps: reserve items, charge payment, and ship items. We'll implement a saga to manage these operations.
public class OrderSagaData
{
    public Guid OrderId { get; set; }
    public bool ItemsReserved { get; set; }
    public bool PaymentCharged { get; set; }
    public bool ItemsShipped { get; set; }
}

public class OrderSaga : Saga<OrderSagaData>,
    IAmInitiatedBy<PlaceOrder>,
    IHandleMessages<ReserveItems>,
    IHandleMessages<ChargePayment>,
    IHandleMessages<ShipItems>
{
    // Saga implementation here
}


Handling Messages in the Saga
Each message represents a step in the saga. For instance, the PlaceOrder message initiates the saga.
public class PlaceOrder
{
    public Guid OrderId { get; set; }
    public List<Item> Items { get; set; }
}

public async Task Handle(PlaceOrder message)
{
    Data.OrderId = message.OrderId;
    // Reserve items logic
    Bus.Send(new ReserveItems { OrderId = message.OrderId, Items = message. Items });
}


Similarly, other messages like ReserveItems, ChargePayment, and ShipItems are handled within the saga, managing the respective operations and updating saga data accordingly.

Compensating Actions

Should any step fail, compensating actions ensure the system maintains consistency. For instance, if charging payment fails, a compensating action might be implemented as follows.
public async Task Handle(ChargePayment message)
{
    // Charge payment logic
    if (paymentFailed)
    {
        // Execute compensating action
        Bus.Send(new CancelOrder { OrderId = Data.OrderId });
    }
}


Implementing the Saga pattern using Rebus and RabbitMQ offers a powerful way to manage distributed transactions and maintain data consistency in a microservices architecture. By orchestrating a sequence of steps and incorporating compensating actions, sagas ensure system integrity despite failures within the distributed environment.


About HostForLIFE.eu

HostForLIFE.eu is European Windows Hosting Provider which focuses on Windows Platform only. We deliver on-demand hosting solutions including Shared hosting, Reseller Hosting, Cloud Hosting, Dedicated Servers, and IT as a Service for companies of all sizes.

We have offered the latest Windows 2016 Hosting, ASP.NET Core 2.2.1 Hosting, ASP.NET MVC 6 Hosting and SQL 2017 Hosting.


Tag cloud

Sign in