European ASP.NET 4.5 Hosting BLOG

BLOG about ASP.NET 4, ASP.NET 4.5 Hosting and Its Technology - Dedicated to European Windows Hosting Customer

ASP.NET 5 Hosting - HostForLIFE.eu :: Implementing Cookie Authentication in ASP.NET 5

clock June 9, 2016 20:03 by author Anthony

In this tutorial, I'm going to explain about cookie based authentication in ASP.NET 5. I am implementing a cookie authentication in ASP.NET MVC application. Similar to other middleware components in ASP.NET, Cookie Authentication is also a middleware component, which you need to plug into ASP.NET pipeline.

For implementing cookie authentication, you require reference of Cookie middleware, here is the project.json file.
{
    "dependencies": {
        "Microsoft.AspNet.Diagnostics": "1.0.0-beta1",
        "Microsoft.AspNet.Hosting": "1.0.0-beta1",
        "Microsoft.AspNet.Mvc": "6.0.0-beta1",
        "Microsoft.AspNet.Server.WebListener": "1.0.0-beta1",
        "Microsoft.AspNet.Security": "1.0.0-beta1",
        "Microsoft.AspNet.Security.Cookies": "1.0.0-beta1",
        "Microsoft.AspNet.StaticFiles": "1.0.0-beta1",
    },
    "commands": {
        "web": "Microsoft.AspNet.Hosting --server Microsoft.AspNet.Server.WebListener --server.urls http://localhost:5001"
    },
     "frameworks": {
        "aspnet50": {}
  }
}


All the components used in this project are available in ASP.NET Core Framework as well.

Now you need to plug the Cookie authentication module to use in ASP.NET pipeline, you can do this via Startup.cs file.

public class Startup
{
    public void Configure(IApplicationBuilder app)
    {
        app.UseErrorPage();
 
        app.UseServices(services =>
        {
            services.AddMvc();
        });
     
        app.UseCookieAuthentication(options => {
            options.LoginPath = new PathString("/Home/Login");
        });
        app.UseMvc();                       
    }       
}


Now, you need to apply the Authorize filter to protect resources, I am applying it in the class level. When there is a unauthorized request to such resource, filter returns 401 and the cookie middleware redirects to /Home/Login.

Note: You need to set the LoginPath property explicitly, otherwise it may not redirect.

Authorize]
public class HomeController : Controller
{
    public IActionResult Index()
    {
        return View();
    }
}


And here is the Login action method, this code is for illustration purpose only, I not validating against database, if username and password matches the hard coded credentials, identity is established with that username.

[AllowAnonymous]
public IActionResult Login()
{
    return View();
}
 
[HttpPost, AllowAnonymous]
public IActionResult Login(User user)
{
    if(user.UserName == "admin" && user.Password == "Password")
    {
        var claims = new[]
        {
            new Claim("name", user.UserName)
        };
        var identity = new ClaimsIdentity(claims,
            CookieAuthenticationDefaults.AuthenticationType);
        Context.Response.SignIn(identity);
 
        return Redirect("~/");
    }
    else
    {
        ModelState.AddModelError("LogOnError",
            "The user name or password provided is incorrect.");
    }
    return View(user);
}
 
public IActionResult Logout()
{
    Context.Response.SignOut
    (CookieAuthenticationDefaults.AuthenticationType);
    return View("Login");
}


And here is the Login view

@using(Html.BeginForm())
{
    @Html.LabelFor(model => model.UserName)
    @Html.EditorFor(model => model.UserName)
    @Html.LabelFor(model => model.Password)
    @Html.PasswordFor(model => model.Password)
    <input type="submit" value="Sign In" />
    <br/>
    @Html.ValidationMessage("LogOnError")
}


To verify the implementation, install the required packages using kpm restore command, once it finishes, execute k web command. If web server is started, browse http://localhost:5001/, which will redirect to /Home/Login page, where you can enter the credentials, you will redirect back to /Home/Index page.

HostForLIFE.eu ASP.NET 5 Hosting
European best, cheap and reliable ASP.NET hosting with instant activation. HostForLIFE.eu is #1 Recommended Windows and ASP.NET hosting in European Continent. With 99.99% Uptime Guaranteed of Relibility, Stability and Performace. HostForLIFE.eu security team is constantly monitoring the entire network for unusual behaviour. We deliver hosting solution including Shared hosting, Cloud hosting, Reseller hosting, Dedicated Servers, and IT as Service for companies of all size.


HostForLIFE.eu supports ASP.NET State Server Service for session :: Moving Session Out-of-Process with StateServer

clock June 2, 2016 20:47 by author Peter

Recently suddenly met a problem with the ASP.NET SessionState. It isn’t a fault of the SessionState itself, but likely a problem with my configuration or uses. Essentially the state was being reset too often. Although I had a timeout value of 1440 minutes, users were getting kicked out after 10-15 minutes. I eventually found out that (for some reason) the IIS worker process was being reset (although it wasn’t configured to self-reset), probably due to an unrecoverable  error in a number of our legacy-based code. And since our SessionState was set to InProc, all of the session data was stored in-the-process and was thus lost whenever it died.

I started researching the alternatives and discovered the proper way to configure the StateServer that comes with ASP.NET to move your sessions out-of-process. This way, you'll literally reset IIS (or if the StateServer is on another machine, reboot your IIS server machine) while not losing session. This seemed like a very appealing situation, and one that many people online endorse as best practice. Another benefit of moving the SessionState out-of-process is that you set yourself up nicely for eventually moving to multiple web servers, or even running simultaneous multiple instances of your application pools on the same machine to spice up performance.

Let’s start from the top. The SessionState is a collection of data that is persisted across multiple web requests to ASP.NET. This can be authentication information, a shopping cart, a theme, or whatnot – essentially any information that you want the server to remember for the next time the user “does something” on your site. This can also be accomplished on the page level with ViewState, but that sends more data back and forth between the client and your server.

If you’re using the cookie method of “tagging” your SessionState (which you should, because cookieless is vulnerable to session hijacking), you’ll have a tiny little harmless cookie called ASP.NET_SessionId which contains a unique session ID that looks something like “okeiohntcofecw55svocxwiz”. This ID is sent to the web server to let the server know which session to retrieve.

If the SessionState is running InProc, all ASP.NET has to do is look at the memory it has of that session information and retrieve or set the values required. However, if that process gets reset (due to an IIS reset, power outage, reboot, failed process, etc) then it no longer has a record of that session information, so that SessionId is no longer valid and the user is “kicked off”.

Additionally, if you increase the number of worker processes per application pool, thinking you’ll be getting better performance on a multiprocessor server, you’ll find that the users continually get kicked off, because each process doesn’t know about the session state of the other so they continually reset the session on each other. This is the same problem you’ll encounter if you try to move to two load-balanced web servers.

The StateServer Solution
Included with .NET is a Windows service called the ASP.NET State Service. This is disabled by default, so if you’re reading this far you may not know about it. This service runs as an additional process so that if the IIS worker process gets reset, the state service is still running with all the session information.

You can even run this State Service on another Windows Server machine. This way, you can have one machine managing your session state, while you can have one or more web servers handling requests. An example situation might look something like this:

(I was trying to find a shape to use for the StateServer to differentiate it from the others… and I chose the “eCommerce Server” shape. As in cash = cache… get it?)

Even though that might be what a more advanced operation might look like, you will likely (such as in development or for a small-load web server) run the StateServer on the same machine as IIS.

Keep in mind that the SessionState is still being stored in memory with the StateServer solution… there’s no persisting of the state to disk. So if the StateServer process gets restarted or rebooted, so does your session information.

The SQL Server Solution
Another solution supported natively by ASP.NET is to use SQL Server to persist state information to disk. This way, even the server handling your state can be rebooted without losing session. This may be the preferred way of doing things for very high-end operations or situations where you need to maintain that information for security or contractual purposes. However, I will not be discussing that here, because I haven’t tried it myself. There’s many resources to learn about this on the web, such as this article from Microsoft.

Enabling StateServer
To enable the ASP.NET State Service, all you have to do is configure the service on both your development and production machines.
Click Start / Run or type Win + R.

  1.     Type in services.msc and press Enter or click OK.
  2.     Locate the ASP.NET State Service in the Services (local) list.
  3.     Right click on it and choose Properties.
  4.     Change the Startup Type to Automatic so that it starts on boot.
  5.     Click the Start button to get it started now.
  6.     Click OK to close the dialog.

Now, if you pull up Task Manager, you’ll notice a nice little aspnet_state.exe process running in addition to the IIS worker process (w3wp.exe). This process is the new StateServer that will maintain all your state data. But in order to use it, we must enable your ASP.NET web site to use the out-of-process StateServer.
Modifying your Web.Config

For the site that you’d like to have use the out-of-process StateServer, first open your web.config file for that site.

Locate (or add) a sessionState element in the system.web section of the config file, like this:

Note the cookieless=”UseCookies” and mode=”StateServer” attributes. These are required to use the StateServer in a cookie’d fashion.

The timeout attribute is the time, in minutes, that you want the session to remain valid.

Also note that this example above is for the StateServer running on the same machine as IIS. With no connection string specified, it looks for a StateServer running on the local machine. If you need to move the StateServer onto another machine, you must match up your MachineKeys and set a StateServer connection string for IIS to connect to. Google is your friend.

Now, your site should be using the StateServer for all of its session data. You may (or may not, but it might be a good idea) need to restart IIS for this to be optimally configured.

Non-Serializable Session Data
The only caveat in this post, and it’s a big one, is that you will receive an error if you try to store non-Serializable data into the session now that you have an out-of-process state (i.e. a System.Data.DataView). Serializable classes are those that have the Serializable attribute set and are optimized for serialization (i.e. a System.Data.DataTable).

You will need to review and test your code (or write new code accordingly) to make sure that you are not storing non-Serializable data to your session when using out-of-process state. If you are using custom classes to store session data, review them for serializable members and properties, and then mark them as serializable.

Final Thoughts
I’ve seen developers proclaim online that all ASP.NET devs should design their applications around an out-of-process session model, and now that I’ve discovered it, I am inclined to agree. If you design from the beginning to be compatible with a StateServer or SQL database state server, you can easily make the jump from one web server to two. A few things to think about are the amount of memory available to the state service, latency and the connection between servers if the StateService is running on another machine, and how to minimize state since it’s now being transferred between processes.

HostForLIFE.eu ASP.NET State Server
European best, cheap and reliable ASP.NET hosting with instant activation. HostForLIFE.eu is #1 Recommended Windows and ASP.NET hosting in European Continent. With 99.99% Uptime Guaranteed of Relibility, Stability and Performace. HostForLIFE.eu security team is constantly monitoring the entire network for unusual behaviour. We deliver hosting solution including Shared hosting, Cloud hosting, Reseller hosting, Dedicated Servers, and IT as Service for companies of all size.


ASP.NET 4.5 Hosting - HostForLIFE.eu :: Fixing ASP.NET 4.5 Register on Web Server

clock May 26, 2016 20:55 by author Anthony


NET 4.5 has not been registered on the Web server. You need to manually configure your Web server for ASP.NET 4.5. When making an ASP.NET website throughout IIS 7.5 in Visual Studio 2008/2010, you can find the following issue:

“ASP.NET 4.5 has not been registered on the Web server. You need to manually configure your Web server for ASP.NET 4.5 in order for your site to run correctly, Press F1 for more details”

This error usually occurs if you have installed IIS 7.x ‘after’ installing .NET. In order to resolve the error, do the following:

Step 1: Open Control Panel > Programs > Turn Windows Features on or off > Internet Information Services > World Wide Web Services > Application development Feature

Check the box 'ASP.NET' . Also in the Web Management Tools, remember to select IIS 6 Management Compatibility and IIS Metabase as shown below.

Note: Make sure that you are running Visual Studio 2010 as Administrator.

Now run the site from Visual Studio 2010 using Ctrl + F5.

Step 2: If you further get the error “Handler "PageHandlerFactory-Integrated" has a bad module "ManagedPipelineHandler" in its module list” or Managed handler is used; however, ASP.NET is not installed or is not installed completely then do a Visual Studio 2010 repair.

Start > Programs > Accessories > Run. Type this command depending on the version of VS 2010 installed.

Silent Repair for 32-bit

%windir%\Microsoft.NET\Framework\v4.0.30319\SetupCache\Client\setup.exe /repair /x86 /x64 /ia64 /parameterfolder Client /q /norestart


Silent Repair for 64-bit

%windir%\Microsoft.NET\Framework64\v4.0.30319\SetupCache\Client\setup.exe /repair /x86 /x64 /ia64 /parameterfolder Client /q /norestart

That’s it. Restart IIS and the errors should be fixed.

Step 3: If the errors are not yet fixed, there could be an issue in the Application Pool. Follow these steps

1. Open IIS Manager (Run > Inetmgr) . Expand the server node and then click Application Pools

2. Now select the application pool that contains the application that you want to change. Go to Actions > View Applications.

3. Select the Application pool to change > In Action Pane, click on ‘Change Application Pool’

4. In the ‘Select Application Pool’ dialog box, select the application pool associated with .NET 4.0 from the Application pool list and then click OK.


HostForLIFE.eu ASP.NET 4.5 Hosting
European best, cheap and reliable ASP.NET hosting with instant activation. HostForLIFE.eu is #1 Recommended Windows and ASP.NET hosting in European Continent. With 99.99% Uptime Guaranteed of Relibility, Stability and Performace. HostForLIFE.eu security team is constantly monitoring the entire network for unusual behaviour. We deliver hosting solution including Shared hosting, Cloud hosting, Reseller hosting, Dedicated Servers, and IT as Service for companies of all size.


ASP.NET Core 1.0 Hosting - HostForLIFE.eu :: How To Make DropDown List with ASP.NET Core WEB API and AngularJS 2 ?

clock May 22, 2016 05:48 by author Anthony

In this post, we take it to next level and implement it with ASP.NET Core Web API and AngularJS 2. But starting/configuring AngularJS 2 with ASP.NET Core is not straight forward and it requires some manual configurations to be done. If you are not sure how to do it, I recommend you to read this helpful post to find out post how to start with AngularJS 2 in ASP.NET Core with TypeScript using Visual Studio 2015.

Cascading DropDown List with ASP.NET Core WEB API and AngularJS 2

I believe now you have an idea about starting with AngularJS 2. I also followed same steps to configure this demo project as mentioned. So now let’s move to next part. Please note, I selected the “Web application template” while creating the project but removed all the unnecessary code.

Add Models classes in Models folder

First, add Country and State model classes in Models folder. Following is the code for Country.cs. This class has 2 properties and a method which returns a list of countries. For demo, I used static data but you can also get the same list from database.

public class Country
{
    public int id { get; set; }
    public string name { get; set; }

    public Country(int CountryID, string CountryName)
    {
        id = CountryID;
        name = CountryName;
    }

    public static List<Country> GetAllCountries()
    {
        List<Country> lstCountries = new List<Country>();
        lstCountries.Add(new Country(1, "USA"));
        lstCountries.Add(new Country(2, "India"));
        lstCountries.Add(new Country(3, "Australia"));
        lstCountries.Add(new Country(4, "Canada"));
        return lstCountries ;
    }
}

And following is the code for State.cs. This class has 3 properties and a method which returns a list of states. Nothing fancy, self-explanatory code.

public class State
{
    public int id { get; set; }
    public int countryid { get; set; }
    public string name { get; set; }

    public State(int StateID, int CountryID, string StateName)
    {
        id = StateID;
        countryid = CountryID;
        name = StateName;
    }
    public static List<State> GetAllStates()
    {
        List<State>  lstState = new List<State>();
        lstState.Add(new State(1, 1, "Arizona"));
        lstState.Add(new State(2, 1, "Alaska"));
        lstState.Add(new State(3, 1, "Florida"));
        lstState.Add(new State(4, 1, "Hawaii"));
        lstState.Add(new State(5, 2, "Gujarat"));
        lstState.Add(new State(6, 2, "Goa"));
        lstState.Add(new State(7, 2, "Punjab"));
        lstState.Add(new State(8, 3, "Queensland"));
        lstState.Add(new State(9, 3, "South Australia"));
        lstState.Add(new State(10, 3, "Tasmania"));
        lstState.Add(new State(11, 4, "Alberta"));
        lstState.Add(new State(12, 4, "Ontario"));
        lstState.Add(new State(13, 4, "Quebec"));
        lstState.Add(new State(14, 4, "Saskatchewan"));
        return lstState;
    }
}


Add action methods in controller
Next step is to make our WEB API ready. For your information, ASP.NET Core comes with Unified Programming Model for MVC and Web API. So open HomeController.cs and add following 2 action methods.

[HttpGet]
[Route("api/Home/GetCountries")]
public IEnumerable<Country> GetCountries()
{
    return Country.GetAllCountries();
}

[HttpGet]
[Route("api/Home/GetState/{countryid?}")]
public IEnumerable<State> GetState(int countryid = 1)
{
    List<State> lstState = State.GetAllStates();
    return lstState.Where(item => item.countryid == countryid);
}
GetCountries() method makes call to Country.GetAllCountries(); and returns the list. Where the second method GetState() accepts countryid as parameters and based on the its value, filters the state list and return the same.

Note countryid parameter is optional for GetState() action method. And also a default value is supplied to it. Why? Well, this actually allows you to pass countryid in querystring. And while calling REST APIs via AngularJS, the arguments/parameters are appended to URL as part of querystring. And that’s why we must allow our API to support querystring. So following URL,

http://localhost:53483/api/Home/GetState/1
is similar to
http://localhost:53483/api/Home/GetState?countryid=1

AngularJS 2 application structure
Create a folder named “app” in wwwroot folder. If you have already created while configuring AngularJS 2 then ignore this step. Now within this folder, following files needs to added.

I already explained about this application structure and about code here. But let me just summarize here again.

country.ts: This file has a simple class called Country with 2 properties id and name.
state.ts: This file has a simple class called States with 3 properties id, countryid and name.
countrylistcomponent.ts: This file contains code for defining a component and template used to render HTML. The Component adds the metadata to the class. And it also makes call to Angular 2 Service, which in turn calls WEB API.
CountryTemplate.html: This file has HTML code to render select dropdown list.
dataservice.ts: This is an Angular 2 service which makes WEB API calls to get list of countries and states.
main.ts: This file contains code to bootstrap angularjs 2 in our application.
country.cs

export class Country {
    constructor(public id: number, public name: string) { }
}
state.cs

export class State {
    constructor(public id: number,
                public countryid: number,
                public name: string) { }
}
dataservice.ts

import { Injectable } from 'angular2/core';
import {Http, URLSearchParams} from "angular2/http";
import 'rxjs/Rx';
import { Country } from './country';
import { State } from './state';


@Injectable()
export class DataService {
    constructor(public http: Http) {
        this.http = http;
    }
    getCountries() {
        return this.http.get("/api/Home/GetCountries")
            .map((responseData) => responseData.json());
    }

    getStates(countryid: string) {
        var params = new URLSearchParams();
        params.set('countryid', countryid);
        return this.http.get("/api/Home/GetState", { search: params })
            .map((responseData) => responseData.json());
    }
}

As you know AngularJS 2 is modular. And as here in this service, we need to make use of HTTP service. So we need to import it. Similarly URLSearchParams, which is used to pass arguments to WEB API method. Therefore,
import {Http, URLSearchParams} from "angular2/http";

And the other import statement import 'rxjs/Rx';, imports ReactiveX library. The Http service in Angular 1 returns a promise where Angular 2 returns an Observable object. And The Observable classes in Angular 2 are provided by the ReactiveX library.

Here, first we inject $http service in class constructor. And we use http.get() to run our HTTP request. And this returns an Observable object. Since it’s an observable object, we can use map() to convert the response into JSON response.

countrylistcomponent.ts

import { Component } from 'angular2/core';
import { DataService } from './dataservice';
import { Country } from './country';
import { State } from './state';

@Component({
    selector: 'my-country-list',
    templateUrl: 'app/CountryTemplate.html',
    providers: [DataService]
})
export class CountryListComponent {
    selectedCountry: Country = new Country(0, 'India');
    countries: Country[];
    states: State[];

    constructor(private _dataService: DataService) {
        this._dataService.getCountries().subscribe(data => { this.countries = data });
    }

    onSelect(countryid) {
        if (countryid == 0)
            this.states = null;
        else
            this._dataService.getStates(countryid).subscribe(data => { this.states = data });
    }
}
This file is modified to use the service to get countries and states list.

First, import the Service and then within @Component directive, set providers: [DataService].
And inject the service in CountryListComponent constructor. And in constructor, call getCountries() method to get list of countries from the service. Since the service returns Observable object, we can use .subscribe() method to get the output in variable.
Also defined onSelect method which will be called onChange event of country dropdown list. This method calls service to get the list of states based on selected countryid and then using subscribe get the list in states variable.
main.ts

import { bootstrap } from 'angular2/platform/browser';
import {HTTP_PROVIDERS} from "angular2/http";
import { CountryListComponent } from './countrylistcomponent';

bootstrap(CountryListComponent, [HTTP_PROVIDERS]);
This file has code to bootstrap AngularJS 2 in our application. Along with that, it also bootstrap application root/parent component. Angular’s http module exposes HTTP_PROVIDERS, which has all the providers that we need, to code http action in our service. Therefore add the http providers to the bootstrap, by importing the HTTP_PROVIDERS from angular2/http.

CountryTemplate.html

<div class="row">
    <div class="col-md-5" style="text-align:right;">
        <label>Country:</label>
    </div>
    <div class="col-md-7" style="text-align:left;">
        <select [(ngModel)]="selectedCountry.id" (change)="onSelect($event.target.value)" style="width:150px;">
            <option value="0">--Select--</option>
            <option *ngFor="let country of countries" value={{country.id}}>{{country.name}}</option>
        </select>
    </div>
</div>
<br />
<div class="row">
    <div class="col-md-5" style="text-align:right;">
        <label>State:</label>
    </div>
    <div class="col-md-7" style="text-align:left;">
        <select style="width:150px;">
            <option value="0">--Select--</option>
            <option *ngFor="let state of states " value={{state.id}}>{{state.name}}</option>
        </select>
    </div>
</div>
And finally the HTML template. This file name is used while specifying metadata for CountryListComponent class.
There are 2 dropdowns list one for country and other for state and also change event defined on country dropdown list. Angular 2 has different way of defining event. Take the HTML event and wrap it with parentheses. $event.target.value will give the selected country id.

I also want to bring in your attention a change made in AngularJS 2 version “2.0.0-beta.17” with respect to *ngFor. Previously we were using,

*ngFor="#state of states"
but in this version, it is changed a bit. Instead of “#”, use “let”

*ngFor="let state of states"
And finally since we are using Angular 2 Http service in our application, we need to include the script in the layout. So, open the _Layout.cshtml file located at Views/Shared/ and add the following code right after the script element that loads Angular 2 core.

<environment names="Development">
  <script src="~/lib/npmlibs/angular2/http.dev.js"></script>
</environment>
<environment names="Staging,Production">
  <script src="~/lib/npmlibs/angular2/http.min.js"></script>
</environment>
Wait!!! We still need to show what we have done till now on UI. So open Views/Home/Index.cshtml and add angular component tag <my-country-list></my-country-list> to HTML file. And we also need to load the application and all its modules. So place following script section to the end of the file.

@section Scripts {
    <script>
        System.config({
            packages: {
                'app': { defaultExtension: 'js' },
                'lib': { defaultExtension: 'js' },
            },
        });

        System.import('app/main')
            .then(null, console.error.bind(console));
    </script>
}


HostForLIFE.eu ASP.NET Core 1.0 Hosting
European best, cheap and reliable ASP.NET hosting with instant activation. HostForLIFE.eu is #1 Recommended Windows and ASP.NET hosting in European Continent. With 99.99% Uptime Guaranteed of Relibility, Stability and Performace. HostForLIFE.eu security team is constantly monitoring the entire network for unusual behaviour. We deliver hosting solution including Shared hosting, Cloud hosting, Reseller hosting, Dedicated Servers, and IT as Service for companies of all size.


ASP.NET Core 1.0 Hosting - HostForLIFE.eu :: How To Inject Codes in HTTP Pipeline?

clock May 12, 2016 21:49 by author Anthony

In this tutorial, I will explain about how to inject little codes in HTTP Pipeline in ASP.NET Core. “Middleware is defined in the OWIN specification as pass through components that form a pipeline between a server and application to inspect, route, or modify request and response messages for a specific purpose. Middleware consists of application components are incorporated into the ASP.NET HTTP pipeline.” The text is in the ASP.NET Core documentation, and as can be seen, with middleware we can insert a component that is incorporated in ASP.NET HTTP pipeline, that is, we can develop a code with a purpose to manipulate the requests and responses.

A characteristic of middleware is that normally there will a chain of middleware whereby order of configuration, one is called after the end of other and the current middleware can on any moment cancel invoking the next middleware, thus all chains of middleware will be canceled.

middlwares

Do you have doubts about what is middlewares? We can compare middleware with the old http modules that today don’t exist in the new ASP.NET. I have already seen somebody comparing middlewares with a hamburger, because the middle is middleware and the ends are the application and the server. How much more middleware, bigger is the hamburger.

To get more clarity about the subject, I am going to show some middlewares that already are utilized by default in application templates to ASP.NET Core, and after I am going to create a custom middleware.

Below I show the startup class, note that there are some comments that indicate where there is a middleware.

public void Configure(IApplicationBuilder app, IHostingEnvironment env, ILoggerFactory loggerFactory)
        {
            loggerFactory.AddConsole(Configuration.GetSection("Logging"));
            loggerFactory.AddDebug();

            app.UseApplicationInsightsRequestTelemetry();

            if (env.IsDevelopment())
            {
                app.UseBrowserLink(); //Middleware
                app.UseDeveloperExceptionPage(); //Middleware
                app.UseDatabaseErrorPage(); //Middleware
            }
            else
            {
                app.UseExceptionHandler("/Home/Error"); //Middleware

                try
                {
                    using (var serviceScope = app.ApplicationServices.GetRequiredService<IServiceScopeFactory>()
                        .CreateScope())
                    {
                        serviceScope.ServiceProvider.GetService<ApplicationDbContext>()
                             .Database.Migrate();
                    }
                }
                catch { }
            }

            app.UseIISPlatformHandler(options => options.AuthenticationDescriptions.Clear()); //Middleware

            app.UseApplicationInsightsExceptionTelemetry(); //Middleware

            app.UseStaticFiles(); //Middleware

            app.UseIdentity(); //Middleware

            app.UseMvc(routes =>
            {
                routes.MapRoute(
                    name: "default",
                    template: "{controller=Home}/{action=Index}/{id?}");
            }); //Middleware
        }

Did you see the middlewares utilized in code? Here, each middleware has a responsibility and the gain that we have is we can choose only the ones needed for our project, different from old version of ASP.NET that by default many features were added even when they were not necessary. A very good phrase says: “Pay only by what you use”, in other words, how many fewer middleware you use, the less heavy will be the HTPP pipeline.

Other thing to observe that in code above, all the middlewares start with a “Use”, this is a pattern done by team ASP.NET.

Now I am going to create a own middleware and my goal will be creating one that shows the total time of application to take care of a request. Below following the code.

using Microsoft.AspNet.Builder;
using Microsoft.AspNet.Http;
using System.Diagnostics;
using System.IO;
using System.Threading.Tasks;

namespace MiddlewareArticle.Middleware
{
    public class ResponseTime
    {
        RequestDelegate _next;

        public ResponseTime(RequestDelegate next)
        {
            _next = next;
        }

        public async Task Invoke(HttpContext context)
        {
            var sw = new Stopwatch();
            sw.Start();

            await _next(context);

            var isHtml = context.Response.ContentType?.ToLower().Contains("text/html");

            if (context.Response.StatusCode == 200 && isHtml.GetValueOrDefault())
            {
                var body = context.Response.Body;
               
                using (var streamWriter = new StreamWriter(body))
                {
                    var textHtml = string.Format(
                        "<footer><div id='process'>Response Time {0} milliseconds.</div>",
                        sw.ElapsedMilliseconds);
                    streamWriter.Write(textHtml);
                }
            }
        }
    }
}


As can be seen, making a middleware is not difficult, it needs a constructor to receive the next middleware and an “Invoke” method that receives the context of HTTP. The goal of showing the total time of application gets in method Invoke. Before calling the next middleware, it is started the time and after of calling the next middleware, when all the middlewares already were executed, I execute the code to show in the HTML the total time.

Remember, I know that all middleware were executed because our middleware must be configured before of all others, thus the code will wait all executions and after the instruction “await _next(context);” we can write our code.

public void Configure(IApplicationBuilder app, IHostingEnvironment env, ILoggerFactory loggerFactory)
        {
            app.UseMiddleware<ResponseTime>(); //Our Middleware
           
            loggerFactory.AddConsole(Configuration.GetSection("Logging"));
            loggerFactory.AddDebug();
           
            //...
            //Continue with others codes

The code above is only to show the set up of our middleware in the Configure method of the Startup class. To that this works, it is needed using the instruction “app.UseMiddleware();”, where the UseMiddleware method is used to call custom middlewares.

Conclusion


The ASP.NET Core has changed, not the code that we know, but your core and by this, the way of manipulating a request and a response was changed to middleware. Now it’s lighter and easier to stay between an application and a server. However, take care, it is not because it got better that you must now only use that to develop.


HostForLIFE.eu ASP.NET Core 1.0 Hosting
European best, cheap and reliable ASP.NET hosting with instant activation. HostForLIFE.eu is #1 Recommended Windows and ASP.NET hosting in European Continent. With 99.99% Uptime Guaranteed of Relibility, Stability and Performace. HostForLIFE.eu security team is constantly monitoring the entire network for unusual behaviour. We deliver hosting solution including Shared hosting, Cloud hosting, Reseller hosting, Dedicated Servers, and IT as Service for companies of all size.


ASP.NET 5 Hosting - HostForLIFE.eu :: Json Files Configuration

clock April 29, 2016 23:12 by author Anthony

The JSON format is syntactically identical to the code for creating JavaScript objects. Because of this similarity, instead of using a parser (like XML does), a JavaScript program can use standard JavaScript functions to convert JSON data into native JavaScript objects.

Much Like XML Because

  • Both JSON and XML is "self describing" (human readable)
  • Both JSON and XML is hierarchical (values within values)
  • Both JSON and XML can be parsed and used by lots of programming languages
  • Both JSON and XML can be fetched with an XMLHttpRequest

Much Unlike XML Because

  • JSON doesn't use end tag
  • JSON is shorter
  • JSON is quicker to read and write
  • JSON can use arrays

The biggest difference is:

XML has to be parsed with an XML parser, JSON can be parsed by a standard JavaScript function.

Visual Studio 2015 with ASP.NET 5 is a sweet surprise for developers. ASP.NET 5 has various JSON files to play with. These files handles global settings for solution, project specific settings, client side packages and node modules packages. In the post, we will take a close look at every JSON file and its code.
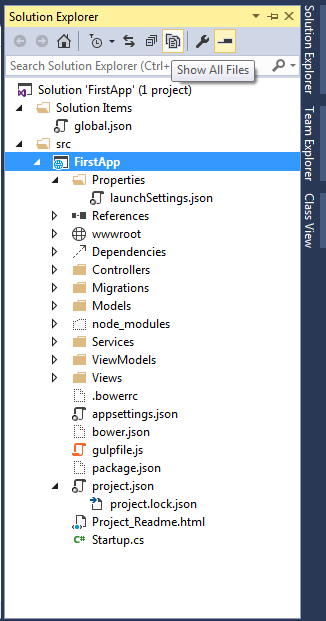
Solution Explorer in ASPNET 5 RC1


As seen from the above image, there are mainly 6 configuration json files.

  • Global.json
  • appsetting.json
  • Project.json
  • launchsetting.json
  • bower.json
  • package.json
  • hosting.json: Though this file is not present in solution explorer till RC 1 release but you can add it manually.


Global.json

As the name suggests, the settings defined in the file should work for the solution as whole. The settings defined in global.json implies to all the projects in the solution. If you open the file, by default you will see the following code.

{
  "projects": [ "src", "test" ],
  "sdk": {
    "version": "1.0.0-rc1-update1"
  }
}

The projects property defines the locations of your solution’s source code. VS 2015, specifies two location for projects in the solution src and test. While the src contains the actual application and test project contains any test (if you have selected option of creating test project while creating the solution for first time].

The team has also made a very interesting and useful change. If you recollect, when you build your application, then all your .dll are placed in bin directory in the same path, where your project is. And we have to handle bin folder very carefully while check-in the code in source control and at the time of deployment. But good news is that it is moved to another location. So you don’t have to worry now. The build artifact is now placed in “Artifact” folder (at the same location), which makes life easy while excluding things from source control.

Artifact folder

And the second property sdk specifies the version of the DNX (.Net Execution Environment) that Visual Studio will use when opening the solution. Specifying the version has an advantage as while working on multiple projects, you can target different versions of ASP.NET 5.

appsettings.json

appsettings.json file is used to define application related settings like connection string, logging settings, or any other custom key which we used to define in web.config file.

{
  "Data": {
    "DefaultConnection": {
      "ConnectionString": "Server=(localdb)\\mssqllocaldb;Database=aspnet5-FirstApp-0ed2f710-6535-4c4e-b080-c26601fbb414;Trusted_Connection=True;MultipleActiveResultSets=true"
    }
  },
  "Logging": {
    "IncludeScopes": false,
    "LogLevel": {
      "Default": "Verbose",
      "System": "Information",
      "Microsoft": "Information"
    }
  }
}


Project.json

This file is used to define project settings and server side dependencies. It largely replaces the web.config file from previous versions of ASP.NET. Read “What is Project.json in ASP.NET 5 (vNext)”. Few things have changed in ASP.NET 5 RC1 release for project.json file.

launchSetting.json

This json file holds project specific settings associated with each profile Visual Studio is configured to use to launch the application, including any environment variables that should be used. You can define framework for your project for compliation and debugging for specific profiles.

{
  "iisSettings": {
    "windowsAuthentication": false,
    "anonymousAuthentication": true,
    "iisExpress": {
      "applicationUrl": "http://localhost:2137/",
      "sslPort": 0
    }
  },
  "profiles": {
    "IIS Express": {
      "commandName": "IISExpress",
      "launchBrowser": true,
      "environmentVariables": {
        "Hosting:Environment": "Development"
      }
    },
    "web": {
      "commandName": "web",
      "environmentVariables": {
        "Hosting:Environment": "Development"
      },
      "sdkVersion": "dnx-clr-win-x86.1.0.0-rc1-update1"
    },
    "kestrel": {
      "commandName": "kestrel",
      "sdkVersion": "dnx-clr-win-x86.1.0.0-rc1-update1"
    }
  }
}


ASP.NET 5 ships with support for 3 different servers:

  • Microsoft.AspNet.Server.IIS
  • Microsoft.AspNet.Server.WebListener (WebListener)
  • Microsoft.AspNet.Server.Kestrel (Kestrel)

So by default, there will be 3 different profiles. However, it also depends on the commands section of project.json. You can change settings for each profile via right click on the Project and then select properties. Read detailed post about launchsetting.json in ASP.NET 5
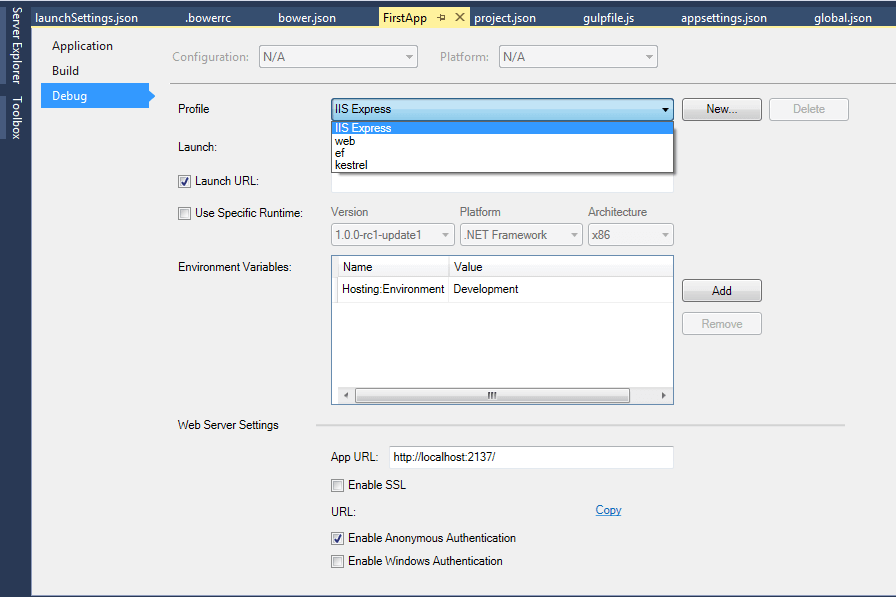
change launchsetting.json settings

Bower.json

Bower is a package manager for the web. Bower can manage components that contain HTML, CSS, JavaScript, fonts or even image files. Bower doesn’t concatenate or minify code or do anything else – it just installs the right versions of the packages you need and their dependencies. With ASP.NET 5 web projects jQuery and bootstrap packages are already installed and bower, gulp and NPM are already in place.
Client-side packages are listed in the bower.json file. As mentioned earlier, bootstrap, jQuery and jQuery validation are pre-configured with ASP.NET 5 project templates.

{
  "name": "ASP.NET",
  "private": true,
  "dependencies": {
    "bootstrap": "3.3.5",
    "jquery": "2.1.4",
    "jquery-validation": "1.14.0",
    "jquery-validation-unobtrusive": "3.2.4"
  }
}


Visual Studio watches the bower.json file for changes. Upon saving, the bower install command is executed. There is another file named “ .bowerrc” which defines the location at which bower package needs to be installed. Open it, and notice that the directory property is set to “wwwroot/lib”.

Package.json

npm is another package manager like bower. But npm is used for installing Node js modules where bower is used for managing front end components like html, css, js, etc. As mentioned earlier, the ASP.NET 5 project template pre-configures NPM, Gulp and bower. Gulp is JavaScript task runner which is used to automate various tasks like minification and bundling of js and css, checking errors in js etc… Since Gulp is a node.js module so npm is used. So node.js modules are listed in package.json.\

{
  "name": "ASP.NET",
  "version": "0.0.0",
  "devDependencies": {
    "gulp": "3.8.11",
    "gulp-concat": "2.5.2",
    "gulp-cssmin": "0.1.7",
    "gulp-uglify": "1.2.0",
    "rimraf": "2.2.8"
  }
}

You can see the installed bower and npm modules by expanding src -> dependencies option.


HostForLIFE.eu ASP.NET 5 Hosting
European best, cheap and reliable ASP.NET hosting with instant activation. HostForLIFE.eu is #1 Recommended Windows and ASP.NET hosting in European Continent. With 99.99% Uptime Guaranteed of Relibility, Stability and Performace. HostForLIFE.eu security team is constantly monitoring the entire network for unusual behaviour. We deliver hosting solution including Shared hosting, Cloud hosting, Reseller hosting, Dedicated Servers, and IT as Service for companies of all size.


ASP.NET 4.5 Hosting - HostForLIFE.eu :: How to Make CAPTCHA?

clock April 15, 2016 21:42 by author Anthony

A CAPTCHA (an acronym for "Completely Automated Public Turing test to tell Computers and Humans Apart") is a type of challenge-response test used in computing to determine whether or not the user is human. The term was coined in 2003 by Luis von Ahn, Manuel Blum, Nicholas J. Hopper, and John Langford.

The technology is used mostly to block spammers and bots that try to automatically harvest email addresses or try to automatically sign up for or make use of Web sites, blogs or forums. CAPTCHA, whose users include Yahoo and Google, blocks automated systems, which can't read the distorted letters in the graphic.

The algorithm for CAPTCHA is public, as the "P" in the name implies. The test was developed in various forms around 1996, but it got its distinctive name in 2000 from researchers at Carnegie Mellon University and IBM. Cracking the algorithm won't make the CAPTCHA vulnerable, since the algorithm is only used for generating the random series of letters and numbers in the image. The system works because humans and computers process strings of characters differently.

One of the problems with CAPTCHA is that sometimes the characters are so distorted that they can't even be recognized by people with good vision, let alone visually handicapped individuals. Depending on local regulations for handicapped access to Web sites, this can also be a compliance issue for some Web-based businesses.

CAPTCHA technology is easy to implement, but requires some knowledge of hypertext preprocessor (PHP) or other Web scripting languages. For more information and links to extensive resources, check the How to use CAPTCHA Web site and The CAPTCHA Project. Both sites also have examples of CAPTCHAs and in-depth tutorials on how to develop and implement CAPTCHA for your Web site.

So, in this article, I will explain how to make basic CAPTCHA.

You can set the height and width of the CAPTCHA image while initializing the CAPTCHA class. The CAPTCHA image generated from the class can be set to the image control directly or it can be save to the local path and then set to the image control. For this example I am saving it to the local path and then set to the image control. And the CAPTCHA image code generated by the class is automatically set to the session variable named CaptchaCode.

Time to get some hand on it

On the page get an image control to display CAPTCHA image, a textbox where user will enter the CAPTCHA text and a button when clicked, we can check and validate if the code entered is correct or not. Plug the DLL in your ASP.NET project and go to the Page_Load event. Here we will generate the image of the height and width we wish to have for out CAPTCHA image and then save the image to the CaptchaImages folder with the random image code generated. The code on the Page_Load event goes like this:
protected void Page_Load(object sender, EventArgs e)
{
        if (!Page.IsPostBack)
        {
            CaptchaImage cImage = new CaptchaImage(CaptchaImage.generateRandomCode(), 140, 40);
            cImage.Image.Save(Server.MapPath("~\\CaptchaImages\\" + Convert.ToString(Session["CaptchaCode"]) + ".jpg"), ImageFormat.Jpeg);
            CaptachaImage.ImageUrl = "~\\CaptchaImages\\" + Convert.ToString(Session["CaptchaCode"]) + ".jpg";
            cImage.Dispose();
        }
        CaptchaCode = Convert.ToString(Session["CaptchaCode"]);
}

Before you can use the above code, declare a public variable which I have used to hold the value of the CAPTCHA code. I named it CaptchaCode. You can name it whatever you like it. We will be using this variable later to check it against the user input. Hit F5 to start and test your application. If everything is in place and you will be able to see the below output.

To check if the user enters the correct CAPTCHA code, we must have an event on button click which will validate the user input and prompt the user if CAPTCHA code is correct or incorrect. The code on the button click is:

protected void btn_Validate(object sender, EventArgs e)
{
        if (CaptchaCode == txt_ccode.Text)
        {
            ClientScript.RegisterClientScriptBlock(typeof(Page), "ValidateMsg", "<script>alert('You entered Correct CAPTCHA Code!');</script>");
        }
        else
        {
            ClientScript.RegisterClientScriptBlock(typeof(Page), "ValidateMsg", "<script>alert('You entered INCORRECT CAPTCHA Code!');</script>");
        }
}

The above code will check the CAPTCHA code entered by the user and check against the CAPTCHA code we previously saved in the session variable (CaptchaCode). If the validation is a success, user will get the message notifying him that he enters correct CAPTCHA code or the error message otherwise.

And that's it, we have successfully implement a CAPTCHA in our ASP.NET application. So, here are few things we can do with this CAPTCHA library:

Set image height and width.
Saves the image to the local path.
Automatically sets the generated CAPTCHA code to the application session.


HostForLIFE.eu ASP.NET 4.5 Hosting
European best, cheap and reliable ASP.NET hosting with instant activation. HostForLIFE.eu is #1 Recommended Windows and ASP.NET hosting in European Continent. With 99.99% Uptime Guaranteed of Relibility, Stability and Performace. HostForLIFE.eu security team is constantly monitoring the entire network for unusual behaviour. We deliver hosting solution including Shared hosting, Cloud hosting, Reseller hosting, Dedicated Servers, and IT as Service for companies of all size.


ASP.NET 5 Hosting - HostForLIFE.eu :: How to Make Ext.NET in ASP.NET?

clock April 11, 2016 23:29 by author Anthony

In this article, I want to share about Ext.Net. Before we begin to learn Ext.net, we need to know what it Ext.net, according to the official web ext.net of are.

Ext.Net is ported to .Net Programming Ext JS, Ext JS is actually also be used in .Net programming, but this Ext.Net easier for developers because it has been created controls can be drag directly to the webform.

Things need to be prepared are:

  • IDE for .Net Programming, here I am using Visual Studio 2010
  • Ext.Net, which can be downloaded on the official website download ext.net, in sharing this time I used ext.net 2.0.0.rc2 community edition version.
  • Extract the downloaded ext.net, in which there Ext.net.dll.
  • ASP.Net with C # code behind.

When you get all the things that needed to be prepared:

  • Create a project, select Visual C # => Web, and then select ASP.Net Web Application
  • Give the name of this project ext.net
  • In the ToolBox window, usually on the left side of the screen, or if no can press Ctrl + Alt + X, right-click the toolbox and select Add Tab, named Ext.Net
  • Right-click the Toolbox Ext.Net, select Choose Items.
  • On the .Net Framework Components, click Browse, find Ext.net.dll then click OK
  • Now the ToolBox Ext.Net already charged components Ext.net.
  • The next step is to create a webform, named WebForm1.aspx
  • Add a ResourceManager to WebForm1.aspx (ResourceManager can be found in the ToolBox Ext.net). ResourceManager is needed by each component Ext.net.
  • Add Ext: Button, set property looks like this:
    <ext:Button ID="Button1" runat="server" Text="Direct Event">
          <DirectEvents>
              <Click OnEvent="Button1_Click" />
          </DirectEvents>
    </ext:Button>

    Button1 DirectEvents method to perform the action.
  • Then, we move on Code Behind of Webform1.aspx, open webform1.aspx.cs or by pressing the F7 key or you can also select the menu View => Code.
  • On Windows Code Behind, on the declaration using (top) add using Ext.Net;
  • Then, add the following method Button1_Click
    protected void Button1_Click(Object sender, DirectEventArgs e)
    {
       X.Msg.Notify("DirectEvent", DateTime.Now.ToLongTimeString()).Show();
    }
  • Back again to WebForm1.aspx by pressing the Shift + F7 keys or select menu View => Designer.
    Add an Ext: Button again into Webform1.aspx, set its properties as follows.
    <ext:Button ID="Button2" runat="server" Text="Direct Method">
          <Listeners>
              <Click Handler="Ext.net.DirectMethods.DoSomething();" />
          </Listeners>
    </ext:Button>
  • Then, add Method Do Something in Code Behind (press F7 to switch to Code Behind window.
    [DirectMethod]
    public void DoSomething()
    {
       X.Msg.Notify("DirectMethod", "Akhirnya bisa Ext.Net").Show();
    }
  • When finished, open the Web.Config the solution Explorer, add the following script.
    <httpModules>
       <add name="DirectRequestModule" type="Ext.Net.DirectRequestModule, Ext.Net" />
    </httpModules>
  • Run the Project by Press F5 or select Debug menu => Start Debugging


HostForLIFE.eu ASP.NET 5 Hosting
European best, cheap and reliable ASP.NET hosting with instant activation. HostForLIFE.eu is #1 Recommended Windows and ASP.NET hosting in European Continent. With 99.99% Uptime Guaranteed of Relibility, Stability and Performace. HostForLIFE.eu security team is constantly monitoring the entire network for unusual behaviour. We deliver hosting solution including Shared hosting, Cloud hosting, Reseller hosting, Dedicated Servers, and IT as Service for companies of all size.


ASP.NET 5 Hosting - HostForLIFE.eu :: Root Of ASP.NET 5

clock April 8, 2016 19:00 by author Anthony

Today we will discuss about the root of ASP.NET 5, which is WWWroot. When you take a closer look at the ASP.NET 5 project, you will see that there are many things which are carry forwarded like Model, View, Controller, clean separation of concerns and may more.

But, there are also some significant changes around ASP.NET 5. Now, the root of the website is no longer the root of the project. By default, root will be WWWroot folder. The idea behind this to maintain the clean separation between the files at the web-server retrieved and sent to the client and the files which contains the logic and configuration. Static files like JS, CSS, HTMLs can live in WWWroot folder.

15th

Now, lets suppose when i run the app and tried to see the image which i have placed in My Imgaes folder, then it will give me 404 error. On the other hand, if i go ahead and add the same folder in WWWroot folder and try to navigate the same then it will produce me the result.

18th

so, the point is all static files are served by root folder and logical stuffs served by project space as we initially saw, when i added controller in the controller’s folder and it took effect. One more thing you might have observed that there is no web.config file now in the solution. Also now there is no Global.asax file; however the same is replaced by startup.cs file. But, we’ll see this later. 1st let’s see project.json file. This file now manages many aspects of website.

19th

First thing which you will notice here that root folder is set to WWWroot here. So, this is the place which is telling website that this is the root folder. So begin the show from here. This you can change as well or rename if you like to. Now, this configuration file is in JSON format. This is also telling the ASP.NET runtime what dependencies project is going to need. In this new ASP.NET 5 system there is a new way to manage dependencies. No need to reference assemblies and store the lists of referenced assemblies in the project file. Instead we refer to nuget packages as dependencies and these dependencies are listed in our project.json file. Now, there are couple of reasons for this change. One reason is to simplify the dependency management. Another good reason for this is that ASP.NET is moving away from VS dependency. So, in future i can use any text editor to build the ASP.NET App.

Now, these dependencies can be both the ways. One way which we used already shown below in the screen shot.

20th

21th

Now, the UI of this also changed. Initially we used to have Modal window. Now, this is more like complete screen giving wider visibility. I can also see the installed templates like

22nd

Also, i still have the flexibility of different nuget source. 2nd Option is via project.json file. Let’s suppose i am planning to install some custom package. Then i can do like shown below as well

24th

However, whatever package you install; you can find its references under “References“. Below, in the screen shot you can see that there are two versions of runtime here. 1st one is the core version and 2nd one is the cloud optimized version.

25th

Let’s collapse the same and drill into it. Now, here dependency management system will keep your assemblies in nice tree structure. So, it nicely tells which package are dependent on which package.

27th

Now, as far as Framework and runtime is concerned as you can see below in the screen shot; i have both frameworks listed here.

28th

So, whenever i am building the solution i am building against both of these frameworks. By building against both i am actually ensuring that it will work well against both the frameworks. This also means whenever i am switching platform my code won’t break there.

But, let’s go ahead and break something here. You remember in the last segment i created one new controller with a notepad. Now, let’s modify the same and refresh the app.

29th

As you can see that it says that GetCallingAssembly() which is part of System.Reflection is not supported in the cloud optimized version. But, let’s suppose i overlooked this error and refresh the app.So, it actually produced me desired result.

31th

But, when i explicitly build the project and checked the output window, then it gave me below error message.

32nd

So, building with error but application is working fine with full blown CLR. Now, if you have decided that you don’t want CORE CLR version. so, you can just comment the Core CLR section in the project.json file as shown below in the screen shot.

33th

As soon as i commented the above section, below references got refreshed automatically.

34th

Now, when i build the app then it will build fine. But, suppose you want the other way means you would like to keep the cloud optimized version also and build should also succeed. For this scenario i need to refer the conditional build as shown below.

36th


HostForLIFE.eu ASP.NET 5 Hosting
European best, cheap and reliable ASP.NET hosting with instant activation. HostForLIFE.eu is #1 Recommended Windows and ASP.NET hosting in European Continent. With 99.99% Uptime Guaranteed of Relibility, Stability and Performace. HostForLIFE.eu security team is constantly monitoring the entire network for unusual behaviour. We deliver hosting solution including Shared hosting, Cloud hosting, Reseller hosting, Dedicated Servers, and IT as Service for companies of all size.


ASP.NET 4.5 Hosting - HostForLIFE.eu :: How To Prevent XSS Attacks in ASP.NET?

clock April 6, 2016 19:17 by author Anthony

In this article, I will explain about how to prevent XSS Attacks. XSS (Cross-Site Scripting) attacks are a type of injection, in which malicious scripts are injected into otherwise benign and trusted web sites. XSS attacks occur when an attacker uses a web application to send malicious code, generally in the form of a browser side script, to a different end user. For sites that allow user input to be displayed in the browser, cross site scripting (XSS) attacks are a possibility that must be protected against.  These attacks are carried out by placing <script> tags pointing to malicious code in the public facing elements, which can be persisted elements such as comments or reviews, or more ephimeral examples such as query variables in the url.  The aim of these attacks varies, but some examples are stealing sensitive information (login credentials, personal data), forcing redirects, or just about anything else that can be accomplished with JavaScript.  These attackes can be prevented by encoding input. So instead of the literal string <script>bad script code</script>, it becomes &lt;script&gt;bad script code&lt;/script&gt;, and instead of running the code, it will simply display the text content of the script.

According to Microsoft, the primary purpose of the HttpUtility.HtmlEncode method is to ensure that ASP.NET output does not break HTML; it's purpose is not necessarily security.  However, the AntiXssEncoder class is primarily designed for security.  To this end, it uses a white-list approach rather than a black-list, only allowing known safe characters to remain unencoded.  The AntiXss method is slightly less performant, and will work in multiple languages.

It is possible to set the AntiXssEncoder as the default for your application, and this has gotten steadily easier.  Phil Haack wrote in 2010 about doing this using a the HttpEncoder abstract base class, and Jon Galloway wrote in 2011 about doing it with version 4.1 which already included an encoder, so it required little more than adding the assembly to the project and changing the web.config file.  Since AntiXss can now be had in NuGet, it's as simple as installing it and setting the httpRuntime encoderType property:

 <system.web>
    <httpRuntime targetFramework="4.5"
             encoderType="Microsoft.Security.Application.AntiXssEncoder, AntiXssLibrary"/>
  </system.web>


HostForLIFE.eu ASP.NET 4.5 Hosting
European best, cheap and reliable ASP.NET hosting with instant activation. HostForLIFE.eu is #1 Recommended Windows and ASP.NET hosting in European Continent. With 99.99% Uptime Guaranteed of Relibility, Stability and Performace. HostForLIFE.eu security team is constantly monitoring the entire network for unusual behaviour. We deliver hosting solution including Shared hosting, Cloud hosting, Reseller hosting, Dedicated Servers, and IT as Service for companies of all size.


About HostForLIFE.eu

HostForLIFE.eu is European Windows Hosting Provider which focuses on Windows Platform only. We deliver on-demand hosting solutions including Shared hosting, Reseller Hosting, Cloud Hosting, Dedicated Servers, and IT as a Service for companies of all sizes.

We have offered the latest Windows 2016 Hosting, ASP.NET Core 2.2.1 Hosting, ASP.NET MVC 6 Hosting and SQL 2017 Hosting.


Tag cloud

Sign in