
September 12, 2013 11:07 by
 Scott
ScottThis is simple code how to send email in ASP.NET 2 with Authentication. In the following tutorial, I will show you how you can authenticate smtp client when sending emails in ASP.NET 2.0.

You need to import System.Net.Mail and System.Net namespaces to test following code.
C#
string mailFrom = "FromEmailAddressHere";
string mailTo = "ToEmailAddressHere";
string subject = "ASP.NET Test Email";
string messageBody = "This email is send to you from ASP.NET";
// Create Mail Message Object
MailMessage message = new MailMessage(mailFrom, mailTo, subject, messageBody);
// Create SmtpClient class to Send Message
SmtpClient client = new SmtpClient();
// Here you specify your smtp host address such as smtp.myserver.com
client.Host = "localhost";
// Specify that you dont want to use default credentials
client.UseDefaultCredentials = false;
// Create user credentials by using NetworkCredential class
NetworkCredential credential = new NetworkCredential();
credential.UserName = "waqas";
credential.Password = "secret";
client.Credentials = credential;
client.Send(message);
VB.NET
Dim mailFrom As String = "FromEmailAddressHere"
Dim mailTo As String = "ToEmailAddressHere"
Dim subject As String = "ASP.NET Test Email"
Dim messageBody As String = "This email is send to you from ASP.NET"
' Create Mail Message Object
Dim message As New MailMessage(mailFrom, mailTo, subject, messageBody)
' Create SmtpClient class to Send Message
Dim client As New SmtpClient()
' Here you specify your smtp host address such as smtp.myserver.com
client.Host = "localhost"
' Specify that you dont want to use default credentials
client.UseDefaultCredentials = False
' Create user credentials by using NetworkCredential class
Dim credential As New NetworkCredential()
credential.UserName = "waqas"
credential.Password = "secret"
client.Credentials = credential
client.Send(message)
September 10, 2013 07:04 by
Ronny
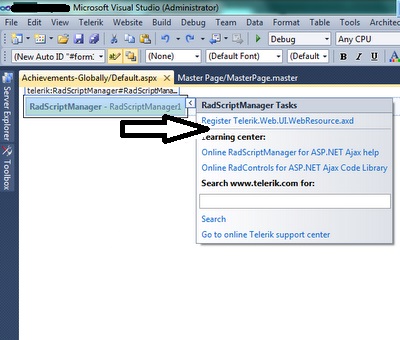
Problem : When you place RadScriptManager on aspx page and compile it gives error like,
‘~/Telerik.Web.UI.WebResource.axd’ is missing in web.config. RadScriptManager requires a HttpHandler registration in web.config. Please, use the control Smart Tag to add the handler automatically, or see the help for more information: Controls > RadScriptManager
Description: An unhandled exception occurred during the execution of the current web request. Please review the stack trace for more information about the error and where it originated in the code.
Exception Details: System.InvalidOperationException: ‘~/Telerik.Web.UI.WebResource.axd’ is missing in web.config. RadScriptManager requires a HttpHandler registration in web.config. Please, use the control Smart Tag to add the handler automatically, or see the help for more information: Controls > RadScriptManager
Solution : Its Simple And fast you Just Have to register The radScriptmanager and it will modify the web config file automatically. To resolve this error you can make changes to your web.config file, or, a perhaps faster and easier solution, is to change your site’s ASP.NET version to Classic Mode – both seem to work equally well.
<system.webServer>
…
<handlers>
…
<add name=”Telerik.Web.UI.WebResource” path=”Telerik.Web.UI.WebResource.axd” verb=”*” type=”Telerik.Web.UI.WebResource, Telerik.Web.UI” />
…
</handlers>
</system.webServer>
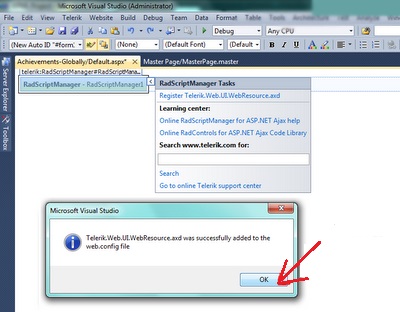
Now save the web.config file, restart the site from IIS Manager and browse the site, the error will disappear. Hope it will help you if you will encounter with similar problem.Please also make sure that ASP .Net 4.0 has been assigned to your website.
Example:
Click RadScriptManager Menu Cursor .It Will Display RadScript Manager Tasks click on Regiter Telerik.Web>UI.WebResource.axd
Telerik.WebUI.WebResources.axd Is Now Succeessfully Register in Web Config.
September 6, 2013 07:20 by
ScottAjax control toolkit contains rich set of controls which are used build highly responsive and interactive web applications. Ajax Control toolkit contains more than 40 controls to choose from which includes ColorPicker, AutoComplete, Calender, Accordion, Watermark, etc. Ajax Control Toolkit’s recently updated version came in September 2012.
Now if you want to add Ajax Control toolkit to your asp.net project in Visual Studio 2012, you have two options.
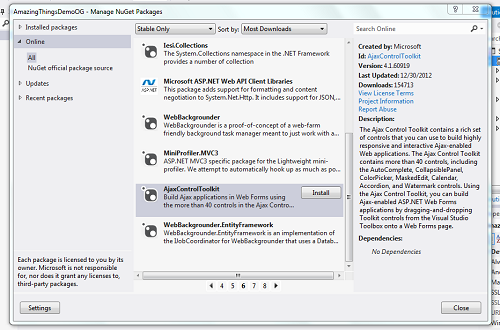
1. Using NuGet Package Manager
This is very simple way to add AjaxControlToolkit to your asp.net project. Just right click on your project under Solution Explorer > Manage NuGet Packages > Online and then select AjaxControlToolkit and then install it.
2. Add Manually
First, you need to download it. Please go to http://ajaxcontroltoolkit.codeplex.com > Downloads > Click on Ajax Control Toolkit 4 > Download.

Then Extract the file. Right Click Zip file > Properties > Unblock > Extract files

The third step is add toolkit to Visual Studio. Right Click on your Toolbox Menus > Click on add tab > Name it as “AjaxControlToolkit” > Right Click on newly added tab > Choose Items > Browse > Select extracted AjaxControlToolkit.dll > Hit ok and there you go.
Select the way which suits you add AjaxControlToolkit to your toolbox and enjoy making a responsive, interactive web applications.
September 2, 2013 08:48 by
Scott
OK, I will talk again about FileUpload Control. Last week I have discussed about how to fix FileUpload Control that not work in Update Panel. FileUpload Control really help us to accepting file uploads from users. It is very easy now. Please see the example below. However, please notice that there are security concerns to to consider when accepting files from users! Here is the markup required:
<form id="form1" runat="server">
<asp:FileUpload id="FileUploadControl" runat="server" />
<asp:Button runat="server" id="UploadButton" text="Upload" onclick="UploadButton_Click" />
<br /><br />
<asp:Label runat="server" id="StatusLabel" text="Upload status: " />
</form>
And here is the CodeBehind code required to handle the upload:
protected void UploadButton_Click(object sender, EventArgs e)
{
if(FileUploadControl.HasFile)
{
try
{
string filename = Path.GetFileName(FileUploadControl.FileName);
FileUploadControl.SaveAs(Server.MapPath("~/") + filename);
StatusLabel.Text = "Upload status: File uploaded!";
}
catch(Exception ex)
{
StatusLabel.Text = "Upload status: The file could not be uploaded. The following error occured: " + ex.Message;
}
}
}
As you can see, it's all relatively simple. Once the UploadButton is clicked, we check to see if a file has been specified in the upload control. If it has, we use the FileUpload controls SaveAs method to save the file. We use the root of our project (we use the MapPath method to get this) as well as the name part of the path which the user specified. If everything goes okay, we notify the user by setting the Text property of the StatusLabel - if not, an exception will be thrown, and we notify the user as well.
This example will get the job done, but as you can see, nothing is checked. The user can upload any kind of file, and the size of the file is only limited by the server configuration. A more robust example could look like this:
protected void UploadButton_Click(object sender, EventArgs e)
{
if(FileUploadControl.HasFile)
{
try
{
if(FileUploadControl.PostedFile.ContentType == "image/jpeg")
{
if(FileUploadControl.PostedFile.ContentLength < 102400)
{
string filename = Path.GetFileName(FileUploadControl.FileName);
FileUploadControl.SaveAs(Server.MapPath("~/") +
filename);
StatusLabel.Text = "Upload status: File uploaded!";
}
else
StatusLabel.Text = "Upload status: The file has to be less than 100 kb!";
}
else
StatusLabel.Text = "Upload status: Only JPEG files are accepted!";
}
catch(Exception ex)
{
StatusLabel.Text = "Upload status: The file could not be uploaded. The following error occured: " + ex.Message;
}
}
}
Here we use the two properties, ContentLength and ContentType, to do some basic checking of the file which the user is trying to upload. The status messages should clearly indicate what they are all about, and you can change them to fit your needs.