European ASP.NET 4.5 Hosting BLOG

BLOG about ASP.NET 4, ASP.NET 4.5 Hosting and Its Technology - Dedicated to European Windows Hosting Customer

ASP.NET Core 2.2.1 Hosting - HostForLIFE.eu :: Google Custom Searching In ASP.NET

clock October 23, 2018 11:28 by author Peter
In many huge contented websites it is very difficult to find some information like any link, page, text etc. So, they use a textbox where visitor types his keyword to search. There are couple of ways to create it like, to search the content from database, crawler. But if you don't have such things then we use Google Custom Search. In Google Custom Search, we create account in Google and provide the domain information to Google and then Google generates some codes which are used inside our web application. If we use the Google Custom Search codes in our application, then Google searches the content from your website. It is available in cost-free and paid also. In cost-free there will be some advertisement of Google.

Let's take a look how to create it.
 
Creating Account in Google Custom Search
 
To create Google Custom Search account use the following link
http://www.google.com/cse/

Click above link to create Google Custom Search.

At the end of this process you will receive some codes generated by Google and you have to keep it for use inside web application. Here is code given Google for my own domain hostforlife.eu.
<scriptsrc="http://www.gmodules.com/ig/ifr?url=http://www.google.com/cse/api/014464787619631746113/cse/67a_iw-duna/gadget&synd=open&w=250&h=100&title=hostforlife.eu+Search&border=%23ffffff%7C0px%2C1px+solid+%23998899%7C0px%2C1px+solid+%23aa99aa%7C0px%2C2px+solid+%23bbaabb%7C0px%2C2px+solid+%23ccbbcc&output=js"></script>  

And I have used it inside the <div> tag in web page, as shown below
<div>    
     <scriptsrcscriptsrc="http://www.gmodules.com/ig/ifr?url=http://www.google.com/cse/api/014464787619631746113/cse/67a_iw-duna/gadget&synd=open&w=250&h=100&title=hostforlife.eu+Search&border=%23ffffff%7C0px%2C1px+solid+%23998899%7C0px%2C1px+solid+%23aa99aa%7C0px%2C2px+solid+%23bbaabb%7C0px%2C2px+solid+%23ccbbcc&output=js"></script>    
  </div>   

HostForLIFE.eu ASP.NET Core 2.2.1 Hosting
European best, cheap and reliable ASP.NET hosting with instant activation. HostForLIFE.eu is #1 Recommended Windows and ASP.NET hosting in European Continent. With 99.99% Uptime Guaranteed of Relibility, Stability and Performace. HostForLIFE.eu security team is constantly monitoring the entire network for unusual behaviour. We deliver hosting solution including Shared hosting, Cloud hosting, Reseller hosting, Dedicated Servers, and IT as Service for companies of all size.


ASP.NET Core 2.2.1 Hosting - HostForLIFE.eu :: How To Use An Area In ASP.NET Core?

clock October 16, 2018 11:40 by author Peter

In order to include an Area in an ASP.NET Core app, first we need to include a conventional route in the Startup.cs file (It's best to place it before any non-area route).

In Startup.cs, configure the method.
    app.UseMvc(routes =>  
    {  
        routes.MapRoute("areaRoute", "{area:exists}/{controller=Admin}/{action=Index}/{id?}");  
        routes.MapRoute(name: "default", template: "{controller=Home}/{action=Index}/{id?}");  
    });   


Then, make a folder named Areas in the app root and make another directory named Admin inside the former. Inside the admin folder, create the following folders (ViewComponent is optional).

Now, we will create a Controller inside the Controllers folder named AdminController.
Now, in order for that to work, you'll need to create Views for all actions that return one. The hierarchy for Views is just like what you have in a non-area Views folder.

Now, you should be good to go!

Question - What if I want to have another Controller inside my Area?

Answer -
Just add another Controller beside AdminController and make sure the routes are like the following,
    [Area("Admin")]  
    [Route("admin/[controller]")]  
    public class ProductsController: Controller {  
        publicProductsController() {  
                //  
            }  
            [Route("{page:int?}")]  
        publicIActionResult Index() {  
            returnView();  
        }  
    }   


The important part is [Route("admin/[controller]")]. With that, you can keep the style of routing to admin /controller/ action/.

HostForLIFE.eu ASP.NET Core 2.2.1 Hosting
European best, cheap and reliable ASP.NET hosting with instant activation. HostForLIFE.eu is #1 Recommended Windows and ASP.NET hosting in European Continent. With 99.99% Uptime Guaranteed of Relibility, Stability and Performace. HostForLIFE.eu security team is constantly monitoring the entire network for unusual behaviour. We deliver hosting solution including Shared hosting, Cloud hosting, Reseller hosting, Dedicated Servers, and IT as Service for companies of all size.


ASP.NET Core 2.2.1 Hosting - HostForLIFE.eu :: End-To-End Testing Of Your Web Applications With Canopy

clock October 9, 2018 09:07 by author Peter

Why Is Canopy Stabilization Layer Built on Top of Selenium?
One of the most crucial concepts of Canopy is reliability - when performing an action the framework tries, during the time span specified via elementTimeout or compareTimeout or pageTimeout, before failing. This improves the experience of writing tests.
Expressiveness

The syntax looks pretty self-explanatory:
    "Bio should contain twitter link" &&& fun _ ->      
        url "https://github.com/
peter"      
        ".user-profile-bio" == "https://twitter.com/
peter

F#
In one of my previous articles, I have already expressed my opinion regarding power and expressiveness of F#.
Writing More Tests

To start, just create a console application, install nuget package canopy and create tests in Program.fs like below:
    open canopy.configuration 
    open canopy.runner.classic 
    open System 
    open canopy.classic 
     
    //set path for chrome direver explicitly 
   chromeDir <- "C:\\" 
    start chrome 
     
    "Left bottom repostitory should be stationwalk.server" &&& fun _ -> 
        //visit the following url 
        url "https://github.com/
peter
        //get 4th child of the following selector 
        let repo = nth 4 ".pinned-repo-item" 
        //get element with the following selector inside repo element 
        let firstRepoCaption = repo |> someElementWithin ".js-repo" 
        match firstRepoCaption with     
        | Some caption -> read caption == "stationwalk.server" //if found read element caption  
                                                               //and compare it 
        | None _ -> failwith "Element not found" //if none element found throw an exception 
     
    "Left bottom repostitory should be stationwalk.client" &&& fun _ -> 
        url "https://github.com/
peter
        let repo = nth 5 ".pinned-repo-item" 
        let firstRepoCaption = repo |> someElementWithin ".js-repo" 
        match firstRepoCaption with 
        | Some caption -> read caption == "stationwalk.client" 
        | None _ -> failwith "Element not found" 
     
    "Bio should contain twitter link" &&& fun _ -> 
        url "https://github.com/
peter" 
        ".user-profile-bio" == "https://twitter.com/peter" 
     
    run() 
     
    printfn "Press any key to exit..." 
    Console.ReadKey() |> ignore 
     
    quit() 


Accessing IWebDriver
If you've ever written tests with Selenium using C#, you might be aware of IWebDriver interface which you still might use for some advanced configuration. For example, let's say we want to run our tests with a browser opened fullscreen. Then we can add the following function to our Program.fs file
    let maximizeBrowser (browser : IWebDriver) =     
      browser.Manage().Window.Maximize() 


Accessing IWebElement
Most of canopy's assertions, i.e., == accept as a parameter either a string which can be css or xpath selector or instance of IWebElement type which again might be already familiar to you if you've ever written selenium tests using C#. So let's say we want to upload something into file upload control.
    let uploadFile fullFilePath = 
      (element "input[type='file']").SendKeys(fullFilePath) 


Splitting Up Big File
Patterns which I've practiced to keep test project maintainable include extracting selectors into page modules and moving tests to separate files.

Let's revisit our github example by moving out selectors into the separate module:
    module GithubProfilePage 
     
    let pinnedRepository = ".pinned-repo-item" 
    let bio = ".user-profile-bio" 


Now we can reference them in the test which we'll move into a separate module too:
    module GithubProfileTests 
     
    open canopy.runner.classic 
    open canopy.classic 
     
    let all() = 
        context "Github page tests" 
     
        "Left bottom repostitory should be staionwalk.server" &&& fun _ -> 
            url "https://github.com/peter" 
            let repo = nth 4 GithubProfilePage.pinnedRepository 
            let firstRepoCaption = repo |> someElementWithin ".js-repo" 
            match firstRepoCaption with 
            | Some caption -> read caption == "stationwalk.server" 
            | None _ -> failwith "Element not found" 
     
        "Right bottom repostitory should be staionwalk.client" &&& fun _ -> 
            url "https://github.com/
peter
            let repo = nth 5 GithubProfilePage.pinnedRepository 
            let firstRepoCaption = repo |> someElementWithin ".js-repo" 
            match firstRepoCaption with 
            | Some caption -> read caption == "stationwalk.client" 
            | None _ -> failwith "Element not found" 
     
        "Bio should contain twitter link" &&& fun _ -> 
            url "https://github.com/peter" 
            GithubProfilePage.bio == "https://twitter.com/peter" 


Our Program.fs will look like this:
    open canopy.configuration 
    open canopy.runner.classic 
    open System 
    open canopy.classic 
     
    chromeDir <- "C:\\" 
    start chrome 
     
    GithubProfileTests.all() 
     
    run() 
     
    printfn "Press any key to exit..." 
    Console.ReadKey() |> ignore 
     
    quit() 


Running Test in Parallel
Recently, Canopy had a major upgrade from 1.x to 2.x and one of the great new features is the ability to run tests in parallel.

Let's revisit our example by using this ability:
    module GithubProfileTests 
     
    open canopy.parallell.functions 
    open canopy.types 
    open prunner 
     
    let all() =   
        "Left bottom repostitory should be stationwalk.server" &&& fun _ -> 
            let browser = start Chrome         
            url "https://github.com/
peter" browser 
            let repo = nth 4 GithubProfilePage.pinnedRepository browser 
            let firstRepoCaption = someElementWithin ".js-repo" repo browser 
            match firstRepoCaption with 
            | Some caption -> equals (read caption browser) "stationwalk.server" browser 
            | None _ -> failwith "Element not found" 
     
        "Right bottom repostitory should be stationwalk.client" &&& fun _ -> 
            let browser = start Chrome         
            url "https://github.com/
peter" browser 
            let repo = nth 5 GithubProfilePage.pinnedRepository browser 
            let firstRepoCaption = someElementWithin ".js-repo" repo browser 
            match firstRepoCaption with 
            | Some caption -> equals (read caption browser) "stationwalk.client" browser 
            | None _ -> failwith "Element not found" 
     
        "Bio should contain twitter link" &&& fun _ -> 
            let browser = start Chrome         
            url "https://github.com/
peter" browser 
            equals GithubProfilePage.bio "https://twitter.com/
peter" browser 

The key trick to follow here is that each test operates now with its own copy of browser and assertions are now taken from open canopy.parallel.functions to accept browser as an argument.

Headless Testing
Testing in a headless browser seems to be the new black now. Although I don't share the sentiment, I still can assure you that testing in headless browsers is supported by Canopy. You can run your tests in headless Chrome as follows:
let browser = start ChromeHeadless 

I hope this article has convinced you that Canopy is a robust and easy to use framework which can be used in building end-to-end testing layers of your application.

HostForLIFE.eu ASP.NET Core 2.2.1 Hosting
European best, cheap and reliable ASP.NET hosting with instant activation. HostForLIFE.eu is #1 Recommended Windows and ASP.NET hosting in European Continent. With 99.99% Uptime Guaranteed of Relibility, Stability and Performace. HostForLIFE.eu security team is constantly monitoring the entire network for unusual behaviour. We deliver hosting solution including Shared hosting, Cloud hosting, Reseller hosting, Dedicated Servers, and IT as Service for companies of all size.


ASP.NET Core 2.2.1 Hosting - HostForLIFE.eu :: System.Diagnostics Useful Actions

clock October 2, 2018 09:51 by author Peter

The namespace System.Diagnostics provides a set of attributes and classes to interact with the system process, event managers, performance counts etc. This namespace can help us too in debugging jobs.

Let’s review the useful actions inside System.Diagnostics namespace.

DebuggerDisplay Attribute
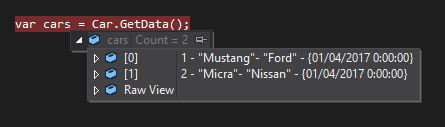
DebuggerDisplay attribute drives the string format with debug screen, which shows the value of: class, properties or fields.

For this same task, it is best known override ToString method, but use DebbugerDisplay attribute is a better choice, because this does not modify the data structure as it only interacts with Visual Studio debbuger screen. Override ToString method for only this purpose can give problems because many actions in .NET takes this value for default, for example bindings in WPF.

This attribute supports delegates, properties, fields and assamblies.

Example
[System.Diagnostics.DebuggerDisplay("{ID} - {Model}- {Manufacturer} - {ProductionDate}")] 
public class Car 

    public int      ID             { get; set; } 
    public string   Model        { get; set; } 
    public string   Manufacturer   { get; set; } 
    public DateTime ProductionDate { get; set; } 
}  


DebuggerHidden Attribute
DebuggerHidden attribute prevents the compiler from stopping in constructors, methods, properties and indexers declarations.
In mentioning this later, my comment might sound lightweight, but in the practice, this can save time push key F11 in debugging.

Example
[System.Diagnostics.DebuggerHidden] 
public static List<Car> GetData() 

    var result = new List<Car>() 
    { 
        new Car{ ID = 1, Manufacturer = "Ford",   Model = "Mustang", ProductionDate = DateTime.Today }, 
        new Car{ ID = 2, Manufacturer = "Nissan", Model = "Micra"  , ProductionDate = DateTime.Today } 
    }; 
 
    return result; 
}  


Debugger.Launch

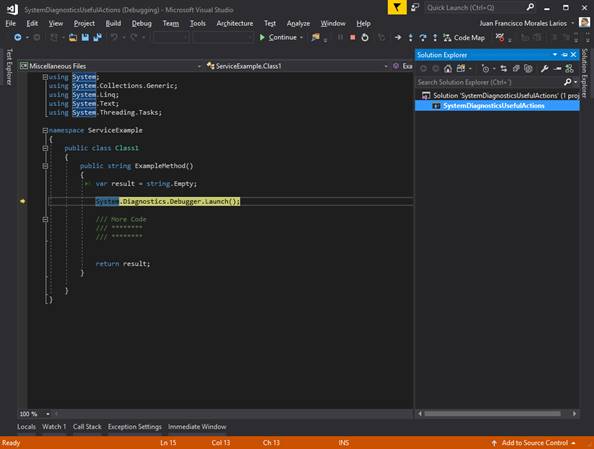
Occasionally, we can’t debug the code of a library, Service etc. because it is not accessible or we can’t add project to our solution. In this case, we can use the Debugger.Launch() method and Visual Studio opens a debug Window and we can debug its code.

When executed, the line Systen.Diagnostics.Debbuger.Launch() opens a MessageBox with the instance of Visual Studio Debugger Options.

In this window, we can choose, if we open a new stance of Visual Studio (all versions) or if we re-use an existing instance. We can debug the code, as shown below.

Conditional Attribute
Conditional attribute allows us to indicate a condition to the methods so that the compiler executes or does not execute its content. We can use it with the precompiler sentences as DEBUG.
static void Main(string[] args) 

 
    DebugMethod(); 
 
 
    Console.Read(); 

 
[System.Diagnostics.Conditional("DEBUG")] 
public static void DebugMethod() 

    Console.WriteLine("Execute Debug Method"); 
}  


It will only run if the solutions configurations are debugged.

The condition doesn’t exist for RELEASE, therefore we will use a define Directives.
Define Directives is another way to use System.Diagnostics.Conditional,
#define RELEASE_MODE 
 
using System; 
namespace SystemDiagnosticsUsefulActions 

    class Program 
    { 
        static void Main(string[] args) 
        { 
            ReleaseMethod(); 
 
            Console.Read(); 
        } 
 
        [System.Diagnostics.Conditional("RELEASE_MODE")] 
        public static void ReleaseMethod() 
        { 
            Console.WriteLine("Execute Release Method"); 
        } 
 
    } 
 
}  


These are the useful tips and traps of System.Diagnostics. They become very practical in many cases and I hope you find them useful.

HostForLIFE.eu ASP.NET Core 2.2.1 Hosting
European best, cheap and reliable ASP.NET hosting with instant activation. HostForLIFE.eu is #1 Recommended Windows and ASP.NET hosting in European Continent. With 99.99% Uptime Guaranteed of Relibility, Stability and Performace. HostForLIFE.eu security team is constantly monitoring the entire network for unusual behaviour. We deliver hosting solution including Shared hosting, Cloud hosting, Reseller hosting, Dedicated Servers, and IT as Service for companies of all size.


About HostForLIFE.eu

HostForLIFE.eu is European Windows Hosting Provider which focuses on Windows Platform only. We deliver on-demand hosting solutions including Shared hosting, Reseller Hosting, Cloud Hosting, Dedicated Servers, and IT as a Service for companies of all sizes.

We have offered the latest Windows 2016 Hosting, ASP.NET Core 2.2.1 Hosting, ASP.NET MVC 6 Hosting and SQL 2017 Hosting.


Tag cloud

Sign in