European ASP.NET 4.5 Hosting BLOG

BLOG about ASP.NET 4, ASP.NET 4.5 Hosting and Its Technology - Dedicated to European Windows Hosting Customer

European ASP.NET Core Hosting - HostForLIFE.eu :: How to Find and Use ASP.NET Core Session

clock February 24, 2017 06:41 by author Scott

I'm building a tutorial (hopefully soon to be a post) and in that tutorial I needed to use Session for some quick-and-dirty data storage. Unfortunately when I tried to use Session in my default project, it was nowhere to be found, and I was sent down a small rabbit hole trying to find it. This post will walk through a reminder of what Session is, where to find it in ASP.NET Core 1.0, an overview of the new extension methods available, and building our own custom extension method. Let's get started!

What is Session?

If you're just starting to develop in ASP.NET, you may not have encountered Session before. Session is a serialized collection of objects that are related to the current user's session. The values are usually stored on the local server memory, but there are alternate architectures where the values can be stored in a SQL database or other distributed storage solutions, especially when your servers are part of a server farm.

You can store any data you like in Session, however any data you store will only be available to the current user as long as the session is active. This means that if that user logs out, the Session data is lost; if you need to keep this data you have to find another way to store it.

Finding the Session

ASP.NET Core 1.0 has been written from the ground up to be a modular, choose-what-you-need framework. What this means is that you must explicitly include any packages you want to use in your project.

This allows us developers to maintain tight control over what functionality our ASP.NET Core projects actually need, and exclude anything that is not necessary.

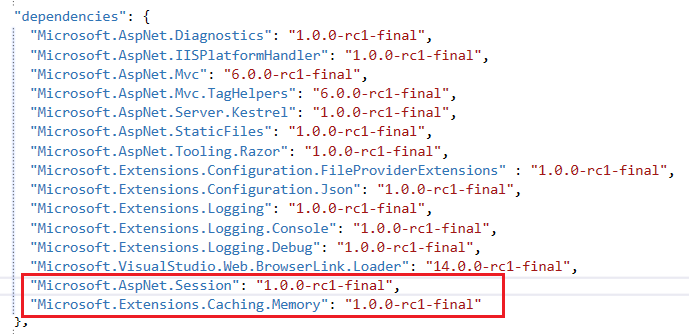
In our case, Session is considered to be one of these "additional" packages. In order to include that package we need to add a reference to Microsoft.AspNet.Session in the project.json file. If we wanted to use memory as our caching backend, we would also include Microsoft.Extensions.Caching.Memory.

Once we've got the package included in our project, we need to make it available to the Services layer by modifying the ConfigureServices()method in the Startup file, like so:

public void ConfigureServices(IServiceCollection services) 
{
    ...
    services.AddMemoryCache();
    services.AddSession(options =>
    {
        options.IdleTimeout = TimeSpan.FromMinutes(60);
        options.CookieName = ".MyCoreApp";
    });
    ...
}

With all of these steps completed, you can now use Session in your projects just like in any other ASP.NET application. If you wanted to use a different cache backend (rather than memory) you could grab a different NuGet package like Redis or SqlServer. Don't forget to check NuGet if you can't find the functionality you need; it is probably there and you just need to download it.

How to Use Session

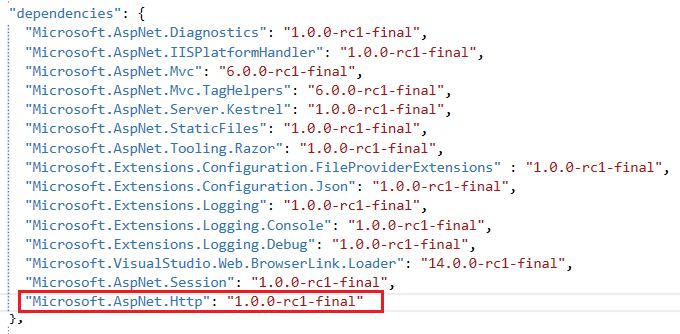
ASP.NET Core 1.0 has introduced some new extension methods that we can use for accessing and storing Session values. The odd thing is that these extensions are not in Microsoft.AspNet.Session; rather, they are in Microsoft.AspNet.Http, and so we will need to add that package.

Once we've got that package included, we can start using the extension methods:

[HttpGet]
public IActionResult Index() 
{
    var userID = Context.Session.GetInt("UserID");
    var userName = Context.Session.GetString("UserName");
    return View();
}

[HttpGet]
public IActionResult Default() 
{
    Context.Session.SetInt("UserID", 5);
    Context.Session.SetString("UserName", "John Smith");
    return View();
}

The new extension methods are:

  • Get: Returns a byte array for the specified Session object.
  • GetInt: Returns an integer value for the specified Session object.
  • GetString: Returns a string value for the specified Session object.
  • Set: Sets a byte array for the specified Session object.
  • SetInt: Sets an integer value for the specified Session object.
  • SetString: Sets a string value for the specified Session object.

Why do only these extensions exist, and not GetDouble, GetDateTime, etc? I'm really not sure. If I had to guess I'd say it is to ensure that the values are serializable, but don't quote me on that. If anybody knows the real reason, I'd love to hear it!

Creating Extension Methods

I'm not completely satisfied with these extensions; they don't have enough functionality for my tastes, and so I'm gonna build some more. Specifically, I want to build extensions that will store a DateTime in session and retrieve it.

Here's the method signatures for these extensions:

public static DateTime? GetDateTime(this ISessionCollection collection, string key) 
{

}

public static void SetDateTime(this ISessionCollection collection, string key, DateTime value) 
{

}

The ISessionCollection interface is exactly what it sounds like: a collection of items stored in Session.

Let's tackle the SetDateTime() method first. DateTimes are weird because they are not inherently serializable, but they can be converted to a serializable type: long. So, we must convert the given DateTime value to a long before it can be stored.

public static void SetDateTime(this ISessionCollection collection, string key, DateTime value) 
{
    collection.Set(key, BitConverter.GetBytes(value.Ticks));
}

The BitConverter class allows us to convert byte arrays into other types easily.

Now we can tackle the GetDateTime() method. There are two things we need to keep in mind when building this extension. First, it is entirely possible that there will be no value in Session for the specified key; if this happens, we should return null. Second, we are storing the DateTime as a long, and therefore we need to serialize it back into a DateTime type; luckily the DateTime constructor makes this really easy. The final code for the method looks like this:

public static DateTime? GetDateTime(this ISessionCollection collection, string key) 
{
    var data = collection.Get(key);
    if(data == null)
    {
        return null;
    }

    long dateInt = BitConverter.ToInt64(data, 0);
    return new DateTime(dateInt);
}

Now we can use these extensions in addition to the ones already defined.

Now we've seen Session in action, including what package to use from NuGet, what extension methods are available, and even how to build our own extension method. Let me know if this helped you out in the comments!

Happy Coding!


European ASP.NET Core Hosting - HostForLIFE.eu :: Customising model-binding conventions in ASP.NET Core

clock February 21, 2017 08:04 by author Scott

A pattern I use when building Web APIs is to create commands to represent an API operation and models to represent resources or results. We share these "common" objects with our .NET client so we can be sure we're using the same parameters names/types.

Here's an excerpt from Fabrik's API for creating a project:

public HttpResponseMessage Post(int siteId, AddProjectCommand command)
{
    var project = new CMS.Domain.Project(
        session.GetSiteId(siteId),
        command.Title,
        command.Slug,
        command.Summary,
        command.ContentType,
        command.Content,
        command.Template,
        command.Tags,
        command.Published,
        command.Private);

    session.Store(project);

    var model = CreateProjectModel(project);
    var link = Url.Link(RouteNames.DefaultRoute, new { controller = "projects", siteId = siteId, id = project.Id.ToIntId() });

    return Created(model, new Uri(link));
}

We also use commands for GET operations that have multiple parameters such as search endpoints. So instead of:

public IActionResult GetProjects(string searchTerm = null, int page = 1, int pageSize = 10)
{

}

We have a GetProjectsCommand:

public class GetProjectsCommand
{
    public string SearchTerm { get; set; }
    [MinValue(1, ErrorMessage = "Page must be greater than 0.")]
    public int Page { get; set; } = 1;
    public int PageSize { get; set; } = 20;
}

This provides a single place to encapsulate our default values and validation rules, keeping our controllers nice and lean.

Model-binding in ASP.NET Core MVC

To bind complex types to query strings in ASP.NET Web API we had to change the parameter binding rules. This is because the default was to bind complex types from the HTTP Request body.

When implementing the above pattern in ASP.NET Core I was pleasantly surprised to see that the following worked out of the box:

// GET: api/values
[HttpGet]
public IEnumerable<string> Get(GetValuesCommand command)
{

}

I thought that perhaps the framework detected that this was a HTTP GET request and therefore bound the parameter values from the query string instead.

Actually this is not the case - in ASP.NET Core, complex types are not bound from the request body by default. Instead you have to opt-in to body-based binding with the FromBodyAttribute:

// POST api/values
[HttpPost]
public void Post([FromBody]AddValueCommand command)
{
}

This seems an odd default given that (in my experience) binding complex types from the request body is far more common.

In any case, we can customise the default model-binding behaviour by providing a convention:

public class CommandParameterBindingConvention : IActionModelConvention
{
    public void Apply(ActionModel action)
    {
        if (action == null)
        {
            throw new ArgumentNullException(nameof(action));
        }

        foreach (var parameter in action.Parameters)
        {
            if (typeof(ICommand).IsAssignableFrom((parameter.ParameterInfo.ParameterType)))
            {
                parameter.BindingInfo = parameter.BindingInfo ?? new BindingInfo();
                parameter.BindingInfo.BindingSource = BindingSource.Body;
            }
        }
    }
}

Which is registered like so:

public void ConfigureServices(IServiceCollection services)
{
    services.AddMvc(options =>
    {
        options.Conventions.Add(new CommandParameterBindingConvention());
    });
}

This convention checks to see if the parameter type implements ICommand (a marker interface I created) and if so, instructs the framework to bind the values for this parameter from the request body.

All I have to do then is update my command with this interface:

public class AddValueCommand : ICommand
{
    public string Value { get; set; }
}

Then I can drop the unnecessary [FromBody] attribute:

// POST api/values
[HttpPost]
public void Post(AddValueCommand command)
{
}


European ASP.NET Core Hosting - HostForLIFE.eu :: How to Setup Webpack in ASP.NET Core

clock February 10, 2017 11:11 by author Scott

Webpack is a great tool for bundling the client side assets in your web application. In this post we'll briefly discuss why you should create bundles and see how Webpack can automate that for us in ASP.NET Core.

Why should I bundle

When building web applications, regardless of the server side framework, you'll need to get your client side resources over to the browser. You may have dozens of JavaScript and CSS files in your project but having to reference each of them individually in your HTML markup is just not ideal for production deployments.

Each browser only allows so many concurrent requests per hostname. BrowserScope has some data on this that you can view on their site. If your web application makes more than the allowed number of simultaneous requests then the additional requests will end up being queued. This leads to longer load times and a not so smooth experience for your users; especially on mobile devices.

It would be much better to group resources into bundles so that the browser would have fewer files to download and thus fewer requests to make. This will help in keeping bandwidth usage low and even with battery life on your users' devices.

What is Webpack?

Webpack is a module bundler for the static assets in your web application. Essentially, you point Webpack at the main entry point(s) of your code then it will determine the dependencies, run transformations and create bundles that you can provide to your browser. What's even better is that in addition to JavaScript Webpack can also handle CSS, LESS, TypeScript, CoffeeScript, images, web fonts and more.

Setting up

We're going to start by setting up a new ASP.NET Core project using the dotnet cli tooling. If you don't have tooling installed, you can find can setup files and instructions here. If you're not a Windows user, the tooling works on Windows, OSX and Linux so no need to worry.

Let's get started by opening a terminal and creating an empty directory. Now, we'll generate a new ASP.NET Core project by running the following command:

dotnet new -t web 

Currently, the generated project includes .bowerrc and bower.json files. You can delete these since we'll be using NPM to install packages. If you don't have NodeJS installed on your system, make sure you do so before continuing.

The next thing we'll do is create a folder called Scripts in the root of your project. You'll find out why later on. Also add an empty webpack.config.js to the root of your project. As you might have guessed, this is the file we'll use to configure Webpack. Your project layout should look something like this.
Configuring Webpack

Before we start configuring Webpack, let's check out where our assets actually are. ASP.NET Core places all the files destined for the browser inside of the wwwroot folder by default. If you take a peep inside that folder, you'll see sub folders for your your JavaScript, CSS and image files. Note, the names of these sub folders aren't important. Feel free to rename them if you wish.

Personally, I prefer to reserve the wwwroot folder for the bundles that I want to provide to the browser. What we'll do is use the Scripts directory that was created earlier for the working files that will get included in the bundles.

Let's add two pretty trivial JavaScript files to our Scripts folder.

//other.js
function func() {
    alert('loaded!');
}
module.exports = func;

//main.js
var other = require('./other');

other();

Our scripts have been written using the CommonJS module syntax. The main.js file imports other.jsand calls the exported function. Ok, simple enough. Let's take a look at webpack.config.js.

var path = require('path');

module.exports = {
    entry: {
        main: './Scripts/main'
    },
    output: {
       publicPath: "/js/",
       path: path.join(__dirname, '/wwwroot/js/'),
       filename: 'main.build.js'
    }
};

The webpack.config.js file is a CommonJS module that we'll use to setup Webpack. The sample above shows a fairly bare bones Webpack configuration. Inside of entry, we define a main module and point it to the location of main.js file since that's where our app starts. The name of the bundle can be changed to something else if you like. There's no requirement for it to be called main. Inside of output, we let Webpack know what to name the bundle file and where to place it. The publicPath property configures the relative URL that the browser will use to reference our bundles.

Alright, that's good for now. Before we generate our bundle, make sure you have Webpack installed globally on your machine. Type the following command in your terminal. You'll only have to do this once.

npm i -g webpack 

Now we're ready to create our bundle. Make sure your terminal path is at the root of your project directory. Now run

webpack 

Your terminal output should look similar to below.
In your code editor, open Views/_Layout.cshtml. Near the bottom of the file, add a script reference to our bundle.

<script src="~/js/main.build.js"></script>

The generated ASP.NET Core template adds a few scripts tags wrapped in environment tag helpers. Go ahead and remove these for now.

<environment names="Development">
        <script src="~/lib/jquery/dist/jquery.js"></script>
        <script src="~/lib/bootstrap/dist/js/bootstrap.js"></script>
        <script src="~/js/site.js" asp-append-version="true"></script>
</environment>

Finally, we can run our application and see if our bundle works. Execute the following commands in the command terminal.

dotnet restore
dotnet run

Navigate to http://localhost:5000 in your browser. If everything works as expected, you should see an alert with loaded! in the browser window.

Tying the builds together

We can reduce the number of commands we have to type by leveraging the build events in project.json. Update the scripts section to include the precompile event. To see the other available events, head over to the .NET Core Tools docs.

"scripts": {
    "precompile": ["webpack"],
  },

Now running dotnet run or dotnet build will also run Webpack to generate the bundle.

Conclusion

In this post, we got a short introduction to setting up Webpack in ASP.NET Core. Webpack often gets labeled as overly complex and difficult to setup. Hopefully, this post showed you how easy it is to get started and made you a little more curious about what else it can do.


European ASP.NET Core Hosting - HostForLIFE.eu :: Cookie Authentication and Policy Based Authorization in ASP.NET Core

clock February 6, 2017 10:23 by author Scott

This is the first part of the series of articles I'll be covering about ASP.NET Core Security. We're going to start off with cookie based authentication and build our way up to configuring policy based authorization.

As part of the ASP.NET Core security, there is a new richer policy based authorization that we can use to authorize against the claims in user's possession.

Let's build an example MVC application to demonstrate the concepts. In our scenario, we'll demand users to be authenticated and have Read claim to view the home page of our application.

I am using Visual Studio 2015 Pro Edition w/Update 3 (you should also be able to use the free community edition).

1. Create a new ASP.NET Core Web Application


2. Select the Empty Template


3. We need to add the required nuget packages to configure authorization, cookie authentication, and the mvc middleware. Bring up the project.jsonfile, add the following under the dependencies section.

"Microsoft.AspNetCore.Authorization": "1.0.0"
"Microsoft.AspNetCore.Authentication.Cookies": "1.0.0"
"Microsoft.AspNetCore.Mvc": "1.0.0"


4. Once you save the project.json file, Notice Visual Studio installs the missing nuget packages automatically. Next, bring up the Startup.cs where we'll configure the middleware we just included in our project.

5. In Configure method, add the following authentication middleware configuration;

app.UseCookieAuthentication(new CookieAuthenticationOptions
    {
        AuthenticationScheme = "Cookies",
        LoginPath = new StringPath("/Account/Login"),
        AccessDeniedPath = new StringPath("/Home/Forbidden"),
        AutomaticAuthenticate = true,
        AutomaticChallenge = true
    });

Here we're using the Cookie authentication, defining our LoginPath, where users will be redirected for authentication, and AccessDeniedPath when the user is not authorized. AutomaticAuthenticate flag indicates that the middleware should run on every request and attempt to validate and reconstruct any serialized principal it created. AutomaticChallenge flag indicates that the middleware should redirect the browser to the LoginPath or the AccessDeniedPath when the authorization fails (there are various other configuration options, however this the bare minimum we need for this example).

Next, we'll configure the requirements for the ReadPolicy. The policy will demand the user to be authenticated and have the Read claim in order access the required resource(s). Depending on your authorization logic, you can setup your policy to require additional claims.

public void ConfigureServices(IServiceCollection services) 
{
    services.AddAuthorization(options =>
    {
        options.AddPolicy("ReadPolicy", policyBuilder =>
        {
            policyBuilder.RequireAuthenticatedUser()
                .RequireAssertion(context => context.User.HasClaim("Read", "true"))
                .Build();
        });
    });
}

6. Finally we need to add the mvc middleware configuration.

app.UseMvc(builder =>
    {
        builder.MapRoute("default", "{controller=Home}/{action=index}/{id?}");
    });

Let's add couple of controllers so that we can test the login and the policy we've created. Create AccountController for user login and HomeController where we'll apply the ReadPolicy.

7. In the AccountController.cs add the following actions to login user;

[HttpGet]
public IActionResult Login(string returnUrl) 
{
    ViewData["ReturnUrl"] = returnUrl;
    return View();
}

8. Add a simple Login.cshtml view under the Views/Account folder (create the folder structure if it doesn't exists) where the user can login to the application.

<form asp-action="Account/Login" method="post" 
      asp-route-returnUrl="@ViewData["ReturnUrl"]">
    <div>
        <label>Username</label>
        <input type="text" name="username" />
    </div>
    <div>
        <label>Password</label>
        <input type="password" name="password" />
    </div>
    <div><button>Login</button></div>
</form> 

In the POST login action, we have a simple verification; The username and the password must match in order to authenticate the user (Obviously you wouldn't do this in a real production application but for our demo purposes this is fine). If they match, we then create a set of claims, the claims identity, and the claims principle that represents the authenticated user. Then, we sign in the user (means we issue a cookie to the user which contains the set of claims we've created) and redirect back to the resource that was requested for access.

[HttpPost]
public async Task<IActionResult> Login(string username, string password, string returnUrl) 
{
    if (username == password)
    {
        var claims = new List<Claim>
        {
            new Claim("Read", "true"),
            new Claim(ClaimTypes.Name, "ayayalar"),
            new Claim(ClaimTypes.Sid, "12345")
        };

        var claimsIdentity = new ClaimsIdentity(claims, "password");
        var claimsPrinciple = new ClaimsPrincipal(claimsIdentity);

        await HttpContext.Authentication.SignInAsync("Cookies", claimsPrinciple);

        if (Url.IsLocalUrl(returnUrl))
        {
            return Redirect(returnUrl);
        }

        return Redirect("~/");
    }

    return View();
}

9. Add the following action to the HomeController.cs;

[Authorize(Policy = "ReadPolicy")]
public IActionResult Index() 
{
    return View();
}

Note that we passed the ReadPolicy to the authorization attribute. The user must be authenticated and have a Read claim to have access. Otherwise, they'll be forwarded to the Forbidden page as we specified in the authentication middleware configuration.

The Index.cshtml view for the home page (can be as simple as one line of code) under Views/Home folder;

<h1>Access Granted</h1>

We should be able to test our changes at this point. Once you run the application, you'll be redirected to the login page since you're not authenticated (notice the return url in the query string is set automatically by the framework). Upon successfully submitting your credentials, you will be authorized and redirected to the home page.

For testing purposes, try removing the Read claim we've added in the Loginaction, rebuild your solution and restart the application, even if the user can login successfully, authorization will be denied and the user will be redirected to the Forbidden page.


About HostForLIFE.eu

HostForLIFE.eu is European Windows Hosting Provider which focuses on Windows Platform only. We deliver on-demand hosting solutions including Shared hosting, Reseller Hosting, Cloud Hosting, Dedicated Servers, and IT as a Service for companies of all sizes.

We have offered the latest Windows 2016 Hosting, ASP.NET Core 2.2.1 Hosting, ASP.NET MVC 6 Hosting and SQL 2017 Hosting.


Tag cloud

Sign in