European ASP.NET 4.5 Hosting BLOG

BLOG about ASP.NET 4, ASP.NET 4.5 Hosting and Its Technology - Dedicated to European Windows Hosting Customer

European ASP.NET 4.5 Hosting - Amsterdam :: Using Model Binding ASP.NET 4.5 to Display Data

clock July 29, 2013 08:17 by author Scott

As I have previously written, ASP.NET 4.5 has introduced many new features. One of them is model binding in ASP.NET 4.5. Now, I will give implementation how to use model binding with ASP.NET Forms 4.5.

Sample data

Before going on with examples let’s create some test data too. Let’s define class Product as follows.

1.public class Product
2.{
3.   public int Id { get; set; }
4.   public string Name { get; set; }
5.   public decimal Price { get; set; }
6.}

We need more than one product and to avoid creating database or doing other complex things we define simple method that returns us list of products.

01.private IList<Product> GetProductList()
02.{
03.   return new[]{
04.      new Product { Id=1, Name="Heineken", Price=0.88m },
05.      new Product { Id=2, Name="Skopsko", Price=0.97m },
06.      new Product { Id=3, Name="Gambrinus", Price=0.63m },
07.      new Product { Id=4, Name="Lapin Kulta", Price=0.92m },
08.      new Product { Id=5, Name="Rock", Price=1.1m }
09.   };
10.}

That’s enough for preparation work. You can use this method also as static method of Product class.

Strongly typed controls

Previous versions of ASP.NET Forms used reflection on data source objects to read values from objects they were bound to. Web is full of examples about how to bind DataTable to GridView or Repeater and so on. With strongly typed controls ASP.NET Forms makes step closer to object orientation in presentation layer.

Let’s define strongly typed Repeater that shows us list of products.

01.<asp:Repeater
02.      runat="server" ID="Repeater1"
03.      ModelType="WebApplication45.Product"
04.      SelectMethod="GetProducts">
05.   <HeaderTemplate>
06.      <table>
07.      <tr>
08.      <th>ID</th>
09.      <th>Name</th>
10.      <th>Price</th>
11.      </tr>
12.   </HeaderTemplate>
13.   <ItemTemplate>
14.      <tr>
15.      <td><%# Item.Id %></td>
16.      <td><%# Item.Name %></td>
17.      <td><%# Item.Price %></td>
18.      </tr>
19.   </ItemTemplate>
20.   <FooterTemplate>
21.      </table>
22.   </FooterTemplate>
23.</asp:Repeater>

Note the following things:

1. There is new ModelType property we can use to specify type of data item.
2. There is new SelectMethod property that specifies the method to call when repeater wants to load data.
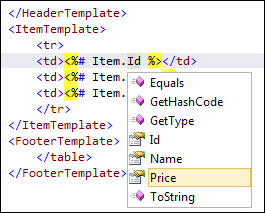
3. To show data in different templates we can use Item property that is strongly typed and – of course – IntelliSense is also supported. You can see IntelliSense in action on screenshot on below.

Now let’s see how SelectMethod works.

Select method

Select method is expected to return us result of type IQueryable<ModelType>. If our data source returns something else we can usually use LINQ extension methods to convert our source data to IQueryable. In our case GetProducts() method is defined as follows.

1.public IQueryable<Product> GetProducts()
2.{
3.   return GetProductList().AsQueryable();
4.}

SelectMethod allows us to do much more but for this example it is enough.

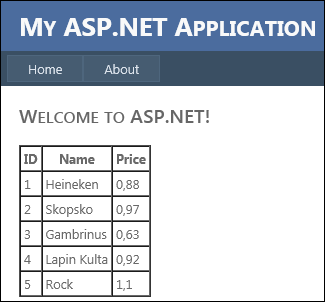
After running our ASP.NET Forms solution we will see product table like this.

Conclusion

Repeater is not the only strongly typed control available in ASP.NET 4.5 – there are many other familiar controls that have support for strongly typed data. In this posting we saw that defining strongly typed web controls is easy. It is also easy to provide data to these controls using data selecting method. SelectMethod is more powerful than you can see here but this is the topic of some other (hopefully interesting) posting.


European ASP.NET Hosting - Amsterdam :: Tips to Populate Or Bind DropDownList With JQuery And XML In Asp.Net

clock July 8, 2013 11:32 by author Scott

In this example i'm explaining How To Populate Or Bind DropDownList With JQuery And XML In Asp.Net.

Add jquery library reference in head section and place one dropdown on the page.

Add one list item with select as it's value.

   1:  <asp:DropDownList ID="DropDownList1" runat="server">
   2:  <asp:ListItem>Select</asp:ListItem>
   3:  </asp:DropDownList>
   4:   
   5:  <asp:Label ID="Label1" runat="server" Text=""/>


Following is the Cities.xml file i'm using to bind dropdownlist using jquery.

01<!--?xml version="1.0" encoding="utf-8" ?-->
02<cities>
03  <city>
04    <name>New York</name>
05    <id>1</id>
06  </city>
07    <city>
08    <name>Washington</name>
09      <id>2</id>
10  </city>
11  <city>
12    <name>Chicago</name>
13    <id>3</id>
14  </city>
15  <city>
16    <name>Seattle</name>
17    <id>4</id>
18  </city>
19</cities>

Add this script in head section of page.

01<script src="jquery-1.7.2.min.js" type="text/javascript"></script>  
02<script type="text/javascript">
03$(document).ready(function()
04{
05  $.ajax(
06  {
07    type: "GET",
08    url: "Cities.xml",
09    dataType: "xml",
10    success: function(xml)
11    {
12      var dropDown = $('#<%=DropDownList1.ClientID %>');
13      $(xml).find('City').each(function()
14      {
15        var name = $(this).find('name').text();
16        var id = $(this).find('id').text();
17        dropDown.append($("<option></option>").val(id).html(name));
18      });
19      dropDown.children(":first").text("--Select--").attr("selected", true);
20    }
21  });
22  $('#<%=DropDownList1.ClientID %>').change(function()
23  {
24  var ddl = $('#<%=DropDownList1.ClientID %>');
25  var selectedText = $('#<%=DropDownList1.ClientID %> option:selected').text();
26  var selectedValue = $('#<%=DropDownList1.ClientID %>').val();
27  document.getElementById('Label1').innerHTML = "You selected " + selectedText + " With id " + selectedValue;
28  });
29});
30</script>

Build and run the code.


European ASP.NET 4.5 Hosting - Amsterdam :: Change Session Timeout in ASP.NET

clock July 1, 2013 11:53 by author Scott

You’re trying to increase session timeout on your ASP.NET site? In this tutorial, I will gonna talk about this issue. But, if you use shared hosting, you cant use session as it will impact to other clients site.

ASP.NET

Usually, the first and easiest thing to do is just change the configuration/system.web/sessionState@timeout value to something like “90″.  This should mean that you’d like your users’ sessions to be persisted until a 90 minute window of idle time has elapsed.

<configuration>
  <system.web>
  ...
   <sessionState timeout="90" />
  ...
 </system.web>
</configuration>

Hmm… Not only about change on your code, but please check this application pool timeout on your IIS setting.

Ensure this value is set to the timeout of your session, at a minimum, to ensure that all sessions persist for the entire session timeout period.

The reason that these two values are dependent on one another is because the session information is actually stored within the worker process of the application pool. That is to say, if the worker process is shutdown or killed for any reason, the session information will be lost.

Session Storage Mode

There are the modes of storing the session information:

  • InProc (or In Process) – Default – Stores session information within the IIS worker process
  • StateServer – Stores session information in a separate process (the ASP.NET state service)
  • SQLServer – Stores session information in a SQL database

The only mode that is vulnerable to losing session information on a worker process is when the state is stored in the worker process. Both StateServer and SQLServer modes are not affected by worker process resets. Likewise, StateServer and SQLServer modes are the only options when it is necessary to share session state across more than a single IIS server.

For more information about these modes, check out MSDN.

ASP

There’s two ways to change the session timeout when you’re dealing with classic ASP.

You can set it at the application level, or programmatically, which means that the value can be different within the application.

Since it doesn’t specifically state that the setting is for classic ASP, it may be confusing to know that the value is in: Application Properties -> Configuration… -> Options -> Enable session state.

It’s as simple as updating this value, and the session timeout for your entire classic ASP application is changed!

Programmatically

You can also use modify the Session.Timeout property at runtime to affect the timeout period of the session. One popular location to put this piece of code is in the global.asa file.

<script language="VBScript" runat="Server">
Sub Session_OnStart
 Session.Timeout = 90
End Sub
</SCRIPT>

Hope this tutorial helpful. 


About HostForLIFE.eu

HostForLIFE.eu is European Windows Hosting Provider which focuses on Windows Platform only. We deliver on-demand hosting solutions including Shared hosting, Reseller Hosting, Cloud Hosting, Dedicated Servers, and IT as a Service for companies of all sizes.

We have offered the latest Windows 2016 Hosting, ASP.NET Core 2.2.1 Hosting, ASP.NET MVC 6 Hosting and SQL 2017 Hosting.


Tag cloud

Sign in