European ASP.NET 4.5 Hosting BLOG

BLOG about ASP.NET 4, ASP.NET 4.5 Hosting and Its Technology - Dedicated to European Windows Hosting Customer

ASP.NET Core 1.1 Hosting - HostForLIFE.eu :: How to Create Circular Progress Bar Dynamically In ASP.NET?

clock December 21, 2016 08:20 by author Peter

In this post, let me explain you about Create Circular Progress Bar Dynamically In ASP.NET. For it, we will take a div and apply style to make it circular.

<div id="circularProgess" class="circularprogress background" runat="server"> 
          <div id="ProgressText" class="overlay" runat="server"></div> 
</div> 


Add the style, mentioned below.
<style> 
    .background { 
        background-image: linear-gradient(<%= Val1 %>, <%= ColorCode %> 50%, rgba(0, 0, 0, 0) 50%, rgba(0, 0, 0, 0)), linear-gradient(<%= Val2 %>, #AC2D36 50%, #ffffff 50%, #ffffff); 
    } 
 
    /* -------------------------------------
     * Bar container
     * ------------------------------------- */ 
    .circularprogress { 
        float: left; 
        margin-left: 50px; 
        margin-top: 30px; 
        position: relative; 
        width: 180px; 
        height: 180px; 
        border-radius: 50%; 
    } 
 
        /* -------------------------------------
         * Optional centered circle w/text
         * ------------------------------------- */ 
        .circularprogress .overlay { 
            position: absolute; 
            width: 130px; 
            height: 110px; 
            color: white; 
            background-color: #CF5760; 
            border-radius: 50%; 
            margin-left: 25px; 
            margin-top: 23px; 
            text-align: center; 
            line-height: 90px; 
            font-size: 35px; 
            padding-top: 20px; 
        } 
</style> 

In the background style, I have added val1 and val2, where I will assign from .cs page, so we can make a dynamic circular progress bar. Add the properties and methods, mentioned below in .cs file.
private string val1 = "90deg"; 
 
       public string Val1 
       { 
           get { return val1; } 
           set { val1 = value; } 
       } 
 
       private string val2 = "90deg"; 
 
       public string Val2 
       { 
           get { return val2; } 
           set { val2 = value; } 
       } 
 
       private string colorCode = "#ffffff"; 
 
       public string ColorCode 
       { 
           get { return colorCode; } 
           set { colorCode = value; } 
       } 
 
       protected void Page_Load(object sender, EventArgs e) 
       { 
           ProgressText.InnerText = "0%"; 
           CalculateActiveUsersAngle(75); 
       } 
 
       private void CalculateActiveUsersAngle(int TotalUser) 
       { 
           //int TotalUser = 50; 
 
           if (TotalUser == 0) 
           { 
               Val2 = "90deg"; 
               Val1 = "90deg"; 
               ColorCode = "#ffffff"; 
           } 
           else if (TotalUser < 50 && TotalUser > 0) 
           { 
               double percentageOfWholeAngle = 360 * (Convert.ToDouble(TotalUser) / 100); 
               Val2 = (90 + percentageOfWholeAngle).ToString() + "deg"; 
               Val1 = "90deg"; 
               ColorCode = "#ffffff"; 
           } 
           else if (TotalUser > 50 && TotalUser < 100) 
           { 
               double percentage = 360 * (Convert.ToDouble(TotalUser) / 100); 
               Val1 = (percentage - 270).ToString() + "deg"; 
               Val2 = "270deg"; 
               ColorCode = "#AC2D36"; 
           } 
           else if (TotalUser == 50) 
           { 
               Val1 = "-90deg"; 
               Val2 = "270deg"; 
               ColorCode = "#AC2D36"; 
           } 
           else if (TotalUser >= 100) 
           { 
               Val1 = "90deg"; 
               Val2 = "270deg"; 
               ColorCode = "#AC2D36"; 
           } 
 
           ProgressText.InnerText = TotalUser + "%"; 
 
       } 


CalculateActiveUsersAngle() method will calculate and show the exact angle .You can assign the angle if you want to CalculateActiveUsersAngle() method. For this example, I have assigned 75, so circular progress will display 75% on the radial. And here is the output:

HostForLIFE.eu ASP.NET Core 1.1 Hosting

European best, cheap and reliable ASP.NET hosting with instant activation. HostForLIFE.eu is #1 Recommended Windows and ASP.NET hosting in European Continent. With 99.99% Uptime Guaranteed of Relibility, Stability and Performace. HostForLIFE.eu security team is constantly monitoring the entire network for unusual behaviour. We deliver hosting solution including Shared hosting, Cloud hosting, Reseller hosting, Dedicated Servers, and IT as Service for companies of all size.


ASP.NET Core 1.1 Hosting - HostForLIFE.eu :: How to Get IP Address In ASP.NET?

clock December 14, 2016 08:07 by author Peter

In this post, I will tell you how to Get IP Address In ASP.NET. An Internet Protocol address (IP address) is a numerical label assigned to each device (e.g., computer, printer) participating in a computer network that uses the Internet Protocol for communication. An IP address serves two principal functions: host or network interface identification and location addressing. Its role has been characterized as follows: "A name indicates what we seek. An address indicates where it is. A route indicates how to get there.”

There are two versions of IP address, earlier Version of IP address is IPv4 contains IP address as 32 bit number, and then because of growth of internet new version of IP is developed named IPv6 which takes 128 bit to store the IP Address.

There are different ways to get IP Address of visitor of the websites.

First method of getting IP Address is using “HTTP_X_FORWARDED_FOR” and “REMOTE_ADDR”. Where, “X_FORWARDED_FOR” is HTTP header field for identifying originating IP Address of the client who connected to internet and “REMOTE_ADDR” Returns the IP address of the remote machine.

Code to get IP Address using Method 1:

Second method of getting IP address is using built in functionality of ASP.NET. Here we use Request property of Page Class which gets the object of HttpRequest class for the requested page. HttpRequest is sealed class which enables ASP.NET to read the HTTP values sent by client machine during the web request. We access the UserHostAddress property of HttpRequest class to get the IP Address of the visitor.

Code to get IP Address using Method 2:

Default.aspx

Call above both method in Page_Load event, as soon as page will load you will get output like this.

HostForLIFE.eu ASP.NET Core 1.1 Hosting

European best, cheap and reliable ASP.NET hosting with instant activation. HostForLIFE.eu is #1 Recommended Windows and ASP.NET hosting in European Continent. With 99.99% Uptime Guaranteed of Relibility, Stability and Performace. HostForLIFE.eu security team is constantly monitoring the entire network for unusual behaviour. We deliver hosting solution including Shared hosting, Cloud hosting, Reseller hosting, Dedicated Servers, and IT as Service for companies of all size.


ASP.NET Core 1.1 Hosting - HostForLIFE.eu :: Using Highchart In ASP.NET

clock December 8, 2016 08:56 by author Peter

In this post, will tell you how to use Highchart in ASP.NET. Highchart in ASP.NET is purely a JavaScript and jQuery based API which can create interactive charts for representing the data. Highchart is a client-side API and it is flexible for use on different kinds of web browsers.

And here is the feature of highchart:

  • Compatible: Highchart works on all kinds of browsers.
  • Highchart is free for non-commercial purposes.
  • Different types of charts are available.
  • We can easily integrate it with .NET.

Types of Charts

Highcharts support different types of charts, such as:

  • Gauges
  • Basic Area chart
  • Bar chart
  • Column chart
  • Line chart
  • Pie chart
  • Polar chart
  • Range series

How it works

  • Download this dll and add to your project:
  • Download and add JavaScript to your project:
  • Chart Creation
  • Chart Output

Step 1

  • Download this dll to add to your project or install NET Highcharts.
  • You can follow the below steps.

Step 2
Download Highcharts and add reference of the JavaScript in your page or master page:
Add the below script
        <script src="../../Scripts/jquery-1.5.1.min.js" type="text/javascript"></script> 
        <script src="../../Scripts/highcharts.js" type="text/javascript"></script> 

Step 3

Chart Creation

Below code 
        for Mvc 
        public ActionResult Index() { 
                DotNet.Highcharts.Highcharts chart = new DotNet.Highcharts.Highcharts("chart").SetXAxis(new XAxis { 
                        Categories = new [] { 
                            "Jan", 
                            "Feb", 
                            "Mar", 
                            "Apr", 
                            "May", 
                            "Jun", 
                            "Jul", 
                            "Aug", 
                            "Sep", 
                            "Oct", 
                            "Nov", 
                            Dec " }  
                        }).SetSeries(new Series { 
                        Data = new Data(new object[] { 
                            29.9, 
                            71.5, 
                            106.4, 
                            129.2, 
                            144.0, 
                            176.0, 
                            135.6, 
                            148.5, 
                            216.4, 
                            .1, 
                            95.6, 
                            54.4 
                        }) 
                    }); 
                    return View(chart); 
                } 
                Below Code 
                for Asp.net 
                protected void Page_Load(object sender, EventArgs e) { 
                    DotNet.Highcharts.Highcharts chart = new DotNet.Highcharts.Highcharts("chart").SetXAxis(new XAxis { 
                        Categories = new [] { 
                            "Jan", 
                            "Feb", 
                            "Mar", 
                            "Apr", 
                            "May", 
                            "Jun", 
                            "Jul", 
                            "Aug", 
                            "Sep", 
                            "Oct", 
                            "Nov", 
                            "Dec" 
                        } 
                    }).SetSeries(new Series { 
                        Data = new Data(new object[] { 
                            29.9, 
                            71.5, 
                            106.4, 
                            129.2, 
                            144.0, 
                            176.0, 
                            135.6, 
                            148.5, 
                            216.4, 
                            194.1, 
                            95.6, 
                            54.4 
                        }) 
                    }); 
                    ltrChart.Text = chart.ToHtmlString(); 
                } 
    HTML Code
        For Mvc 
        @model DotNet.Highcharts.Highcharts 
        @(Model) 
        For Asp.net < asp: Content ID = "BodyContent" 
        runat = "server" 
        ContentPlaceHolderID = "MainContent" > < asp: Literal ID = "ltrChart" 
        runat = "server" > < /asp:Literal>  < /asp:Content> 


Step 4

We get the output like the below image.

HostForLIFE.eu ASP.NET Core 1.1 Hosting

European best, cheap and reliable ASP.NET hosting with instant activation. HostForLIFE.eu is #1 Recommended Windows and ASP.NET hosting in European Continent. With 99.99% Uptime Guaranteed of Relibility, Stability and Performace. HostForLIFE.eu security team is constantly monitoring the entire network for unusual behaviour. We deliver hosting solution including Shared hosting, Cloud hosting, Reseller hosting, Dedicated Servers, and IT as Service for companies of all size.


European ASP.NET SignalR Hosting - HostForLIFE.eu :: Using ASP.NET SignalR for Chat Application

clock December 5, 2016 10:04 by author Scott

ASP.Net SignalR is one of the major revolutions in the development technology world these days for creating real applications. Consider an application having a page where you are required to update the user interface with the latest data, as soon as it is available. Such applications are said to be real-time applications, where the UI is updated as soon as the latest data is available for the user.

The best example is a stock market application that must maintain the user interface updated with the data as soon as the stock rates are changed. Another example is a chat application that updates the receiver with the latest message, from the sender. Some of the techniques could use timer-based requests to the server for getting the data and some could use polling to get the data. A good alternative to these is SignalR. 

As we know, our model of the web applications mainly consists of a server that hosts the application and the client, representing the end users of the applications. For creating SignalR based applications, we need to create a hub on the server that is responsible for updating the client or the end users with the latest data. This hub is nothing but a simple class inheriting from the Hub class. At the client end, we get an automatically generated JavaScript based proxy file (at run time) that can be used by the client for connecting with the hub. The client code also contains a JavaScript function that the hub uses to provide them the latest data.

To explain this process in detail, our hub directly calls the client JavaScript functions, to provide the latest data. On the other hand, by using the auto-generated JavaScript proxy file at the client end, client code can uses this proxy, to call the methods of the server hub, if required. The term if required is used here deliberately with the fact that the client may not be required to call the hub. For example, in an application where we have a user dashboard with some data from a database, we can use SqlDependency and SignalR to keep the user interface updated, whenever there is any change in the database records. In this case, the client is not required to make any calls to the server for getting the updates. On the other hand, if we have a chat application, the client code will call the server hub and forward the message. The Hub will than broadcast this message to the users of the application, by calling the JavaScript method of the clients.

One very important point from the preceding paragraph is that the client never calls the hub for getting the latest data. The client may only call the hub so that the hub can forward the message to the other connected clients. If the client code needs to make the calls for the latest data to the server, than the entire purpose of using the SignalR fails and we could have used the old concepts of a timer or page refresh for this.

Build Simple Group Chat Application in 15 minutes Using SignalR

Yes, that's correct. Once you are familiar with the basic concept/flow of SignalR, you can do it very easily. We will be now creating a group chat, without the use of a database. If we think about the flow of the application, this entire process requires a client to send a message to the server that will broadcast this message to all the connected client users. So the server needs to have a component that can broadcast the message to the clients. This role is played by the hub class.

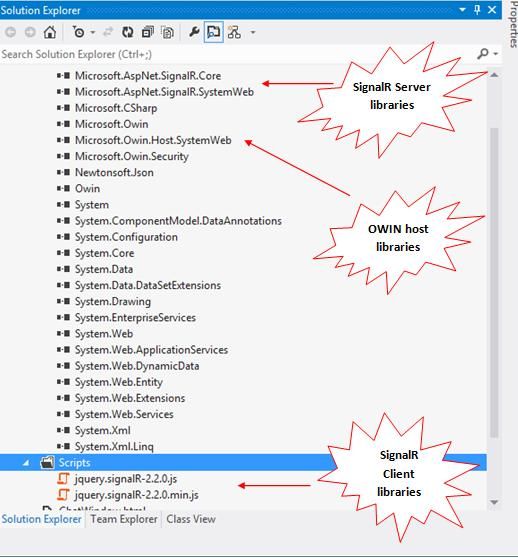
Create a new project named SignalRChat. Add the references to the SignalR libraries using Nuget. It will automatically add the references to the OWIN hosting option libraries that allow addition of the SignalR application to the OWIN pipeline. Apart from the server libraries, it also adds the client libraries required for using SignalR. See the following references that are to be added:

Create OWIN host for the application

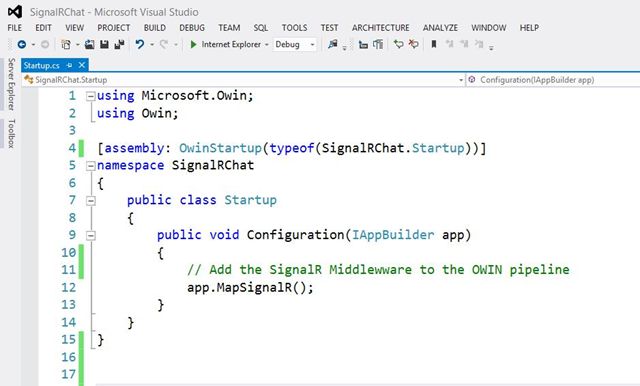
We will be using the OWIN based hosting, to host this application. Without going into depth about the OWIN hosting, let's add a class named Startup.cs. The name must be Startup as in the OWIN based hosting specifications and its namespace must be decorated with the assembly attribute, specifying that the Startup assembly is the starting point of the application. Next we define a method named Configuration and register the SignalR in the OWIN pipeline using app.MapSignalR().

Create the Hub on the Server

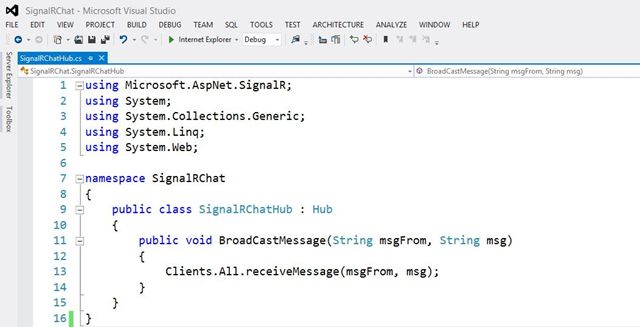
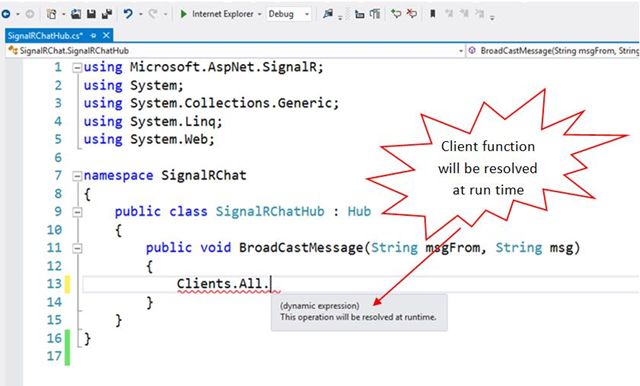
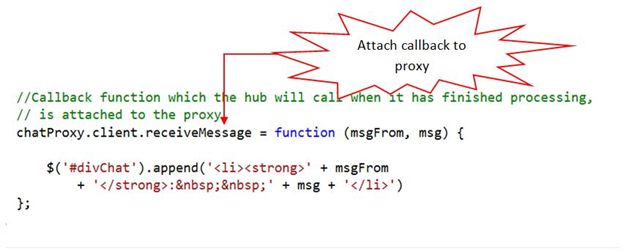
Our next step is to create the hub on the server that is nothing but a class file. We will name it SignalRChatHub and derive from the Hub class. It will contain a method named BroadCastMessage, with 2 parameters. the client code will use this method (using the proxy generated at its end) for communication with the hub and the parameters as the data to be sent to the hub. Inside this method, use the Clients property of the Hub class to call the client-side function. This function is a simple JavaScript function that will receive the data sent by the hub and update the chat window of the user. We will define a function with the name receiveMessage at the client end (later in the code). So for now, we will use this method name.

A point to be noted here is that we will not get any intelligence help for the client methods, of course. This method will be dynamically resolved. See the image below:

Setup the Client code

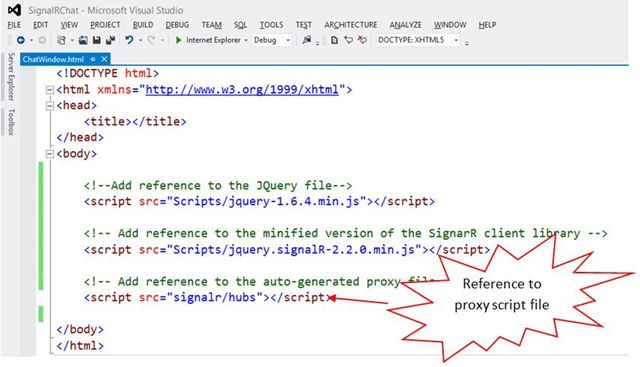
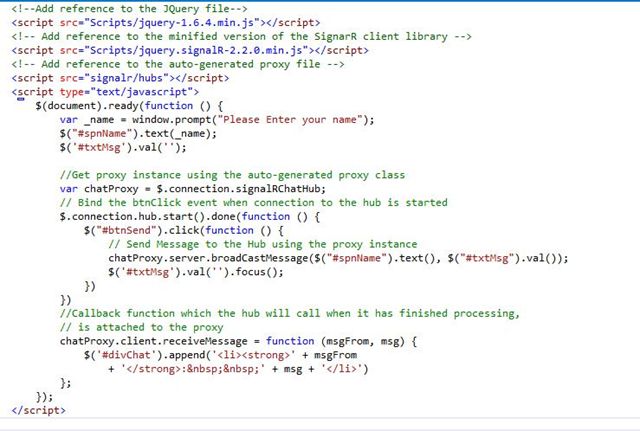
The server setup is done. We will now add an HTML page named ChatWindow.html that will be our chat window for the user. Also we add the references to the jquery-1.6.4.min.js and jquery.signalR-2.2.0 .min,js on this page that were added by the Nuget package manager. Earlier we discussed that SignalR automatically generates a proxy class at run time, for client code, to connect with the hub. So we also need to reference this file. Since this file is generated at run time, it does not exist physically for us. As in the SignalR tutorials on the official ASP.Net website, it states:

SignalR creates the JavaScript code for the proxy on the fly and serves it to the client in response to the "/signalr/hubs" URL.

So we need to add this reference also.

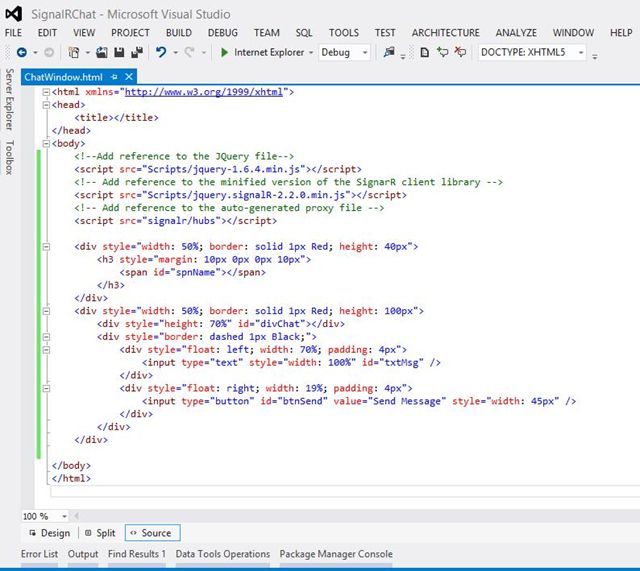
We also have the option to disable this auto-generated proxy file generation (that is out of scope for this discussion) and create the proxy ourselves. In that case, we need to reference that file accordingly. Next, let's add some HTML mark-up to generate the chat window and design it using CSS styling.

Now it's time for the client code to connect with the hub and send the message, so that hub can broadcast to all the users. For this, we first get the proxy instance in a variable named chatProxy. Note the camel case syntax of the client code below. This is the convention to be followed when creating the SignalR application. For detailed specifications, I recommend you check out the ASP.Net official SignalR website. Without going further into the details, let's move forward with the code. Here, signalRChatHub is the name of the hub on the server (that we created on the server earlier).

Next, we attach the button click event (the button to send the message to the users), when the connection to the hub is successfully started. This event will call the method of the hub, using the proxy instance that will receive the message and broadcast it to users. See the code below:

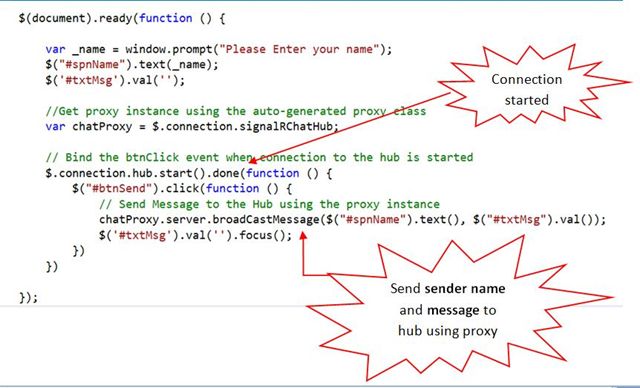
We also declare the function to which the hub will call, when it needs to update all the users with the message received. This is the function name we referred to, from the hub method, at the start of the discussion. So this function acts as a type of callback function here.

So all the client code is also set up and we can now run the application. So our complete client code will now look as in:

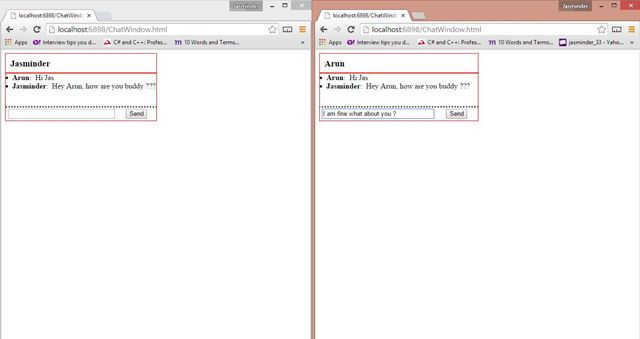
We can now run the application. Copy the URL and open another instance of the browser or any other browser and we can start chatting.


HostForLIFE.eu Proudly Launches Visual Studio 2017 Hosting

clock December 2, 2016 07:01 by author Peter

European leading web hosting provider, HostForLIFE.eu announces the launch of Visual Studio 2017 Hosting

HostForLIFE.eu was established to cater to an underserved market in the hosting industry; web hosting for customers who want excellent service. HostForLIFE.eu - a cheap, constant uptime, excellent customer service, quality, and also reliable hosting provider in advanced Windows and ASP.NET technology. HostForLIFE.eu proudly announces the availability of the Visual Studio 2017 hosting in their entire servers environment.

The smallest install is just a few hundred megabytes, yet still contains basic code editing support for more than twenty languages along with source code control. Most users will want to install more, and so customer can add one or more 'workloads' that represent common frameworks, languages and platforms - covering everything from .NET desktop development to data science with R, Python and F#.

System administrators can now create an offline layout of Visual Studio that contains all of the content needed to install the product without requiring Internet access. To do so, run the bootstrapper executable associated with the product customer want to make available offline using the --layout [path] switch (e.g. vs_enterprise.exe --layout c:\mylayout). This will download the packages required to install offline. Optionally, customer can specify a locale code for the product languages customer want included (e.g. --lang en-us). If not specified, support for all localized languages will be downloaded.

HostForLIFE.eu hosts its servers in top class data centers that is located in Amsterdam (NL), London (UK), Paris (FR), Frankfurt(DE) and Seattle (US) to guarantee 99.9% network uptime. All data center feature redundancies in network connectivity, power, HVAC, security, and fire suppression. All hosting plans from HostForLIFE.eu include 24×7 support and 30 days money back guarantee. The customers can start hosting their Visual Studio 2017 site on their environment from as just low €3.00/month only.

HostForLIFE.eu is a popular online ASP.NET based hosting service provider catering to those people who face such issues. The company has managed to build a strong client base in a very short period of time. It is known for offering ultra-fast, fully-managed and secured services in the competitive market.

HostForLIFE.eu offers the latest European Visual Studio 2017 hosting installation to all their new and existing customers. The customers can simply deploy their Visual Studio 2017 website via their world-class Control Panel or conventional FTP tool. HostForLIFE.eu is happy to be offering the most up to date Microsoft services and always had a great appreciation for the products that Microsoft offers.

Further information and the full range of features Visual Studio 2017 Hosting can be viewed here http://hostforlife.eu/European-Visual-Studio-2017-Hosting


About HostForLIFE.eu

HostForLIFE.eu is European Windows Hosting Provider which focuses on Windows Platform only. We deliver on-demand hosting solutions including Shared hosting, Reseller Hosting, Cloud Hosting, Dedicated Servers, and IT as a Service for companies of all sizes.

We have offered the latest Windows 2016 Hosting, ASP.NET Core 2.2.1 Hosting, ASP.NET MVC 6 Hosting and SQL 2017 Hosting.


Tag cloud

Sign in