European ASP.NET 4.5 Hosting BLOG

BLOG about ASP.NET 4, ASP.NET 4.5 Hosting and Its Technology - Dedicated to European Windows Hosting Customer

European ASP.NET Core Hosting :: Integration of the Google Calendar API with .Net Core

clock June 27, 2023 07:50 by author Peter

I will explain how web server applications implement OAuth 2.0 authorization to access Google APIs using Google OAuth 2.0 endpoints.
OAuth 2.0


OAuth 2.0 enables users to grant selective data-sharing permission to applications while preserving their own credentials. As an example, an application can use OAuth 2.0 to obtain the user's permission to create calendar events in their Google Calendar.

Pre-Requisite

    Enable Google API project.
    Create credentials for Authorization.
    Get Access and Refresh the token in the authorization code's name.
    Redirect URL: The Google OAuth 2.0 server verifies the user's identity and obtains the user's permission to grant your application access to the requested Scope. Using the 'Redirect URL' you specified, the response is sent back to the application.

Tokens
Tokens of access have a finite lifespan and may expire over time. To prevent interruptions in access to related APIs, it is possible to refresh an access token without user permission. This is possible by requesting the token with inactive access.

    1024 bytes are used for the Authorization Code
    2048-bit Access Token
    Refresh Token: 512 bytes

Code Structure

Packages

  • NodeTime
  • Google.Apis
  • Google.Apis.Auth
  • Google.Apis.Calendar.v3

UserController

public class UserController: Controller {

  private IGoogleCalendarService _googleCalendarService;
  public UserController(IGoogleCalendarService googleCalendarService)

  {
    _googleCalendarService = googleCalendarService;
  }

  [HttpGet]
  [Route("/user/index")]
  public IActionResult Index() {
    return View();
  }

  [HttpGet]
  [Route("/auth/google")]
  public async Task < IActionResult > GoogleAuth() {
    return Redirect(_googleCalendarService.GetAuthCode());
  }

  [HttpGet]
  [Route("/auth/callback")]
  public async Task < IActionResult > Callback() {
    string code = HttpContext.Request.Query["code"];
    string scope = HttpContext.Request.Query["scope"];

    //get token method
    var token = await _googleCalendarService.GetTokens(code);
    return Ok(token);
  }

  [HttpPost]
  [Route("/user/calendarevent")]
  public async Task < IActionResult > AddCalendarEvent([FromBody] GoogleCalendarReqDTO calendarEventReqDTO) {
    var data = _googleCalendarService.AddToGoogleCalendar(calendarEventReqDTO);
    return Ok(data);
  }
}

DTO
public class GoogleCalendarReqDTO {
  public string Summary {
    get;
    set;
  }

  public string Description {
    get;
    set;
  }

  public DateTime StartTime {
    get;
    set;
  }

  public DateTime EndTime {
    get;
    set;
  }

  public string CalendarId {
    get;
    set;
  }

  public string refreshToken {
    get;
    set;
  }
}

public class GoogleTokenResponse {
  public string access_type {
    get;
    set;
  }

  public long expires_in {
    get;
    set;
  }

  public string refresh_token {
    get;
    set;
  }

  public string scope {
    get;
    set;
  }

  public string token_type {
    get;
    set;
  }
}

IGoogleCalendarService
public interface IGoogleCalendarService {
  string GetAuthCode();

  Task < GoogleTokenResponse > GetTokens(string code);
  string AddToGoogleCalendar(GoogleCalendarReqDTO googleCalendarReqDTO);
}

GoogleCalendarService
public class GoogleCalendarService: IGoogleCalendarService {

  private readonly HttpClient _httpClient;

  public GoogleCalendarService() {
    _httpClient = new HttpClient();
  }

  public string GetAuthCode() {
    try {

      string scopeURL1 = "https://accounts.google.com/o/oauth2/auth?redirect_uri={0}&prompt={1}&response_type={2}&client_id={3}&scope={4}&access_type={5};
      var redirectURL = "https://localhost:7272/auth/callback;
      string prompt = "consent"
      string response_type = "code";
      string clientID = ".apps.googleusercontent.com";
      string scope = "https://www.googleapis.com/auth/calendar;
      string access_type = "offline";
      string redirect_uri_encode = Method.urlEncodeForGoogle(redirectURL);
      var mainURL = string.Format(scopeURL1, redirect_uri_encode, prompt, response_type, clientID, scope, access_type);

      return mainURL;
    } catch (Exception ex) {
      return ex.ToString();
    }
  }

  public async Task < GoogleTokenResponse > GetTokens(string code) {

    var clientId = "_____.apps.googleusercontent.com";
    string clientSecret = "_____";
    var redirectURL = "https://localhost:7272/auth/callback;
    var tokenEndpoint = "https://accounts.google.com/o/oauth2/token;
    var content = new StringContent($"code={code}&redirect_uri={Uri.EscapeDataString(redirectURL)}&client_id={clientId}&client_secret={clientSecret}&grant_type=authorization_code", Encoding.UTF8, "application/x-www-form-urlencoded");

    var response = await _httpClient.PostAsync(tokenEndpoint, content);
    var responseContent = await response.Content.ReadAsStringAsync();
    if (response.IsSuccessStatusCode) {
      var tokenResponse = Newtonsoft.Json.JsonConvert.DeserializeObject < GoogleTokenResponse > (responseContent);
      return tokenResponse;
    } else {
      // Handle the error case when authentication fails
      throw new Exception($"Failed to authenticate: {responseContent}");
    }
  }

  public string AddToGoogleCalendar(GoogleCalendarReqDTO googleCalendarReqDTO) {
    try {
      var token = new TokenResponse {
        RefreshToken = googleCalendarReqDTO.refreshToken
      };
      var credentials = new UserCredential(new GoogleAuthorizationCodeFlow(
        new GoogleAuthorizationCodeFlow.Initializer {
          ClientSecrets = new ClientSecrets {
            ClientId = "___.apps.googleusercontent.com", ClientSecret = "__"
          }

        }), "user", token);

      var service = new CalendarService(new BaseClientService.Initializer() {
        HttpClientInitializer = credentials,
      });

      Event newEvent = new Event() {
        Summary = googleCalendarReqDTO.Summary,
          Description = googleCalendarReqDTO.Description,
          Start = new EventDateTime() {
            DateTime = googleCalendarReqDTO.StartTime,
              //TimeZone = Method.WindowsToIana();    //user's time zone
          },
          End = new EventDateTime() {
            DateTime = googleCalendarReqDTO.EndTime,
              //TimeZone = Method.WindowsToIana();    //user's time zone
          },
          Reminders = new Event.RemindersData() {
            UseDefault = false,
              Overrides = new EventReminder[] {

                new EventReminder() {
                    Method = "email", Minutes = 30
                  },

                  new EventReminder() {
                    Method = "popup", Minutes = 15
                  },

                  new EventReminder() {
                    Method = "popup", Minutes = 1
                  },
              }
          }

      };

      EventsResource.InsertRequest insertRequest = service.Events.Insert(newEvent, googleCalendarReqDTO.CalendarId);
      Event createdEvent = insertRequest.Execute();
      return createdEvent.Id;
    } catch (Exception e) {
      Console.WriteLine(e);
      return string.Empty;
    }
  }
}


Method.cs
public static class Method {
  public static string urlEncodeForGoogle(string url) {
    string unreservedChars = "abcdefghijklmnopqrstuvwxyzABCDEFGHIJKLMNOPQRSTUVWXYZ0123456789-.~";
    StringBuilder result = new StringBuilder();
    foreach(char symbol in url) {
      if (unreservedChars.IndexOf(symbol) != -1) {
        result.Append(symbol);
      } else {
        result.Append("%" + ((int) symbol).ToString("X2"));
      }
    }

    return result.ToString();

  }

  public static string WindowsToIana(string windowsTimeZoneId) {
    if (windowsTimeZoneId.Equals("UTC", StringComparison.Ordinal))
      return "Etc/UTC";

    var tzdbSource = TzdbDateTimeZoneSource.Default;
    var windowsMapping = tzdbSource.WindowsMapping.PrimaryMapping
      .FirstOrDefault(mapping => mapping.Key.Equals(windowsTimeZoneId, StringComparison.OrdinalIgnoreCase));

    return windowsMapping.Value;
  }
}


Program.cs
builder.Services.AddScoped<IGoogleCalendarService, GoogleCalendarService>();

Run your application


It will redirect to [Route("/auth/google")].


After successful sign-in, you will see this window because our calendar project on GCP is not recognized with the domain name. You can visit the google drive link, as I mentioned above.

Google will ask you to give access to your Google calendar, then continue.

It will redirect to [Route("/auth/callback")], and you will get an authorization code.

Now you can copy the refresh token and send the request.
Save the refresh token for future use.


European ASP.NET Core Hosting :: Action Filters in .Net Core

clock June 22, 2023 07:55 by author Peter

What are filters and what are their advantages?
Filters allow us to execute a piece of code before or after any request processing pipeline stage.

The advantages of filtration

  • Instead of writing code for each individual action, we write it once and then reuse it.
  • Extensible: They allow us to perform some action ABC before the method and some operation XYZ after the method.


Varieties of Filters

  • Authorization Filters: Most prominent in ascending order to determine if the user is authorized.
  • Resource Filters: It is executed following authorization and prior to the next request pipeline.
  • Action Filters: They are executed prior to and following the execution of an action method Exception Filters: It is used to manage global exceptions and is executed when an unhandled exception is thrown.
  • Result Filters: These are executed following the implementation of the action method and prior to and after the execution of action results.

There are Action Filters in.Net Core.
Action filters execute immediately before and after the execution of an action method. It can perform multiple operations, including modifying the passed arguments and the output.

How Do I Configure Action Filters?
Globally Tailored Action Based

The subsequent stages are identical for both

  • Create a filter by extending a class that implements the IActionFilter interface.
  • It will require you to implement these two procedures. OnActionExecuted and OnActionExecuting are event handlers.
  • OnActionExecuted is executed after the method, while the other is executed before the method is invoked.

Global Action Filtering System
After creating this filter, you must add it to the controllers services container.

public class GlobalFilter: IActionFilter {
  public void OnActionExecuted(ActionExecutedContext context) {
    Console.WriteLine("Global Action Executed");
  }

  public void OnActionExecuting(ActionExecutingContext context) {
    Console.WriteLine("Global Action is Executing");
  }
}

public void ConfigureServices(IServiceCollection services) {
  services.AddMvc().SetCompatibilityVersion(CompatibilityVersion.Version_2_2);
  services.AddHangfire(x =>
    x.UseSqlServerStorage("Data Source=DJHC573\\MYSYSTEM;Initial Catalog=Hangfire-DB;Integrated Security=true;Max Pool Size = 200;"));
  services.AddHangfireServer();
  services.AddMvcCore(options => {
    options.Filters.Add(new GlobalFilter());
  });

}

That’s all you need to do, so this one will run whenever any action gets called.

Custom Action-Based Filter
    Add your filter in Startup.cs, if you have multiple filters, add them in a similar fashion.
    Add ServiceFilter(typeof(YourFilter)) at your controller level or action level, that’s all.

public class NewsletterFilter: IActionFilter {
  public void OnActionExecuted(ActionExecutedContext context) {
    Console.WriteLine("Action is Executed");
  }

  public void OnActionExecuting(ActionExecutingContext context) {
    Console.WriteLine("Action is Executing");
  }
}


public void ConfigureServices(IServiceCollection services) {
  services.AddMvc().SetCompatibilityVersion(CompatibilityVersion.Version_2_2);
  //services.AddHangfire(x =>
  //x.UseSqlServerStorage("Data Source=DJHC573\\MYSYSTEM;Initial Catalog=Hangfire-DB;Integrated Security=true;Max Pool Size = 200;"));
  //services.AddHangfireServer();
  services.AddMvcCore(options => {
    options.Filters.Add(new GlobalFilter());
  });
  services.AddScoped < NewsletterFilter > ();

}

public class ValuesController: ControllerBase {
  // GET api/values
  [ServiceFilter(typeof (NewsletterFilter))]
  [HttpGet]
  public ActionResult < IEnumerable < string >> Get() {
    return new string[] {
      "value1",
      "value2"
    };
  }
}


When I applied Global Action Filter and Newsletter (Custom Filters) on the same controller, it executed like this.


*If we want an asynchronous action filter, then we can inherit from IAsyncActionFilter instead of IActionFilter it has an extra method OnActionExecutionAsync which takes action context and delegate in parameters.


European ASP.NET Core Hosting :: Full Cache, Cache Aside, and Read-Through Caching: NCache and Caching Patterns

clock June 14, 2023 07:24 by author Peter

Caching is a technique for storing data in the server's memory. It will enhance the application's performance by reducing database calls. Indirectly, it will improve the efficacy of the database by delivering higher throughput and lower latency than most databases. This blog will cover caching techniques/patterns such as full Cache, cache-aside, and read-through using the NCache cache service provider.

What exactly is NCache?
NCache is an open-source distributed cache for.NET, Java, and Node.js that operates in memory. NCache is incredibly quick and scalable, and it caches application data to minimize database access. NCache is utilized to address the performance issues associated with data storage, databases, and the scalability of.NET, Java, and Node.js applications.

Learn how to use NCache here. Please complete the NCache installation process.

Full Cache

A full cache is a technique that loads all datasets at the outset of an application. This Technique is commonly used for applications with inert or infrequently changing data. It enhances application performance by decreasing data source calls. NCache provides the Cache Startup injector feature for implementing the Full Cache. In other terms, it populates it with all data beforehand.

By implementing the ICacheLoader interface, Cache Startup Loader can be simply integrated into our current and future applications. Enabling the Cache Loader/Refresher from NCache Web Manager is the next step. This capability is exclusive to the enterprise edition.

Launch NCache Web Manager, select the existing Clustered Cache or create a new clustered cache with the minimum number of nodes required to configure the full Cache, and then click View Details.

This link will transport you to the Cache Settings page, where you can enable Cache Loader/Refresher.

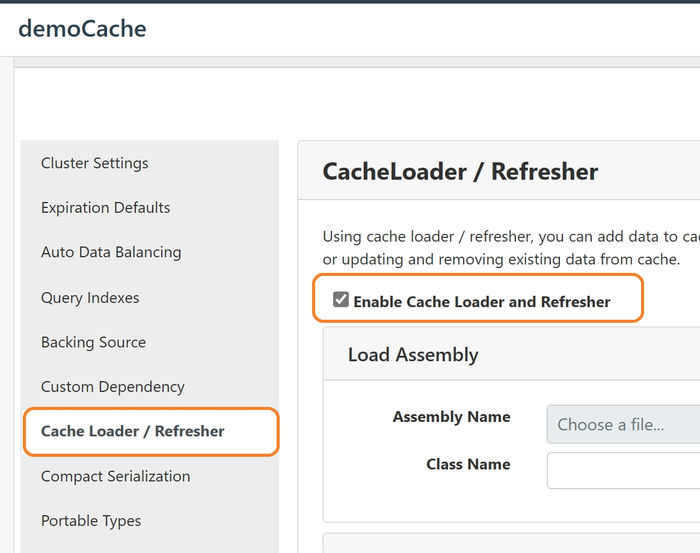
Please visit the aforementioned link and finalize the CacheLoader / Refresher configuration. Consider, for instance, a web application that imports hundreds of images on the initial page. In this instance, we should utilize a cache startup loader that pre-loads the Cache with all images at application startup, allowing all images to load from the Cache, which is extremely fast and also eliminates the data source request.

Any modifications to the images from the data source will render the Cache obsolete. Cache Refresher is another feature offered by NCache to prevent this invalidation.

public class LoaderRefresher: ICacheLoader {
  private string _connectionString;
  private static ICache _cache;
  public void Init(IDictionary < string, string > parameters, string cacheName) {

    if (parameters != null && parameters.Count > 0)
      _connectionString = parameters.ContainsKey("ConnectionString") ?
      parameters["ConnectionString"] as string : string.Empty;
      _cache = CacheManager.GetCache(cacheName);
  }

  public object LoadDatasetOnStartup(string dataSet) {

    IList < object > loadDatasetAtStartup;
    if (string.IsNullOrEmpty(dataSet))
      throw new InvalidOperationException("Invalid dataset.");

    switch (dataSet.ToLower()) {
      //call FetchProductsFromDataSouce based on dataset value
    }

    string[] keys = GetKeys(loadDatasetAtStartup);
    IDictionary < string, CacheItem > cacheData = GetCacheItemDictionary(keys, loadDatasetAtStartup);
    _cache.InsertBulk(cacheData);

    object userContext = DateTime.Now;
    return userContext;
  }

  public object RefreshDataset(string dataSet, object userContext) {
    if (string.IsNullOrEmpty(dataSet))
      throw new InvalidOperationException("Invalid dataset.");

    DateTime ? lastRefreshTime;

    switch (dataSet.ToLower()) {

      //call FetchUpdatedSuppliers based on dataset value and insert the update value in cache.

    }

    userContext = DateTime.Now;
    return userContext;
  }

  public IDictionary < string, RefreshPreference > GetDatasetsToRefresh(IDictionary < string, object > userContexts) {
   IDictionary < string, RefreshPreference > DatasetsNeedToRefresh = new Dictionary < string, RefreshPreference > ();
    DateTime ? lastRefreshTime;
    bool datasetHasUpdated;

    foreach(var dataSet in userContexts.Keys) {
    switch (dataSet.ToLower()) {
        // Based on switch input check the dataset to be updated, if it returns true call invoke DatasetsNeedToRefresh method for the dataset.
      }
    }

    return DatasetsNeedToRefresh;
  }
  p
ublic void Dispose() {
    // clean your unmanaged resources
  }
}

Local/Clustered Cache information and Database connection string information are set by the Init Function.

During program startup, the loadDatasetOnStartup function imports the dataset from the data source.

RefreshDataset
This function is invoked according to the Refresh Frequency specified during CacheLoader / Refresher configuration.  
GetDatasetsToRefresh – This function is used to obtain a new dataset in real-time via polling if the refresh-on-event property is enabled, as depicted in the following illustration. This configuration can be enabled on the NCache web manager cache details page under the Cache Loader/Refresher section.
Create a new class to support the IReadThruProvider interface.

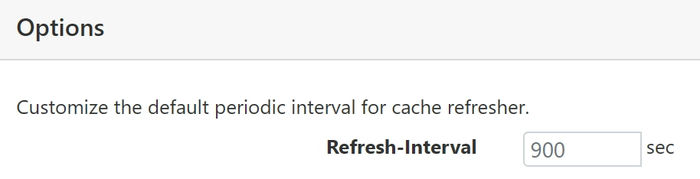
The Cache keeps calling this method to update the data set based on the frequency/interval set for “Refresh-Interval”. By default, it is 900 sec.

You can refresh the cached dataset manually using NCache Web Manager or Manager.

NCache web Manager: The refresh now option for the dataset is available in the cache details page under Cache Loader/Refresher section from advanced settings.

PowerShell command: Use the below command to refresh the dataset.
Invoke-RefresherDataset -CacheName [your clustered cache name] -Server [server IP address] -Dataset [your dataset name] -RefreshPreference RefreshNow

Cache-Aside

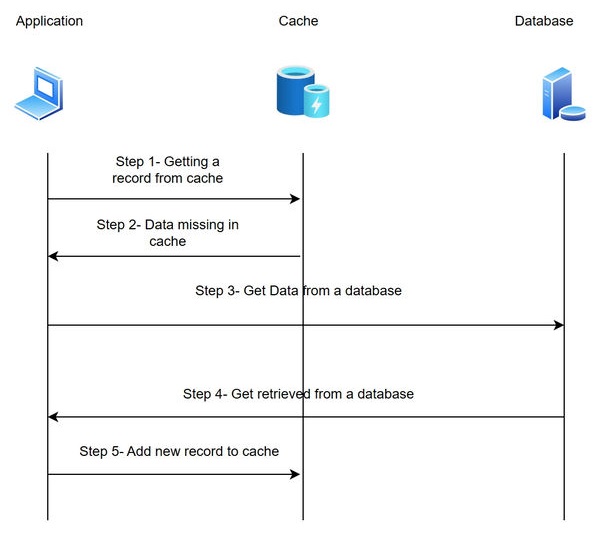
In the Cache-aside technique, the database and Cache won’t interact. Let me elaborate on the step-by-step process involved in this caching Technique.
Step 1. The application tries to get data from the Cache.
Step 2. In this step, the flow will check whether the request data(Key) is available in the cache server.
Step 3. If the Key is unavailable, the application will directly talk to the database.
Step 4. The data from the database is transferred to the application.
Step 5. Add the data into the Cache.


NCache, one of the leading caching service providers, to implement the cache-aside functionality in our application, the below code snippet.
try
{
    // Pre-condition: Cache is already connected

    // Get key to fetch from cache
    string key = $"Product:{product.ProductID}";

    // Get item against key from cache in template type
    var retrievedItem = cache.Get<Product>(key);
    if (retrievedItem != null)
    {
        if (retrievedItem is Product)
        {
            // Perform operations according to business logic
        }
    }
    else
    {
        // block to query the datasource and write it to the Cache server
    }
}

So, in the process, if the data is not cached, the application will directly connect with the database to get new data. Each Technique in caching has its pros and cons.

Advantages
If the caching layer is unavailable, the application still works. Instead of querying the caching, you will have complete control of the database every time.

Disadvantages

The very first time, the access will be slower. Because the keys may not be available in the Cache, so initially, the application will update the Cache by fetching the data from the database. This process may slow down the performance of the application. On the other hand, you will have inconsistent data. A separate service is required to update the data in the Cache whenever there is an update in the database for a table.

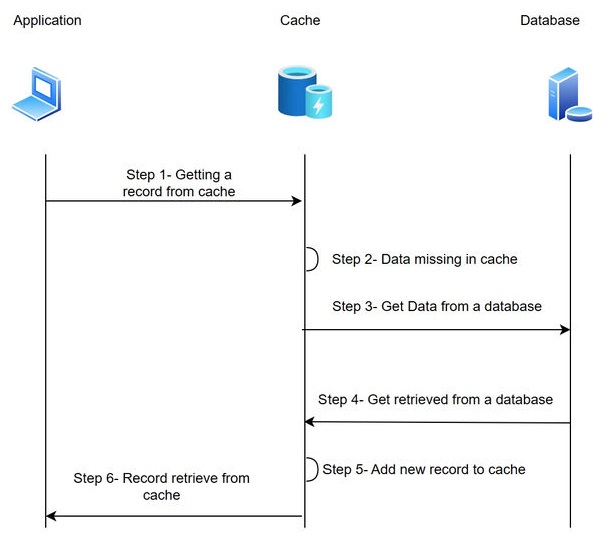
Read-through technique
Read-thru is another technique where the cache layer is always synced with the database layer. The application will query the Cache directly to get the data. If the requested Key is not available in the Cache, the cache layer will directly talk with the database layer and update the Cache. The step-by-step process involved in this caching Technique.

Step 1. The application tries to get data from the Cache.
Step 2. Check the requested key availability in Cache.
Step 3. If the Key is not available, the cache layer will directly talk with the database layer.
Step 4. The new data will be added to the Cache.
Step 5. The cache layer will return the data to the application.


public class SqlReadThruProvider : Runtime.DatasourceProviders.IReadThruProvider
    {
        private SqlDatasource sqlDatasource;

        public void Init(IDictionary parameters, string cacheId)
        {
            object connString = parameters["connstring"];
            sqlDatasource = new SqlDatasource();
            sqlDatasource.Connect(connString == null ? "" : connString.ToString());
        }

        public void Dispose()
        {
            sqlDatasource.DisConnect();
        }

        public ProviderCacheItem LoadFromSource(string key)
        {
            ProviderCacheItem cacheItem = new ProviderCacheItem(sqlDatasource.LoadCustomer(key));
            cacheItem.ResyncOptions.ResyncOnExpiration = true;
            return cacheItem;
        }

        public IDictionary<string, ProviderCacheItem> LoadFromSource(ICollection<string> keys)
        {
            IDictionary<string, ProviderCacheItem> providerItems = new Dictionary<string, ProviderCacheItem>();
            foreach (string key in keys)
            {
                object data = sqlDatasource.LoadCustomer(key);
                ProviderCacheItem item = new ProviderCacheItem(data);
                item.Expiration = new Expiration(ExpirationType.DefaultAbsolute);
                item.Group = "customers";

                providerItems.Add(key, item);
            }
            return providerItems;
        }

        public ProviderDataTypeItem<IEnumerable> LoadDataTypeFromSource(string key, DistributedDataType dataType)
        {
            ProviderDataTypeItem<IEnumerable> providerItem = null;
            switch (dataType)
            {

                case DistributedDataType.Counter:
                    providerItem = new ProviderDataTypeItem<IEnumerable>(sqlDatasource.GetCustomerCountByCompanyName(key));
                    break;
                case DistributedDataType.Dictionary:
                    providerItem = new ProviderDataTypeItem<IEnumerable>(sqlDatasource.LoadCustomersByCity(key));
                    break;
                case DistributedDataType.List:
                    providerItem = new ProviderDataTypeItem<IEnumerable>(sqlDatasource.LoadCustomersFromCountry(key));
                    break;
                case DistributedDataType.Queue:
                    providerItem = new ProviderDataTypeItem<IEnumerable>(sqlDatasource.LoadCustomersByOrder(key));
                    break;
                case DistributedDataType.Set:

                    providerItem = new ProviderDataTypeItem<IEnumerable>(sqlDatasource.LoadOrderIDsByCustomer(key));
                    break;
            }

            return providerItem;
        }
    }

We have five methods implemented from the IReadThruProvider interface.

  • Init(): establish the connection to the data source.
  • LoadFromSource(string key): This method is used to load the data to the Cache from the source based on the Key.
  • LoadFromSource(ICollection<string> keys): This method is used to load multiple objects from the data source and returns the dictionary of keys with respective data contained in ProviderCacheItem
  • LoadDataTypeFromSource(string key, DistributedDataType dataType): This method load data structure from the external data source and returns the data Structure contained in ProviderCacheItem, which is enumerated.
  • Dispose(): This function will release the resource.

var ReadThruProviderName = "SqlReadThruProvider";
var customer = _cache.Get<Customer>(CustomerID, new ReadThruOptions(ReadMode.ReadThru, ReadThruProviderName));


The above statements are used to get data from the Cache with the read mode as ReadThru.

Pros
The data is always up to data in the Cache, the application code doesn’t query the database, and everything will take care of by caching layer.

Cons
Single point of failure -If the caching layer is not available, the application can’t retrieve data because it’s not connected to the database.

We have seen what is full Cache, Cache-aside, and Read-thru Cache and how NCache as a distributed cache provider, used to implement all these features or techniques. All these techniques have pros and cons, so based on the requirement, we need to understand which is the right choice to solve our business problem.


European ASP.NET Core Hosting :: File Picker in .NET MAUI

clock June 6, 2023 07:11 by author Peter

Cross-platform framework.NET MAUI enables developers to create native mobile and desktop applications using C# and XAML. It facilitates the creation of apps that operate seamlessly on Android, iOS, macOS, and Windows using a single codebase. This open-source platform is an evolution of Xamarin Forms, extending its applicability to desktop scenarios and enhancing UI controls for enhanced performance and extensibility.

Using.NET MAUI, you can create applications that run on multiple platforms, including Android, iOS, MacOS, and Windows, from a single codebase.

.NET MAUI enables efficient cross-platform development, eliminating the need for distinct codebases for each platform and simplifying application maintenance and updates.

.NET MAUI saves time and effort and simplifies application maintenance. Visual Studio 2022 supports dotnet 7 and.Net Maui application development

Cross-platform framework.NET MAUI enables developers to create native mobile and desktop applications using C# and XAML. It facilitates the creation of apps that operate seamlessly on Android, iOS, macOS, and Windows using a single codebase. This open-source platform is an evolution of Xamarin Forms, extending its applicability to desktop scenarios and enhancing UI controls for enhanced performance and extensibility.

This article demonstrates how to implement a File Picker in a.NET MAUI application.
Project Setup

    To create a new project, launch Visual Studio 2022 and select Create a new project in the start window.

In the Create a new project window, select MAUI in the All project types drop-down, select the .NET MAUI App template, and click the Next button:

Give your project a name, pick an appropriate location for it, then click the Next button in the Configure your new project window:


In the Additional information window, click the Create button:

Implementation
As a first point, we need to implement the screen design as per our requirements. In this tutorial, we will use 3 controls - button, image, and label like in the following code block.

<?xml version="1.0" encoding="utf-8" ?>
<ContentPage xmlns="http://schemas.microsoft.com/dotnet/2021/maui"
             xmlns:x="http://schemas.microsoft.com/winfx/2009/xaml"
             x:Class="MauiFilePicker.MainPage">

    <ScrollView>
        <VerticalStackLayout
            Spacing="25"
            Padding="30"
            VerticalOptions="Start">

            <Button
                x:Name="ImageSelect"
                Text="Select Barcode"
                SemanticProperties.Hint="Select Image"
                Clicked="SelectBarcode"
                HorizontalOptions="Center" />
            <Label x:Name="outputText"
                   Padding="10"/>
            <Image
                x:Name="barcodeImage"
                SemanticProperties.Description="Selected Barcode"
                HeightRequest="200"
                HorizontalOptions="Center" />
        </VerticalStackLayout>
    </ScrollView>

</ContentPage>


Here,

    Button - used to select images from the device.
    Image - used to display the selected image.
    Label - used to display the file path once the image is selected through the file picker.

Functional part
    Add a click event for the button to select the image like below.
private async void SelectBarcode(object sender, EventArgs e)
{
    var images = await FilePicker.Default.PickAsync(new PickOptions
    {
        PickerTitle = "Pick Barcode/QR Code Image",
        FileTypes = FilePickerFileType.Images
    });
    var imageSource = images.FullPath.ToString();
    barcodeImage.Source = imageSource;
    outputText.Text = imageSource;
}


Here,
FileTypes: The default file type available for selection in the FilePicker are FilePickerFileType.Images, FilePickerFileType.Png, and FilePickerFileType.Videos. However, if you need to specify custom file types for a specific platform, you can create an instance of the FilePickerFileType class. This allows you to define the desired file types according to your requirements.
PickerTitle: The PickOptions.PickerTitle is presented to the user and its behavior varies across different platforms.

Full Code
namespace MauiFilePicker;

public partial class MainPage : ContentPage
{
    int count = 0;

    public MainPage()
    {
        InitializeComponent();
    }

    private async void SelectBarcode(object sender, EventArgs e)
    {
        var images = await FilePicker.Default.PickAsync(new PickOptions
        {
            PickerTitle = "Pick Barcode/QR Code Image",
            FileTypes = FilePickerFileType.Images
        });
        var imageSource = images.FullPath.ToString();
        barcodeImage.Source = imageSource;
        outputText.Text = imageSource;
    }
}


<?xml version="1.0" encoding="utf-8" ?>
<ContentPage xmlns="http://schemas.microsoft.com/dotnet/2021/maui"
             xmlns:x="http://schemas.microsoft.com/winfx/2009/xaml"
             x:Class="MauiFilePicker.MainPage">

    <ScrollView>
        <VerticalStackLayout
            Spacing="25"
            Padding="30"
            VerticalOptions="Start">

            <Button
                x:Name="ImageSelect"
                Text="Select Barcode"
                SemanticProperties.Hint="Select Image"
                Clicked="SelectBarcode"
                HorizontalOptions="Center" />
            <Label x:Name="outputText"
                   Padding="10"/>
            <Image
                x:Name="barcodeImage"
                SemanticProperties.Description="Selected Barcode"
                HeightRequest="200"
                HorizontalOptions="Center" />
        </VerticalStackLayout>
    </ScrollView>

</ContentPage>


Demo
Android


About HostForLIFE.eu

HostForLIFE.eu is European Windows Hosting Provider which focuses on Windows Platform only. We deliver on-demand hosting solutions including Shared hosting, Reseller Hosting, Cloud Hosting, Dedicated Servers, and IT as a Service for companies of all sizes.

We have offered the latest Windows 2016 Hosting, ASP.NET Core 2.2.1 Hosting, ASP.NET MVC 6 Hosting and SQL 2017 Hosting.


Tag cloud

Sign in