European ASP.NET 4.5 Hosting BLOG

BLOG about ASP.NET 4, ASP.NET 4.5 Hosting and Its Technology - Dedicated to European Windows Hosting Customer

European ASP.NET Core Hosting :: Remoting in .NET

clock November 24, 2020 08:30 by author Peter

Distributed computing is an integral part of almost every software development. Before .Net Remoting, DCOM was the most used method of developing distributed application on Microsoft platform. Because of object oriented architecture, .NET Remoting replaces DCOM as .Net framework replaces COM.
 
Benefits of Distributed Application Development
 
Fault Tolerance: Fault tolerance means that a system should be resilient when failures within the system occur.
 
Scalability: Scalability is the ability of a system to handle increased load with only an incremental change in performance.
 
Administration: Managing the system from one place.
 
In brief, .NET remoting is an architecture which enables communication between different application domains or processes using different transportation protocols, serialization formats, object lifetime schemes, and modes of object creation. Remote means any object which executes outside the application domain. The two processes can exist on the same computer or on two computers connected by a LAN or the Internet. This is called marshalling (This is the process of passing parameters from one context to another.), and there are two basic ways to marshal an object:
 
Marshal by value: the server creates a copy of the object passes the copy to the client.
 
Marshal by reference: the client creates a proxy for the object and then uses the proxy to access the object.
 
Comparison between .NET Remoting and Web services


Architecture

Remote objects are accessed thro channels. Channels are Transport protocols for passing the messages between Remote objects. A channel is an object that makes communication between a client and a remote object, across app domain boundaries. The .NET Framework implements two default channel classes, as follows:
 
HttpChannel: Implements a channel that uses the HTTP protocol. TcpChannel: Implements a channel that uses the TCP protocol (Transmission Control Protocol). Channel take stream of data and creates package for a transport protocol and sends to other machine. A simple architecture of .NET remoting is as in Fig 1.


As Fig.1 shows, Remoting system creates a proxy for the server object and a reference to the proxy will be returned to the client. When client calls a method, Remoting system sends request thro the channel to the server. Then client receives the response sent by the server process thro the proxy.
 
Example
Let us see a simple example which demonstrates .Net Remoting. In This example the Remoting object will send us the maximum of the two integer numbers sent.
Creating Remote Server and the Service classes on Machine 1: Please note for Remoting support your service (Remote object) should be derived from MarshalByRefObject.
    using System;  
    using System.Runtime.Remoting.Channels; //To support and handle Channel and channel sinks  
    using System.Runtime.Remoting;  
    using System.Runtime.Remoting.Channels.Http; //For HTTP channel  
    using System.IO;  
    namespace ServerApp {  
      public class RemotingServer {  
        public RemotingServer() {  
          //  
          // TODO: Add constructor logic here  
          //  
        }  
      }  
      //Service class  
      public class Service: MarshalByRefObject {  
        public void WriteMessage(int num1, int num2) {  
          Console.WriteLine(Math.Max(num1, num2));  
        }  
      }  
      //Server Class  
      public class Server {  
        public static void Main() {  
          HttpChannel channel = new HttpChannel(8001); //Create a new channel  
          ChannelServices.RegisterChannel(channel); //Register channel  
          RemotingConfiguration.RegisterWellKnownServiceType(typeof Service), "Service", WellKnownObjectMode.Singleton);  
        Console.WriteLine("Server ON at port number:8001");  
        Console.WriteLine("Please press enter to stop the server.");  
        Console.ReadLine();  
      }  
    }  
    }


Save the above file as ServerApp.cs. Create an executable by using Visual Studio.Net command prompt by, csc /r:system.runtime.remoting.dll /r:system.dll ServerApp.cs
 
A ServerApp.Exe will be generated in the Class folder.
 
Run the ServerApp.Exe will give below message on the console
 
Server ON at port number:8001
 
Please press enter to stop the server.
 
In order to check whether the HTTP channel is binded to the port, type http://localhost:8001/Service?WSDL in the browser. You should see a XML file describing the Service class.
 
Please note before running above URL on the browser your server (ServerApp.Exe should be running) should be ON.
 
Creating Proxy and the Client application on Machine 2
 
SoapSuds.exe is a utility which can be used for creating a proxy dll.
 
Type below command on Visual studio.Net command prompt.
 
soapsuds -url:http://< Machine Name where service is running>:8001/Service?WSDL -oa:Server.dll
 
This will generates a proxy dll by name Server.dll. This will be used to access remote object.
 
Client Code
    using System;  
    using System.Runtime.Remoting.Channels; //To support and handle Channel and channel sinks  
    using System.Runtime.Remoting;  
    using System.Runtime.Remoting.Channels.Http; //For HTTP channel  
    using System.IO;  
    using ServerApp;  
    namespace RemotingApp {  
      public class ClientApp {  
        public ClientApp() {}  
        public static void Main(string[] args) {  
          HttpChannel channel = new HttpChannel(8002); //Create a new channel  
          ChannelServices.RegisterChannel(channel); //Register the channel  
          //Create Service class object  
          Service svc = (Service) Activator.GetObject(typeof(Service), "http://<Machine name where Service running>:8001/Service"); //Localhost can be replaced by  
          //Pass Message  
          svc.WriteMessage(10, 20);  
        }  
      }  
    }


Save the above file as ClientApp.cs. Create an executable by using Visual Studio.Net command prompt by, csc /r:system.runtime.remoting.dll /r:system.dll ClientrApp.cs
 
A ClientApp.Exe will be generated in the Class folder. Run ClientApp.Exe , we can see the result on Running ServerApp.EXE command prompt.
 
In the same way we can implement it for TCP channel also.


ASP.NET 5 Hosting Available NOW!

clock November 24, 2020 07:35 by author Scott

HostForLIFE.eu is a popular online Windows and ASP.NET based hosting service provider catering to those people who face such issues. The company has managed to build a strong client base in a very short period of time. It is known for offering ultra-fast, fully-managed and secured services in the competitive market.

.NET 5 is the next version of .NET Core and the future of the .NET platform. With .NET 5 you have everything you need to build rich, interactive front end web UI and powerful backend services. .NET 5 contains great performance improvements in the
runtime and libraries and for the gRPC components. These improvements, when applied to ASP.NET Core, result in some significant wins in throughput (RPS) and latency.

HostForLIFE.eu hosts its servers in top rate data centers that's located in Amsterdam (NL), London (UK), Washington, D.C. (US), Paris (France), Frankfurt (Germany), Chennai (India), Milan (Italy), Toronto (Canada) and São Paulo (Brazil) to ensure 99.9% network period. All data center feature redundancies in network connectivity, power, HVAC, security, and fire suppression. HostForLIFE.eu proudly announces available ASP.NET 5 feature for new customers and existing customers. 


HostForLIFE.eu is a popular online Windows based hosting service provider catering to those people who face such issues. The company has managed to build a strong client base in a very short period of time. It is known for offering ultra-fast, fully-managed and secured services in the competitive market. Their powerful servers are especially optimized and ensure ASP.NET 5 performance. They have best data centers on three continent, unique account isolation for security, and 24/7 proactive uptime monitoring.

Further information and the full range of features ASP.NET 5 Hosting can be viewed here
https://hostforlife.eu/European-ASPNET-5-Hosting.


European ASP.NET Core Hosting :: How to Fix Method Not Allowed on PUT and DELETE

clock November 23, 2020 07:16 by author Scott

This tutorial shows how to fix method not allowed on PUT and DELETE requests in ASP.NET Core.

After pushing code to the beta server, most of it was working fine. The front-end was being able to call GET, POST and OPTIONS requests normally. When trying to DELETE or PUT entries, however, the following error would show up on the browser’s console:


Method not allowed? CORS error? What?

Initially, I was misled by the CORS error. Having had problems with this in the past, I thoroughly checked my API code for any possible problem in the configuration that could lead to this error only after deployed. I found none.

Then, it dawned on me that the CORS error could be not because my API wasn’t sending the ‘Access-Control-Allow-Origin’ on its response, but because it wasn’t being sent on the HTTP 405 error seen above.

Solution

What happens is that, when published, .NET Core enables the WebDAVModule, which disables PUT and DELETE requests by default.

So, to solve the issue, I ended up disabling WebDAV in the whole application, by adding these lines to the auto-generated web.config:

<system.webServer>
  <modules runAllManagedModulesForAllRequests="false">
   <remove name="WebDAVModule" />
  /modules>
</system.webServer>


After restarting the API in IIS, TA-DA! Everything (or at least your PUT and DELETE requests) should be working normally.

I hope this will be helpful to someone that host ASP.NET website on Windows Server.


ASP.NET Core 3.1.9 Hosting - HostForLIFE.eu :: Implement Global Exception Handling In ASP.NET Core Application

clock November 17, 2020 07:55 by author Peter

Today, in this article we will discuss the exception handling concept in any ASP.NET Core application. Exception handling is one of the most import functionality or part for any type of application which always need to be taken care and implement properly. Exceptions are mainly means for the run time errors which occur during the execution time of the application. So, if this type of error is not properly handled, then the application will be terminated.

In ASP.NET Core, the concept of exception handling has been changed, and rather to say, now it is in very much in better shape to implement exception handling. For any API projects implementing exception handling against every action, the method is quite time-consuming and it also requires extra efforts. So, for this purpose, we can implement the Global Exception handler so that all types of unhandled exceptions can be caught in this handler. The benefit of implementing a global exception handler is that we need to define this in one place. Through this handler, any exception that occurs in our application will be handled, even we ann new methods or controllers. So, in this article, we will discuss how to implement global exception handling in the ASP.NET Core Web API.

Create ASP.NET Core Web API Projects in Visual Studio 2019
So, before going to discuss the global exception handler, first, we need to create an ASP.NET Web API project. For this purpose, follow the steps mentioned below,

Now open the Microsoft Visual Studio and Click on Create a New Project
In the Create New Project dialog box, select ASP.NET Core Web Application for C# and then click on the Next Button.

In the Configure your new project window, provide the project name and then click on the Create button.
In the Create a New ASP.NET Core Web Application dialog, select API, and then click on Create Button.
Ensure that the checkboxes “Enable Docker Support” and “Configure for HTTPS” are unchecked. We won’t be using these features.
Ensure that “No Authentication” is selected as we won’t be using authentication either.
Click OK

Use the UseExceptionHandler middleware in ASP.NET Core

So, to implement the global exception handler, we can use the benefits of the ASP.NET Core build-in Middleware. A middleware is indicated as a software component inserted into the request processing pipeline which handles the requests and responses. We can use the ASP.NET Core in-build middleware UseExceptionHandler to use as a global exception handler. The ASP.NET Core request processing pipeline includes a chain of middleware components. This pipeline in turn contains a series of request delegates that are invoked one after another. While the incoming requests flow through each of the middleware components in the pipeline, each of these components can either process the request or pass the request to the next component in the pipeline.

Through this middleware, we can get all the detailed information of the exception object like the Stack trace, inner exception, message, etc., and also return that information through the API to return as an output. We need to put the exception handler middleware inside the configure() of a startup.cs file. If we use any MVC based application, then we can use the exception handler middleware just as below. This code snippet demonstrates how we can configure the UseExceptionHandler middleware to redirect the user to an error page when any type of exception has occurred.
public void Configure(IApplicationBuilder app, IWebHostEnvironment env)  
{  
app.UseExceptionHandler("/Home/Error");  
app.UseMvc();  
}  


Now, we need to check this exception message. For that purpose, open the WeatherForecastController.cs file and add the below action method to throw an exception –
[Route("GetExceptionInfo")]  
[HttpGet]  
public IEnumerable<string> GetExceptionInfo()  
{  
string[] arrRetValues = null;  
if (arrRetValues.Length > 0)  
{ }  
return arrRetValues;  
}  


If we want to capture the details of the exception objects – i.e. like the stack trace, message, etc then we use the below code as the exception middleware –
app.UseExceptionHandler(  
    options =>  
    {  
        options.Run(  
            async context =>  
            {  
                context.Response.StatusCode = (int)HttpStatusCode.InternalServerError;  
                context.Response.ContentType = "text/html";  
                var exceptionObject = context.Features.Get<IExceptionHandlerFeature>();  
                if (null != exceptionObject)  
                {  
                    var errorMessage = $"<b>Exception Error: {exceptionObject.Error.Message} </b> {exceptionObject.Error.StackTrace}";  
                    await context.Response.WriteAsync(errorMessage).ConfigureAwait(false);  
                }  
            });  
    }  
);  


For checking the output, just execute the API endpoint in any browser:

Define a Custom Exception Middleware to handle Exceptions in ASP.NET Core API
Also, we can write our custom middleware to handle any type of exceptions. In this section, we demonstrate how to create a typical custom middleware class. Custom middleware also provides much more flexibility to handle exceptions. We can add a stack trace, an exception type name, error code, or anything else which we want to include as a part of the error message. The below code snippet shows the typical custom middleware class:
    using Microsoft.AspNetCore.Http;    
    using Newtonsoft.Json;    
    using System;    
    using System.Collections.Generic;    
    using System.Linq;    
    using System.Net;    
    using System.Threading.Tasks;    
        
    namespace API.DemoSample.Exceptions    
    {    
        public class ExceptionHandlerMiddleware    
        {    
            private readonly RequestDelegate _next;    
        
            public ExceptionHandlerMiddleware(RequestDelegate next)    
            {    
                _next = next;    
            }    
        
            public async Task Invoke(HttpContext context)    
            {    
                try    
                {    
                    await _next.Invoke(context);    
                }    
                catch (Exception ex)    
                {    
                        
                }    
            }    
        }    
    }    


In the above class, a request delegate is passed to any middleware. The middleware either processes this or passes it to the next middleware in the chain. If the request is unsuccessful, then an exception will be thrown, and then the HandleExceptionMessageAsync method will be executed within the catch block. So, let's update the Invoke method code as shown below:
    public async Task Invoke(HttpContext context)  
            {  
                try  
                {  
                    await _next.Invoke(context);  
                }  
                catch (Exception ex)  
                {  
                    await HandleExceptionMessageAsync(context, ex).ConfigureAwait(false);  
                }  
            }  


Now, we need to implement the HandleExceptionMessageAsync method, as shown below:
    private static Task HandleExceptionMessageAsync(HttpContext context, Exception exception)  
            {  
                context.Response.ContentType = "application/json";  
                int statusCode = (int)HttpStatusCode.InternalServerError;  
                var result = JsonConvert.SerializeObject(new  
                {  
                    StatusCode = statusCode,  
                    ErrorMessage = exception.Message  
                });  
                context.Response.ContentType = "application/json";  
                context.Response.StatusCode = statusCode;  
                return context.Response.WriteAsync(result);  
            }  


Now, in the next step, we need to create a static class named ExceptionHandlerMiddlewareExtensions and add the below code within that class,
    using Microsoft.AspNetCore.Builder;  
    using System;  
    using System.Collections.Generic;  
    using System.Linq;  
    using System.Threading.Tasks;  
      
    namespace API.DemoSample.Exceptions  
    {  
        public static class ExceptionHandlerMiddlewareExtensions  
        {  
            public static void UseExceptionHandlerMiddleware(this IApplicationBuilder app)  
            {  
                app.UseMiddleware<ExceptionHandlerMiddleware>();  
            }  
        }  
    }  


Now, in the last step, we need to turn on our custom middleware within the Configure method of the startup class, as shown below:
    app.UseExceptionHandlerMiddleware();  

Conclusion

Exception handling is a mainly cross-cutting concept for any type of application. In this article, we discuss the implementation process of the global exception handling concept. We can take the benefits of global exception handling in any ASP.NET Core application to ensure that every exception will be caught and return the proper details related to that exception. With the global exception handling, we just need to write the exception handling related code for our entire application just in one place. Any suggestions or feedback or query related to this article are most welcome.


ASP.NET 5 Now Available on HostForLIFE.eu Hosting Server!

clock November 12, 2020 09:34 by author Scott

Today, we are announcing ASP.NET 5 on our hosting environment. We are happy to support this new ASP.NET 5 for our customers on our servers.

High-level goals for .NET 5 include providing a unified .NET SDK experience, with a single BCL (base class library) across all .NET 5 applications, and with support for both native and web applications across multiple operating systems. A single .NET 5 native application project would support targets such as Windows, Microsoft Duo (Android), and Apple iOS using native controls on those platforms.

Additional goals of .NET 5 include support for building high-performance cloud applications, faster algorithms in the BCL, better support for containers in the runtime, and support for HTTP3. .NET 5.0 includes support for the WebAssembly binary format, via the Mono runtime and .NET libraries. A set of nullable reference type annotations also is featured.

The following is ASP.NET 5 features

1. Cross-Platform Runtime

As we know that ASP.NET 5 can work with two different environment .NET core and .NET Framework to provide you a better experience and flexibility.

The .NET core runtime is a cross-platform and modular runtime with a small impression. .NET Core runtime has the following benefits.

  • You can run your application with a deployed version of runtime instead of that runtime which is installed on a host operating system. That makes easy to the app deployment and framework update.
  • The ASP.NET 5 provides a cross-platform version of .NET Core for Linux, Mac, and Windows operating system rather than that operating system you use for development.
  • .NET Core runtime will never ask you for update the runtime feature which is not relevant to your application. You can save your time on testing and deploying updates.

2. Fast HTTP performance

ASP.NET 5 has introduced a modular HTTP request pipeline so you can add the component according to your requirements. A pipeline does not depend on system.web. By reducing upward in pipeline app can work better and tuned better HTTP stack. The pipeline is also supported OWIN.

You can use the configure method in your Startup class to customize the pipeline the configure method used to specify which middleware you want to use in your requested pipeline. ASP.NET 5 has introduced many different middlewares from katana project including middleware for authentication, diagnostics, and static files.

3. Dependency injection

ASP.NET Frameworks like SignalR, Web API and MVC supports the dependency injection but not the holistic way and consistent through the entire web stack. You can access service in middleware, in filters,  at startup, in model binding, virtually any part of the pipeline and in controllers wherever you want use your service. ASP.NET 5 has a minimum dependency injection container to bootstrap the system. but it also provides the facility of changing containers of your choice like Ninject, Autofac, etc.

4. Cloud-ready configure

The best feature of ASP.NET 5 is you not need to use Web.config file for configuration. The main aim of ASP.NET 5 is making easy to deploy an application to the cloud and automatically read the correct configuration value for particular environment. The new system allows you to request name value from different sources like XML, environment variable and XML you have to decide which format is best in your scenario.

5. MVC 6 – a unified programming model

Web API, Web Pages, and MVC frequently used together in developing solution and they provide complementary functionality. in past ASP.NET release, this framework was implemented separately due to this they have inconsistencies and duplication issues. In MVC 6 we can merge those models in a single programming model. Now you are able to create a single web app that handles the data services and Web UI without reconciling in the programing framework. You also able to transition a site first developed with a web page into a more robust MVC app.

Now you can return content-negotiated data and Razor views from same controller and using same MVC filter pipeline.

Conclusion

The .NET 5 project is an important and exciting new direction for .NET. You will see .NET become simpler but also have broader and more expansive capability and utility. All new development and feature capabilities will be part of .NET 5, including new C# versions.

Now, you can host your ASP.NET 5 with us as low as €3.00/month. For more information about this new ASP.NET 5, please visit our site at
https://www.hostforlife.eu.


ASP.NET Core 3.1.9 Hosting - HostForLIFE.eu :: Creating Text Editor Using ASP.Net and jQuery

clock November 10, 2020 07:51 by author Peter

This article explains how to create a Text Editor using ASP.NET and jQuery. First of all, add a new application to your Visual Studio and name it "ASPNet Text Editor".

Now in this application we will add two TextBoxes, one Button and a Hidden Field.
    <asp:TextBox ID="TextBox1" TextMode="MultiLine" runat="server" CssClass="textBox" onblur="Test()"></asp:TextBox>  
    <asp:Button ID="Button1" runat="server" Text="Show it Below" />  
    <asp:HiddenField ID="hdField" runat="server" />  
    <asp:TextBox ID="textBox2" TextMode="MultiLine" runat="server" CssClass="textBox2"></asp:TextBox>

As you can see, I provided the CSS Classes in the code above. That's because I had already created the CSS and then I passed its name to these controls.
You can check the CSS code by downloading the Zip Code provided at the start of the article.
 

After creating the CSS, provide their reference in the Head section of the page like this:
    <link href="CSS/demo.css" rel="stylesheet" type="text/css" />  
    <link href="CSS/demo2.css" rel="stylesheet" type="text/css" />


Now you need to add two jQuery files to your application named jquery-1.10.2.min.js and jquery-te-1.4.0.min.js. You will get these files from my application code provided in the Zip.
 
Provide this code after the Body tag:
    <script src="JS/jquery-1.10.2.min.js" type="text/javascript"></script>  
    <script src="JS/jquery-te-1.4.0.min.js" type="text/javascript"></script>  
    <script language="javascript" type="text/javascript">  
    $('.textEditor1').jqte();  
    $(".textBox2").jqte({  
         blur: function() {  
              document.getElementById('<%=hdField.ClientID %>').value = document.getElementById('<%=txtBox2.ClientID %>').value;  
         }  
    });  
    </script>


On the Button click pass this code:
    protected void btnText_Click(object sender, EventArgs e) {    
        textbox2.Text = hdFieldt.Value;    
    }   


Now your complete code will look like this:
    <head runat="server">  
        <title>ASP.NET Text Editor</title>  
        <link href="CSS/demo.css" rel="stylesheet" type="text/css" />  
        <link href="CSS/demo2.css" rel="stylesheet" type="text/css" />  
    </head>  
      
    <body>  
        <form id="Editor" runat="server">  
            <div>  
                <asp:TextBox ID="TextBox1" TextMode="MultiLine" runat="server" CssClass="textBox" onblur="Test()"></asp:TextBox>  
                <asp:Button ID="Button1" runat="server" Text="Show it Below" />  
                <asp:HiddenField ID="hdField" runat="server" />  
                <asp:TextBox ID="textBox2" TextMode="MultiLine" runat="server" CssClass="textBox2"></asp:TextBox>  
            </div>  
        </form>  
    </body>  
    <script src="JS/jquery-1.10.2.min.js" type="text/javascript"></script>  
    <script src="JS/jquery-te-1.4.0.min.js" type="text/javascript"></script>  
    <script language="javascript" type="text/javascript">  
    $('.textEditor1').jqte();  
    $(".textBox2").jqte({  
        blur: function() {  
            document.getElementById('<%=hdField.ClientID %>').value = document.getElementById('<%=txtBox2.ClientID %>').value;  
        }  
    });  
    </script>

Output


European ASP.NET Core 3.1 Hosting :: Is .NET Core 3.1 Secure?

clock November 5, 2020 09:12 by author Scott

Well, Microsoft will release Asp.net 5 version, now it is on RC version and of course we will support this feature on our hosting environment. Asp.net Core keep improving and it is very fast. Previously, we have also advise steps by steps to migrate your Asp.net Core to latest Asp.net Core 3.1. Why? It because with latest Asp.net Core, it will be more secure and improving your website speed.

Why .NET Core is Better for Security

If you’ve ever tried to update an old house, you know that it can be challenging. As we’ve learned more about home construction and materials we have updated building codes and standards to ensure that modern homes have far few troubles and are far more efficient. .NET Core is the same thing.

Microsoft built .NET Core from the ground up with twenty years of lessons learned and updated best practices built in. Application and website security are not add-ons and patches. Security was a fundamental attribute of design and structure which means we can build more secure apps with less complexity and faster performance. And this is especially important in the age of platforms and the cloud when APIs and service calls are flying back and forth to keep your business tech connected to the world at the speed of light.

Importantly, one of the lessons Microsoft learned was to always be looking forward. So even though .NET Core was built to be cloud-native, they were also looking at the fledgling technologies of connected devices (IoT) and edge-computing. So, this forward-looking technology is wired in as well.

In other words, many of the same things that make .NET Core orders of magnitude faster than previous .NET iterations also make it more secure.

Security for .NET Core 3.1

Security is still in the hands of the developers and admins who write, deploy, and maintain the applications. The best practices that have been developed over the last two decades – some of which we’ve documented over the years — are still best practices. .NET Core 3.1 just makes them easier to deploy, easier to maintain, and faster to run.

The basics still apply, including:

Manage Your Identity Providers in .NET 3.1

Great security starts with keeping the black-hats out and letting the good guys in to do business. Before we talk about things like authentication, we need to start with the tools to do that user authentication. .NET Core 3.1 natively includes Identity providers. But it also supports major third-party identity services, including from the major social networks (e.g., Facebook, Twitter, LinkedIn).

Authentication First / Authorization Second

Old-school applications used to focus on Authorization — which allowed users to access certain functions or features based upon roles first. But once given any degree of access, a system is less secure if that individual has bad intent.

Enforce HTTPS

Deploying HTTPS is not the same as enforcing it.

Encryption keys used to cost money. But we live in a time when adding encryption to your web application is either free or VERY inexpensive. Three years ago we wrote extensively about great services like
LetsEncrypt that offer free basic encryption. But there are a surprising number of sites that still have no encryption at all and many that do offer it as a security to visitors but do not enforce it as a security for and across the application itself.

Common Vulnerability Issues

According to Microsoft, the most common vulnerability types to guard against in .NET Core 3.1 are as follows:

  • Cross-Site Scripting (XSS) — An attacker places client-side scripts inside vulnerable website code, allowing the interception of cookies or access tokens.
  • SQL Injection — An attacker places executable database statements in an entry field. This is one of the most common attack types today. You can read about SQL injections on our blog.
  • Cross-Site Request Forgery (XSRF) — An attacker takes advantage of a previously authorized session. To learn more about
  • Open Redirect — Page/URL redirects are important tools in the hands of coders. But vulnerable websites can have redirects tampered with to point to a malicious URL. Information on preventing this kind of attack can be found on Microsoft’s website.

Summary - .NET Core 3.1 is Fully Secure

It is our opinion that the latest version of .NET Core 3.1.x is the safest and most secure development platform available today for creating business-class and enterprise-class websites and applications. But as with all development frameworks, deploying best practices and proper maintenance are key.


ASP.NET Core 3.1.9 Hosting - HostForLIFE.eu :: Health Monitoring In ASP.NET Core

clock November 4, 2020 09:13 by author Peter

The dream of every software engineer is to write a code in such a way that there won’t be any defects and none of the infrastructure will ever go down. But, that is not the case in the real world and with the Microservices architecture it has become even more difficult to identify the state of the container.

In fact, we need a mechanism in place to quickly identify and fix the issue at the earliest unless it turns out to be a bigger problem. This is where Health Monitoring comes into picture.

Health Monitoring in ASP.NET Core allows you to get near real-time state of the container. These monitoring mechanisms are handy when your application is dealing with components such as database, cache, url, message broker etc.

Implementing basic health monitoring
When developing ASP.NET Core Microservices, you can use a built-in health monitoring feature by using a nuget package Microsoft.Extension.Diagnostic.HealthCheck. These health monitoring features can be enabled by using a set of services and middleware.
public void ConfigureServices    
       (IServiceCollection services)    
{    
   services.AddControllers();    
   services.AddHealthChecks();    
}     
public void Configure(IApplicationBuilder app,    
IWebHostEnvironment env)    
{    
   if (env.IsDevelopment())    
   {    
      app.UseDeveloperExceptionPage();    
   }    
      app.UseHttpsRedirection();    
      app.UseRouting();    
      app.UseAuthorization();    
      app.UseEndpoints(endpoints =>    
      {    
        endpoints.MapControllers();    
        endpoints.MapHealthChecks("/api/health");    
      }    
}   


When you run the application, you will see the output as Healthy

Health Monitoring In ASP.NET Core
For two lines of code, not too bad. However, we can do much better.

Returning status in JSON format
By default, the output of the health monitoring is in “plain/text”. Therefore, we can see the health status as Healthy or UnHealthy. In order to see the detailed output with all the dependencies, the application has to be customized with “ResponseWriter” property which is available in AspNetCore.HealthChecks.UI.Client

Firstly, add the nuget package
dotnet add package AspNetCore.HealthChecks.UI    
dotnet add package AspNetCore.HealthChecks.UI.Client    


Now, let’s configure the application
endpoints.MapHealthChecks("/api/health",     
new HealthCheckOptions()    
 {    
    Predicate = _ => true,    
    ResponseWriter = UIResponseWriter.     
                WriteHealthCheckUIResponse    
 });   


Now, run the application and you will see the output in json format
{    
  "status": "Healthy",    
  "totalDuration": "00:00:00.0038176"    
}  


Health Status for URI’s

You can easily verify the status of the endpoints/uri’s by using nuget package

dotnet add package AspNetCore.HealthChecks.uris    

Now, let's modify our code to accommodate the uri’s
public void ConfigureServices    
     (IServiceCollection services)    
{    
     
   services.AddControllers();    
   services.AddHealthChecks()    
     .AddUrlGroup(new Uri    
            ("https://localhost:5001/weatherforecast"),    
             name: "base URL", failureStatus:     
             HealthStatus.Degraded)    
}   


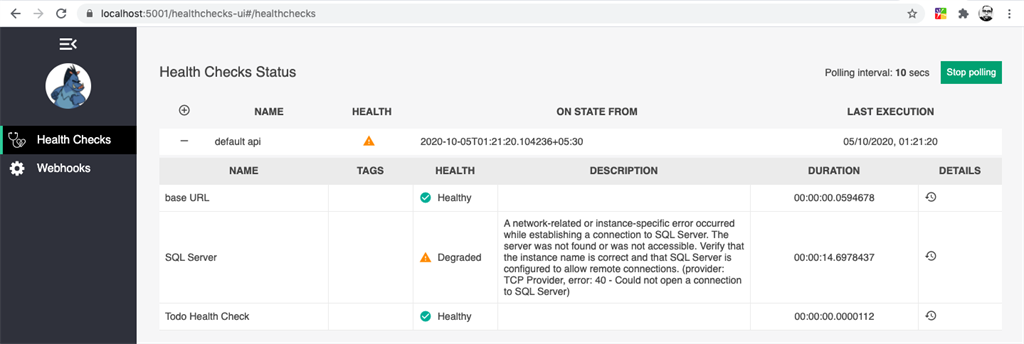
You need to use AddUrlGroup method to verify the uri’s and in case of failure, the status of the url will be displayed as Degraded.

Now, run the application and the output will look similar.
{    
  "status": "Healthy",    
  "totalDuration": "00:00:00.1039166",    
  "entries": {    
    "base URL": {    
      "data": {},    
      "duration": "00:00:00.0904980",    
      "status": "Healthy",    
      "tags": []    
    }    
}   

Health Status for SQL Server
In order to verify the status of SQL Server database, I did database installation in docker; however, you can use local instance of database server.

You can install SQL Server in docker using below commands
//Docker pull command to install    
docker pull mcr.microsoft.com/mssql/server    
     
//Docker Run command     
docker run --privileged -e 'ACCEPT_EULA=Y'     
-e 'SA_PASSWORD=Winter2019' -p 1433:1433     
--name=MSSQL -d     
mcr.microsoft.com/mssql/server:latest    


Once the database is up and running, add the below nuget package.
dotnet add package AspNetCore.HealthChecks.SqlServer    
public void ConfigureServices    
 (IServiceCollection services)    
        {    
     
            services.AddControllers();    
            services.AddHealthChecks()    
                .AddUrlGroup(new Uri("https://localhost:5001/weatherforecast"), name: "base URL", failureStatus: HealthStatus.Degraded)              .AddSqlServer(Configuration.GetConnectionString("DefaultConnection"),    
                healthQuery: "select 1",    
                failureStatus: HealthStatus.Degraded,    
                name: "SQL Server");    
        }  


Note
In the HealthQuery, don’t use any fancy queries to verify the Database connection. The main purpose of using “Select 1” is that it takes less execution time.

Now run the application and your output will look similiar.
{    
  "status": "Healthy",    
  "totalDuration": "00:00:00.1039166",    
  "entries": {    
    "base URL": {    
      "data": {},    
      "duration": "00:00:00.0904980",    
      "status": "Healthy",    
      "tags": []    
    },    
    "SQL Server": {    
      "data": {},    
      "duration": "00:00:00.0517363",    
      "status": "Healthy",    
      "tags": []    
    }    
  }    
}   


Custom Health Check
Custom Health Check can be easily implemented by using IHealthCheck interface.
public class TodoHealthCheck : IHealthCheck    
    {    
        public Task<HealthCheckResult> CheckHealthAsync(HealthCheckContext context, CancellationToken cancellationToken = default)    
        {    
            //Implement you logic here    
            var healthy = true;    
            if (healthy)    
                return Task.FromResult(HealthCheckResult.Healthy());    
            return Task.FromResult(HealthCheckResult.Unhealthy());    
        }    
    }    


The AddCheck method in Configure services is used to add health check with the specified name.
public void ConfigureServices(IServiceCollection services)    
       {    
           services.AddControllers();    
           services.AddHealthChecks()    
               .AddUrlGroup(new Uri("https://localhost:5001/weatherforecast"), name: "base URL", failureStatus: HealthStatus.Degraded)    
               .AddSqlServer(Configuration.GetConnectionString("DefaultConnection"),    
               healthQuery: "select 1",    
               failureStatus: HealthStatus.Degraded,    
               name: "SQL Server")    
               .AddCheck<TodoHealthCheck>("Todo Health Check",failureStatus:HealthStatus.Unhealthy);    
       }  


Now, run the application

{  
    "status": "Healthy",  
    "totalDuration": "00:00:00.0544065",  
    "entries": {  
        "base URL": {  
            "data": {},  
            "duration": "00:00:00.0527285",  
            "status": "Healthy",  
            "tags": []  
        },  
        "SQL Server": {  
            "data": {},  
            "duration": "00:00:00.0386450",  
            "status": "Healthy",  
            "tags": []  
        },  
        "Todo Health Check": {  
            "data": {},  
            "duration": "00:00:00.0001681",  
            "status": "Healthy",  
            "tags": []  
        }  
    }  
}  


Let’s visualize.

Display the output in the JSON format looks reasonable; however, visualizing the UI makes more sense and can be easily understandable for non-technical background people as well.

Add nuget package.

dotnet add package AspNetCore.HealthChecks.UI.InMemory.Storage    

To visualize the UI health check, you need to amend changes in services and middleware.
public void ConfigureServices(IServiceCollection services)    
        {    
     
            services.AddControllers();    
            services.AddHealthChecks()    
                .AddUrlGroup(new Uri("https://localhost:5001/weatherforecast"), name: "base URL", failureStatus: HealthStatus.Degraded)    
                .AddSqlServer(Configuration.GetConnectionString("DefaultConnection"),    
                healthQuery: "select 1",    
                failureStatus: HealthStatus.Degraded,    
                name: "SQL Server")    
                .AddCheck<TodoHealthCheck>("Todo Health Check",failureStatus:HealthStatus.Unhealthy);    
     
            services.AddHealthChecksUI(opt =>    
            {    
                opt.SetEvaluationTimeInSeconds(10); //time in seconds between check    
                opt.MaximumHistoryEntriesPerEndpoint(60); //maximum history of checks    
                opt.SetApiMaxActiveRequests(1); //api requests concurrency    
                opt.AddHealthCheckEndpoint("default api", "/api/health"); //map health check api    
            })    
            .AddInMemoryStorage();    
        }   

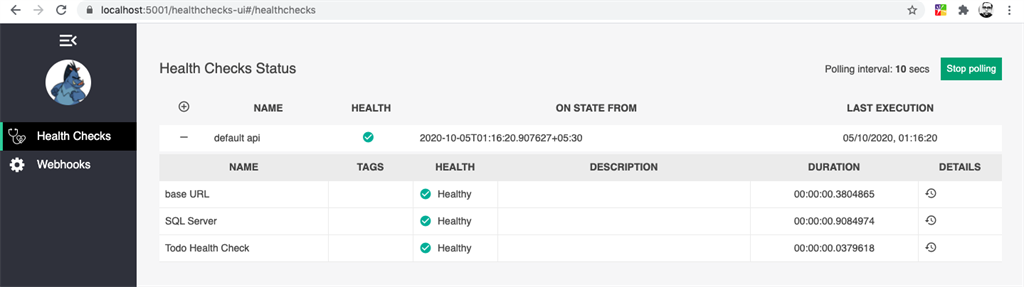
The Health Check UI endpoint comes by default as “/healthchecks-ui“. You can change this value by customizing it through the MapHealthCheckUI method.

In the code, I have set the polling interval as 10 seconds. It checks whether all the endpoints/databases etc within the application are working as expected.

Now run the application.

Health Monitoring In ASP.NET Core

Now, let’s stop the SQL Server from Docker container and verify the output
//Get Container ID    
docker ps    
     
//Stop Docker container for SQL Server    
docker stop <Container Id here>   


Health Monitoring In ASP.NET Core

Other Health checksFeatures.


About HostForLIFE.eu

HostForLIFE.eu is European Windows Hosting Provider which focuses on Windows Platform only. We deliver on-demand hosting solutions including Shared hosting, Reseller Hosting, Cloud Hosting, Dedicated Servers, and IT as a Service for companies of all sizes.

We have offered the latest Windows 2016 Hosting, ASP.NET Core 2.2.1 Hosting, ASP.NET MVC 6 Hosting and SQL 2017 Hosting.


Tag cloud

Sign in