European ASP.NET 4.5 Hosting BLOG

BLOG about ASP.NET 4, ASP.NET 4.5 Hosting and Its Technology - Dedicated to European Windows Hosting Customer

European ASP.NET Core Hosting :: Working With AutoMapper

clock December 22, 2020 09:10 by author Peter

This article provides some guidelines on how to use AutoMapper in C#.
We have come across a lot of situations when we need to copy data from one object to another. Normally, we follow the below mentioned approach to achieve this. Let’s say we have two classes declared as below,

First Class:
    public class UserObject  
       {  
           public int Id;  
           public string Name;  
           public string Address;  
       }  

Second Class:
    public class UserAnotherObject  
    {  
        public int Id;  
        public string Name;  
        public string Address;  
    }
 

Now, if an object of the first class have some data in it and we want to copy that data to an object of the second class, we would be using the following approach for this:
    UserObject uObj = new UserObject();                         //an object of First Class  
               UserAnotherObject uAnotherObj = new UserAnotherObject();    //an object of Second   
      
               uAnotherObj.Id = uObj.Id;  
               uAnotherObj.Name = uObj.Name;  
               uAnotherObj.Address = uObj.Address;   


This is undoubtedly a tedious and repetitive task in case the object has a lot of properties.

Now, to overcome this task we can use a Nuget Package called the Auto-Mapper. Its working is quite simple to explain, in that it creates copy of one object into another but a bit automatically on the basis of Datatypes and names of the properties.

In order to use AutoMapper we would have to install it first from the Nuget Package Manager as pictorially explained below:

Step 1: Go to Manage NuGet Packages.. option in the project.
 

Step 2: Search and install AutoMapper to your project.

Step 3: Include the required Library on the page.
    using AutoMapper.Mappers;   

Now that this been done, we create a Mapper between the UserObject class and UserAnotherObject class. This will be done using the following line.

    AutoMapper.Mapper.CreateMap<UserObject, UserAnotherObject>();   

After creating this Mapper, let’s put some data into the object of the class UserObject that we made above,
    uObj.Id = 123;  
    uObj.Name = "Peter";  
    uObj.Address = "London";  


Now that we have the data, let’s copy the data from the object of UserObject class into the object of class UserAnotherObject using the AutoMapper that we just created above.
    uAnotherObj = AutoMapper.Mapper.Map<UserAnotherObject>(uObj);   

This copies the complete data from the uObj object to uAnotherObj object.

Note:
We need to keep it in mind that Auto Mapper copies data to properties in the target object with the same name as the properties name in the source object. The name should be the same but NOT CASE-SENSITIVE i.e. the name in source object can be “id” and that in the target object can be “ID”.


European ASP.NET Core Hosting :: ASP.NET Core 2.0 Structured Logging

clock December 15, 2020 07:28 by author Peter

In this tutorial, I will show you how to work with structured logging in ASP.NET Core and Serilog. Let's start with logging, add NuGet packages:
    Serilog.AspNetCore
    Serilog.Sinks.Literate
    Serilog.Sinks.Seq


In Program.cs, configure Serilog using its LoggerConfiguration class and storing an instance of ILogger (returned by CreateLogger) in Serilog’s static Log class.
    public static void Main(string[] args)  
          {  
              Log.Logger = new LoggerConfiguration()  
                          .WriteTo.LiterateConsole()  
                          .CreateLogger();  
      
             BuildWebHost(args).Run();  
          }  
      
          public static IWebHost BuildWebHost(string[] args) =>  
              WebHost.CreateDefaultBuilder(args)  
                  .UseStartup<Startup>()  
                  .UseSerilog()  
                  .Build();  


Using the ILogger is the same process as described in our previous post, however, with Serilog we can do structured logging.
    public async Task Invoke(HttpContext context)  
        {  
            var message = new  
            {  
                GreetingTo = "James Bond",  
                GreetingTime = "Morning",  
                GreetingType = "Good"  
            };  
            this.logger.LogInformation("Inoke executing {@message}", message);  
      
            await context.Response.WriteAsync("Hello Logging!");  
      
            this.logger.LogInformation(  
                "Inoke executed by {developer} at {time}", "Tahir", DateTime.Now);  
        }

Running the application will show messages in Console window.

Structured logging is a technique to include semantic information as part of the messages being logged. This helps ‘machine readability’ of these messages and tools can be written to analyze raw log messages and produce interesting information.

Serilog uses message template, similar to string.Format() in .NET. Few interesting aspects of template syntax are,
    Use {} to enclose property names e.g. {developer} in above solution. These will be stored as metadata and can be queried using structured data storage (e.g. Seq, Azure).
    Use @ to preserve object structure e.g. in solution above the anonymous object is serialized into JSON representation.

Enrichers
In Serilog, enrichers are used to attach information to every log event that can then be used by structured data storage (e.g. Seq, Azure) for viewing and filtering. A simple way to do this is by using .Enrich.WithProperty() when configuring Serilog,
    Log.Logger = new LoggerConfiguration()  
                               .Enrich.WithProperty("ApiVersion", "1.2.5000")  
                               .WriteTo.LiterateConsole()  
                               .CreateLogger();  
As we saw in the previous post, a category can be attached to the logged messages, which normally is the fully qualified name of the class. This information could be used by structured data storage (e.g. Seq, Azure). Serilog provides this mechanism by attaching Context via ForContext() method,
    Log.Logger = new LoggerConfiguration()  
                        .Enrich.WithProperty("ApiVersion", "1.2.5000")  
                        .WriteTo.LiterateConsole()  
                        .CreateLogger()  
                        .ForContext<HelloLoggingMiddleware>();  


Sinks
Sinks in Serilog refer to destination of log messages e.g. file, database or console (in our example). There are several sinks available (refer to link below). I’ll use Seq as an example sink to show how all the metadata we’ve added is available in a structured storage,
    Log.Logger = new LoggerConfiguration()  
                              .Enrich.WithProperty("ApiVersion", "1.2.5000")  
                              .WriteTo.LiterateConsole()  
                              .WriteTo.Seq("http://localhost:5341")  
                              .CreateLogger()  
                              .ForContext<HelloLoggingMiddleware>(); 

Notice how data we added via enricher, context and custom object appears as key/value pairs. This can now be used for filtering data and creating dashboards within Seq.


European ASP.NET Core Hosting :: How to Write Testable Code in .NET?

clock December 8, 2020 08:15 by author Peter

In this article, I give a brief introduction to writing testable code. Although I have described and used samples in the context of .NET, the high-level principles of writing testable code applies to most of the programming language.  
 
What is Testable Code?
Testable code refers to the loosely coupled code where code does not directly depend on internal/external dependencies, so we can easily replace the real dependencies (sometimes referred to as real service) with mock services in test cases. For example, if my code calls a method GetProductInfo() which is connecting to a real database, fetching the product information, and returning to the main method. To test my main method functionality without actually connecting to the real database, I can write a test that uses a mock service to get product data.
 
While it might seem a little confusing at this point, it is actually very simple when you see a working example of it.
 
Why is it important to write testable code?
Writing testable code is crucial, as it helps you to identify and resolve the potential problems/ bugs in the early development stage instead of getting issues in UAT or production when working with real services. Also, testing the fake services is fast compared to testing real services. For example, connecting to a real database is more time consuming than testing with fake data in mock service.
 
How to write testable code
Writing testable code is all about dependency management. If we are writing code using the SOLID principles, then our code will already be loosely coupled and in compliance with testing standards. While writing testable code, our main objective is to identify the dependencies and moving the instantiation of those dependencies outside of our code. When we create an object of the class using a new keyword inside the current class, then this class directly depends on the class whose object we are creating. For example, in the below code ProcessProduct class creating the object of DBService class. Hence DBService class is the dependency and ProcessProduct class depends directly on DBService.
    class Product  
        {  
            public int Id { get; set; }  
            public string Name { get; set; }  
            public string Category { get; set; }  
            public float Price { get; set; }  
      
        }  
        class ProcessProduct  
        {  
            public void DisplayProduct()  
            {  
                DBService dbService = new DBService();  
                var product = dBService.getProduct();  
                Console.WriteLine($" Product Name: { product.Name } Category: { product.Category } Price: { product.Price }");  
            }  
              
        }  
      
        class DBService  
        {  
            public Product getProduct() {  
                throw new NotImplementedException("Get product from database");  
            }  
        }  


To make this code loosely coupled, we will use a very popular design pattern called dependency injection. There are several ways to implement dependency injection which is itself a very wide topic. So to keep this article simple, I will use one of the ways to implement dependency injection-  Dependency injection using Constructor.
 
In this method, instead of creating the object of DBService inside ProcessProduct, we will inject the object through the constructor of the dependent class and save it in a private variable as shown in the below code:
    class Product  
    {  
        public int Id { get; set; }  
        public string Name { get; set; }  
        public string Category { get; set; }  
        public float Price { get; set; }  
      
    }  
    class ProcessProduct  
    {  
        private IDBservice _dbService;  
      
        public ProcessProduct(IDBservice dbService)  
        {  
            _dbService = dbService;  
        }  
        public void DisplayProduct()  
        {  
            var product = _dbService.getProduct();  
            Console.WriteLine($" Product Name: { product.Name } Category: { product.Category } Price: { product.Price }");  
        }  
          
    }  
      
    interface IDBservice {  
         Product getProduct();  
    }  
      
    class DBService : IDBservice  
    {  
        public Product getProduct() {  
            throw new NotImplementedException("Get product from database");  
        }  
    }  


We have also created an interface IDBService in the above example and declared the object of DBService using this interface. By using this interface, we allow any class’object that implements the IDBService interface to inject through the constructor.
 
Below is an example of passing a mock class object for testing.
    class ProcessProduct  
        {  
            private IDBservice _dbService;  
      
            public ProcessProduct(IDBservice dbService)  
            {  
                _dbService = dbService;  
            }  
            public void DisplayProduct()  
            {  
                var product = _dbService.getProduct();  
                Console.WriteLine($" Product Name: { product.Name } Category: { product.Category } Price:  { product.Price }");  
            }  
      
        }  
      
        interface IDBservice {  
            Product getProduct();  
        }  
      
        class MockDBService : IDBservice  
        {  
            public Product getProduct()  
            {  
                return new Product()  
                {  
                    Id = 2124,  
                    Name = "Eggs",  
                    Category = "Food",  
                    Price = 2.23m  
                };  
      
            }  
      
        }  
      
        class TestProcessProduct  
        {  
            void Test()  
            {  
                ProcessProduct processProduct = new ProcessProduct(new MockDBService());  
                processProduct.DisplayProduct();  
            }  
        }  


In this example, we want to test the ProcessProduct class to display product information without actually connecting to the real database. To achieve this, instead of injecting the DBService class object we are injecting the MockDBService class object. And because of dependency injection, we do not need to do any changes in the ProcessProduct class. Hence, this code is loosely coupled and testable.


ASP.NET Core 3.1.9 Hosting - HostForLIFE.eu :: Converting HTML to Plain Text in ASP.NET

clock December 1, 2020 08:40 by author Peter

Sometimes you want to remove tags from HTML and get only plain text. In general, this is simple task but there are few drawbacks in some scenarios. The simplest solution is to just remove all tags from given HTML without any formatting.

You can do it with code like this:

[ C# ]

public string RemoveHTMLTags(string HTMLCode)
{
 return System.Text.RegularExpressions.Regex.Replace(
   HTMLCode, "<[^>]*>", "");
}

[ VB.NET ]

Public Function RemoveHTMLTags(ByVal HTMLCode As String) As String
 Return System.Text.RegularExpressions.Regex.Replace( _
   HTMLCode, "<[^>]*>", "")
End Function

Better HTML to plain text conversion\

Example above removes any tag from HTML. This is good enough in some scenarios, but there are some issues too:

- Text inside HEAD tag will be visible too
- Empty spaces &nbsp; and new lines <br /> or paragraph <p> will be lost
- Unwanted empty spaces that are invisible in HTML will show in plain text, and that will distract text even more
- Special characters like &amp; or &copy etc. will not be translated etc

To solve all these problems, you need a little more processing of input HTML. Next function will provide better HTML to text conversion:

[ C# ]

// This function converts HTML code to plain text
// Any step is commented to explain it better
// You can change or remove unnecessary parts to suite your needs

public string HTMLToText(string HTMLCode)
{
 // Remove new lines since they are not visible in HTML
 HTMLCode = HTMLCode.Replace("\n", " ");

 
 // Remove tab spaces
 HTMLCode = HTMLCode.Replace("\t", " ");
 
 // Remove multiple white spaces from HTML
 HTMLCode = Regex.Replace(HTMLCode, "\\s+", " ");
 
 // Remove HEAD tag
 HTMLCode = Regex.Replace(HTMLCode, "<head.*?</head>", ""
                     , RegexOptions.IgnoreCase | RegexOptions.Singleline);

 
 // Remove any JavaScript
 HTMLCode = Regex.Replace(HTMLCode, "<script.*?</script>", ""
   , RegexOptions.IgnoreCase | RegexOptions.Singleline);

 
 // Replace special characters like &, <, >, " etc.
 StringBuilder sbHTML = new StringBuilder(HTMLCode);

// Note: There are many more special characters, these are just
// most common. You can add new characters in this arrays if needed
 string[] OldWords = {"&nbsp;", "&amp;", "&quot;", "&lt;",
   "&gt;", "&reg;", "&copy;", "&bull;", "&trade;"};
 string[] NewWords = {" ", "&", "\"", "<", ">", "®", "©", "•", "â„¢"};
 for(int i = 0; i < OldWords.Length; i++)
 {
   sbHTML.Replace(OldWords[i], NewWords[i]);
 }

 
 // Check if there are line breaks (<br>) or paragraph (<p>)
 sbHTML.Replace("<br>", "\n<br>");
 sbHTML.Replace("<br ", "\n<br ");
 sbHTML.Replace("<p ", "\n<p ");

 
 // Finally, remove all HTML tags and return plain text
 return System.Text.RegularExpressions.Regex.Replace(
   sbHTML.ToString(), "<[^>]*>", "");
}

[ VB.NET ]

' This function converts HTML code to plain text
' Any step is commented to explain it better
' You can change or remove unnecessary parts to suite your needs

Public Function HTMLToText(ByVal HTMLCode As String) As String
 ' Remove new lines since they are not visible in HTML
 HTMLCode = HTMLCode.Replace("\n", " ")
 
 ' Remove tab spaces
 HTMLCode = HTMLCode.Replace("\t", " ")
 
 ' Remove multiple white spaces from HTML
 HTMLCode = Regex.Replace(HTMLCode, "\\s+", "  ")
 
 ' Remove HEAD tag
 HTMLCode = Regex.Replace(HTMLCode, "<head.*?</head>", "" _
   , RegexOptions.IgnoreCase Or RegexOptions.Singleline)

 
 ' Remove any JavaScript
 HTMLCode = Regex.Replace(HTMLCode, "<script.*?</script>", "" _
   , RegexOptions.IgnoreCase Or RegexOptions.Singleline)
 

 ' Replace special characters like &, <, >, " etc.
 Dim sbHTML As StringBuilder = New StringBuilder(HTMLCode)

 ' Note: There are many more special characters, these are just
 ' most common. You can add new characters in this arrays if needed

 Dim OldWords() As String = {"&nbsp;", "&amp;", "&quot;", "&lt;", _
    "&gt;", "&reg;", "&copy;", "&bull;", "&trade;"}
 Dim NewWords() As String = {" ", "&", """", "<", ">", "®", "©", "•", "â„¢"}
 For i As Integer = 0 To i < OldWords.Length
   sbHTML.Replace(OldWords(i), NewWords(i))
 Next i

 
 ' Check if there are line breaks (<br>) or paragraph (<p>)
 sbHTML.Replace("<br>", "\n<br>")
 sbHTML.Replace("<br ", "\n<br ")
 sbHTML.Replace("<p ", "\n<p ")

 
 ' Finally, remove all HTML tags and return plain text
 Return System.Text.RegularExpressions.Regex.Replace( _
    sbHTML.ToString(), "<[^>]*>", "")
End Function

HTML to plain text ASP.NET example

Now, you can build an example that convert HTML to plain text. Create new web page with one Button control and two TextBox controls, like on image bellow:
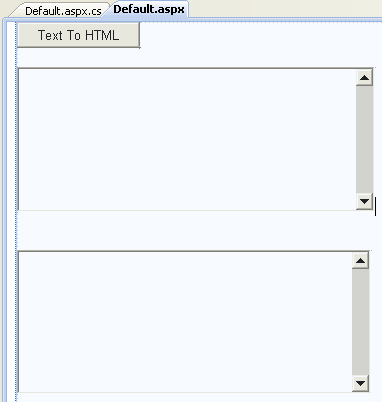
First TextBox control ID will be tbHTML and second TextBox control ID set to tbPlainText. On button's click write this code:

[ C# ]

protected void btnTextToHTML_Click(object sender, EventArgs e)
{
 tbPlainText.Text = HTMLToText(tbHTML.Text);
}


[ VB.NET ]

Protected Sub btnTextToHTML_Click(ByVal sender As Object, ByVal e As System.EventArgs) Handles btnTextToHTML.Click
 tbPlainText.Text = HTMLToText(tbHTML.Text)
End Sub

Please note that HTML is considered as dangerous input. To make this example works you need to add ValidateRequest="false" part to @Page directive. Otherwise, you'll get an error "A potentially dangerous Request.Form value was detected from the client...)" like on next image.
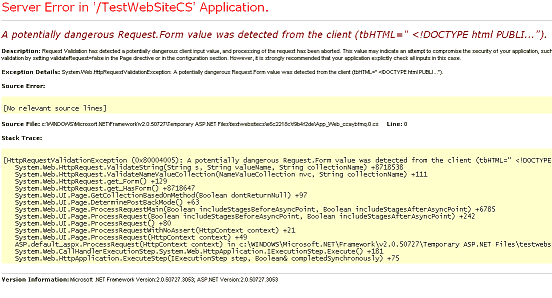
 

When you set ValidateRequest parameter to false, you can run an example. Place some HTML code to tbHTML TextBox control and click on Button. Plain text will be extracted from given HTML and shown in tbPlainText.

As you see, there are few different options when converting HTML to plain text. Depending of your needs you can only remove tags or provide additional formatting. Suggested HTMLToText function is not perfect. You can make it better if you add all symbols or add line breaks for new table rows, or add tab spaces for evey new table cell etc. Be aware that with every new option included this function becomes slower. If you overdo the conversion could be unsatisfactory, especially if you have large HTML files. Happy coding!

HostForLIFE.eu ASP.NET 5 Hosting
HostForLIFE.eu is European Windows Hosting Provider which focuses on Windows Platform only. We deliver on-demand hosting solutions including Shared hosting, Reseller Hosting, Cloud Hosting, Dedicated Servers, and IT as a Service for companies of all sizes. We have customers from around the globe, spread across every continent. We serve the hosting needs of the business and professional, government and nonprofit, entertainment and personal use market segments.


About HostForLIFE.eu

HostForLIFE.eu is European Windows Hosting Provider which focuses on Windows Platform only. We deliver on-demand hosting solutions including Shared hosting, Reseller Hosting, Cloud Hosting, Dedicated Servers, and IT as a Service for companies of all sizes.

We have offered the latest Windows 2016 Hosting, ASP.NET Core 2.2.1 Hosting, ASP.NET MVC 6 Hosting and SQL 2017 Hosting.


Tag cloud

Sign in