European ASP.NET 4.5 Hosting BLOG

BLOG about ASP.NET 4, ASP.NET 4.5 Hosting and Its Technology - Dedicated to European Windows Hosting Customer

ASP.NET Core 8 Hosting - HostForLIFE.eu :: ASP.NET Secure CAPTCHA Generator

clock July 31, 2023 07:18 by author Peter

After submitting the download link, follow these steps to import the ADCaptcha.dll into an ASP.NET project:

Provide a download link to the ADCaptcha.dll file on your website or any other platform where users can access it.
Include ADCaptcha.dll in the project: After downloading the ADCaptcha.dll, you must include it in the references section of your ASP.NET project.

  • In the Solution Explorer of your project, right-click on the "References" node.
  • Select "Add Reference."
  • Locate the downloaded ADCaptcha.dll file by clicking the "Browse" option.
  • Click "Add" to add the ADCaptcha.dll file to the project's references.

Import ADCaptcha Namespace: Import the necessary namespaces into the files where you want to use the ADCaptcha library. For example, if your ADCaptcha.dll has the namespace ADCaptcha, import it in the code files where you use the CAPTCHA functionalities:

using ADCaptcha; // Import the ADCaptcha namespace.

Utilize the ADCaptcha Library: Now that you have imported the ADCaptcha namespace, you can use the CAPTCHA functionalities provided by the ADCaptcha.dll in your code. For example:
using ADCaptcha;

// ... (other code)

// Generate a new CAPTCHA text and image.

string captchaText = CaptchaGenerator.GenerateRandomText(6, DifficultyMode.Medium);

byte[] captchaImageBytes = CaptchaGenerator.GenerateCaptchaImage(captchaText, 200, 60, 30, Color.White, Color.DarkBlue, DistortionTechnique.Warp, DistortionTechnique.NoiseLines);

// ... (other code)

By following these steps, you can successfully import the ADCaptcha.dll into your ASP.NET project and leverage its CAPTCHA generation and verification capabilities to secure your website from automated bots and spam.

How to generate a CAPTCHA image and verify user input

Below are example usages and sample code for the ADCAPTCHA DLL. We will demonstrate how to generate a CAPTCHA image in an ASP.NET web form and how to verify user input against the CAPTCHA text.

Generating and Displaying a CAPTCHA Image (ASP.NET Web Form)
In your ASP.NET web form (e.g., CaptchaPage.aspx), add an Image control to display the CAPTCHA image:

<asp:Image ID="CaptchaImage" runat="server" />
<asp:TextBox ID="UserInputTextBox" runat="server" CssClass="form-control mt-2"></asp:TextBox>
<asp:Button ID="SubmitButton" runat="server" Text="Submit" OnClick="SubmitButton_Click" CssClass="btn btn-info mt-2" />
<%--For Testing Purpose Only DLL By ASHOK DUDI--%>
<asp:Label Text="" ID="lblMsg" runat="server" />

In the code-behind file (CaptchaPage.aspx.cs), add the following code:
using ADCaptcha;

Add the below code to Page_Load event
if (!IsPostBack)
{
    // Generate a new CAPTCHA text (You can also store this in session for verification later).
    string captchaText = CaptchaGenerator.GenerateRandomText(6, DifficultyMode.Medium);

    // Generate the CAPTCHA image and convert it to a base64 string.
    byte[] captchaImageBytes = CaptchaGenerator.GenerateCaptchaImage(captchaText, 200, 60, 24, System.Drawing.Color.White, System.Drawing.Color.DarkBlue,DistortionTechnique.NoiseLines,DistortionTechnique.Swirl, DistortionTechnique.Warp);
    // You can use anyone as required. Generate the CAPTCHA image and convert it to a base64 string.
    //byte[] captchaImageBytes = CaptchaGenerator.GenerateCaptchaImage(captchaText, 200, 60);
    string captchaImageBase64 = Convert.ToBase64String(captchaImageBytes);

    // Set the CAPTCHA image source to the base64 string.
    CaptchaImage.ImageUrl = "data:image/png;base64," + captchaImageBase64;
    CaptchaImage.BorderColor = System.Drawing.Color.DarkBlue;
    CaptchaImage.BorderWidth = 1;

    // Store the CAPTCHA text in a session for verification during form submission.
    Session["CaptchaText"] = captchaText;
}


To verify Captcha, use the below code on SubmitButton_Click event
protected void SubmitButton_Click(object sender, EventArgs e)
{
    lblMsg.Text = "";
    // Retrieve the stored CAPTCHA text from the session.
    string captchaText = Session["CaptchaText"] as string;

    // Retrieve the user's input from the TextBox.
    string userInput = UserInputTextBox.Text;

    // Verify the user's input against the CAPTCHA text (case-insensitive comparison by default).
    bool isCaptchaValid = CaptchaVerifier.VerifyCaptcha(captchaText, userInput,false);

    if (isCaptchaValid)
    {
        // CAPTCHA verification successful.
        // Proceed with the form submission or any other action.
        // ...
        lblMsg.Text = "Success";
        // Optionally, you can remove the CAPTCHA text from the session to prevent reuse of the same CAPTCHA.
       Session.Remove("CaptchaText");
    }
    else
    {
        lblMsg.Text = "Failed";
        // CAPTCHA verification failed.
        // Show an error message to the user and ask them to try again.
        // ...
    }
}


Remember to modify the code and styling to match the structure and design of your unique ASP.NET project. Additionally, ensure that the session state in your ASP.NET application is appropriately configured to save and retrieve the CAPTC. Remember to alter the code and styling to reflect your individual ASP.NET project structure and design. Additionally, check that the session state in your ASP.NET application is appropriately configured to save and retrieve the CAPTCHA text for verification.Text from HA for verification.

HostForLIFE.eu ASP.NET 8 Hosting
HostForLIFE.eu is European Windows Hosting Provider which focuses on Windows Platform only. We deliver on-demand hosting solutions including Shared hosting, Reseller Hosting, Cloud Hosting, Dedicated Servers, and IT as a Service for companies of all sizes. We have customers from around the globe, spread across every continent. We serve the hosting needs of the business and professional, government and nonprofit, entertainment and personal use market segments.


European ASP.NET Core Hosting :: How to Implementing Real-Time Cache Sync with NCache and SignalR?

clock July 28, 2023 10:26 by author Peter

This article will give you a complete insight into SignalR and how to implement the Real-time cache sync with NCache.

What is SignalR?

One client can communicate with other clients dynamically is possible with SignalR. When we are talking about web applications, one browser instance can somehow communicate with the other browser instances dynamically, which is made possible with SignalR. These kinds of applications are called real-time applications. It enabled the browser to update the data dynamically to reflect the latest data change as they happen in real-time.

How does SignalR work?
The real-time communication provided by SignalR is enabled by the concepts called Hubs and clients. The "Hub" is a class derived from the Hub base class that is present within the ASP.NET Core framework. It maintains connections with clients. Once the connection between the browser and the hub on the server has been established, the hub can communicate with the browser and the browser to the hub because the connection is two-way. The hub can act as a relay for all the connected clients once the client sends the message to the hub, and based on the new message, the hub could send a message to all the connected clients. Hub can be part of any ASP.NET Core server-side application.

SignalR uses RPC(Remote Procedure Call) principle to do its work. The procedure, in other terms, is called methods or functions, so SignalR makes it possible to call methods or functions remotely. SignalR uses the Hub Protocol that defines the format of the messages that go back and forth, just like HTTP is the protocol that can be used on a TCP connection. It uses the new WebSocket transport where available and gets back to the older one where it’s needed. WebSocket is a full-duplex and stateful protocol, which means the connection between client and server will stay alive until terminated by any one of them.

Use cases of SignalR
Chat System
IoT
Stock Market System
Any Game Score check application
Gaming Industry

Scaling Out SignalR

We use the web farm to scale out the SignalR application. Based on the above image, the web servers connect with the respective clients with a load balancer. Now with the SignalR, there is a web socket connection between the client and the server. From the above image, it’s obvious that client A is connected with Server A and clients B and C to the respective servers B and C. The main problem here is if the SignalR invokes some functionality on the client end, it would only do it for the currently connected clients; since there are multiple servers and multiple clients, and these clients can grow in the long run, there is a chance that lot of the clients have been missed because other web server has its respective clients, so each web server sends messages for the invocation of the methods through SignalR to it’s only connected clients through web socket. So you end up having inconsistent user experience from all the clients which are connected.

For example, if server A invoked some functionality, it would sync with Client A, B, and C but not with servers B and C. This will lead to inconsistent user experience. To overcome this issue, we can use SignalR backplane.

What is SignalR Backplane?
It is a shared bus, repository, or resource where all your web servers are connected. So, with Backplane, the web servers, instead of connected with the client by invoking the functions on clients, send the message to Backplane, and that will broadcast the message to all the web servers, and it broadcast to all the connected clients from this process you will achieve the consistent view and scalability factor.


Bottlenecks with SignalR Backplane
Database as a SignalR BackPlane is slow SignalR needs low latency
SignalR application with Backplane should be reliable; sometimes, using a database may lead to a single point of failure due to high load.
SignalR Backplane should be highly available; the unplanned outage may lead to service delivery issues.

We can overcome all these bottlenecks by using scalable In-memory distributed Cache. In this article, I’m going to explain the NCache, which provides a distributed linear scalability that will help us to overcome all the bottlenecks which we discussed earlier.

What is NCache?
NCache is an in-memory distributed cache for .NET, Java, and Node.js, and it is also open-source. NCache is super-fast and scalable and caches application data to reduce database trips. NCache is used to overcome the performance issues related to data storage, databases, and scaling the .NET, Java, and Node.js applications.

What is ASP.NET Core SignalR?
ASP.NET Core SignalR is a library for developers to implement the process to integrate real-time functionality. The library can be used to integrate any kind of real-time web functionality into your ASP.NET application. It can have server-side code push content to the connected clients immediately once it is available. It is an open-source Microsoft API.
Implementing Real-Time Cache Sync NCache as a Backplane and ASP.Net Core SignalR Application

I’m going to use my existing ASP.NET Core SignalR application for the demo. You can download the source code from GitHub. Please read this article to understand how to create an ASP.NET Core SignalR application.

Add the below JSON object in the appsettings.json file:
"NCacheConfiguration": {
  "CacheName": "myLocalCache",
  "EventKey ": "signalRApplication"
},


CacheName: Provide your newly created cluster cache name
ApplicationID: Give some unique string relevant to your application. It acts as an event key, and each client of the application will use the same key while using the invoking NCache extension method.

Download and install the package AspNetCore.SignalR.NCache from NuGet Package Manager or use the below command from the package manager console in Visual Studio.
Install-Package AspNetCore.SignalR.NCache

Add the below code to Program.cs file.
ConfigurationManager configuration = builder.Configuration;
builder.Services.AddSignalR().AddNCache(ncacheOptions => {
    ncacheOptions.CacheName = configuration["NCacheConfiguration:CacheName"];
    ncacheOptions.EventKey = configuration["NCacheConfiguration: EventKey"];
});


Now our application is connected with NCache, assume we have two web servers connected with NCache as a backplane.

The application which I have used is to collect the real-time temperature from different agriculture farms; in real-time, the data will come from an IoT device, but for a demo, I used the client-side data entry for the temperature update. Once the temperature is updated from one client, it will reach the SignalR hub; since the web server is connected with NCache, an In-memory distributed cache acts as a Backplane. It will sync the data with other servers, and the real-time data will reach all the clients.

The default Hub protocol is using JSON. The sample looks like the below statement.
{
 “type”: 1
  “target”: “Receiving a message”
   “argument”: [{”id”:1, “NewTemperature”:29}]
}


Type 1 means that this is a function invocation.
Target is the name of the function, and argument is an array of parameters passed to the function.
Run the application and try it from two browsers as two clients and assume we have two web servers connected with NCache as a Backplane.

Update the temperature of farm B from 26 to 29. It will reflect across different clients.


Client Connection has been established, and now the NCache will act as a backplane for our SignalR application. Once the NCache initiates, you can see the client count in the NCache web monitor application, as shown in the below figure:

We have seen the basics of SignalR, the Backplane for SignalR to avoid the inconsistency in the real-time data across all the clients, and we found some bottlenecks with maintaining performance and avoiding the single point of failure with the conventional implementation of the SignalR with Backplane. To overcome these bottlenecks, we used NCache distributed Cache as a Backplane for our ASP.NET Core SignalR application to sync to real-time data and maintain user consistency across all the clients with high performance and no single point of failure.


European ASP.NET Core Hosting :: How to Implementing Real-Time Cache Sync with NCache and SignalR

clock July 28, 2023 10:24 by author Peter

This article will give you a complete insight into SignalR and how to implement the Real-time cache sync with NCache.

What is SignalR?


One client can communicate with other clients dynamically is possible with SignalR. When we are talking about web applications, one browser instance can somehow communicate with the other browser instances dynamically, which is made possible with SignalR. These kinds of applications are called real-time applications. It enabled the browser to update the data dynamically to reflect the latest data change as they happen in real-time.
How does SignalR work?

The real-time communication provided by SignalR is enabled by the concepts called Hubs and clients. The "Hub" is a class derived from the Hub base class that is present within the ASP.NET Core framework. It maintains connections with clients. Once the connection between the browser and the hub on the server has been established, the hub can communicate with the browser and the browser to the hub because the connection is two-way. The hub can act as a relay for all the connected clients once the client sends the message to the hub, and based on the new message, the hub could send a message to all the connected clients. Hub can be part of any ASP.NET Core server-side application.


European ASP.NET Core Hosting :: OneOf Package for.NET Core to Handle Multiple Return Types

clock July 24, 2023 09:42 by author Peter

The "OneOf" library in.NET Core offers a quick and efficient mechanism for C# programmers to interact with discriminated unions (sum types). It is advantageous for portraying situations with numerous possible outcomes or states because it enables you to design types that can hold values of different types but only one value at a time.

We'll cover how to utilize "OneOf" as a return type in a.NET Core Web API in this section:

Create a Web API Project with the.NET 6.0 framework as the target in Step 1.
Installing the "OneOf" NuGet package is step two.

Create API endpoints that return a "OneOf" type in step 3.

Let's examine the illustration.
using Microsoft.AspNetCore.Mvc;
using OneOf;

namespace OneOfTutorial.Controllers
{
    [Route("api/[controller]")]
    [ApiController]
    public class SampleController : ControllerBase
    {
        /// <summary>
        /// returnType : default, error
        /// </summary>
        /// <param name="returnType"></param>
        /// <returns></returns>
        [HttpGet("data/{returnType}")]
        public IActionResult GetData([FromRoute] string returnType ="default")
        {

            var data = GetDataByType(returnType);
            return Ok(data.Value);
        }

        /// <summary>
        ///
        /// </summary>
        /// <param name="recordType"></param>
        /// <returns></returns>
            private OneOf<MyDataModel,ErrorViewModel> GetDataByType(string recordType)
            {

                try
                {
                    if (recordType == "error")
                        throw new Exception("Returning Error View Model");
                    var data = new MyDataModel
                    {
                        Id = 1,
                        Name = "default message"
                    };
                    return data;
                }
                catch (Exception ex)
                {
                    // Handle errors and return ErrorViewModel
                    var errorViewModel = new ErrorViewModel
                    {
                        StatusCode = 500,
                        ErrorMessage = ex.Message
                    };
                    return errorViewModel;

                }
            }
        }

        public class MyDataModel
        {
            public int Id { get; set; }
            public string? Name { get; set; }
        }

        public class ErrorViewModel
        {
            public int StatusCode { get; set; }
            public string? ErrorMessage { get; set; }
        }
}

This code defines a SampleController class that inherits from ControllerBase, and it contains two action methods: GetData and GetDataByType. The controller demonstrates how to use the OneOf type in a .NET Core Web API to handle different response types based on a specified returnType.

  • GetData Action Method: This action method is an HTTP GET endpoint that takes a returnType as a parameter from the route (e.g., "/data/default" or "/data/error"). The GetData method then calls the private GetDataByType method to get the data based on the returnType. It returns an IActionResult, and in this case, it returns an OkObjectResult with the value extracted from the OneOf<MyDataModel, ErrorViewModel> response.
  • GetDataByType Private Method: This private method is called by the GetData action method and takes a recordType parameter that determines the type of data to return. If the recordType is "error", the method throws an exception to simulate an error scenario. It then returns an ErrorViewModel wrapped in the OneOf type. If the recordType is not "error", the method creates a MyDataModel instance with default values, and it returns the MyDataModel wrapped in the OneOf type.
  • MyDataModel and ErrorViewModel Classes: These are two simple model classes representing the data and the error response, respectively. They are used to demonstrate the OneOf usage.


To summarize, the SampleController class defines two endpoints. The GetData endpoint takes a returnType parameter, calls the GetDataByType method to get the data, and then returns the data as an OkObjectResult. The GetDataByType method determines the type of data to return based on the recordType parameter, either a MyDataModel instance or an ErrorViewModel instance, wrapped in the OneOf<MyDataModel, ErrorViewModel> type. This allows the client to handle different response types gracefully based on the specified returnType.

Here's how a potential usage of this method might look like.

// Example usage of the method
var result = GetDataByType("error");

if (result.IsT0) // Check if the result is of type MyDataModel
{
    MyDataModel data = result.AsT0; // Extract the MyDataModel value
    // Handle the data as needed
}
else if (result.IsT1) // Check if the result is of type ErrorViewModel
{
    ErrorViewModel error = result.AsT1; // Extract the ErrorViewModel value
    // Handle the error as needed
}

By using the "OneOf" library, you can easily work with discriminated unions in a type-safe and concise manner, improving the readability and maintainability of your code.


European ASP.NET Core Hosting :: How to Use ASPX Files in .NET Core?

clock July 17, 2023 10:46 by author Peter

.NET Core issues
In .NET Core, there are problems such as the bad complexity of web programming and the vagueness of coding in the controller, and the destruction of the web programming structure on the server side. Also, one of the negative points of .NET Core is the lack of support for aspx files. An executable physical file (aspx) in the root makes your program more structured.

Introducing Code-Behind

This style is completely based on MVC, and in the near future, we will expand it in such a way that there is no need for coding the view part, such as for, foreach, and while loops.

We will also try to add support for a Web-Form structure in Code-Behind in such a way that it does not have the past problems of the standard .NET Web-Form and avoids generating additional codes, and does not generate additional overhead on the server; in fact, this new Web-Form structure will not be different from the MVC model in terms of performance, bandwidth, and server overhead; therefore, our Code-Behind can support MVC, Code-Behind, and Web-Form at the same time.

We added Code-Behind in Nuget so you can easily access it.

Write code with Code-Behind

You can add aspx files in the wwwroot directory and its subdirectories.

An example of an aspx file based on Code-Behind.
<%@ Page Controller="YourProjectName.wwwroot.DefaultController" Model="YourProjectName.wwwroot.DefaultModel" %><!DOCTYPE html>
<html>
<head>
    <meta charset="utf-8" />
    <title><%=model.PageTitle%></title>
</head>
<body>
    <%=model.BodyValue%>
</body>
</html>


An example of a controller class that is based on Code-Behind.
using CodeBehind;

namespace YourProjectName.wwwroot
{
    public partial class DefaultController : CodeBehindController
    {
        public DefaultModel model = new DefaultModel();
        public void PageLoad(HttpContext context)
        {
            model.PageTitle = "My Title";
            model.BodyValue = "HTML Body";
            View(model);
        }
    }
}


An example of a model class that is based on Code-Behind.
using CodeBehind;

namespace YourProjectName.wwwroot
{
    public partial class DefaultModel : CodeBehindModel
    {
        public string PageTitle { get; set; }
        public string BodyValue { get; set; }
    }
}


Program file and additional Code-Behind items.
using CodeBehind;
using SetCodeBehind;

var builder = WebApplication.CreateBuilder(args);

var app = builder.Build();

// Configure the HTTP request pipeline.
if (!app.Environment.IsDevelopment())
{
    app.UseExceptionHandler("/Error");
    // The default HSTS value is 30 days. You may want to change this for production scenarios, see https://aka.ms/aspnetcore-hsts.
    app.UseHsts();
}

+ CodeBehindCompiler.Initialization();

app.Run(async context =>
{
+    CodeBehindExecute execute = new CodeBehindExecute();
+    await context.Response.WriteAsync(execute.Run(context));
});

app.UseHttpsRedirection();
app.UseStaticFiles();
app.UseRouting();
app.Run();

In the Program.cs class codes above, the three values marked with the + character must be added.
We show the codes separately for you.
CodeBehindCompiler.Initialization();

CodeBehindExecute execute = new CodeBehindExecute();
await context.Response.WriteAsync(execute.Run(context));

You can use the Write method in the model and controller classes; the Write method adds a string value to the ResponseText attribute; you can also change the values of the ResponseText attribute by accessing them directly.

In the controller class, there is an attribute named IgnoreViewAndModel attribute, and if you activate the IgnoreViewAndModel attribute, it will ignore the values of model and view, and you will only see a blank page; this feature allows you to display the values you need to the user and avoid multiple redirects and transfers.

To receive the information sent through the form, you can follow the instructions below.
public DefaultModel model = new DefaultModel();
public void PageLoad(HttpContext context)
{
    if (!string.IsNullOrEmpty(context.Request.Form["btn_Add"]))
        btn_Add_Click();

    View(model);
}

private void btn_Add_Click()
{
    model.PageTitle = "btn_Add Button Clicked";
}


Note. After running the program and compiling the aspx pages by Code-Behind, your program will no longer refer to any aspx files.
If the scale of the program you are building is high or you need to act dynamically, using Code-Behind will definitely give you more freedom.

If the scale of the program is low, using Code-Behind will simplify your program, and you will generate faster and more understandable code.

The following example shows the power of Code-Behind

aspx page
<%@ Page Controller="YourProjectName.wwwroot.DefaultController" Model="YourProjectName.wwwroot.DefaultModel" %><!DOCTYPE html>
<html>
<head>
    <meta charset="utf-8" />
    <title><%=model.PageTitle%></title>
</head>
<body>
    <%=model.LeftMenuValue%>
    <div class="main_content">
        <%=model.MainContentValue%>
    </div>
    <%=model.RightMenuValue%>
</body>
</html>


Controller class
using CodeBehind;

namespace YourProjectName.wwwroot
{
    public partial class DefaultController : CodeBehindController
    {
        public DefaultModel model = new DefaultModel();

        public void PageLoad(HttpContext context)
        {
            model.PageTitle = "My Title";
            CodeBehindExecute execute = new CodeBehindExecute();

            // Add Left Menu Page
            context.Request.Path = "/menu/left.aspx";
            model.LeftMenuValue = execute.Run(context);

            // Add Right Menu Page
            context.Request.Path = "/menu/right.aspx";
            model.RightMenuValue = execute.Run(context);

            // Add Main Content Page
            context.Request.Path = "/pages/main.aspx";
            model.MainContentValue = execute.Run(context);

            View(model);
        }
    }
}


Each of the pages is left.aspx, right.aspx, and main.aspx can also call several other aspx files; these calls can definitely be dynamic, and an add-on can be executed that the kernel programmers don't even know about.

Enjoy Code-Behind, but be careful not to loop the program! (Don't call pages that call the current page).

What power does Code-Behind give you while running the program?
Accessing hypertext contents of pages and replacing some values before calling in other pages.

Microsoft usually ties your hands, so you cannot create a dynamic system.

By using the default architecture of Microsoft's ASP.NET Core, you will face some very big challenges. Creating a system with the ability to support plugins that both provides security and does not loop, and can call other pages on your pages is very challenging.

Suppose you have created an application using the default ASP.NET Core cshtml that has a main page that includes a right menu and a left menu. As shown in the code above, can you change the values of these menus to Fill the dynamic form with cshtml pages and replace the values obtained from the pages? It is definitely possible, but it is difficult.

Code-Behind will not even refer to the physical aspx file to call the aspx pages and will only call a method.

How do you manage events in ASP.NET Core?

For example, a route from your program requires several methods to be executed, and these methods do not exist in the core of your program! This work can be blinded with the default cshtml of .NET, but it is difficult.

For example, we should have an event before the request to the search page and not allow the user to do more than 2 searches per minute. Using Code-Behind, we only need to check an aspx page, then reject or allow the search request.

Have you ever tried to create a plugin, module, or dynamic page for .NET systems?
Have you ever built a .NET system that supports a plugin, module, or dynamic page add-on?
Have you ever wondered why this process is so difficult in .NET?


European ASP.NET Core Hosting :: What is ASP.NET Core Response Caching?

clock July 12, 2023 08:28 by author Peter

Response buffering entails storing output responses. Response caching enables browsers and other clients to retrieve a server's response swiftly and efficiently in response to subsequent requests. Response caching in ASP.NET Core reduces server burden and enhances the user experience in web applications. This blog will provide a comprehensive explanation of response caching in ASP.NET Core.

What exactly is Response Cache?

Using the response cache, the server can store responses in memory or on disk so that subsequent requests can retrieve them rapidly. Caching mechanisms examine the cache for responses whenever a server request is made. The cache returns the response rather than generating a new one. Using response caching decreases the server's burden and the number of requests made to the server.

Note the HTTP caching directives and how they can be used to control caching behavior.

Response Header Caching
To cache the response, the 'Client and Server' exchange HTTP header information. How HTTP caching directives can be used to control caching behavior. Cache control specifies the manner in which the response can be retained. When the cache-control header is present in the response, it is the responsibility of browsers, clients, and proxy servers to honor it.

Principal Response Caching Headers appear as follows:

  • Cache-Control Pragmatism
  • Vary
  • Header with the Cache-Control directive

The Cache-Control header is the primary response caching header. To add a Cache-Control header in ASP.Net Core, use the Response object in the action method of your controller. So, let's begin with the most prevalent cache-control directives:

  • This cache can either store the response on the device or in a shared location.
  • This Private Cache always stores Client Side Response, but does not purge the cache on the client side.
  • max-age: This cache-control directive indicates how long a response should be stored in the cache.
  • no-cache: This value denotes that the client should not store a copy of the response in its cache.
  • no-store: This cache is not permitted to retain the response.

Pragma Header
The Pragma header can control cache performance for ASP.NET Core. Included in the Pragma preface are server and client instructions. If the response is decorated with Cache-Control, Pragma is omitted.

Change Header
The Vary HTTP response header is included in this method's request message, and the URL is the response's body.

ResponseCache Property

ResponseCache attributes specify header properties for response cache headers in ASP.NET Core web applications. This attribute can be applied at either the controller or endpoint level.

Following are several input parameters for the cache attribute.

Duration
You can set or retrieve the cached duration of the response in seconds. This defines the "max-age" attribute within the "cache-control" header. The max-age header, which is used to specify the cache duration, will be generated based on the duration of this property.

Location
specifies the Location where data from a specific URL will be cached. If the Location is decorated with "ResponseCacheLocation.Client," it functions as a cached response on the client and adds "cache-control" to the private header.

In this example, the Location has the "ResponseCacheLocation" attribute."None" operates as "cache-control", and the "Pragma" header is set to "no-cache."

Note: If you are able to examine the cached response, follow the links on web pages or use Swagger to execute API endpoints in the browser.

Otherwise, if you attempt to refresh the page or revisit the URI, the browser will always request a new response from the server regardless of the response cache settings.

Public
public class HomeController: Controller
{
    [HttpGet]
    [ResponseCache(Duration = 180, Location = ResponseCacheLocation.Any)]
    public IActionResult getCache()
    {
        return Ok($"Responses are generated on {DateTime.Now}");
    }
}


This Duration property will generate the max-age header, which we use to define the duration of the cache for 3 minutes (180 seconds). The Location property will define the Location within the cache-control header.

So, the API endpoint and verify these response headers:
cache-control: public,max-age=180

​The status code indicates that the response comes from the disk cache:
Status Code: 200

Private
We just need to change the Location property in ResponseCacheLocation.Client to private:
​public class HomeController: Controller
{
    [HttpGet]
    [ResponseCache(Duration = 180, Location = ResponseCacheLocation.Client)]
    public IActionResult getCache()
    {
        return Ok($"Responses are generated on {DateTime.Now}");
    }
}

This changes the value of the cache control header to private, which means that only the client can cache the response:
cache-control: private,max-age=180
No-Cache


Now let us update the Location parameter to ResponseCacheLocation.  None:
public class HomeController: Controller
{
    [HttpGet]
    [ResponseCache(Duration = 180, Location = ResponseCacheLocation.None)]
    public IActionResult getCache()
    {
        return Ok($"Responses are generated on {DateTime.Now}");
    }
}


Because the cache-control and pragma headers are set to no-cache, the client is unable to use a cached response without first verifying it with the server:

cache-control: no-cache,max-age=180

pragma: no-cache

The server generates a new response each time, and the browser does not use the cached response.

NoStore
Gets or sets the value to determine whether to store the data. If NoStore is decorated with the value "true", the "cache-control" header is set to "no-store". It ignores the "Location" and the parameter has ignored the values; otherwise values "None".

public class HomeController: Controller
{
    [HttpGet]
    [ResponseCache(Duration = 180, Location = ResponseCacheLocation.Any,NoStore =True)]
    public IActionResult getCache()
    {
        return Ok($"Responses are generated on {DateTime.Now}");
    }
}


This sets the response header cache control to no-store. This means that the client should not cache the response:

cache-control: no-store
VaryByHeader

Sets or gets the "Vary" response header value. ResponseCache's VaryByHeader property allows us to set the vary header:

Now that User-Agent is the value for the VaryByHeader property, the cached response will be used as long as the request originates from the same client device. Once the User-Agent value on the client device changes, a new response will be fetched from the server. Let's verify this.
​public class HomeController: Controller
{
    [HttpGet]
    [ResponseCache(Duration = 180, Location = ResponseCacheLocation.Any,VaryByHeader="User-Agent")]
    public IActionResult getCache()
    {
        return Ok($"Responses are generated on {DateTime.Now}");
    }
}


In the response headers, check for the Vary header:

vary: User-Agent

The application is run in desktop mode, then you can see the response header "Vary" contains the value "User-Agent" (see below).

    user-agent: Mozilla/5.0 (Windows NT 10.0; Win64; x64) AppleWebKit/537.36 (KHTML, like Gecko) Chrome/110.0.0.0 Safari/537.36
    user-agent: Mozilla/5.0 (iPhone; CPU iPhone OS 13_2_3 like Mac OS X) AppleWebKit/605.1.15 (KHTML, like Gecko) Version/13.0.3 Mobile/15E148 Safari/604.1

VaryByQueryKeys Property

The VaryByQueryKeys property can be used to trigger the server to deliver a fresh response every time the response will change. There is a change in query string parameters.

​public class HomeController: Controller
{
    [HttpGet]
    [ResponseCache(Duration = 180, Location = ResponseCacheLocation.Any, VaryByQueryKeys = new string[] { "Id " })]
    public IActionResult getCache()
    {
        return Ok($"Responses are generated on {DateTime.Now}");
    }
}

C#

For example, When the Id value change and then URI also change, and  we want to generate a new response:

/api/Home?Id=1

/api/Home?Id=2

Cache Profile

In this project, you can use Response Cache attributes, as most action methods have the same input parameters. With ASP.Net Core, all parameter options are related in a Program class and with it's name and which can be used in the Response Cache attribute to remove duplicate parameter settings.

Cache3 is a new cache profile that has a time duration of 3 minutes and a location of the public.
builder.Services.AddControllers (option =>
{
   option.Cache Profiles.Add("Cache3",
      new CacheProfile()
      {
          Duration= 180,
          Location = ResponseCacheLocation.Any
      });
});

public class HomeController: Controller
{
    [HttpGet]
    [ResponseCache (Cache ProfileName ="Cache3")]
     public IActionResult getCache()
     {
          return Ok ($"Responses are generated on (DateTime.Now}");
     }
}

The defined cache-control response (see below):
cache-control: public,max-age=180
Caching Middleware

Middleware can be written to add a response cache, but this implementation adds a response cache to every page.

Program.cs File
var builder = WebApplication.CreateBuilder(args);
builder.Services.AddControllers();
builder.Services.AddResponseCaching();

var app = builder.Build();

app.MapControllers();
app.UseResponseCaching () ;
app.Run();


public class HomeController: Controller
{
    [HttpGet]
    [ResponseCache(Duration = 180, Location = ResponseCacheLocation.Any, VaryByQueryKeys = new string[] { "Id" })]
    public IActionResult getCache(int Id)
    {
        return Ok($"Responses are generated on Id:{Id} at {DateTime.Now}");
    }
}


First, add the response caching middleware using the AddResponseCaching() method, then configure the app to use it with UseResponseCaching().

That's it. Response caching middleware has been enabled, so VaryByQueryKeys should now work.

Let us start the application and navigate to the /Home?id=1 endpoint:

The response was generated for Id:1 at 23-05-2022 05:52:50

Changing the query string resulted in a new response from the server.

Let's change the query string to /Home?id=2:

The response was generated for Id:2 at 23-05-2022 05:53:45

Conclusion

ASP.NET Core's response caching feature allows web applications to scale and perform better. It is possible to speed up and improve page loading efficiency by caching responses at the server or client level.

ASP.NET Core lets you configure caching middleware to cache responses based on URL path, query string parameters, and HTTP headers. Additionally, you can customize the caching behavior using options such as cache expiration times, cache location, and cache key prefixes.

You can increase user satisfaction and reduce hosting costs by using response caching in ASP.NET Core. If you're building a high-traffic website or web application, response caching should be considered a key optimization strategy.


European ASP.NET Core Hosting :: Generics in .Net 2.0 made simple

clock July 11, 2023 10:08 by author Peter

Why Generics?
Generics provide the solution to a limitation in earlier versions of the common language runtime and the C# language in which generalization is accomplished by casting types to and from the universal base type Object. By creating a generic class, you can create a collection that is type-safe at compile-time.
By allowing you to specify the specific types acted on by a generic class or method, the generics feature shifts the burden of type safety from developer to the compiler. There is no need to write code to test for the correct data type, because it is enforced at compile time. The need for type casting and the possibility of run-time errors are reduced.


Also Generics got rid of disadvantage of array list by avoiding the type casting.
Let us go through the simple example with usage of Generics.

Implementation of Generics
The first step in generics is to create the list of generic template for which the class is applicable.

Let us take an example of creating Generic collection using the simple bank requirement below. Requirement is to create the collection of either Current Bank account or Savings bank account.

Create two classes.
Savings bank account
Current Bank account

SavingsBank.cs

using System;
using System.Collections.Generic;

using System.Text;
namespace GenericImplementation
{
    class SavingsBank
    {
        protected string name;
        protected int age;
        private const float MIN_AMT_LMT = 10000;

        private float  accBalance;
        public SavingsBank(string AccName, int age, string opType, float balanceAmt)
        {
            this.Name = AccName;
            this.Age = age;
            if (opType.ToLower().Equals("credit"))
            {
               this.DoCredit(balanceAmt);
            }
            else
            {
                this.DoDebit(balanceAmt);
            }
        }
        public string Name
        {
         get
          {
            return name;
          }
            set
            { name = value;
            }
        }
       public int Age
        {
            get
            {
            return age;
            }
            set
            { age = value;
            }
        }
        public float TotalBalance
        {
            get
            {
                return accBalance;
            }
            set
            {
                accBalance = value;
            }
        }
        public void DoCredit(float credBal)
        {
            TotalBalance = TotalBalance + credBal;
        }
        public void DoDebit(float debBal)
        {
            if (TotalBalance - debBal > MIN_AMT_LMT)
            {
            TotalBalance = TotalBalance - debBal;
            }
            else
            {
                throw new Exception("Balance should not be less than minimum amount " + MIN_AMT_LMT.ToString());
            }
        }
        public override string ToString()
        {
            return " Account name :" + this.Name + " Age:" + this.age.ToString() + " Balance : " + this.TotalBalance.ToString();
        }
    }
}

Current Bank A/C:
using System;
using System.Collections.Generic;
using System.Text;

namespace GenericImplementation
{
    class CurrentBank
    {
        protected string name;
        protected int age;
        private float accBalance;
        private const float MIN_AMT_LMT = 20000;
        public CurrentBank(string AccName, int age,string opType,float balanceAmt)
        {
            this.Name = AccName;
            this.Age = age;
            if (opType.ToLower().Equals("credit"))
            {
                this.DoCredit(balanceAmt);
            }
            else
            {
                this.DoDebit(balanceAmt);
            }
        }
        public string Name
        {
            get
            {
                return name;
            }
            set
            {
                name = value;
            }
        }
        public float GetCreditLimit
        {
               get
            {
                return MIN_AMT_LMT;
            }
        }

        public int Age
        {
           get
            {
                return age;
            }
            set
            {
               age = value;
            }
        }
        public float TotalBalance
        {
            get
            {
                return accBalance;
            }
            set
            {
                accBalance = value;
            }
        }
        public void DoCredit(float credBal)
        {
            TotalBalance = TotalBalance + credBal;
        }
        public void DoDebit(float debBal)
        {
            if (TotalBalance - debBal > MIN_AMT_LMT)
            {
                TotalBalance = TotalBalance - debBal;
            }
            else
            {
                throw new Exception("Balance should not be less than minimum amount " + MIN_AMT_LMT.ToString());
            }
       }
        public override string ToString()
        {
            return " Account name :" +this.Name + " Age:" +this.age.ToString() + " Balance : " + this.TotalBalance.ToString();
        }
    }
}
 
Now create a Generic bank account collection which can hold the collection of either Savings Bank account or Current bank account.
Generic Bank Collection:
using System;
using System.Collections;
using System.Collections.Generic;
using System.Text;

namespace GenericImplementation
{
    class GenericBankCollection<AccountType>  : CollectionBase
    {
        public void Add(AccountType GenericObject)
        {
            InnerList.Add(GenericObject);
        }
        public void Remove(int index)
        {
            InnerList.RemoveAt(index);
        }
        public AccountType Item(int index)
        {
            return (AccountType)InnerList[index];
        }
    }
}
 
Usage:
Now we can use the Generic bank collection to hold either the savingsBankAccount or CurrentBankAccount collection.

Program.cs:
using System;
using System.Collections.Generic;
using System.Text;

namespace GenericImplementation
{
    class Program
    {
        static void Main(string[] args)
        {
           GenericBankCollection<SavingsBank> sbAccs = new GenericBankCollection<SavingsBank>();
            sbAccs.Add(new SavingsBank("Peter",34,"credit",1000));
            sbAccs.Add(new SavingsBank("Tom",30,"debit",1000));
            GenericBankCollection<CurrentBank> curAccs = new GenericBankCollection<CurrentBank>();
            curAccs.Add(new CurrentBank("Michael", 34, "credit", 1000));
            curAccs.Add(new CurrentBank("Mark", 30, "credit", 1000));

            System.Console.WriteLine("Savings Accounts");
            System.Console.WriteLine("=========");
            foreach (SavingsBank savingsBank in sbAccs)
            {
                System.Console.WriteLine(savingsBank.ToString());
            }

            System.Console.WriteLine("Current Accounts");
            System.Console.WriteLine("=========");
            foreach (CurrentBank CurrentBank in curAccs)
            {
                System.Console.WriteLine(CurrentBank.ToString());
            }
            System.Console.ReadLine();
    }

    }

}


European ASP.NET Core Hosting :: Harnessing the Power of UserManager and RoleManager for Robust User Control in .Net Core Identity

clock July 4, 2023 07:05 by author Peter

In this article, I will demonstrate how to utilise the.Page control is executed using NetCore Identity Framework, with a concentration on the UserManager and RoleManager classes. The involved web application is a.NET Core Razor Pages application, and the database is an Entity Framework Core-managed MSSQL database.

Imagine you are a member of the HR department responsible for administering the internal website of your company. Your organisation consists of three kinds of employees:

  • Only personnel of the IT Department are granted access to IT-related pages.
  • Only personnel of the Sales Department are permitted access to finance-related pages.
  • The chief executive officer has access to all pages, including CEO-only pages.

Final Resolution Summary
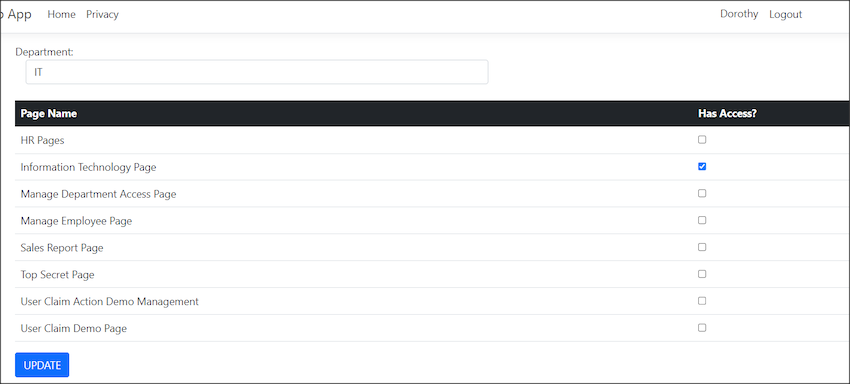
(This is how it looks when HR configure which page/s are allowed to access by IT Department in Page Access Management Page.)

(This is how it looks like when Bob from the IT department acesss IT page)

(This is how it looks like when Bob from IT department access to view the Sales Team page)

Programming
First, I create two projects.
1. A website named "WebApp1"
    A .Net Core Razor Web App and called it "WebApp1"
    A Library and project named "DataLibray"

In the appsetting.json of my WebApp1, I configure the database connection
"ConnectionStrings": {
  "MyDBContextConnection": "Server=.\\SQLEXPRESS;Database=WebApp1;Integrated Security=True; TrustServerCertificate=True;"
}


In my DataLibrary project, I have created a class named "MyDbContext.cs" that looks like the following:
public class MyDbContext : IdentityDbContext<IdentityUser, IdentityRole, string,
  IdentityUserClaim<string>, IdentityUserRole<string>, IdentityUserLogin<string>,
  IdentityRoleClaim<string>, IdentityUserToken<string>>
{
    public MyDbContext() : base()
    {
    ....//omitted code

Take note of IdentityUser, IdentityRole, and IdentityRoleClaim. These three classes are integral to nearly all sections of my code.

This is what I registered in the program.cs
var connectionString = builder.Configuration.GetConnectionString("MyDBContextConnection")
    ?? throw new InvalidOperationException("Connection string 'MyDBContextConnection' not found.");

builder.Services.AddDbContext<MyDbContext>(options =>
    options.UseSqlServer(connectionString, b => b.MigrationsAssembly("WebApp1")));


builder.Services.AddIdentity<IdentityUser, IdentityRole>(options =>
{
    options.SignIn.RequireConfirmedAccount = false;
    options.User.RequireUniqueEmail = false;

    options.Password.RequireDigit = false;
    options.Password.RequireLowercase = false;
    options.Password.RequireUppercase = false;
    options.Password.RequireNonAlphanumeric = false;
    options.Password.RequiredLength = 0;
    options.Password.RequiredUniqueChars = 0;

}).AddEntityFrameworkStores<MyDbContext>().AddDefaultTokenProviders();


From the code snippet in my Program.cs, it is evident that I have disabled the requirement for users to have an email as their account and have also disabled the password policy. I made these modifications to simplify the development process, as I prefer not to repeatedly enter email addresses and complex passwords during development.

By the way, ensure both projects are set to target framework .Net 7.0.

Also, ensure that both initiatives adhere to the target framework.Net 7.0.
Once all required configurations are in place, the Entity Framework (EF) commands can be executed to establish the database. In my instance, these are the commands I use:
    After the first command completes successfully and returns no error, add-migration FirstTimeCreateDB updates the database.

If everything is in order, the following tables will be added to the "WebApp1" database:
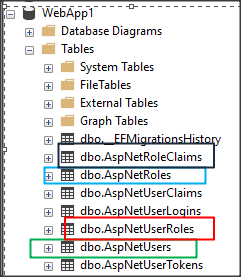
    AspNetUsers is the table that stores all the user information.
    AspNetRoles is the table that stores all the roles (in my case, it is the Department)
    AspNetUserRoles is the table that stores the relationship between the user and role (in my case, it is the Employee and the Department)
    AspNetRoleClaims is the table to store the claims of each department (in my case, it is the info that what pages can each department can access)

.NET Core provides Scaffold Identity, which offers the convenience of auto-generating user interface components such as Register, Login, Logout, and Forgot Password. However, considering the specific focus of my demo project on showcasing the functionalities of the User Manager and Role Manager, and the specific responsibilities of the HR department in this scenario, certain pages like Register and Forgot Password are not required.

Department Page

First, I establish a Department Page to create departments. It appears as follows:
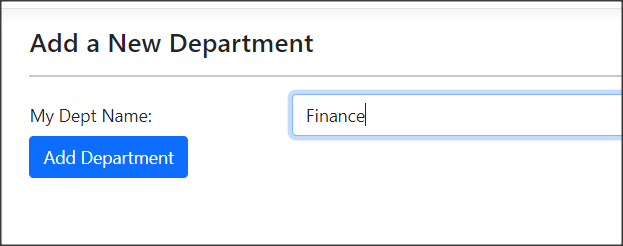
The source code for this task is very straightforward. It primarily involves the use of RoleManager. To begin, declare the RoleManager, then inject it via the constructor, and finally, invoke the CreateAsync() method.
private readonly RoleManager<IdentityRole> _roleManager;

public DepartmentManagementModel(  RoleManager<IdentityRole> rolemanager)
{
    _roleManager = rolemanager;
}

public async Task<IActionResult> OnPostAsync()
{
    IdentityRole IdentityRole = new IdentityRole();
    IdentityRole.Name = this.IdentityRole.NormalizedName;
    IdentityRole.NormalizedName = this.IdentityRole.NormalizedName;
    await _roleManager.CreateAsync(IdentityRole);
}


If the creation is successful, you’ll be able to see the newly created role in the AspNetRoles table.

Employee Page
Next, Create an Employee Page to create Employee.

Employee Page
Next, Create an Employee Page to create Employee.
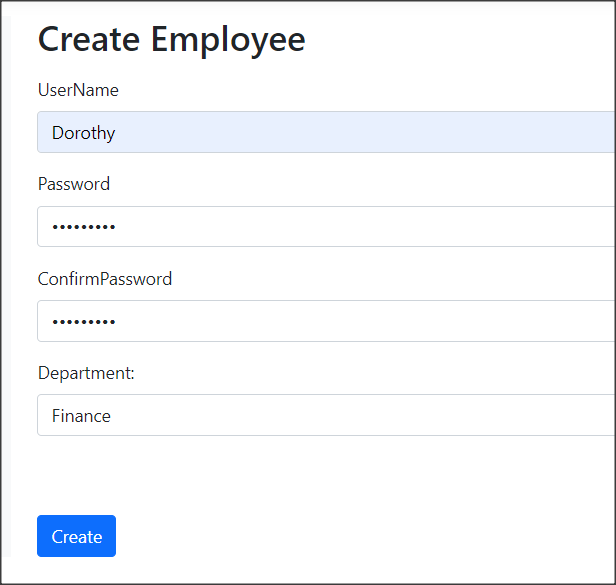
This page contains a drop-down box to store all the Departments. We use Role Manager to get all the roles (Department):
DepartmentOptions = _roleManager.Roles
.Select(r => new SelectListItem
{
    Text = r.Name,
    Value = r.Id
}).ToList();

The source code for creating an employee is straightforward and primarily utilizes the UserManager. First, declare the UserManager, then inject it via the constructor, and finally, invoke the CreateAsync() method.
private readonly UserManager<IdentityUser> _userManager;
public CreateEmployeeModel(UserManager<IdentityUser> userManager,
            RoleManager<IdentityRole> rolemanager, UrlEncoder urlencoder, IWebHostEnvironment env)
{
    _userManager = userManager;
    _roleManager = rolemanager;
}

public async Task<IActionResult> OnPostAsync()
{
    var user = new IdentityUser { UserName = Input.UserName };
    var result = await _userManager.CreateAsync(user, Input.Password);
}


The source code of add a role to the department is
await _userManager.AddToRoleAsync(user, Groupname);

Page Access Management Page
Then, we can see in table AspNetUsers and AspNetUserRoles that a User with the role she belongs has been added.
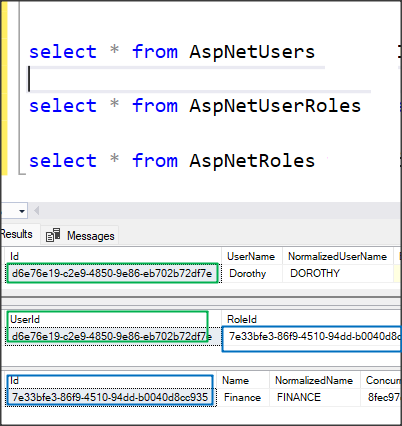
Next is the Page Access Management Page. First, I created a Class called PageNameConfiguration to configure the page name that we will control access.
public static class PageNameConfiguration
{
    public static IServiceCollection ConfigurPageNameFunction(this IServiceCollection services)
    {
        PageNameDictionary.Instance.Add("Sales Report Page", PagesNameConst.SalesReport);
        PageNameDictionary.Instance.Add("Information Technology Page", PagesNameConst.IT);
        //...omitted codes
        return services;
    }

    public static void AddPageAccessPolicy(this AuthorizationOptions options)
    {
        options.AddPolicy(PagesNameConst.SalesReport,
            policy => policy.RequireClaim(PagesNameConst.SalesReport, "Yes"));

        options.AddPolicy(PagesNameConst.IT,
          policy => policy.RequireClaim(PagesNameConst.IT, "Yes"));

   //...omitted code

The AddPageAccessPolicy method is used to establish the Access Policy. Here, ‘claims’ refer to the names of each page, with the assigned value of "Yes". The value could be anything; you can use "Yes" or "True" to indicate that the page can be accessed by a certain user.

To ensure the functionality of the AddPageAccessPolicy method, it must be registered within the Program.cs file.
builder.Services.AddAuthorization(options =>
{
    options.AddPageAccessPolicy();
});

This is the page that manages page access. It features a dropdown menu containing all the departments. Listed below are the page names. I utilize checkboxes to control which pages can be accessed by the selected department.

Once selected, click the update button, and the claims will be updated. The code behind of update claim to the role is
await _roleManager.AddClaimAsync(role, new Claim(pagename.ClaimType, "Yes"));

Please note that I have hard-coded the value of ‘claims’ to "Yes". This is because, in the AddPageAccessPolicy method, I specified that the value must be set to "Yes". Consequently, in the AspNetRoleClaims table, the Claim Type is now associated with the page name, and the Claim Value is designated as "Yes".
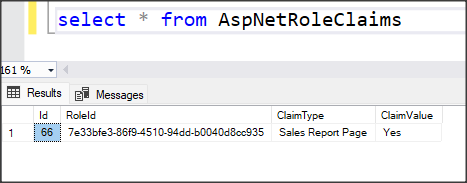

Authorize Attribute Set Policy
To set up the page to be viewable only with certain claims, it is imperative to set the policy attribute directly on the page itself. For instance, take my SalesReport Page as an example, where I’ve implemented the policy attribute at the class level.
[Authorize(Policy = PagesNameConst.SalesReport)]
public class SalesReportModel : PageModel
{
    public void OnGet()
    {
    }
}

Access Denied Page
I have created an ‘Access Denied’ page. This page will be displayed when an employee attempts to access a page for which they do not have the necessary authorization. Like the login page, the AccessDenied page needed to be registered in Program.cs we well.
builder.Services.ConfigureApplicationCookie(options =>
{
    options.LoginPath = "/Identity/Login";
    options.AccessDeniedPath = "/Identity/AccessDenied";
});

Now, we are done. I created a Employee named ‘Bob’, which is from IT Department; he can access IT page but not the Sales Report page.
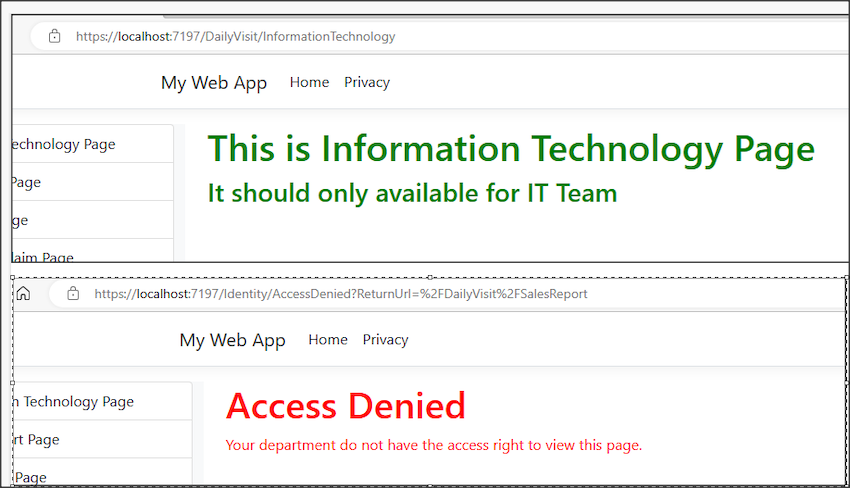
2FA with Sign In Manager
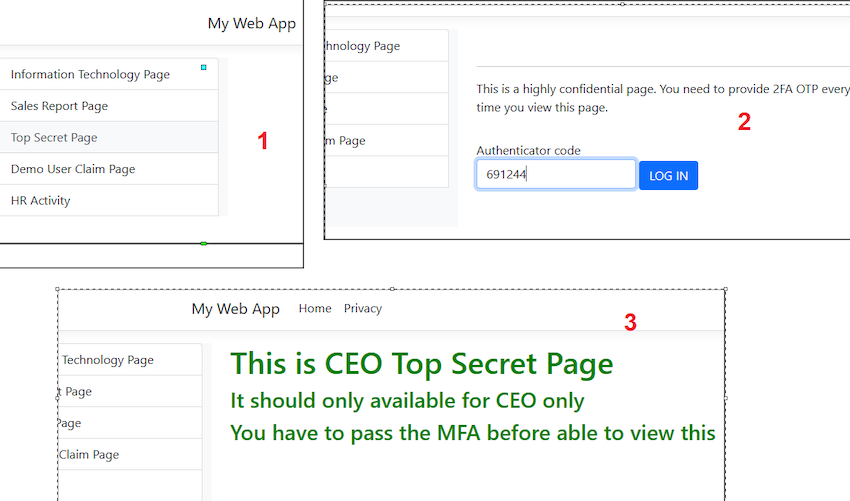
Now, let’s take this a step further. Imagine there’s a page named "TopSecretCEOOnly", which can only be accessed by the CEO. Since this page holds the company’s top secrets, a standard username and password combination isn’t secure enough. Management has requested an additional layer of security: Two-Factor Authentication (2FA).

This added security can be accomplished by creating a 2FA verification page. I have developed a page called VerifyWith2FA.cshtml (note that this page can also be auto-generated using identity scaffolding).

Then, I implemented a redirect to the 2FA page in my "TopSecretCEOOnly" page. This ensures that before a user can view this page, they must successfully pass the 2FA verification.
[Authorize(Policy = PagesNameConst.TopSecret)]
public class TopSecretCEOOnlyModel : PageModel
{
    public IActionResult OnGet()
    {
        if (HttpContext.Session.GetString("Passed2FA") != "true")
        {
            TempData["ReturnUrl"] = "/DailyVisit/TopSecretCEOOnly";
            return RedirectToPage("/Identity/VerifyWith2FA");
        }
        HttpContext.Session.Remove("Passed2FA");
        return Page();
    }
}


In my VerifyWith2FA page, I’m using the UserManager, method VerifyTwoFactorTokenAsync to verify the 2FA OTP code.
var authenticatorCode = Input.TwoFactorCode.Replace(" ", string.Empty).Replace("-", string.Empty);
bool isOTPValid = await _userManager.VerifyTwoFactorTokenAsync(user, _userManager.Options.Tokens.AuthenticatorTokenProvider, authenticatorCode);


Please take note that I have created TWO 2FA pages for verification

  • LoginWith2FA.cshtml - This is for 2FA DURING login; it use SigninManager to verify user sign in using OTP
  • VerifyWith2FA.cshtml - This is for 2FA verification AFTER login. To visit certain sensitive page, it uses UserManager to verify the user

So, to access the "Top Secret" page, one must input an OTP (One-Time Password). Once this OTP has been successfully verified, only then will the page's contents be displayed.
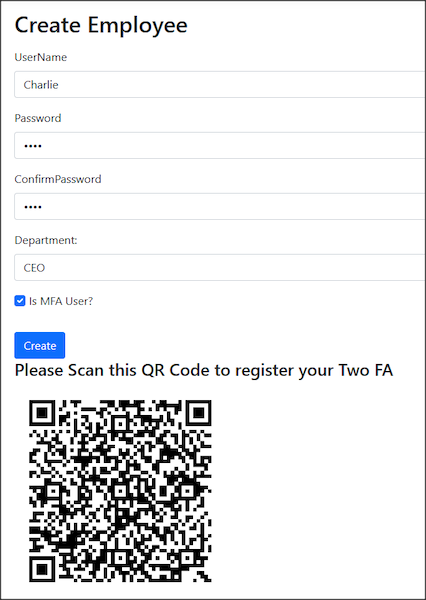
Since I am using 2FA to login/verify, I updated my create Employee UI to allow users to select whether this user will have 2FA or not. This 2D QR code needs to use Google Authenticator App to scan and store the OTP.

Reset Password
I have a page to reset password. You can use ResetPasswordAsync from User Manager to reset the password.
var token = await _userManager.GeneratePasswordResetTokenAsync(user);
var password = GeneratePassword();
var resetResult = await _userManager.ResetPasswordAsync(user, token, password);


If it is a 2FA user, you need to GenerateNewTwoFactorRecoveryCodesAsync.
await _userManager.SetAuthenticationTokenAsync(user, "Google", "secret", null);
await _userManager.GenerateNewTwoFactorRecoveryCodesAsync(user, 1);


Personal Level Claim

So far, I just discussed the claim at the group level; how about claim at the PERSONAL user level?

I have created a page named UserClaimActionManagement.cshtml. This page is designed to control the number of actions a user is permitted to perform. For instance, Bob has been granted both the right to view and edit a document.

The underlying code for associating a claim with a user involves using the _userManager.AddClaimAsync() method. As you can see, if the claim is at the personal level, we use the UserManager and invoke the AddClaim method. In the previous example, the claim was at the role level, which is why we used RoleManager.

await _userManager.AddClaimAsync(user, new Claim(actionname.ClaimType, "Yes"));

For the demo, I got another page named DemoUserClaim.cshtml. In OnGet() method, I get the claim from the user and decide what they can do.
public async Task OnGet()
{
    var user = await _userManager.GetUserAsync(User);
    var userClaims = await _userManager.GetClaimsAsync(user);

    CanViewDocument = userClaims.Any(c => c.Type == DemoUserClaimConst.CanViewDocument && c.Value == "Yes");
    CanEditDocument = userClaims.Any(c => c.Type == DemoUserClaimConst.CanEditDocument && c.Value == "Yes");
}


With the claim, I can control the user’s rights, either in view or in the backend. Either user without "CanEditDocument" claims unable to view the edit part, or we blocked the edit method being called in the backend code.
@if(Model.CanViewDocument)
{
<h3>You can see me means you have the claims for <span style="color:orange;">Can View document</span></h3>
}

@if (Model.CanEditDocument)
{
    <h3>You can see me means you have the claims for <span style="color: green;">Can Edit document</span></h3>

    <form method="post">
        <input type="submit" value="Edit Document" />
    </form>
}


Markup
public async Task OnPost()
{
    if (!CanEditDocument)
    {
        //sorry you are not allowed to Edit Documet
        return;
    }
    else
    {
        //proceed with edit document
    }
}

Generate Navigation Bar Contents By Claims
Naturally, a more effective and refined approach would be to generate the web navigation bar based on claims. This way, when users log in, they will only see menu options corresponding to their respective claims. The following code snippet demonstrates how I utilize "User.HasClaim" in the _NavigationBar to dictate access to the IT Page and Sales Report Page respectively.
if (User.HasClaim(x => x.Type == Constant.PagesNameConst.IT))
{
    <a href="/DailyVisit/InformationTechnology" class="list-group-item list-group-item-action">
        Information Technology Page
    </a>
}
if (User.HasClaim(x => x.Type == Constant.PagesNameConst.IT))
{
    <a href="/DailyVisit/SalesReport" class="list-group-item list-group-item-action">
        Sales Report Page
</a>
}
//and so on...

However, it’s still necessary to apply the authorization policy to individual pages. Relying on navigation bar control alone isn’t secure enough; without the policy, users could still attempt to access a page if they have the URL, even if it isn’t displayed in the navigation bar.

Customized User Manager or Role Manager
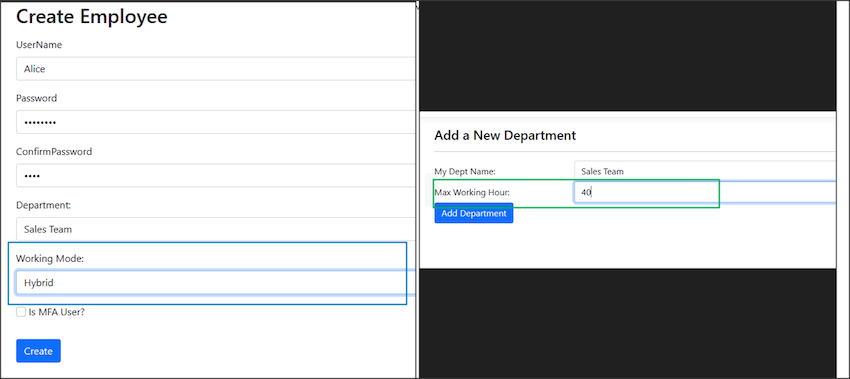
Imagine you need extra information; say the employee has an extra information called the mode of work, either working in an office, WFH, or hybrid. Or the department needs to set maximum working hours every week. The existing AspNetUsers and AspNetRoles do not have such columns; then, you may use inheritance in C# to customize it.

To solve this, I created another project (new Data Library and New Web App and DB) similar to the previous one but slightly modified.

For the employee, I now created a customized class named "MyEmployee", which inherits IdentityUser, and added the work mode customized new field.
public class MyEmployee : IdentityUser
{
    public WorkMode EmployeeWorkMode { get; set; }
//... omitted code


The same thing goes for Role. I created a customized class named "MyDepartment", which inherits IdentityRole, and added the Max Working Hours customized new field.
public class MyDepartment : IdentityRole
    {
        public int MaxWorkingHours{ get; set; }
//... omitted code


The same thing goes for claims.
public class MyDepartmentClaim : IdentityRoleClaim<string>
{
    //... omitted code
public class MyEmployeeDepartment : IdentityUserRole<string>
{
    //... omitted code


For my DB Context configuration, I now created a CreateMyOwnIdentity method to rename those identity tables.
public class MyDbContext : IdentityDbContext<MyEmployee, MyDepartment, string,
      IdentityUserClaim<string>, MyEmployeeDepartment, IdentityUserLogin<string>,
      MyDepartmentClaim, IdentityUserToken<string>>
{
    ....
    protected override void OnModelCreating(ModelBuilder modelBuilder)
    {
        base.OnModelCreating(modelBuilder);
        modelBuilder.CreateMyOwnIdentity();
    }

Following is how I renamed the tables (not necessary, but I did it for demo purposes)
public static class IdentityModelBuilderExtensions
{
    public static void CreateMyOwnIdentity(this ModelBuilder builder)
    {
        builder.Entity<MyEmployee>(b =>
        {
            b.ToTable("MyEmployee");

        });

        builder.Entity<MyDepartment>(b =>
        {
            b.ToTable("MyDepartment");


            b.HasMany(e => e.MyDepartmentClaim)
                .WithOne(e => e.MyDepartment)
                .HasForeignKey(rc => rc.RoleId)
                .IsRequired();
        });
        builder.Entity<MyDepartmentClaim>(b =>
        {
            b.ToTable("MyDepartmentClaim");

        });

        builder.Entity<MyEmployeeDepartment>(b =>
        {
            b.ToTable("MyEmployeeDepartment");
        });
    }
}


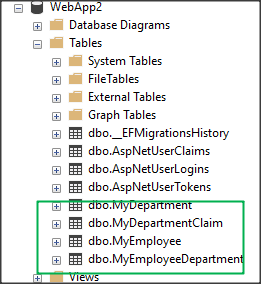
After executing the EF create migration and update DB commands, I have the new tables with new names.
The rest are pretty much the same, just add an extra column during Create Employee and Create Department.
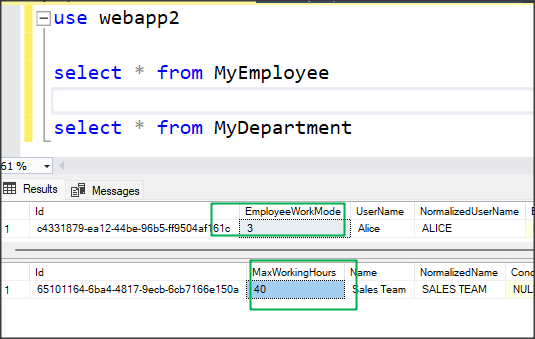
The data will be updated in the database as well.
Further enhancements and notes

  • I do not do input validation for most of my UI.
  • Some pages can be grouped more tidily. For example, the manage employee and reset employee pages can be mixed into one page. I separate it for demo purposes.
  • I used QRCoder v1.4.1 to create a 2D QR Code for this project. My code for QR Code creation will not work if you use the latest version, v1.4.3. You may also use other QR Coder libraries.

Conclusion
When I first started developing this project using .Net Core Identity, I encountered a myriad of questions and issues, especially when it came to navigating IdentityManager, RoleManager, and claims. I hope this article can serve as a useful guide for others using .Net Core Identity to develop their own applications.


About HostForLIFE.eu

HostForLIFE.eu is European Windows Hosting Provider which focuses on Windows Platform only. We deliver on-demand hosting solutions including Shared hosting, Reseller Hosting, Cloud Hosting, Dedicated Servers, and IT as a Service for companies of all sizes.

We have offered the latest Windows 2016 Hosting, ASP.NET Core 2.2.1 Hosting, ASP.NET MVC 6 Hosting and SQL 2017 Hosting.


Tag cloud

Sign in