European ASP.NET 4.5 Hosting BLOG

BLOG about ASP.NET 4, ASP.NET 4.5 Hosting and Its Technology - Dedicated to European Windows Hosting Customer

European ASP.NET Core Hosting :: How to Use Auth Cookies in ASP.NET Core

clock March 29, 2019 11:49 by author Scott

Cookie-based authentication is the popular choice to secure customer facing web apps. For .NET programmers, ASP.NET Core has a good approach that is worth looking into. In this take, I will delve deep into the auth cookie using ASP.NET Core 2.1. Version 2.1 is the latest LTS version as of the time of this writing. So, feel free to follow along, I’ll assume you’re on Visual Studio or have enough C# chops to use a text editor. I will omit namespaces and using statements to keep code samples focused. If you get stuck, download the sample code found at the end.

With ASP.NET 2.1, you can use cookie-based authentication out of the box. There is no need for additional NuGet packages. New projects include a metapackage that has everything, which is Microsoft.AspNetCore.App. To follow along, type dotnet new mvc in a CLI or do File > New Projectin Visual Studio.

For those of you who come from classic .NET, you may be aware of the OWIN auth cookie. You will be happy to know those same skills transfer over to ASP.NET Core quite well. The two implementations remain somewhat similar. With ASP.NET Core, you still configure the auth cookie, set up middleware, and set identity claims.

Setup

To begin, I’ll assume you know enough about the ASP.NET MVC framework to gut the scaffolding into a skeleton web app. You need a HomeController with an Index, Login, Logout, and Revoke action methods. Login will redirect to Index after it signs you in, so it doesn’t need a view. I’ll omit showing view sample code since views are not the focus here. If you get lost, be sure to download the entire demo to play with it.

I’ll use debug logs to show critical events inside the cookie authentication. Be sure to enable debug logs in appsettings.json and disable Microsoft and system logs.

My log setup looks like this:

"LogLevel": {
  "Default": "Debug",
  "System": "Warning",
  "Microsoft": "Warning"
}

Now you’re ready to build a basic app with cookie authentication. I’ll forgo HTML forms with a user name and password input fields. These front-end concerns only add clutter to what is more important which is the auth cookie. Starting with a skeleton app shows how effective it is to add an auth cookie from scratch. The app will sign you in automatically and land on an Index page with an auth cookie. Then, you can log out or revoke user access. I want you to pay attention to what happens to the auth cookie as I put authentication in place.

Cookie Options

Begin by configuring auth cookie options through middleware inside the Startup class. Cookie options tell the authentication middleware how the cookie behaves in the browser. There are many options, but I will only focus on those that affect cookie security the most.

  • HttpOnly: A flag that says the cookie is only available to servers. The browser only sends the cookie but cannot access it through JavaScript.
  • SecurePolicy: This limits the cookie to HTTPS. I recommend setting this to Always in prod. Leave it set to None in local.
  • SameSite: Indicates whether the browser can use the cookie with cross-site requests. For OAuth authentication, set this to Lax. I am setting this to Strict because the auth cookie is only for a single site. Setting this to None does not set a cookie header value.

There are cookie options for both the auth cookie and a global cookie policy. Stay alert since the cookie policy can override auth cookie options and vice versa. Setting HttpOnly to false in the auth cookie will override cookie policy options. While setting SameSite in the cookie policy overrides auth cookie options. In my demo, I’ll illustrate both scenarios, so it is crystal clear how this works.

In the Startup class, find the ConfigureServices method and type:

services.AddAuthentication(CookieAuthenticationDefaults.AuthenticationScheme)
  .AddCookie(options =>
  {
    options.Cookie.HttpOnly = true;
    options.Cookie.SecurePolicy = _environment.IsDevelopment()
      ? CookieSecurePolicy.None : CookieSecurePolicy.Always;
      options.Cookie.SameSite = SameSiteMode.Lax;
  });

This creates the middleware service with the AddAuthentication and AddCookie methods. AuthenticationScheme is useful when there is more than one auth cookie. Many instances of the cookie authentication let you protect endpoints with many schemes. You supply any string value; the default is set to Cookies. Note that the options object is an instance of the CookieAuthenticationOptions class.

The SecurePolicy is set through a ternary operator that comes from _environment. This is a private property that gets set in the Startup constructor. Add IHostingEnvironment as a parameter and let dependency injection do the rest.

In this same ConfigureServices method, add the global cookie policy through middleware:

services.Configure<CookiePolicyOptions>(options =>
{
  options.MinimumSameSitePolicy = SameSiteMode.Strict;
  options.HttpOnly = HttpOnlyPolicy.None;
  options.Secure = _environment.IsDevelopment()
    ? CookieSecurePolicy.None : CookieSecurePolicy.Always;
});

Take a good look at SameSite and HttpOnly settings for both cookie options. When I set the auth cookie, you will see this set to HttpOnly and Strict. This illustrates how both options override each other.

Invoke this middleware inside the request pipeline in the Configure method:

app.UseCookiePolicy();
app.UseAuthentication();

The cookie policy middleware is order sensitive. This means it only affects components after invocation. By invoking the authentication middleware, you will get a HttpContext.User property. Be sure to call this UseAuthentication method before calling UseMvc.

Login

In the HomeController add an AllowAnonymous filter to the Login and Logout methods. There are only two action methods available without an auth cookie.

Inside the Startup class, look for the AddMvc extension method and add a global auth filter:

services.AddMvc(options => options.Filters.Add(new AuthorizeFilter()))

With the app secure, configure the cookie name and login / logout paths. Find where the rest of the CookieAuthenticationOptions are and do:

options.Cookie.Name = "SimpleTalk.AuthCookieAspNetCore";
options.LoginPath = "/Home/Login";
options.LogoutPath = "/Home/Logout";

This will cause the app to redirect to the login endpoint to sign in. However, before you can take this for a spin, you’ll need to create the auth cookie.

Do this inside the Login action method in the HomeController:

var claims = new List<Claim>
{
  new Claim(ClaimTypes.Name, Guid.NewGuid().ToString())
}; 

var claimsIdentity = new ClaimsIdentity(
  claims, CookieAuthenticationDefaults.AuthenticationScheme);
var authProperties = new AuthenticationProperties(); 

await HttpContext.SignInAsync(
  CookieAuthenticationDefaults.AuthenticationScheme,
  new ClaimsPrincipal(claimsIdentity),
  authProperties);

AuthenticationProperties drive further auth cookie behavior in the browser. For example, the IsPersistent property persists the cookie across browser sessions. Be sure to get explicit user consent when you enable this property. ExpiresUtc sets an absolute expiration, be sure to enable IsPersistent and set it to true. The default values will give you a session cookie that goes away when you close the tab or browser window. I find the default values in this object enough for most use cases.

To take this for a spin load up the browser by going to the home or Index page. Note it redirects to Login which redirects back to Index with an auth cookie.

Once this loads it looks something like this. Be sure to take a good look at how the auth cookie is set:
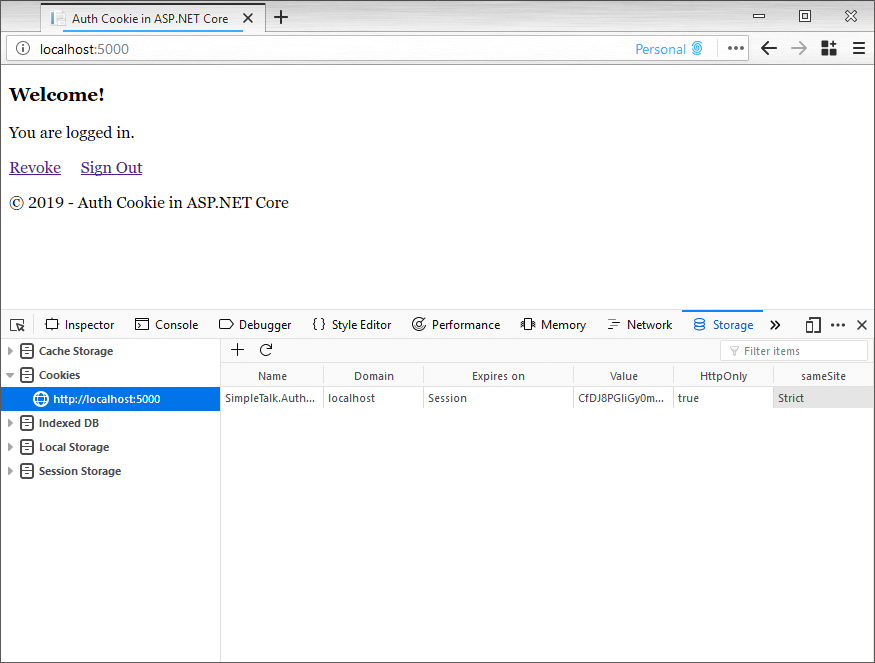
JWT Identity Claim

Often, an auth cookie isn’t enough to secure API endpoints or microservices. For the web app to call a service, it can use a JWT bearer token to authenticate. To make the access token accessible, place it inside the identity claims.

In the Login action method within HomeController, expand the list of claims with a JWT:

var userId = Guid.NewGuid().ToString();
var claims = new List<Claim>
{
  new Claim(ClaimTypes.Name, userId),
  new Claim("access_token", GetAccessToken(userId))
}; 

private static string GetAccessToken(string userId)
{
  const string issuer = "localhost";
  const string audience = "localhost"; 

  var identity = new ClaimsIdentity(new List<Claim>
  {
    new Claim("sub", userId)
  }); 

  var bytes = Encoding.UTF8.GetBytes(userId);
  var key = new SymmetricSecurityKey(bytes);
  var signingCredentials = new SigningCredentials(
    key, SecurityAlgorithms.HmacSha256); 

  var now = DateTime.UtcNow;
  var handler = new JwtSecurityTokenHandler(); 

  var token = handler.CreateJwtSecurityToken(
    issuer, audience, identity,
    now, now.Add(TimeSpan.FromHours(1)),
    now, signingCredentials); 

  return handler.WriteToken(token);
}

I must caution, don’t ever do this is in production. Here, I use the user id as the signing key which is symmetric to keep it simple. In a prod environment use an asymmetric signing key with public and private keys. Client apps will then use a well-known configuration endpoint to validate the JWT.

Placing the JWT in ClaimsIdentity makes it accessible through the HttpContex.User property. For this app, say you want to put the JWT in a debug log to show off this fancy access token.

In the Startup class, create this middleware inside the Configure method:

app.Use(async (context, next) =>
{
  var principal = context.User as ClaimsPrincipal;
  var accessToken = principal?.Claims
    .FirstOrDefault(c => c.Type == "access_token"); 

  if (accessToken != null)
  {
    _logger.LogDebug(accessToken.Value);
  } 

  await next();
});

The _logger is another private property you set through the constructor. Add ILogger<Startup> as a parameter and let dependency injection do the rest. Note the ClaimsPrincipal has a list of Claims you can iterate through. What I find useful is to look for a Type of claim like an access_token and get a Value. Because this is middleware always call next() so it doesn’t block the request pipeline.

Logout

To log out of the web app and clear the auth cookie do:

await HttpContext.SignOutAsync(
  CookieAuthenticationDefaults.AuthenticationScheme);

This belongs inside the Logout action method in the HomeController. Note that you specify the authentication scheme. This tells the sign-out method which auth cookie it needs to blot out. Inspecting HTTP response headers reveals Cache-Control and Pragma headers set to no-cache. This shows the auth cookie disables browser caching when it wants to update the cookie. The Login action method responds with the same HTTP headers.

Revocation

There are use cases where the app needs to react to back-end user access changes. The auth cookie will secure the application, but, remains valid for the lifetime of the cookie. With a valid cookie, the end-user will not see any changes until they log out or the cookie expires. In ASP.NET Core 2.1, one way to validate changes is through cookie authentication events. The validation event can do back-end lookups from identity claims in the auth cookie. Create the event by extending CookieAuthenticationEvents. Override the ValidatePrincipal method and set the event in the auth cookie options.

For example:

public class RevokeAuthenticationEvents : CookieAuthenticationEvents
{
  private readonly IMemoryCache _cache;
  private readonly ILogger _logger; 

  public RevokeAuthenticationEvents(
    IMemoryCache cache,
    ILogger<RevokeAuthenticationEvents> logger)
  {
    _cache = cache;
    _logger = logger;
  } 

  public override Task ValidatePrincipal(
    CookieValidatePrincipalContext context)
  {
    var userId = context.Principal.Claims
      .First(c => c.Type == ClaimTypes.Name); 

    if (_cache.Get<bool>("revoke-" + userId.Value))
    {
      context.RejectPrincipal(); 

      _cache.Remove("revoke-" + userId.Value);
      _logger.LogDebug("Access has been revoked for: "
        + userId.Value + ".");
    } 

    return Task.CompletedTask;
  }
}

To have IMemoryCache set by dependency injection, put AddMemoryCache inside the ConfigureSerices method in the Startup class. Calling RejectPrincipal has an immediate effect and kicks you back out to Login to get a new auth cookie. Note this relies on in-memory persistence which gets set in the Revoke action method. Keep in mind that this event runs once per every request, so you want to use an efficient caching strategy. Doing an expensive lookup at every request will affect performance.

Revoke access by setting the cache inside the Revoke method in the HomeController:

var principal = HttpContext.User as ClaimsPrincipal;
var userId = principal?.Claims
  .First(c => c.Type == ClaimTypes.Name); 

_cache.Set("revoke-" + userId.Value, true);
return View();

After visiting the Revoke endpoint, the change does not have an immediate effect. After revocation, navigating home will show the debug log and redirect to Login. Note that landing in the Index page again will have a brand new auth cookie.

To register this event, be sure to set the EventsType in the CookieAuthenticationOptions. You will need to provide a scoped service to register this RevokeAuthenticationEvents. Both are set inside the ConfigureServices method in the Startup class.

For example:

options.EventsType = typeof(RevokeAuthenticationEvents);
services.AddScoped<RevokeAuthenticationEvents>();

The CookieValidatePrincipalContext in ValidatePrincipal can do more than revocation if necessary. This context has ReplacePrincipal to update the principal, then renew the cookie by setting ShouldRenew to true.

Session Store

Setting a JWT in the claims to have a convenient way to access identity data works well. However, every identity claim you put in the principal ends up in the auth cookie. If you inspect the cookie, you will notice it doubles in size with an access token. As you add more claims in the principal the auth cookie gets bigger. You may hit HTTP header limits in a prod environment with many auth cookies. In IIS, the default max limit is set to 8KB-16KB depending on the version. You can increase the limit, but this means bigger payloads per request because of the cookies.

There are many ways to quell this problem, like a user session to keep all JWTs out of the auth cookie. If you have current code that accesses the identity through the principal, then this is not ideal. Moving identity data out of the principal is risky because it may lead to a complete rewrite.

One alternative is to use the SessionStore found in CookieAuthenticationOptions. OWIN, for example, has a similar property. Implement the ITicketStore interface and find a way to persist data in the back-end. Setting the SessionStore property defines a container to store the identity across requests. Only a session identifier gets sent to the browser in the auth cookie.

Say you want to use in-memory persistence instead of the auth cookie:

public class InMemoryTicketStore : ITicketStore
{
  private readonly IMemoryCache _cache; 

  public InMemoryTicketStore(IMemoryCache cache)
  {
    _cache = cache;
  } 

  public Task RemoveAsync(string key)
  {
    _cache.Remove(key); 

    return Task.CompletedTask;
  } 

  public Task<AuthenticationTicket> RetrieveAsync(string key)
  {
    var ticket = _cache.Get<AuthenticationTicket>(key); 

    return Task.FromResult(ticket);
  } 

  public Task RenewAsync(string key, AuthenticationTicket ticket)
  {
    _cache.Set(key, ticket); 

    return Task.CompletedTask;
  } 

  public Task<string> StoreAsync(AuthenticationTicket ticket)
  {
    var key = ticket.Principal.Claims
      .First(c => c.Type == ClaimTypes.Name).Value; 

    _cache.Set(key, ticket); 

    return Task.FromResult(key);
  }
}

Set an instance of this class in SessionStore inside CookieAuthenticationOptions, these options are set in the ConfigureServices method in the Startup class. One caveat is getting an instance since it needs a provider from BuildServiceProvider. A temporary IoC container here feels hacky and pines after a better solution.

A better approach is to use the options pattern in ASP.NET Core. Post-configuration scenarios set or change options at startup. With this solution, you leverage dependency injection without reinventing the wheel.

To put in place this options pattern, implement IPostConfigureOptions<CookieAuthenticationOptions>:

public class ConfigureCookieAuthenticationOptions
  : IPostConfigureOptions<CookieAuthenticationOptions>
{
  private readonly ITicketStore _ticketStore; 

  public ConfigureCookieAuthenticationOptions(ITicketStore ticketStore)
  {
    _ticketStore = ticketStore;
  } 

  public void PostConfigure(string name,
           CookieAuthenticationOptions options)
  {
    options.SessionStore = _ticketStore;
  }
}

To register both InMemoryTicketStore and ConfigureCookieAuthenticationOptions, place this in ConfigureServices:

services.AddTransient<ITicketStore, InMemoryTicketStore>();
services.AddSingleton<IPostConfigureOptions<CookieAuthenticationOptions>,
  ConfigureCookieAuthenticationOptions>();

Make sure you make this change in the Startup class. If you peek inside Configure<CookiePolicyOptions>, for example, and crack open the code. Note the pattern; configuration runs through a singleton object and a lambda expression. ASP.NET Core uses this same options pattern under the hood. Now, firing this up in the browser and inspecting the auth cookie will have a much smaller footprint.

Conclusion

Implementing an auth cookie is seamless in ASP.NET Core 2.1. You configure cookie options, invoke middleware, and set identity claims. Sign in and sign out methods work based on an authentication scheme. Auth cookie options allow the app to react to back-end events and set a session store. The auth cookie is flexible enough to work well with any enterprise solution. 


European ASP.NET Core Hosting :: Consuming RabbitMQ Messages In ASP.NET Core

clock March 26, 2019 11:42 by author Peter

Background tasks play a very important role when we are building a distributed system. The most common scenario is consuming the service bus's message. In this article, I'd like to present how to consume the RabbitMQ message via BackgroundService in ASP.NET Core.
Run RabbitMQ Host

We should set up an instance of RabbitMQ. The fastest way is to use Docker.
docker run -p 5672:5672 -p 15672:15672 rabbitmq:management  

After running the Docker container, we are able to view the management page via http://localhost:15672.

Consuming RabbitMQ Messages In ASP.NET Core
Setup the BackgroundService
Here, we create a new class named ConsumeRabbitMQHostedService that is inherited from BackgroundService.
BackgroundService is a base class for implementing a long-running IHostedService. It provides the main work needed to set up the background task.
Here is an example to demonstrate how to consume RabbitMQ messages.
public class ConsumeRabbitMQHostedService : BackgroundService 

    private readonly ILogger _logger; 
    private IConnection _connection; 
    private IModel _channel; 
 
    public ConsumeRabbitMQHostedService(ILoggerFactory loggerFactory) 
    { 
        this._logger = loggerFactory.CreateLogger<ConsumeRabbitMQHostedService>(); 
        InitRabbitMQ(); 
    } 
 
    private void InitRabbitMQ() 
    { 
        var factory = new ConnectionFactory { HostName = "localhost" }; 
 
        // create connection 
        _connection = factory.CreateConnection(); 
 
        // create channel 
        _channel = _connection.CreateModel(); 
 
        _channel.ExchangeDeclare("demo.exchange", ExchangeType.Topic); 
        _channel.QueueDeclare("demo.queue.log", false, false, false, null); 
        _channel.QueueBind("demo.queue.log", "demo.exchange", "demo.queue.*", null); 
        _channel.BasicQos(0, 1, false); 
 
        _connection.ConnectionShutdown += RabbitMQ_ConnectionShutdown; 
    } 
 
    protected override Task ExecuteAsync(CancellationToken stoppingToken) 
    { 
        stoppingToken.ThrowIfCancellationRequested(); 
 
        var consumer = new EventingBasicConsumer(_channel); 
        consumer.Received += (ch, ea) => 
        { 
            // received message 
            var content = System.Text.Encoding.UTF8.GetString(ea.Body); 
 
            // handle the received message 
            HandleMessage(content); 
            _channel.BasicAck(ea.DeliveryTag, false); 
        }; 
 
        consumer.Shutdown += OnConsumerShutdown; 
        consumer.Registered += OnConsumerRegistered; 
        consumer.Unregistered += OnConsumerUnregistered; 
        consumer.ConsumerCancelled += OnConsumerConsumerCancelled; 
 
        _channel.BasicConsume("demo.queue.log", false, consumer); 
        return Task.CompletedTask; 
    } 
 
    private void HandleMessage(string content) 
    { 
        // we just print this message  
        _logger.LogInformation($"consumer received {content}"); 
    } 
     
    private void OnConsumerConsumerCancelled(object sender, ConsumerEventArgs e)  {  } 
    private void OnConsumerUnregistered(object sender, ConsumerEventArgs e) {  } 
    private void OnConsumerRegistered(object sender, ConsumerEventArgs e) {  } 
    private void OnConsumerShutdown(object sender, ShutdownEventArgs e) {  } 
    private void RabbitMQ_ConnectionShutdown(object sender, ShutdownEventArgs e)  {  } 
 
    public override void Dispose() 
    { 
        _channel.Close(); 
        _connection.Close(); 
        base.Dispose(); 
    } 


Configure Services
We should configure this hosted service with the background task logic in ConfigureServices method.
public void ConfigureServices(IServiceCollection services) 

    // others ... 
     
    services.AddHostedService<ConsumeRabbitMQHostedService>(); 
}  

Result

After running this app, we may get the following output in the terminal.Turning to the Management UI of RabbitMQ, we find that it creates a new exchange and a new queue.

The next time we try to publish a message to show the background task is running well, we get the following result.


European ASP.NET Core Hosting :: Using Docker to Store ASP.NET Core Kestrel Certificates

clock March 22, 2019 08:48 by author Scott

When working with ASP.Net Core in Docker containers, it can be cumbersome to deal with certificates. While there is a documentation about setting certificate for dev environment, there’s no real guidance on how to make it work when deploying containers in a Swarm for example.
In this article we are going to see how to take advantage of Docker secrets to store ASP.Net Core Kestrel certificates in the context of Docker Swarm.

Hosting the service

First of all, we are going to create à Swarm service on our machine that use the sample Asp.Net Core app. The purpose of this article is to make SSL work in the container withoutchanging anything to an existing image.

docker service create --name mywebsite --publish published=8080,target=80,mode=host microsoft/dotnet-samples:aspnetapp

We are creating service mywebsite, publishing only one port 8080 bound to the port 80 in the container using the host mode and using the image microsoft/dotnet-samples:aspnetapp. Please note that you can use others configuration (for example expose port in routing mesh mode).

Preparing the certificate

We need a certificate. It can be created via an external certificate authority but here for the sake of the article, we are going to create a self signed certificate (of course, don’t use this in production). We are using Powershell for this task (you can skip this if you already have a pfx certificate signed by a real CA).

$cert = New-SelfSignedCertificate -DnsName "mywebsite" -CertStoreLocation "cert:\LocalMachine\My"
$password = ConvertTo-SecureString -String "mylittlesecret" -Force -AsPlainText
$cert | Export-PfxCertificate -FilePath c:\temp\mywebsite.pfx -Password $password

Once you have your pfx, we are goind to unprotect it from the password. It might be seem unsecure but when it will be added to the Docker secret store, it will be stored securedly. For this task I will use OpenSSL (not possible with Powerhsell as far as I know). OpenSSL is provided with Git for example.

& 'C:\Program Files\Git\mingw64\bin\openssl.exe' pkcs12 -in c:\temp\mywebsite.pfx -nodes -out c:\temp\mywebsite.pem -passin pass:mylittlesecret
& 'C:\Program Files\Git\mingw64\bin\openssl.exe' pkcs12 -export -in c:\temp\mywebsite.pem -out c:\temp\mywebsite.unprotected.pfx -passout pass:

Now that the pfx is un protected, we can add it to the docker store certificate and display it.

docker secret create kestrelcertificate c:\temp\mywebsite.unprotected.pfx

docker secret ls

ID                          NAME                 DRIVER              CREATED             UPDATED

iapy6rolt7po1mwm9aw6z0qc5   kestrelcertificate                       13 minutes ago      13 minutes ago

Our secret being in the store, you can delete (or store securely somewhere else your pfx).

Making it work

We can now update our service to take in account this secret. When adding a secret to a service, Docker will create a file in a specific directory containing the value of the secret. On Windows it’s c:\programdata\docker\secrets.

Let’s update our service and see what happened inside the container.

docker service update --secret-add kestrelcertificate mywebsite

docker exec 4b51e736ce65 cmd.exe /c dir c:\programdata\docker\secrets

 Volume in drive C has no label.
 Volume Serial Number is 3CBB-E577

 Directory of c:\programdata\docker\secrets

11/15/2018  10:38 PM    <DIR>          .
11/15/2018  10:38 PM    <DIR>          ..
11/15/2018  10:38 PM    <SYMLINK>      kestrelcertificate [C:\ProgramData\Docker\internal\secrets\iapy6rolt7po1mwm9aw6z0qc5]
               1 File(s)              0 bytes
               2 Dir(s)  21,245,009,920 bytes free

We can see that our secret exists and is named kestrelcertificate, as we named it in the command line.

We can therefore update our service to remove the old binding on port 80, replace it with a binding on port 443, tell Kestrel to use this port and finally give Kestrel the path of our secret.
This can be done with only one command:

docker service update --publish-rm published=8080,target=80,mode=host --publish-add published=8080,target=443,mode=host --env-add ASPNETCORE_URLS=https://+:443 --env-add Kestrel__Certificates__Default__Path=c:\programdata\docker\secrets\kestrelcertificate mywebsite

Wait a while that your service update, try to browse and it should work ! Well, actually it should only works on Linux.

Making it work on Windows

If you try to have a look a the logs generated by your service, you should end with something like this.

docker service logs mywebsite

mywebsite.1.uy3vm8txwxec@nmarchand-lt    | crit: Microsoft.AspNetCore.Server.Kestrel[0]
mywebsite.1.uy3vm8txwxec@nmarchand-lt    |       Unable to start Kestrel.
mywebsite.1.uy3vm8txwxec@nmarchand-lt    | Internal.Cryptography.CryptoThrowHelper+WindowsCryptographicException: Unspecified error
mywebsite.1.uy3vm8txwxec@nmarchand-lt    |    at Internal.Cryptography.Pal.CertificatePal.FromBlobOrFile(Byte[] rawData, String fileName, SafePasswordHandle password, X509KeyStorageFlags keyStorageFlags)
mywebsite.1.uy3vm8txwxec@nmarchand-lt    |    at System.Security.Cryptography.X509Certificates.X509Certificate..ctor(String fileName, String password, X509KeyStorageFlags keyStorageFlags)
mywebsite.1.uy3vm8txwxec@nmarchand-lt    |    at System.Security.Cryptography.X509Certificates.X509Certificate2..ctor(String fileName, String password)
mywebsite.1.uy3vm8txwxec@nmarchand-lt    |    at Microsoft.AspNetCore.Server.Kestrel.KestrelConfigurationLoader.LoadCertificate(CertificateConfig certInfo, String endpointName)
mywebsite.1.uy3vm8txwxec@nmarchand-lt    |    at Microsoft.AspNetCore.Server.Kestrel.KestrelConfigurationLoader.LoadDefaultCert(ConfigurationReader configReader)
mywebsite.1.uy3vm8txwxec@nmarchand-lt    |    at Microsoft.AspNetCore.Server.Kestrel.KestrelConfigurationLoader.Load()
mywebsite.1.uy3vm8txwxec@nmarchand-lt    |    at Microsoft.AspNetCore.Server.Kestrel.Core.KestrelServer.ValidateOptions()
mywebsite.1.uy3vm8txwxec@nmarchand-lt    |    at Microsoft.AspNetCore.Server.Kestrel.Core.KestrelServer.StartAsync[TContext](IHttpApplication`1 application, CancellationToken cancellationToken)
mywebsite.1.uy3vm8txwxec@nmarchand-lt    |
mywebsite.1.uy3vm8txwxec@nmarchand-lt    | Unhandled Exception: Internal.Cryptography.CryptoThrowHelper+WindowsCryptographicException: Unspecified error
mywebsite.1.uy3vm8txwxec@nmarchand-lt    |    at Internal.Cryptography.Pal.CertificatePal.FromBlobOrFile(Byte[] rawData, String fileName, SafePasswordHandle password, X509KeyStorageFlags keyStorageFlags)
mywebsite.1.uy3vm8txwxec@nmarchand-lt    |    at System.Security.Cryptography.X509Certificates.X509Certificate..ctor(String fileName, String password, X509KeyStorageFlags keyStorageFlags)
mywebsite.1.uy3vm8txwxec@nmarchand-lt    |    at System.Security.Cryptography.X509Certificates.X509Certificate2..ctor(String fileName, String password)
mywebsite.1.uy3vm8txwxec@nmarchand-lt    |    at Microsoft.AspNetCore.Server.Kestrel.KestrelConfigurationLoader.LoadCertificate(CertificateConfig certInfo, String endpointName)
mywebsite.1.uy3vm8txwxec@nmarchand-lt    |    at Microsoft.AspNetCore.Server.Kestrel.KestrelConfigurationLoader.LoadDefaultCert(ConfigurationReader configReader)
mywebsite.1.uy3vm8txwxec@nmarchand-lt    |    at Microsoft.AspNetCore.Server.Kestrel.KestrelConfigurationLoader.Load()
mywebsite.1.uy3vm8txwxec@nmarchand-lt    |    at Microsoft.AspNetCore.Server.Kestrel.Core.KestrelServer.ValidateOptions()
mywebsite.1.uy3vm8txwxec@nmarchand-lt    |    at Microsoft.AspNetCore.Server.Kestrel.Core.KestrelServer.StartAsync[TContext](IHttpApplication`1 application, CancellationToken cancellationToken)
mywebsite.1.uy3vm8txwxec@nmarchand-lt    |    at Microsoft.AspNetCore.Hosting.Internal.WebHost.StartAsync(CancellationToken cancellationToken)
mywebsite.1.uy3vm8txwxec@nmarchand-lt    |    at Microsoft.AspNetCore.Hosting.WebHostExtensions.RunAsync(IWebHost host, CancellationToken token, String shutdownMessage)
mywebsite.1.uy3vm8txwxec@nmarchand-lt    |    at Microsoft.AspNetCore.Hosting.WebHostExtensions.RunAsync(IWebHost host, CancellationToken token)
mywebsite.1.uy3vm8txwxec@nmarchand-lt    |    at Microsoft.AspNetCore.Hosting.WebHostExtensions.Run(IWebHost host)
mywebsite.1.uy3vm8txwxec@nmarchand-lt    |    at aspnetapp.Program.Main(String[] args) in C:\app\aspnetapp\Program.cs:line 18

We can see a nasty bug of Windows here (Github issue).
What did happen ? If you look closely at the dir command we made in the container, you’ll see that the secret is not really a file but instead a symbolic link to an other file. Unfortunately, Windows is unable to use a certificate that is a symlink. One solution could be to manually read the certificate with File.ReadAllBytes() and pass it to the constructor of X509Certificate. However, it would be against the purpose of this article which is to not modify the Docker image.

We can find a workaround by browsing the Docker documentation which states that the real file containing the secret (which in fact is the target of the symlink) can be found in the path c:\programdata\docker\internal\secrets\<secretid> where secretid is the id of the secret (as shown by docker secret ls).

We can update our service to change the path by updating the environment variable. It now works also on windows!

docker service update --env-rm
Kestrel__Certificates__Default__Path=c:\programdata\docker\secrets\kestrelcertificate --env-add Kestrel__Certificates__Default__Path=c:\programdata\docker\internal\secrets\iapy6rolt7po1mwm9aw6z0qc5 mywebsite

docker logs 7b54cdc42a86

Hosting environment: Production
Content root path: C:\app
Now listening on: https://[::]:443
Application started. Press Ctrl+C to shut down.

Final word

We have seen in this article how to use Docker secrets to store ASP.Net Core Kestrel certificates in our Docker Swarm. However, please keep in mind that the Windows workaround should be used with care as written in the Docker documentation.

Another word also about SSL Offloading : I know that usually the reverse proxy (Nginx, Traefik, etc.) is used to be the SSL termination but sometimes you still want SSL end to end. 


ASP.NET Core 2.2.3 Hosting - HostForLIFE.eu :: Show Alert Message Box using JavaScript jQuery in ASP.NET

clock March 20, 2019 12:03 by author Peter

Today, I will explain you about Showing Alert Message Box from client Side on ASP.NET Core 2.2.3 using JavaScript and JQuery. In the Following, this is jQuery Code Snippet to show/display alert message:

//Function for jQuery
$(function () {
$('#btnUsingjQuery').click(function () {
alert('Alert using jQuery Function!');
});
});

And, this is the JavaScript code to show or display alert message:
//Function for JavaScript
function alertUsingJavaScript() {
alert('Alert using JavaScript Function!');
}

Show Alert Message – (.aspx)
Here is the code snippet for your .aspx webpage:

<html xmlns="http://www.w3.org/1999/xhtml">
<head runat="server">
<title>How to show alert message using jQuery/JavaScript in ASP.NET
</title>
<script type="text/javascript" src="http://code.jquery.com/jquery-1.6.2.js">
</script>
<script type="text/javascript">
//Function for JavaScript
function alertUsingJavaScript() {
alert('Alert using JavaScript Function!');
}
//Function for jQuery
$(function () {
$('#btnUsingjQuery').click(function () {
alert('Alert using jQuery Function!');
});
});
</script>
</head>
<body>
<form id="form1" runat="server">
<h4>
Show alert message using JavaScript/jQuery in Asp.net</h4>
<div>
<input id="btnUsingJavaScript" type="button" onclick="alertUsingJavaScript()"
value="Using JavaScript" />
<input id="btnUsingjQuery" type="button" value="Using jQuery" />
</div>
</form>
</body>
</html>

You can see i’d added onclick=”alertUsingJavaScript()” when calling function using JavaScript. Just in case of jQuery, we are able to bind click event directly on window load as $(‘#btnUsingjQuery’).click(function () ); });. And here is the result
:


European ASP.NET Core Hosting :: ASP.NET Core with MySQL and Entity Framework Core

clock March 14, 2019 07:58 by author Scott

This article shows how to use MySQL with ASP.NET Core 2.1 using Entity Framework Core.

The Entity Framework MySQL package can be downloaded using the NuGet package Pomelo.EntityFrameworkCore.MySql. At present no official provider from MySQL exists for Entity Framework Core which can be used in an ASP.NET Core application.

The Pomelo.EntityFrameworkCore.MySql package can be added to the csproj file.

<Project Sdk="Microsoft.NET.Sdk"> 

  <PropertyGroup>
    <TargetFramework>netcoreapp2.2</TargetFramework>
    <AssemblyName>DataAccessMySqlProvider</AssemblyName>
    <PackageId>DataAccessMySqlProvider</PackageId>
  </PropertyGroup> 

  <ItemGroup>
    <ProjectReference Include="..\DomainModel\DomainModel.csproj" />
  </ItemGroup> 

  <ItemGroup>
    <PackageReference Include="Microsoft.AspNetCore.App"  />
    <PackageReference Include="Microsoft.EntityFrameworkCore.Tools" Version="2.2.0" PrivateAssets="All" />
    <PackageReference Include="Pomelo.EntityFrameworkCore.MySql" Version="2.0.1" />
  </ItemGroup> 

  <ItemGroup>
    <Folder Include="Properties\" />
  </ItemGroup> 

</Project>

The web project which loads the project with EF Core needs to support migrations if you wish to create a database this way.

<Project Sdk="Microsoft.NET.Sdk.Web"> 

  <PropertyGroup>
    <TargetFramework>netcoreapp2.1</TargetFramework>
    <AssemblyName>AspNetCoreMultipleProject</AssemblyName>
    <PackageId>AspNet5MultipleProject</PackageId>
  </PropertyGroup> 

  <ItemGroup>
    <Content Update="wwwroot\**\*;Views;Areas\**\Views;appsettings.json;config.json;web.config">
      <CopyToPublishDirectory>PreserveNewest</CopyToPublishDirectory>
    </Content>
  </ItemGroup> 

  <ItemGroup>
    <ProjectReference Include="..\DataAccessMsSqlServerProvider\DataAccessMsSqlServerProvider.csproj" />
    <ProjectReference Include="..\DataAccessMySqlProvider\DataAccessMySqlProvider.csproj" />
    <ProjectReference Include="..\DataAccessPostgreSqlProvider\DataAccessPostgreSqlProvider.csproj"
/>
    <ProjectReference Include="..\DataAccessSqliteProvider\DataAccessSqliteProvider.csproj" />
    <ProjectReference Include="..\DomainModel\DomainModel.csproj" />
  </ItemGroup>   

  <ItemGroup>
    <PackageReference Include="Microsoft.AspNetCore.App"  />
    <PackageReference Include="Microsoft.EntityFrameworkCore.Tools" Version="2.2.0" PrivateAssets="All" />
  </ItemGroup>
  <ItemGroup>
    <DotNetCliToolReference Include="Microsoft.VisualStudio.Web.CodeGeneration.Tools" Version="2.0.0" />
  </ItemGroup>
    <ItemGroup>
      <Folder Include="Migrations\" />
    </ItemGroup>
</Project>

An EfCore DbContext can be added like any other context supported by Entity Framework Core.

using System;
using System.Linq;
using DomainModel.Model;
using Microsoft.EntityFrameworkCore;
using Microsoft.Extensions.Configuration; 

namespace DataAccessMySqlProvider
{
    // >dotnet ef migration add testMigration
    public class DomainModelMySqlContext : DbContext
    {
        public DomainModelMySqlContext(DbContextOptions<DomainModelMySqlContext> options) :base(options)
        { }         

        public DbSet<DataEventRecord> DataEventRecords { get; set; } 

        public DbSet<SourceInfo> SourceInfos { get; set; } 

        protected override void OnModelCreating(ModelBuilder builder)
        {
            builder.Entity<DataEventRecord>().HasKey(m => m.DataEventRecordId);
            builder.Entity<SourceInfo>().HasKey(m => m.SourceInfoId); 

            // shadow properties
            builder.Entity<DataEventRecord>().Property<DateTime>("UpdatedTimestamp");
            builder.Entity<SourceInfo>().Property<DateTime>("UpdatedTimestamp"); 

            base.OnModelCreating(builder);
        } 

        public override int SaveChanges()
        {
            ChangeTracker.DetectChanges(); 

            updateUpdatedProperty<SourceInfo>();
            updateUpdatedProperty<DataEventRecord>(); 

            return base.SaveChanges();
        } 

        private void updateUpdatedProperty<T>() where T : class
        {
            var modifiedSourceInfo =
                ChangeTracker.Entries<T>()
                    .Where(e => e.State == EntityState.Added || e.State == EntityState.Modified); 

            foreach (var entry in modifiedSourceInfo)
            {
                entry.Property("UpdatedTimestamp").CurrentValue = DateTime.UtcNow;
            }
        }
    }
}

In an ASP.NET Core web application, the DbContext is added to the application in the startup class. In this example, the DbContext is defined in a different class library. The MigrationsAssembly needs to be defined, so that the migrations will work. If the context and the migrations are defined in the same assembly, this is not required.

public Startup(IHostingEnvironment env)
{
    var builder = new ConfigurationBuilder()
        .SetBasePath(env.ContentRootPath)
        .AddJsonFile("appsettings.json", optional: true, reloadOnChange: true)
        .AddJsonFile("config.json", optional: true, reloadOnChange: true); 

    Configuration = builder.Build();
}         
public void ConfigureServices(IServiceCollection services)
{  
    var sqlConnectionString = Configuration.GetConnectionString("DataAccessMySqlProvider"); 

    services.AddDbContext<DomainModelMySqlContext>(options =>
        options.UseMySQL(
            sqlConnectionString,
            b => b.MigrationsAssembly("AspNetCoreMultipleProject")
        )
    );
}

The application uses the configuration from the config.json. This file is used to get the MySQL connection string, which is used in the Startup class.

{
    "ConnectionStrings": { 
        "DataAccessMySqlProvider": "server=localhost;userid=store;password=3333;database=store;"
        }
    }
}

MySQL workbench can be used to add the schema ‘store to the MySQL database. The user ‘store is also required, which must match the defined user in the connection string. If you configure the MySQL database differently, then you need to change the connection string in the config.json file.

Now the database migrations can be created and the database can be updated.

>
> dotnet ef migrations add mySqlMigration --context DomainModelMySqlContext
>
> dotnet ef database update --context DomainModelMySqlContext
>

If successful, the tables are created.

The MySQL provider can be used in a MVC controller using construction injection.

using System.Collections.Generic;
using DomainModel;
using DomainModel.Model;
using Microsoft.AspNetCore.Mvc;
using Newtonsoft.Json; 

namespace AspNet5MultipleProject.Controllers
{
    [Route("api/[controller]")]
    public class DataEventRecordsController : Controller
    {
        private readonly IDataAccessProvider _dataAccessProvider; 

        public DataEventRecordsController(IDataAccessProvider dataAccessProvider)
        {
            _dataAccessProvider = dataAccessProvider;
        } 

        [HttpGet]
        public IEnumerable<DataEventRecord> Get()
        {
            return _dataAccessProvider.GetDataEventRecords();
        } 

        [HttpGet]
        [Route("SourceInfos")]
        public IEnumerable<SourceInfo> GetSourceInfos(bool withChildren)
        {
            return _dataAccessProvider.GetSourceInfos(withChildren);
        } 

        [HttpGet("{id}")]
        public DataEventRecord Get(long id)
        {
            return _dataAccessProvider.GetDataEventRecord(id);
        } 

        [HttpPost]
        public void Post([FromBody]DataEventRecord value)
        {
            _dataAccessProvider.AddDataEventRecord(value);
        } 

        [HttpPut("{id}")]
        public void Put(long id, [FromBody]DataEventRecord value)
        {
            _dataAccessProvider.UpdateDataEventRecord(id, value);
        } 

        [HttpDelete("{id}")]
        public void Delete(long id)
        {
            _dataAccessProvider.DeleteDataEventRecord(id);
        }
    }
}

The controller api can be called using Fiddler:

POST http://localhost:5000/api/dataeventrecords HTTP/1.1
User-Agent: Fiddler
Host: localhost:5000
Content-Length: 135
Content-Type: application/json;  

{
  "DataEventRecordId":3,
  "Name":"Funny data",
  "Description":"yes",
  "Timestamp":"2015-12-27T08:31:35Z",
   "SourceInfo":
  {
    "SourceInfoId":0,
    "Name":"Beauty",
    "Description":"second Source",
    "Timestamp":"2015-12-23T08:31:35+01:00",
    "DataEventRecords":[]
  },
 "SourceInfoId":0
}

The data is added to the database as required.


European ASP.NET Core Hosting :: Smart Logging Middleware for ASP.NET Core

clock March 13, 2019 09:44 by author Scott

ASP.NET Core comes with request logging built-in. This is great for getting an app up-and-running, but the events are not as descriptive or efficient as hand-crafted request logging can be. Here is a typical trace from a single GET request to /about:


If the request fails because of an error, you'll see instead:


While these fine-grained events are sometimes useful, they take up storage space and bandwidth, and add noise to the log.

Spreading the information across many events also makes it harder to perform some analyses, for example, the HTTP method and elapsed time are on different events, making it hard to separate the timings of GET and POST requests to the same RequestPath.

In production we want:

One "infrastructure" event per normal request, with basic HTTP information attached

Extra information to help with debugging if a request fails due to a server-side (5xx) error

The same format and event type for all requests, so that logs from both successful and failed requests can be easily grouped, sorted and analyzed together

Here's the format we're aiming for, expanded so that you can see all of the attached properties:

Instead of five infrastructure events + one application event, just a single infrastructure event is logged. This makes the application's own "Hello" event much easier to spot.

This post includes the full source code for the middleware, so you can take it and modify it to include the information you find most useful.

Step 1: Install and Configure Serilog

ASP.NET Core includes some basic logging providers, but to get the most out of it you'll need to plug in a full logging framework like Serilog. If you haven't done that already, these instructions should have you up and running quickly.

Step 2: Turn off Information events from Microsoft and System

Where Serilog is configured, add level overrides for the Microsoft and System namespaces:

Log.Logger = new LoggerConfiguration() 
    .MinimumLevel.Override("Microsoft", LogEventLevel.Warning)
    .MinimumLevel.Override("System", LogEventLevel.Warning)
    // Other logger configuration

These can be turned back on for debugging when they're needed.

If you're using appsettings.json configuration, check out the level overrides example in the README.

Step 3: Add the SerilogMiddleware class

The SerilogMiddleware class hooks into the request processing pipeline to collect information about the requests:

using Microsoft.AspNetCore.Http; 
using Serilog; 
using Serilog.Events; 
using System; 
using System.Collections.Generic; 
using System.Diagnostics; 
using System.Linq; 
using System.Threading.Tasks;

namespace Datalust.SerilogMiddlewareExample.Diagnostics 
{
    class SerilogMiddleware
    {
        const string MessageTemplate =
            "HTTP {RequestMethod} {RequestPath} responded {StatusCode} in {Elapsed:0.0000} ms";

        static readonly ILogger Log = Serilog.Log.ForContext<SerilogMiddleware>();

        readonly RequestDelegate _next;

        public SerilogMiddleware(RequestDelegate next)
        {
            if (next == null) throw new ArgumentNullException(nameof(next));
            _next = next;
        }

        public async Task Invoke(HttpContext httpContext)
        {
            if (httpContext == null) throw new ArgumentNullException(nameof(httpContext));

            var sw = Stopwatch.StartNew();
            try
            {
                await _next(httpContext);
                sw.Stop();

                var statusCode = httpContext.Response?.StatusCode;
                var level = statusCode > 499 ? LogEventLevel.Error : LogEventLevel.Information;

                var log = level == LogEventLevel.Error ? LogForErrorContext(httpContext) : Log;
                log.Write(level, MessageTemplate, httpContext.Request.Method, httpContext.Request.Path, statusCode, sw.Elapsed.TotalMilliseconds);
            }
            // Never caught, because `LogException()` returns false.
            catch (Exception ex) when (LogException(httpContext, sw, ex)) { }
        }

        static bool LogException(HttpContext httpContext, Stopwatch sw, Exception ex)
        {
            sw.Stop();

            LogForErrorContext(httpContext)
                .Error(ex, MessageTemplate, httpContext.Request.Method, httpContext.Request.Path, 500, sw.Elapsed.TotalMilliseconds);

            return false;
        }

        static ILogger LogForErrorContext(HttpContext httpContext)
        {
            var request = httpContext.Request;

            var result = Log
                .ForContext("RequestHeaders", request.Headers.ToDictionary(h => h.Key, h => h.Value.ToString()), destructureObjects: true)
                .ForContext("RequestHost", request.Host)
                .ForContext("RequestProtocol", request.Protocol);

            if (request.HasFormContentType)
                result = result.ForContext("RequestForm", request.Form.ToDictionary(v => v.Key, v => v.Value.ToString()));

            return result;
        }
    }
}

I've deliberately kept this to a single (somewhat ugly!) source file so that it's easy to copy, paste and modify.

There are a lot of design details and trade-offs involved. You can see that when a request is deemed to have failed, some additional information is attached, including the headers sent by the client, and the form data if any.

Step 4: Add the middleware to the pipeline

In your application's Startup.cs file, you can add the middleware either before or after the outermost exception handling components. If you add it before this, you won't get the full Exception information in any error events, but you will always be able to record the exact status code returned to the client. Adding the middleware into the pipeline inside the exception handling components (i.e., after them in the source code) will provide all exception detail but has to assume that the status code is 500 in this case.

public void Configure(IApplicationBuilder app, IHostingEnvironment env, 
                      ILoggerFactory loggerFactory)
{
    loggerFactory.AddSerilog();

    if (env.IsDevelopment())
    {
        app.UseDeveloperExceptionPage();
        app.UseBrowserLink();
    }
    else
    {
        app.UseExceptionHandler("/Home/Error");
    }

    app.UseMiddleware<SerilogMiddleware>();

    app.UseStaticFiles();

    app.UseMvc(routes =>
    {
        routes.MapRoute(
            name: "default",
            template: "{controller=Home}/{action=Index}/{id?}");
    });
}

Step 5: Profit!

Now you have a stream of request log events each with paths, status codes, timings, and exceptions:

We've seen how a simple customized logging strategy can not only produce cleaner events, but also reduce the volume of infrastructure log events.


ASP.NET Core Hosting :: How to Upload File using C# | SFTP Server

clock March 4, 2019 07:56 by author Scott

Although there are many Graphical Tools available for sending files to a server using SFTP. But as a developer, we may have a scenario where we need to upload a file to SFTP Serverfrom our Code.

A few days ago a job assigned to me was to develop a Task Scheduler for generating XML files daily on a specific time of the day & send these files on a Remote Server using File Transfer Protocol in a secure way.

In .Net Framework there are many Libraries available for uploading files to another machine using File Transfer Protocol but most of the libraries don’t work with .Net Core. In this Tutorial, we will develop a very simple SFTP client using C# for .Net Core.

Before start let’s have a quick look at SFTP.

What is SFTP?

SFTP stands for SSH File Transfer Protocol or Secure File Transfer Protocol. It is a protocol used to transfer files between remote machines over a secure shell.


In almost all cases, SFTP is preferable over FTP because of security features. FTP is not a secure protocol & it should only be used on a trusted network.

Choosing Library for C#

A lot of search & after testing many libraries I finally met with SSH.NET which was working perfectly with .Net Core 2.2 project & the good thing was that It does its job in a very few lines of Code.

So we’ll use SSH.NET

What is SSH.NET?

SSH.NET is an open-source library available at Nuget for .NET to work over SFTP. It is also optimized for parallelism to achieve the best possible performance. It was inspired by Sharp.SSH library which was ported from Java. This library is a complete rewrite using .Net, without any third party dependencies.

Here are the features of SSH.NET: 

Creating Project

I’m in love with VS Code right after its first release so I’m going to use VS Code for creating project to upload/transfer a file to a remote server using SFTP.

Create a console application using this command

dotnet new console

Installing SSH.NET

I won’t recommend you to install the latest version of SSH.NET. It has a bug, it can be stuck on transferring the file to the remote location.

version 2016.0.0 is perfect. 

run this command to install the library from NuGet

using package manager

Install-Package SSH.NET -Version 2016.0.0

or using .Net CLI

dotnet add package SSH.NET --version 2016.0.0

Code

Finally, It’s time to create a class for SFTP Client Code.

Create a file with the name as “SendFileToServer” & add the below code

using Renci.SshNet

public static class SendFileToServer
{
// Enter your host name or IP here
private static string host = "127.0.0.1";

// Enter your sftp username here
private static string username = "sftp";

// Enter your sftp password here
private static string password = "12345";
public static int Send(string fileName)
{
var connectionInfo = new ConnectionInfo(host, "sftp", new PasswordAuthenticationMethod(username, password));

// Upload File
using (var sftp = new SftpClient(connectionInfo)){

sftp.Connect();
//sftp.ChangeDirectory("/MyFolder");
using (var uplfileStream = System.IO.File.OpenRead(fileName)){
sftp.UploadFile(uplfileStream, fileName, true);
}
sftp.Disconnect();
}
return 0;
}
}

Now you can call this Method to transfer a file to SFTP Server like this

SendFileToServer.Send("myFile.txt");

“myFile.txt” is the name of the file which should be located in your project root directory. 


About HostForLIFE.eu

HostForLIFE.eu is European Windows Hosting Provider which focuses on Windows Platform only. We deliver on-demand hosting solutions including Shared hosting, Reseller Hosting, Cloud Hosting, Dedicated Servers, and IT as a Service for companies of all sizes.

We have offered the latest Windows 2016 Hosting, ASP.NET Core 2.2.1 Hosting, ASP.NET MVC 6 Hosting and SQL 2017 Hosting.


Tag cloud

Sign in