European ASP.NET 4.5 Hosting BLOG

BLOG about ASP.NET 4, ASP.NET 4.5 Hosting and Its Technology - Dedicated to European Windows Hosting Customer

ASP.NET Core Hosting :: How to Upload File using C# | SFTP Server

clock March 4, 2019 07:56 by author Scott

Although there are many Graphical Tools available for sending files to a server using SFTP. But as a developer, we may have a scenario where we need to upload a file to SFTP Serverfrom our Code.

A few days ago a job assigned to me was to develop a Task Scheduler for generating XML files daily on a specific time of the day & send these files on a Remote Server using File Transfer Protocol in a secure way.

In .Net Framework there are many Libraries available for uploading files to another machine using File Transfer Protocol but most of the libraries don’t work with .Net Core. In this Tutorial, we will develop a very simple SFTP client using C# for .Net Core.

Before start let’s have a quick look at SFTP.

What is SFTP?

SFTP stands for SSH File Transfer Protocol or Secure File Transfer Protocol. It is a protocol used to transfer files between remote machines over a secure shell.


In almost all cases, SFTP is preferable over FTP because of security features. FTP is not a secure protocol & it should only be used on a trusted network.

Choosing Library for C#

A lot of search & after testing many libraries I finally met with SSH.NET which was working perfectly with .Net Core 2.2 project & the good thing was that It does its job in a very few lines of Code.

So we’ll use SSH.NET

What is SSH.NET?

SSH.NET is an open-source library available at Nuget for .NET to work over SFTP. It is also optimized for parallelism to achieve the best possible performance. It was inspired by Sharp.SSH library which was ported from Java. This library is a complete rewrite using .Net, without any third party dependencies.

Here are the features of SSH.NET: 

Creating Project

I’m in love with VS Code right after its first release so I’m going to use VS Code for creating project to upload/transfer a file to a remote server using SFTP.

Create a console application using this command

dotnet new console

Installing SSH.NET

I won’t recommend you to install the latest version of SSH.NET. It has a bug, it can be stuck on transferring the file to the remote location.

version 2016.0.0 is perfect. 

run this command to install the library from NuGet

using package manager

Install-Package SSH.NET -Version 2016.0.0

or using .Net CLI

dotnet add package SSH.NET --version 2016.0.0

Code

Finally, It’s time to create a class for SFTP Client Code.

Create a file with the name as “SendFileToServer” & add the below code

using Renci.SshNet

public static class SendFileToServer
{
// Enter your host name or IP here
private static string host = "127.0.0.1";

// Enter your sftp username here
private static string username = "sftp";

// Enter your sftp password here
private static string password = "12345";
public static int Send(string fileName)
{
var connectionInfo = new ConnectionInfo(host, "sftp", new PasswordAuthenticationMethod(username, password));

// Upload File
using (var sftp = new SftpClient(connectionInfo)){

sftp.Connect();
//sftp.ChangeDirectory("/MyFolder");
using (var uplfileStream = System.IO.File.OpenRead(fileName)){
sftp.UploadFile(uplfileStream, fileName, true);
}
sftp.Disconnect();
}
return 0;
}
}

Now you can call this Method to transfer a file to SFTP Server like this

SendFileToServer.Send("myFile.txt");

“myFile.txt” is the name of the file which should be located in your project root directory. 


European ASP.NET Hosting - HostForLIFE.eu :: jQuery PJAX Implementation In ASP.NET Core

clock February 26, 2019 11:15 by author Peter

PJAX is a jQuery plugin that uses AJAX and pushState to deliver a fast browsing experience with real permalinks, page titles, and a working back button. It is available to download from GitHub.

In all websites, the header and footer remain the same for all pages. Only the page contents (the content in the middle area between the header and footer) are changed for each page. PJAX uses this concept to fetch only the page contents while the header and footer remains the same for each page. In short, you can also say PJAX is the brother of the Update Panel of Web Forms that works for ASP.NET Core.

With PJAX, you get the following advantages.

    The website becomes fast since the header and footer are not loaded for different pages.
    You website behaves like a SPA (Single Page Application), and you don’t need to employ Angular framework in your ASP.NET Core Application.
    If you have worked with Update Panel of ASP.NET Web Forms then it is quite similar to it.

This is how PJAX will work.
See the below video which illustrates the working of PJAX.

PJAX Implementation in ASP.NET Core

Integration of PJAX in ASP.NET Core involves the following things.

Layout.cshtml View
In your application _Layout.cshml View, add jQuery and PJAX script links. You do this inside the head section:
    <script src="https://code.jquery.com/jquery-2.2.4.js"></script> 
    <script src="~/js/jquery.pjax.js"></script> 
    Also call PJAX on all anchors inside the #main element.  
    <script type="text/javascript"> 
        $(function () { 
            // call pjax 
            $(document).pjax('#menu li a', '#main', { timeout: 10000 }); 
     
        }); 
    </script> 


Loading Image
If you want to show the loading image when a new page contents are being fetched then add the following code inside the script section of Layout:
    $(document).ajaxStart(function () { 
        $("#loadingDiv").show(); 
    }); 
     
    $(document).ajaxComplete(function (event, jqxhr, settings) { 
        $("#loadingDiv").hide(); 
    }); 


Also, place the loading image somewhere in your layout.
    <div id="loadingDiv" style="display:none;"> 
        <img src="~/loading.gif" /> 
    </div> 


Do not worry as the source code contains all the loading image codes. Do check it.

Add some links to your _Layout.cshtml View. On these links, PJAX will work so when these links are clicked then their page’s contents are loaded by PJAX (but the header and footer area are not loaded).
    <ul> 
        <li><a href="/Home/Index">Index</a></li> 
        <li><a href="/Home/About">About</a></li> 
        <li><a href="/Home/Contact">Contact</a></li> 
    </ul> 


Don’t forget to add the #main element on the Layout so that PJAX only fetches the contents inside this #main element with AJAX.
    <div id="main"> 
        @RenderBody()  
    </div> 

Controller
Add a controller called Home with the following 3 action methods:

    public IActionResult Index() 
    { 
        if (string.IsNullOrEmpty(Request.Headers["X-PJAX"])) 
            return View(); 
        else 
            return PartialView("/Views/Home/Index.cshtml"); 
    } 
     
    public IActionResult About() 
    { 
        if (string.IsNullOrEmpty(Request.Headers["X-PJAX"])) 
            return View(); 
        else 
            return PartialView("/Views/Home/About.cshtml"); 
    } 
     
    public IActionResult Contact() 
    { 
        if (string.IsNullOrEmpty(Request.Headers["X-PJAX"])) 
            return View(); 
        else 
            return PartialView("/Views/Home/Contact.cshtml"); 
    }  


Make sure that the Action methods that are called by PJAX (i.e. clicking on menu links in my case) return PartialViews. Since PJAX sends ‘X-PJAX’ request in the HTTP Header therefore I can easily make a selection of View or Partial View by checking the HTTP header.

The condition applied in each action method that does this work is:
    if (string.IsNullOrEmpty(Request.Headers["X-PJAX"])) 
        return View(); 
    else 
        return PartialView("/Views/Home/Index.cshtml");  


Views

Add the 3 Views called ‘Index.cshtml’, ‘About.cshtml’ and ‘Contact.cshtml’ inside the ‘Views/Home’ folder:

Index.cshtml
    <div class="templatemo_content_area"> 
        <h1>WELCOME TO Index Page</h1> 
    </div> 


About.cshtml
    <div class="templatemo_content_area"> 
        <h1>WELCOME TO About Page</h1> 
    </div> 


Contact.cshtml
    <div class="templatemo_content_area"> 
        <h1>WELCOME TO Contact Page</h1> 
    </div> 


Also add _ViewStart.cshtml View inside the ‘Views’ folder:
    @{ 
        Layout = "_Layout"; 
    }


European ASP.NET Core Hosting :: How to Use HTTP-REPL tool to test WEB API in ASP.NET Core 2.2

clock February 26, 2019 07:37 by author Scott

Today there are no tools built into Visual Studio to test WEB API. Using browsers, one can only test http GET requests. You need to use third-party tools like PostmanSoapUIFiddler or Swagger to perform a complete testing of the WEB API. In ASP.NET Core 2.2, a CLI based new dotnet core global tool named “http-repl” is introduced to interact with API endpoints. It’s a CLI based tool which can list down all the routes and execute all HTTP verbs. In this post, let’s find out how to use HTTP-REPL tool to test WEB API in ASP.NET Core 2.2.

HTTP-REPL Tool to test WEB API in ASP.NET Core 2.2

The “http-repl” is a dotnet core global tool and to install this tool, run the following command. At the time of writing this post, the http-repl tool is in preview stage
and available for download at 
dotnet.myget.org

dotnet tool install -g dotnet-httprepl --version 2.2.0-* --add-source https://dotnet.myget.org/F/dotnet-core/api/v3/index.json

Once installed, you can verify the installation using the following command.

dotnet tool list -g


Now the tool is installed, let’s see how we can test the WEB API. For this tool to work properly, the prerequisite here is that your services will have Swagger/OpenAPI available that describes the service.

We need to add this tool to web browser list so that we can browse the API with this tool. To do that, follow the steps given in the below image.


The location of HTTP-REPL tool executable is "C:\Users\<username>\.dotnet\tools". Once added, you can verify it in the browser list.

Run the app (make sure HTTP REPL is selected in browser list) and you should see a command prompt window. As mentioned earlier, it’s a CLI based experience so you can use commands like dir, ls, cdand cls. Below is an example run where I start-up a Web API.

You can use all the HTTP Verbs, and when using the POST verb, you should set a default text editor to supply the JSON. You can set Visual Studio Code as default text editor using the following command.

pref set editor.command.default "C:\Program Files (x86)\Microsoft VS Code\Code.exe"

Once the default editor is set, and you fire POST verb, it will launch the editor with the JSON written for you. See below GIF.

You can also navigate to the Swagger UI from the command prompt via executing ui command. Like,

Similarly, you can also execute the DELETE and PUT. In case of PUT command, you should use following syntax and in the default code editor, supply the updated data.

> delete 2 //This would delete the record with id 2.
>
> put 2010 -h "Content-Type: application/json"

When you fire PUT command, the behavior is same as the POST verb. The text editor will open with the JSON written for you, just supply the updated value to execute PUT command.

Pros and Cons

Pros

  • Helps in debugging WEB API
  • Fast and quickly switch between API endpoints
  • Descriptive error response shown

Cons:

  • Dependency on Swagger/Open API specification
  • Not as informative as UI tools

After playing with this for a while, I strongly feel it’s command line version of the Swagger UI and it would be very handy when there are many API endpoints. You can easily navigate or switch between the APIs and execute it. 


European ASP.NET Hosting :: Overriding ASP.NET Core Framework

clock February 20, 2019 10:57 by author Scott

OVERVIEW

In .NET it’s really easy to create your own interfaces and implementations. Likewise, it’s seemingly effortless to register them for dependency injection. But it is not always obvious how to override existing implementations. Let’s discuss various aspects of “dependency injection” and how you can override the “framework-provided services”.

As an example, let’s take a recent story on our product backlog for building a security audit of login attempts. The story involved the capture of attempted usernames along with their corresponding IP addresses. This would allow system administrators to monitor for potential attackers. This would require our ASP.NET Core application to have custom logging implemented.

LOGGING

Luckily ASP.NET Core Logging is simple to use and is a first-class citizen within ASP.NET Core.

In the Logging repository there is an extension method namely AddLogging, here is what it looks like:

public static IServiceCollection AddLogging(this IServiceCollection services)
{
    if (services == null)
    {
        throw new ArgumentNullException(nameof(services));
    }

    services.TryAdd(ServiceDescriptor.Singleton<ILoggerFactory, LoggerFactory>());
    services.TryAdd(ServiceDescriptor.Singleton(typeof(ILogger<>), typeof(Logger<>)));

    return services;
}

As you can see, it is rather simple. It adds two ServiceDescriptor instances to the IServiceCollection, effectively registering the given service type to the corresponding implementation type.

FOLLOWING THE RABBIT DOWN THE HOLE

When you create a new ASP.NET Core project from Visual Studio, all the templates follow the same pattern. They have the Program.cs file with a Main method that looks very similar to this:

public static void Main(string[] args)
{
    var host = new WebHostBuilder()
        .UseKestrel()
        .UseContentRoot(Directory.GetCurrentDirectory())
        .UseIISIntegration()
        .UseStartup<Startup>()
        .UseApplicationInsights()
        .Build();

    host.Run();
}

TEMPLATES 

One thing that is concerning about a template like this is that the IWebHost is an IDisposable, so why then is this statement not wrapped in a using you ask? The answer is that the Run extension method internally wraps itself in a using. If you were wondering where the AddLogging occurs, it is a result of invoking the Build function.

[ Microsoft.AspNetCore.Hosting.WebHostBuilder ]
    public IWebHost Build() ...
        private IServiceCollection BuildCommonServices() ...
            creates services then invokes services.AddLogging()

A FEW WORDS ON THE SERVICE DESCRIPTOR

The ServiceDescriptor class is an object that describes a service, and this is used by dependency injection. In other words, instances of the ServiceDescriptor are descriptions of services. The ServiceDescriptor class exposes several static methods that allow its instantiation.

The ILoggerFactory interface is registered as a ServiceLifetime.Singleton and its implementation is mapped to the LoggerFactory. Likewise, the generic type typeof(ILogger<>) is mapped to typeof(Logger<>). This is just one of the several key “Framework-Provided Services” that are registered.

PUTTING IT TOGETHER

Now we know that the framework is providing all implementations of ILogger<T>, and resolving them as their Logger<T>. We also know that we could write our own implementation of the ILogger<T>interface. Being that this is open-source we can look to their implementation for inspiration.

public class RequestDetailLogger<T> : ILogger<T>
{
    private readonly ILogger _logger;

    public RequestDetailLogger(ILoggerFactory factory,
                               IRequestCategoryProvider requestCategoryProvider)
    {
        if (factory == null)
        {
            throw new ArgumentNullException(nameof(factory));
        }
        if (requestCategoryProvider == null)
        {
            throw new ArgumentNullException(nameof(requestCategoryProvider));
        }

        var category = requestDetailCategoryProvider.CreateCategory<T>();
        _logger = factory.CreateLogger(category);
    }

    IDisposable ILogger.BeginScope<TState>(TState state)
        => _logger.BeginScope(state);

    bool ILogger.IsEnabled(LogLevel logLevel)
        => _logger.IsEnabled(logLevel);

    void ILogger.Log<TState>(LogLevel logLevel,
                             EventId eventId,
                             TState state,
                             Exception exception,
                             Func<TState, Exception, string> formatter)
        => _logger.Log(logLevel, eventId, state, exception, formatter);
}

The IRequestCategoryProvider is defined and implemented as follows:

using static Microsoft.Extensions.Logging.Abstractions.Internal.TypeNameHelper;

public interface IRequestCategoryProvider
{
    string CreateCategory<T>();
}

public class RequestCategoryProvider : IRequestCategoryProvider
{
    private readonly IPrincipal _principal;
    private readonly IPAddress _ipAddress;

    public RequestCategoryProvider(IPrincipal principal,
                                   IPAddress ipAddress)
    {
        _principal = principal;
        _ipAddress = ipAddress;
    }

    public string CreateCategory<T>()
    {
        var typeDisplayName = GetTypeDisplayName(typeof(T));

        if (_principal == null || _ipAddress == null)
        {
            return typeDisplayName;
        }

        var username = _principal?.Identity?.Name;
        return $"User: {username}, IP: {_ipAddress} {typeDisplayName}";
    }
}

If you’re curious how to get the IPrincipal and IPAddress into this implementation (with DI). It is pretty straight-forward. In the Startup.ConfigureServices method do the following:

public void ConfigureServices(IServiceCollection services)
{
    // ... omitted for brevity

    services.AddTransient<IRequestCategoryProvider, RequestCategoryProvider>();
    services.AddTransient<IHttpContextAccessor, HttpContextAccessor>();
    services.AddTransient<IPrincipal>(
        provider => provider.GetService<IHttpContextAccessor>()
                           ?.HttpContext
                           ?.User);
    services.AddTransient<IPAddress>(
        provider => provider.GetService<IHttpContextAccessor>()
                           ?.HttpContext
                           ?.Connection
                           ?.RemoteIpAddress);
}

Finally, we can Replace the implementations for the ILogger<T> by using the following:

public void ConfigureServices(IServiceCollection services)
{
    // ... omitted for brevity
    services.Replace(ServiceDescriptor.Transient(typeof(ILogger<>),
                                                 typeof(RequestDetailLogger<>)));
}

Notice that we replace the framework-provided service as a ServiceLifetime.Transient. Opposed to the default ServiceLifetime.Singleton. This is more or less an extra precaution. We know that with each request we get the HttpContext from the IHttpContextAccessor, and from this we have the User. This is what is passed to each ILogger<T>.

CONCLUSION

This approach is valid for overriding any of the various framework-provided service implementations. It is simply a matter of knowing the correct ServiceLifetime for your specific needs. Likewise, it is a good idea to leverage the open-source libraries of the framework for inspiration. With this you can take finite control of your web-stack.


European ASP.NET Core Hosting :: ASP.NET Core 2.0 MVC Filters

clock January 28, 2019 09:58 by author Scott

The following is tutorial how to run code before and after MVC request pipeline in ASP.NET Core.

Solution

In an empty project update Startup class to add services and middleware for MVC:

        public void ConfigureServices
            (IServiceCollection services)
        {
            services.AddMvc();
        } 

        public void Configure(
            IApplicationBuilder app,
            IHostingEnvironment env)
        {
            app.UseMvc(routes =>
            {
                routes.MapRoute(
                    name: "default",
                    template: "{controller=Home}/{action=Index}/{id?}");
            });
        }

Add the class to implement filter:

    public class ParseParameterActionFilter : Attribute, IActionFilter
    {
        public void OnActionExecuting(ActionExecutingContext context)
        {
            object param;
            if (context.ActionArguments.TryGetValue("param", out param))
                context.ActionArguments["param"] = param.ToString().ToUpper();
            else
                context.ActionArguments.Add("param", "I come from action filter");
        } 

        public void OnActionExecuted(ActionExecutedContext context)
        {
        }
    }

In the Home controller add an action method that uses Action filter:

        [ParseParameterActionFilter]
        public IActionResult ParseParameter(string param)
        {
            return Content($"Hello ParseParameter. Parameter: {param}");
        }

Browse to /Home/ParseParameter, you’ll see:


Discussion

Filter runs after an action method has been selected to execute. MVC provides built-in filters for things like authorisation and caching. Custom filters are very useful to encapsulate reusable code that you want to run before or after action methods.

Filters can short-circuit the result i.e. stops the code in your action from running and return a result to the client. They can also have services injected into them via service container, which makes them very flexible.

Filter Interfaces

Creating a custom filter requires implementing an interface for the type of filter you require. There are two flavours of interfaces for most filter type, synchronous and asynchronous:

    public class HelloActionFilter : IActionFilter
    {
        public void OnActionExecuting(ActionExecutingContext context)
        {
            // runs before action method
        } 

        public void OnActionExecuted(ActionExecutedContext context)
        {
            // runs after action method
        }
    } 

    public class HelloAsyncActionFilter : IAsyncActionFilter
    {
        public async Task OnActionExecutionAsync(
            ActionExecutingContext context,
            ActionExecutionDelegate next)
        {
            // runs before action method
            await next();
            // runs after action method
        }
    }

You can short-circuit the filter pipeline by setting the Result (of type IActionResult) property on context parameter (for Async filters don’t call the next delegate):

    public class SkipActionFilter : Attribute, IActionFilter
    {
        public void OnActionExecuting(ActionExecutingContext context)
        {
            context.Result = new ContentResult
            {
                Content = "I'll skip the action execution"
            };
        } 

        public void OnActionExecuted(ActionExecutedContext context)
        { }
    } 

    [SkipActionFilter]
    public IActionResult SkipAction()
    {
       return Content("Hello SkipAction");
    }

For Result filters you could short-circuit by setting the Cancel property on context parameter and sending a response:

        public void OnResultExecuting(ResultExecutingContext context)
        {
            context.Cancel = true;
            context.HttpContext.Response.WriteAsync("I'll skip the result execution");
        } 

        [SkipResultFilter]
        public IActionResult SkipResult()
        {
            return Content("Hello SkipResult");
        }

Filter Attributes

MVC provides abstract base classes that you can inherit from to create custom filters. These abstract classes inherit from Attribute class and therefore can be used to decorate controllers and action methods:

  • ActionFilterAttribute
  • ResultFilterAttribute
  • ExceptionFilterAttribute
  • ServiceFilterAttribute
  • TypeFilterAttribute

Filter Types

There are various type of filters that run at different stages of the filter pipeline. Below a figure from official documentation illustrates the sequence:
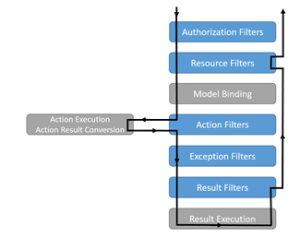


Authorization


This is the first filter to run and short circuits request for unauthorised users. They only have one method (unlike most other filters that have Executing and Executed methods). Normally you won’t write your own Authorization filters, the built-in filter calls into framework’s authorisation mechanism.

Resource

They run before model binding and can be used for changing how it behaves. Also they run after the result has been generated and can be used for caching etc.

Action

They run before and after the action method, thus are useful to manipulate action parameters or its result. The context supplied to these filters let you manipulate the action parameters, controller and result.

Exception

They can be used for unhandled exception before they’re written to the response. Exception handling middleware works for most scenarios however this filter can be used if you want to handle errors differently based on the invoked action.

Result

They run before and after the execution of action method’s result, if the result was successful. They can be used to manipulate the formatting of result.

Filter Scope

Filters can be added at different levels of scope: Action, Controller and Global. Attributes are used for action and controller level scope. For globally scoped filters you need to add them to filter collection of MvcOptions when configuring services in Startup:

            services.AddMvc(options =>
            {
                             // by instance
                options.Filters.Add(new AddDeveloperResultFilter("Tahir Naushad")); 

                // by type
                options.Filters.Add(typeof(GreetDeveloperResultFilter));
            });

Filters are executed in a sequence:

1. The Executing methods are called first for Global > Controller > Action filters.

2. Then Executed methods are called for Action > Controller > Global filters.

Filter Dependency Injection

In order to use filters that require dependencies injected at runtime, you need to add them by Type. You can add them globally (as illustrated above), however, if you want to apply them to action or controller (as attributes) then you have two options:

ServiceFilterAttribute

This attributes retrieves the filter using service container. To use it:

Create a filter that uses dependency injection:

    public class GreetingServiceFilter : IActionFilter
    {
        private readonly IGreetingService greetingService; 

        public GreetingServiceFilter(IGreetingService greetingService)
        {
            this.greetingService = greetingService;
        } 
        public void OnActionExecuting(ActionExecutingContext context)
        {
            context.ActionArguments["param"] =
                this.greetingService.Greet("James Bond");
        } 

        public void OnActionExecuted(ActionExecutedContext context)
        { }
    }

Add filter to service container:

services.AddScoped<GreetingServiceFilter>();

Apply it using ServiceFilterAttribute:

[ServiceFilter(typeof(GreetingServiceFilter))]
public IActionResult GreetService(string param)

TypeFilterAttribute

This attributes doesn’t need registering the filter in service container and initiates the type using ObjectFactory delegate. To use it:

Create a filter that uses dependency injection:

    public class GreetingTypeFilter : IActionFilter
    {
        private readonly IGreetingService greetingService; 

        public GreetingTypeFilter(IGreetingService greetingService)
        {
            this.greetingService = greetingService;
        } 

        public void OnActionExecuting(ActionExecutingContext context)
        {
            context.ActionArguments["param"] = this.greetingService.Greet("Dr. No");
        } 

        public void OnActionExecuted(ActionExecutedContext context)
        { }
    }

Apply it using TypeFilterAttribute:

[TypeFilter(typeof(GreetingTypeFilter))]
public IActionResult GreetType1(string param)

You could also inherit from TypeFilterAttribute and then use without TypeFilter:

public class GreetingTypeFilterWrapper : TypeFilterAttribute
{
   public GreetingTypeFilterWrapper() : base(typeof(GreetingTypeFilter))
   { }


[GreetingTypeFilterWrapper]
public IActionResult GreetType2(string param)


European ASP.NET Core Hosting :: How to Use Dapper Asynchronously in ASP.NET Core 2.1

clock November 12, 2018 08:13 by author Scott

In this post, we're going to create a very simple ASP.NET Core 2.1 application which uses Dapper to access data. There's already a sample project worked up over on GitHub, and you might want to use that to follow along here.

Step 1: Get the NuGet Package

First things first, we need to grab the NuGet package for Dapper. In Visual Studio, you can do this by right-clicking on your project file and selecting Manage NuGet Packages and then search for the Dapper package, like so:

With that installed, let's try creating a repository.

Step 2: Creating an Employee Class and Repository

For this demo, I am not going to go over how to create a database or show a demo database with sample data; I don't have one available and it's a pain to make one. So let's assume we have a table Employee with columns for FirstName, LastName, ID, and DateOfBirth. We can make a corresponding C# class for this table, like so:

public class Employee
{
   
public int ID { get; set; }
   
public string FirstName { get; set; }
   
public string LastName { get; set; }
   
public DateTime DateOfBirth { get; set; }
}

Now we need a sample repository. Let's call it EmployeeRepository and give it an interface so we can use ASP.NET Core's Dependency Injection setup.

Here's the interface:

public interface IEmployeeRepository
{
   
Task<Employee> GetByID(int id);
   
Task<List<Employee>> GetByDateOfBirth(DateTime dateOfBirth);
}

Now we can work up a skeleton implementation of this repository. Here's what we're starting with:

public class EmployeeRepository : IEmployeeRepository
{
   
public async Task<Employee> GetByID(int id)
   
{

   
}

   
public async Task<List<Employee>> GetByDateOfBirth(DateTime dateOfBirth)
    {

We also need to update our project's Startup file to include our new repository in the services layer:

public class Startup
{
   
public Startup(IConfiguration configuration)
   
{
       
Configuration = configuration;
   
}

   
public IConfiguration Configuration { get; }

   
public void ConfigureServices(IServiceCollection services)
   
{
       
services.AddTransient<IEmployeeRepository, EmployeeRepository>();

       
services.AddMvc().SetCompatibilityVersion(CompatibilityVersion.Version_2_1);
   
}

   
public void Configure(IApplicationBuilder app, IHostingEnvironment env)
   
{
       
//...
   
}
}

Next, we need to enable this repository to use Dapper. Before we can do that, however, we need it to be aware of what connection string we are using.

Step 3: Injecting IConfiguration

Very often in ASP.NET Core projects, Connection Strings are defined in the appSettings.json file:

{
 
"Logging": {
   
"LogLevel": {
     
"Default": "Debug",
     
"System": "Information",
     
"Microsoft": "Information"
   
}
 
},
 
"ConnectionStrings": {
   
"MyConnectionString": "MyConnectionString"
 
}
}

The problem is: how do we pass that connection string to the repository so it can create a SqlConnection object for Dapper to use.

ASP.NET Core introduces a new IConfiguration object which can be injected into other classes. That injected instance will contain a method called GetConnectionString which we can use to obtain our connection string from the appSettings.json files. So, let's inject IConfiguration like so:

public class EmployeeRepository : IEmployeeRepository
{
   
private readonly IConfiguration _config;

   
public EmployeeRepository(IConfiguration config)
   
{
       
_config = config;
    }


//Remainder of file is unchanged
}

Step 4: Creating a SqlConnection

With the injected IConfiguration now available to our repository, we can create a Dapper-enabled SqlConnection object that all of our repository's methods can utilize.

public class EmployeeRepository : IEmployeeRepository
{
   
private readonly IConfiguration _config;

   
public EmployeeRepository(IConfiguration config)
   
{
       
_config = config;
   
}

   
public IDbConnection Connection
   
{
       
get
       
{
           
return new SqlConnection(_config.GetConnectionString("MyConnectionString"));
       
}
    }


//Remainder of file is unchanged
}

Step 5: Employee by ID

Let's first create a method to return employees by their ID.

To start, let's remember that the way Dapper works is by processing raw SQL and then mapping it to an object. Because our table columns and object properties share the same names, we don't need to do any special mapping here.

Here's the implementation of our GetByID method:

public class EmployeeRepository : IEmployeeRepository
{
   
//...

   
public async Task<Employee> GetByID(int id)
   
{
       
using (IDbConnection conn = Connection)
        {

            string sQuery = "SELECT ID, FirstName, LastName, DateOfBirth FROM Employee WHERE ID = @ID";
           
conn.Open();
           
var result = await conn.QueryAsync<Employee>(sQuery, new { ID = id });
           
return result.FirstOrDefault();
       
}
   
}
}

Step 6: Employees by Date of Birth

We also need to get all employees born on a particular date. Since we are now returning a collection of employees rather than a single one, the implementation changes very slightly.

public class EmployeeRepository : IEmployeeRepository
{
    //...


public async Task<List<Employee>> GetByDateOfBirth(DateTime dateOfBirth)
   
{
       
using (IDbConnection conn = Connection)
       
{
           
string sQuery = "SELECT ID, FirstName, LastName, DateOfBirth FROM Employee WHERE DateOfBirth = @DateOfBirth";
           
conn.Open();
           
var result = await conn.QueryAsync<Employee>(sQuery, new { DateOfBirth = dateOfBirth });
           
return result.ToList();
       
}
   
}
}

Step 7: Implement the Controller

The final step is creating a controller to which our EmployeeRepository can be injected. Here it is:

[Route("api/[controller]")]
[ApiController]
public class EmployeeController : ControllerBase
{
   
private readonly IEmployeeRepository _employeeRepo;

   
public EmployeeController(IEmployeeRepository employeeRepo)
   
{
       
_employeeRepo = employeeRepo;
   
}

   
[HttpGet]
   
[Route("{id}")]
   
public async Task<ActionResult<Employee>> GetByID(int id)
   
{
       
return await _employeeRepo.GetByID(id);
   
}

   
[HttpGet]
   
[Route("dob/{dateOfBirth}")]
   
public async Task<ActionResult<List<Employee>>> GetByID(DateTime dateOfBirth)
   
{
       
return await _employeeRepo.GetByDateOfBirth(dateOfBirth);
   
}
}

Summary

That's it! We've implemented Dapper into our ASP.NET Core 2.1 application!


European ASP.NET Core Hosting - HostForLIFE.eu :: File logging on ASP.NET Core

clock March 8, 2017 10:13 by author Scott

ASP.NET Core introduces new framework level logging system. Although it is feature-rich it is not complex to use and it provides decent abstractions that fit well with the architecture of most web applications. This blog post shows how to set up and use Serilog file logging using framework-level dependency injection.

Configuring logging

Logging is configured in ConfigureServices() method of Startup class. ASP.NET Core comes with console and debug loggers. For other logging targets like file system, log servers etc third-party loggers must be used. This blog post uses Serilog file logger.

"dependencies": {
 
// ...
  "Serilog.Extensions.Logging.File": "1.0.0"
},

Project has now reference to Serilog file logger. Let’s introduce it to ASP.NET Core logging system. AddFile(string path) is the extension method that adds Serilog file logger to logger factory loggers collection. Notice that there can be multiple loggers active at same time.

public void Configure(IApplicationBuilder app, IHostingEnvironment env, ILoggerFactory loggerFactory)
{
    loggerFactory.AddConsole(Configuration.GetSection("Logging"));
    loggerFactory.AddDebug();
    loggerFactory.AddFile("Logs/ts-{Date}.txt");
 
    // ...
}

Serilog will write log files to Logs folder of web application. File names are like ts-20170108.txt.

Injecting logger factory

Loggers are not injected to other classes. It’s possible to inject logger factory and let it create new logger. If it sounds weird for you then just check internal loggers collection of logger factory to see that also other classes that need logger have their own instances. The code below shows how to get logger to controller through framework level dependency injection.

public class DummyController : Controller
{
    private ILogger _logger;
 
    public DummyController(ILoggerFactory loggerFactory)
    {
        _logger = loggerFactory.CreateLogger(typeof(DummyController));
    }
 
    // ...
}

Why we have to inject logger factory and not single instance of ILogger? Reason is simple – application may use multiple loggers like shown above. This is the fact we don’t want to know in parts of application where logging is done. It’s external detail that si not related to code that uses logging.

Logging

Logging is done using extension methods for ILogger interface. All classic methods one can expect are there:

  • LogDebug()
  • LogInformation()
  • LogWarning()
  • LogError()
  • LogCritical()

Now let’s write something to log.

public class DummyController : Controller
{
    private ILogger _logger;
 
    public DummyController(ILoggerFactory loggerFactory)
    {
        _logger = loggerFactory.CreateLogger(typeof(DummyController));
    }
 
    public void Index()
    {
        _logger.LogInformation("Hello from dummy controller!");
    }
}

Making request to Dummy controller ends up with log message added to debug window and log file. The following image shows log message in output window.

And here is the same log message in log file.


European ASP.NET Core Hosting - HostForLIFE.eu :: Customising model-binding conventions in ASP.NET Core

clock February 21, 2017 08:04 by author Scott

A pattern I use when building Web APIs is to create commands to represent an API operation and models to represent resources or results. We share these "common" objects with our .NET client so we can be sure we're using the same parameters names/types.

Here's an excerpt from Fabrik's API for creating a project:

public HttpResponseMessage Post(int siteId, AddProjectCommand command)
{
    var project = new CMS.Domain.Project(
        session.GetSiteId(siteId),
        command.Title,
        command.Slug,
        command.Summary,
        command.ContentType,
        command.Content,
        command.Template,
        command.Tags,
        command.Published,
        command.Private);

    session.Store(project);

    var model = CreateProjectModel(project);
    var link = Url.Link(RouteNames.DefaultRoute, new { controller = "projects", siteId = siteId, id = project.Id.ToIntId() });

    return Created(model, new Uri(link));
}

We also use commands for GET operations that have multiple parameters such as search endpoints. So instead of:

public IActionResult GetProjects(string searchTerm = null, int page = 1, int pageSize = 10)
{

}

We have a GetProjectsCommand:

public class GetProjectsCommand
{
    public string SearchTerm { get; set; }
    [MinValue(1, ErrorMessage = "Page must be greater than 0.")]
    public int Page { get; set; } = 1;
    public int PageSize { get; set; } = 20;
}

This provides a single place to encapsulate our default values and validation rules, keeping our controllers nice and lean.

Model-binding in ASP.NET Core MVC

To bind complex types to query strings in ASP.NET Web API we had to change the parameter binding rules. This is because the default was to bind complex types from the HTTP Request body.

When implementing the above pattern in ASP.NET Core I was pleasantly surprised to see that the following worked out of the box:

// GET: api/values
[HttpGet]
public IEnumerable<string> Get(GetValuesCommand command)
{

}

I thought that perhaps the framework detected that this was a HTTP GET request and therefore bound the parameter values from the query string instead.

Actually this is not the case - in ASP.NET Core, complex types are not bound from the request body by default. Instead you have to opt-in to body-based binding with the FromBodyAttribute:

// POST api/values
[HttpPost]
public void Post([FromBody]AddValueCommand command)
{
}

This seems an odd default given that (in my experience) binding complex types from the request body is far more common.

In any case, we can customise the default model-binding behaviour by providing a convention:

public class CommandParameterBindingConvention : IActionModelConvention
{
    public void Apply(ActionModel action)
    {
        if (action == null)
        {
            throw new ArgumentNullException(nameof(action));
        }

        foreach (var parameter in action.Parameters)
        {
            if (typeof(ICommand).IsAssignableFrom((parameter.ParameterInfo.ParameterType)))
            {
                parameter.BindingInfo = parameter.BindingInfo ?? new BindingInfo();
                parameter.BindingInfo.BindingSource = BindingSource.Body;
            }
        }
    }
}

Which is registered like so:

public void ConfigureServices(IServiceCollection services)
{
    services.AddMvc(options =>
    {
        options.Conventions.Add(new CommandParameterBindingConvention());
    });
}

This convention checks to see if the parameter type implements ICommand (a marker interface I created) and if so, instructs the framework to bind the values for this parameter from the request body.

All I have to do then is update my command with this interface:

public class AddValueCommand : ICommand
{
    public string Value { get; set; }
}

Then I can drop the unnecessary [FromBody] attribute:

// POST api/values
[HttpPost]
public void Post(AddValueCommand command)
{
}


European ASP.NET Core Hosting - HostForLIFE.eu :: How to Setup Webpack in ASP.NET Core

clock February 10, 2017 11:11 by author Scott

Webpack is a great tool for bundling the client side assets in your web application. In this post we'll briefly discuss why you should create bundles and see how Webpack can automate that for us in ASP.NET Core.

Why should I bundle

When building web applications, regardless of the server side framework, you'll need to get your client side resources over to the browser. You may have dozens of JavaScript and CSS files in your project but having to reference each of them individually in your HTML markup is just not ideal for production deployments.

Each browser only allows so many concurrent requests per hostname. BrowserScope has some data on this that you can view on their site. If your web application makes more than the allowed number of simultaneous requests then the additional requests will end up being queued. This leads to longer load times and a not so smooth experience for your users; especially on mobile devices.

It would be much better to group resources into bundles so that the browser would have fewer files to download and thus fewer requests to make. This will help in keeping bandwidth usage low and even with battery life on your users' devices.

What is Webpack?

Webpack is a module bundler for the static assets in your web application. Essentially, you point Webpack at the main entry point(s) of your code then it will determine the dependencies, run transformations and create bundles that you can provide to your browser. What's even better is that in addition to JavaScript Webpack can also handle CSS, LESS, TypeScript, CoffeeScript, images, web fonts and more.

Setting up

We're going to start by setting up a new ASP.NET Core project using the dotnet cli tooling. If you don't have tooling installed, you can find can setup files and instructions here. If you're not a Windows user, the tooling works on Windows, OSX and Linux so no need to worry.

Let's get started by opening a terminal and creating an empty directory. Now, we'll generate a new ASP.NET Core project by running the following command:

dotnet new -t web 

Currently, the generated project includes .bowerrc and bower.json files. You can delete these since we'll be using NPM to install packages. If you don't have NodeJS installed on your system, make sure you do so before continuing.

The next thing we'll do is create a folder called Scripts in the root of your project. You'll find out why later on. Also add an empty webpack.config.js to the root of your project. As you might have guessed, this is the file we'll use to configure Webpack. Your project layout should look something like this.

Configuring Webpack

Before we start configuring Webpack, let's check out where our assets actually are. ASP.NET Core places all the files destined for the browser inside of the wwwroot folder by default. If you take a peep inside that folder, you'll see sub folders for your your JavaScript, CSS and image files. Note, the names of these sub folders aren't important. Feel free to rename them if you wish.

Personally, I prefer to reserve the wwwroot folder for the bundles that I want to provide to the browser. What we'll do is use the Scripts directory that was created earlier for the working files that will get included in the bundles.

Let's add two pretty trivial JavaScript files to our Scripts folder.

//other.js
function func() {
    alert('loaded!');
}
module.exports = func;

//main.js
var other = require('./other');

other();

Our scripts have been written using the CommonJS module syntax. The main.js file imports other.jsand calls the exported function. Ok, simple enough. Let's take a look at webpack.config.js.

var path = require('path');

module.exports = {
    entry: {
        main: './Scripts/main'
    },
    output: {
       publicPath: "/js/",
       path: path.join(__dirname, '/wwwroot/js/'),
       filename: 'main.build.js'
    }
};

The webpack.config.js file is a CommonJS module that we'll use to setup Webpack. The sample above shows a fairly bare bones Webpack configuration. Inside of entry, we define a main module and point it to the location of main.js file since that's where our app starts. The name of the bundle can be changed to something else if you like. There's no requirement for it to be called main. Inside of output, we let Webpack know what to name the bundle file and where to place it. The publicPath property configures the relative URL that the browser will use to reference our bundles.

Alright, that's good for now. Before we generate our bundle, make sure you have Webpack installed globally on your machine. Type the following command in your terminal. You'll only have to do this once.

npm i -g webpack 

Now we're ready to create our bundle. Make sure your terminal path is at the root of your project directory. Now run

webpack 

Your terminal output should look similar to below.

In your code editor, open Views/_Layout.cshtml. Near the bottom of the file, add a script reference to our bundle.

<script src="~/js/main.build.js"></script>

The generated ASP.NET Core template adds a few scripts tags wrapped in environment tag helpers. Go ahead and remove these for now.

<environment names="Development">
        <script src="~/lib/jquery/dist/jquery.js"></script>
        <script src="~/lib/bootstrap/dist/js/bootstrap.js"></script>
        <script src="~/js/site.js" asp-append-version="true"></script>
</environment>

Finally, we can run our application and see if our bundle works. Execute the following commands in the command terminal.

dotnet restore
dotnet run

Navigate to http://localhost:5000 in your browser. If everything works as expected, you should see an alert with loaded! in the browser window.

Tying the builds together

We can reduce the number of commands we have to type by leveraging the build events in project.json. Update the scripts section to include the precompile event. To see the other available events, head over to the .NET Core Tools docs.

"scripts": {
    "precompile": ["webpack"],
  },

Now running dotnet run or dotnet build will also run Webpack to generate the bundle.

Conclusion

In this post, we got a short introduction to setting up Webpack in ASP.NET Core. Webpack often gets labeled as overly complex and difficult to setup. Hopefully, this post showed you how easy it is to get started and made you a little more curious about what else it can do.


About HostForLIFE.eu

HostForLIFE.eu is European Windows Hosting Provider which focuses on Windows Platform only. We deliver on-demand hosting solutions including Shared hosting, Reseller Hosting, Cloud Hosting, Dedicated Servers, and IT as a Service for companies of all sizes.

We have offered the latest Windows 2016 Hosting, ASP.NET Core 2.2.1 Hosting, ASP.NET MVC 6 Hosting and SQL 2017 Hosting.


Tag cloud

Sign in