We covered the essentials of expression trees, use cases, and restrictions in our prior tutorial. Any subject that lacks a real-world example is particularly nonsensical when it comes to programming. The second section of expression trees in C# will be covered in this article, along with some practical examples of how they may be used effectively.

What are we going to construct?
Our primary goal is to create an Asp.NET Core web API with dynamic filtering capabilities using Expression Trees, EF core, and a simple API.
In order to demonstrate the true potential of expression trees for creating intricate and dynamic searches, we intend to implement filtering across the product database. The last example with several dynamic filtering arguments is as follows:
Getting started
First, open Visual Studio and select the Asp.NET Core Web API template with the following configuration:
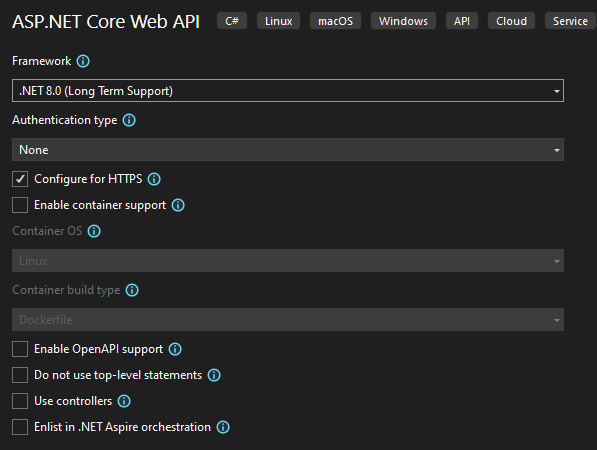
We use .NET 8.0, but the topic itself doesn’t depend on any .NET version. You can even use classical .NET Framework to use Expression Trees. The project name is “ExpressionTreesInPractice”. Here is the generated template from the Visual Studio:
To have simple storage, we will use InMemory Ef Core. You can use any other EF Core sub-storage.
Now go to Tool->Nuget Package Manager->Package Manager Console and type the following command:
install-package microsoft.entityframeworkcore.inmemory
Now, let’s create our DbContext implementation. Create a folder called ‘Database’ and add a class called ProductDbContext to it with the following implementation:
using ExpressionTreesInPractice.Models;
using Microsoft.EntityFrameworkCore;
namespace ExpressionTreesInPractice.Database
{
public class ProductDbContext : DbContext
{
public DbSet<Product> Products { get; set; }
public ProductDbContext(DbContextOptions<ProductDbContext> options) : base(options) { }
protected override void OnModelCreating(ModelBuilder modelBuilder)
{
modelBuilder.Entity<Product>().HasData(new List<Product>
{
new Product(){ Id = 1, Category = "TV", IsActive = true, Name = "LG", Price = 500},
new Product(){ Id = 2, Category = "Mobile", IsActive = false, Name = "Iphone", Price = 4500},
new Product(){ Id = 3, Category = "TV", IsActive = true, Name = "Samsung", Price = 2500}
});
base.OnModelCreating(modelBuilder);
}
}
}
We just need some basic initialized data when we run our application, and that is why we need to override OnModelCreating from DbContext. A great example of a template method pattern, isn’t it?
We need our Entity model called Product, and you can create a folder called ‘Models’ and add the Product class to it with the following content:
namespace ExpressionTreesInPractice.Models
{
public class Product
{
public int Id { get; set; }
public string Category { get; set; }
public decimal Price { get; set; }
public bool IsActive { get; set; }
public string Name { get; set; }
}
}
It is time to register our DbContext implementation in the Program.cs file:
builder.Services.AddDbContext<ProductDbContext>(x => x.UseInMemoryDatabase("ProductDb"));
By the way, Program.cs has tons of unnecessary code snippets that we need to remove. After the cleaning process, our should look like this:
using ExpressionTreesInPractice.Database;
using Microsoft.EntityFrameworkCore;
var builder = WebApplication.CreateBuilder(args);
// Add services to the container.
builder.Services.AddDbContext<ProductDbContext>(x => x.UseInMemoryDatabase("ProductDb"));
var app = builder.Build();
// Configure the HTTP request pipeline.
app.UseHttpsRedirection();
app.Run();
We don’t want to use controllers because they are heavy and cause additional problems. That is why we choose to use minimal API. If you don’t know what minimal API is, please refer to our video tutorial to learn more.
After understanding it, open Program.cs and add the following code snippet:
app.MapGet("/products", async ([FromBody] ProductSearchCriteria productSearch, ProductDbContext dbContext) =>
{ }
The above code defines a route in a minimal ASP.NET Core API and creates an endpoint for an HTTP GET request to the /products path. The method uses asynchronous programming to handle potentially long-running operations without blocking the main application flow.
ProductSearchCriteria is a parameter passed to the method, which contains the criteria used to filter the products. It's marked with [FromBody], meaning the request body will be bound to this parameter. Usually, GET requests don't use request bodies, but this setup is allowed if you need to pass a complex object.
ProductDbContext is the database context, which represents the session with the database. It's injected into the method, allowing the application to perform operations like querying the database for products based on the search criteria.
The reason for using `ProductSearchCriteria` instead of `Product` is that the query needs to be dynamic. In this case, the user may provide some of the attributes of the `Product`, but not all of them. Since the properties of `Product` are not nullable, the user would be required to provide every property, even if they don't want to filter by all of them.
By using `ProductSearchCriteria`, we allow for more flexibility. It acts as a container for optional and dynamic parameters. The user can choose to provide only the attributes they want to search by, making it a better fit for scenarios where not all product properties are needed in the query.
Here is what our ProductSearchCriteria class looks like in the ‘Models’ folder.
namespace ExpressionTreesInPractice.Models
{
public record PriceRange(decimal? Min, decimal? Max);
public record Category(string Name);
public record ProductName(string Name);
public class ProductSearchCriteria
{
public bool? IsActive { get; set; }
public PriceRange? Price { get; set; }
public Category[]? Categories { get; set; }
public ProductName[]? Names { get; set; }
}
}
Now, let's focus on our minimal API implementation. Please take into account that the purpose of the current tutorial is not to show the best practices or write clean code. The purpose is to demonstrate Expression trees in practice and after learning the point you can easily refactor the code.
Here is our first code snippet inside the MapGet function:
await dbContext.Database.EnsureCreatedAsync();
ParameterExpression parameterExp = Expression.Parameter(typeof(Product), "x");
Expression predicate = Expression.Constant(true);//x=>True && x.IsActive=true/false
if (productSearch.IsActive.HasValue)
{
MemberExpression memberExp = Expression.Property(parameterExp, nameof(Product.IsActive));
ConstantExpression constantExp = Expression.Constant(productSearch.IsActive.Value);
BinaryExpression binaryExp = Expression.Equal(memberExp, constantExp);
predicate = Expression.AndAlso(predicate, binaryExp);
}
var lambdaExp = Expression.Lambda<Func<Product, bool>>(predicate, parameterExp);
var data = await dbContext.Products.Where(lambdaExp).ToListAsync();
return Results.Ok(data);
This code is using C#'s Expression classes to dynamically build a predicate for querying a database. Let's break it down step by step.
- await dbContext.Database.EnsureCreatedAsync();
- This line asynchronously ensures that the database is created. If it doesn’t exist, it will be created. This is typically used in development or testing environments to ensure the database schema is in place.
- ParameterExpression parameterExp = Expression.Parameter(typeof(Product), "x");
- Here, a parameter expression is created to represent an instance of the Product class. This will act as the input parameter (x) in the expression tree, similar to how you define a lambda expression like x => ....
- Expression predicate = Expression.Constant(true);
- An initial predicate is created as a constant boolean expression with the value true. This is useful for building the dynamic predicate incrementally, as you can use it as a base to add more conditions (e.g., true AND other conditions). It serves as a starting point for combining additional expressions.
- if (productSearch.IsActive.HasValue)
- This block checks if the IsActive property in productSearch is not null, meaning the user has provided a filter for whether the product is active or not.
- Inside the if block:
- MemberExpression memberExp = Expression.Property(parameterExp, nameof(Product.IsActive));
- This creates a MemberExpression that accesses the IsActive property of the Product instance represented by parameterExp (x.IsActive). Essentially, it represents the expression x => x.IsActive.
- ConstantExpression constantExp = Expression.Constant(productSearch.IsActive.Value);
- A ConstantExpression is created with the value of productSearch.IsActive. This represents the value to compare against (true or false).
- BinaryExpression binaryExp = Expression.Equal(memberExp, constantExp);
- A BinaryExpression is created to compare the IsActive property with the provided value. This represents x.IsActive == productSearch.IsActive.
- predicate = Expression.AndAlso(predicate, binaryExp);
- The current predicate (which started as true) is combined with the new condition (x.IsActive == productSearch.IsActive) using a logical AND. This results in an expression that can be used to filter products based on their active status.
Overall, the above code is dynamically building an expression tree that will eventually be used to filter products based on whether they are active. The initial predicate (true) allows for additional conditions to be added easily without special handling for the first condition. If productSearch.IsActive is provided. It adds a condition that checks if the product’s IsActive property matches the given value (true or false).
Then, the lambdaExp variable is assigned a lambda expression that represents a filtering function for the Product entities. This lambda expression is created from the predicate built earlier, which may contain conditions like checking whether the product is active (IsActive). The Expression.Lambda<Func<Product, bool>> call generates a Func<Product, bool>, meaning a function that takes a Product as input and returns a boolean value, determining whether the product satisfies the filtering criteria.
Next, this lambda expression is passed to the Where method of the Products DbSet in dbContext. The Where method applies this filter to the product records in the database. It creates a query that retrieves only the products matching the conditions defined in the lambda expression.
Finally, the ToListAsync() method asynchronously executes the query and retrieves the matching products as a list. This list is then returned as part of an HTTP 200 OK response using Results.Ok(data). The result is the filtered list of products, which is sent back as the API's response.
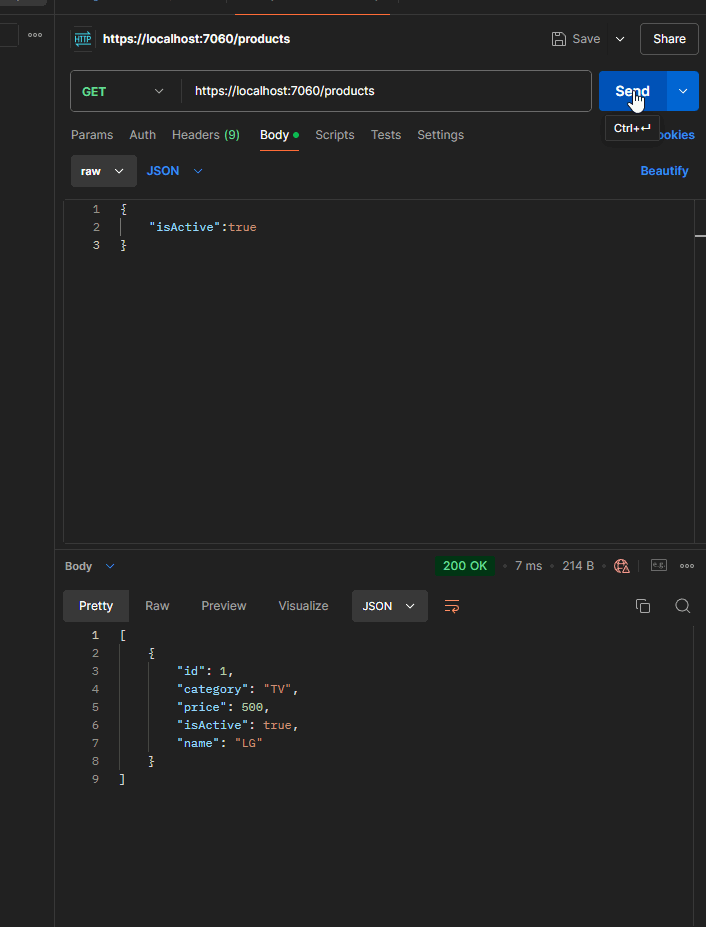
In order to test it, just run the application and send the following GET request with Body via Postman:
This approach is useful for us when building queries dynamically, as it allows the flexibility to add conditions based on which filters are provided.
Here is how your LINQ expression should look after compiling your expression tree:
{x => (True AndAlso (x.IsActive == True))}
So far, we have implemented the easiest property, which has two values: true or false. But how about other properties like categories, names, prices, etc.? Users are also able to not pick a product based on whether it is active or not but pick, for example, based on its category field. We allow users to provide multiple categories at the same time. That is why we implemented it as an array in our ProductSearchCategory class.
if (productSearch.Categories is not null && productSearch.Categories.Any())
{
//x.Category
MemberExpression memberExp = Expression.Property(parameterExp, nameof(Product.Category));
Expression orExpression = Expression.Constant(false);
foreach (var category in productSearch.Categories)
{
var constExp = Expression.Constant(category.Name);
BinaryExpression binaryExp = Expression.Equal(memberExp, constExp);
orExpression = Expression.OrElse(orExpression, binaryExp);
}
predicate = Expression.AndAlso(predicate, orExpression);
}
The code is adding dynamic filtering for product categories. It first checks if the `Categories` in the `productSearch` object is not null and contains any items. If so, it proceeds to build a dynamic expression to filter products by category.
It starts by accessing the `Category` property of the `Product` class through an expression. This member expression represents `x => x.Category`, where `x` is an instance of `Product`.
An initial `orExpression` is set to `false`. This will serve as the base for the dynamic category comparison. It uses a loop to iterate over each category in `productSearch.Categories`. For each category, a constant expression with the category name is created, and a binary expression checks if the product's `Category` equals this name.
The binary expressions are then combined using `OrElse`, meaning that if the product matches any of the given categories, the condition becomes true. After processing all categories, the combined `orExpression` is appended to the main `predicate` with `AndAlso`. This means the overall predicate will now check both the previous conditions and whether the product's category matches any of the categories in the search criteria.
This approach allows for dynamically filtering products by multiple categories, and it integrates the category filtering into the existing predicate.
At the end of the last code, you would get a LINQ expression that represents a lambda function used to filter products based on dynamic conditions. This expression can be translated into a predicate for use in a LINQ query, which can be applied to your ProductDbContext or any IQueryable<Product>.
The LINQ expression, in this case, would be a combination of logical operations (AND and OR) that filter products. Specifically, it looks like this in pseudocode:
products.Where(x => (x.Category == "Category1" || x.Category == "Category2" || ...) && other conditions)
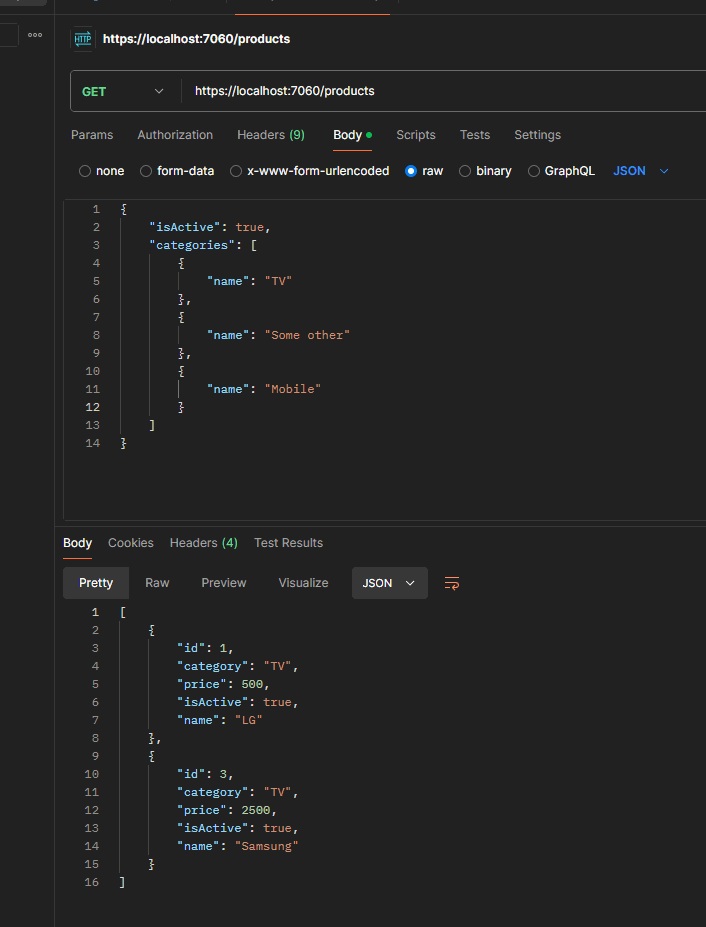
If a user provides both (isActive and categories) then we should get the following lambda expression:
{x => ((True AndAlso (x.IsActive == True)) AndAlso (((False OrElse (x.Category == "TV")) OrElse (x.Category == "Some Other")) OrElse (x.Category == "Mobile")))}
We follow the same approach for the Names field. Here is our code snippet:
if (productSearch.Names is not null && productSearch.Names.Any())
{
//x.Name
MemberExpression memberExp = Expression.Property(parameterExp, nameof(Product.Name));
Expression orExpression = Expression.Constant(false);
foreach (var productName in productSearch.Names)
{
var constExp = Expression.Constant(productName.Name);
BinaryExpression binaryExp = Expression.Equal(memberExp, constExp);
orExpression = Expression.OrElse(orExpression, binaryExp);
}
predicate = Expression.AndAlso(predicate, orExpression);
}
This code snippet dynamically builds a filtering condition for product names using expression trees. It first checks if the `productSearch.Names` property is not null and contains any items. If there are product names to filter by, it proceeds to build an expression for comparing the `Name` property of the `Product` entity.
The `memberExp` expression refers to the `Name` property of the `Product` (`x.Name` in a lambda expression). An initial expression, `orExpression`, is created, starting as `false`. This `orExpression` will be updated in a loop to accumulate comparisons for each name in `productSearch.Names`.
Within the loop, for each name in the `productSearch.Names` collection, a constant expression is created from the product name. A binary expression is then formed to check if the product's `Name` equals the current name from the search. The loop builds up a series of `OR` conditions using `Expression.OrElse`, which creates a logical OR operation between the current `orExpression` and the new comparison.
After the loop, the final `orExpression` represents a chain of OR conditions where the product's `Name` must match one of the names in `productSearch.Names`. This expression is combined with the existing `predicate` using `Expression.AndAlso`, ensuring that the name filter is applied along with any other conditions previously defined in the `predicate`.
Long story short, our block of code dynamically constructs a query filter that matches products based on their `Name`, allowing for multiple possible names from the `productSearch.Names` collection.
If the User provides only Names from the Body of the query, we will get approximately the following lambda expression at the end:
{x => (True AndAlso (((False OrElse (x.Name == "LG")) OrElse (x.Name == "LG2")) OrElse (x.Name == "Samsung")))}
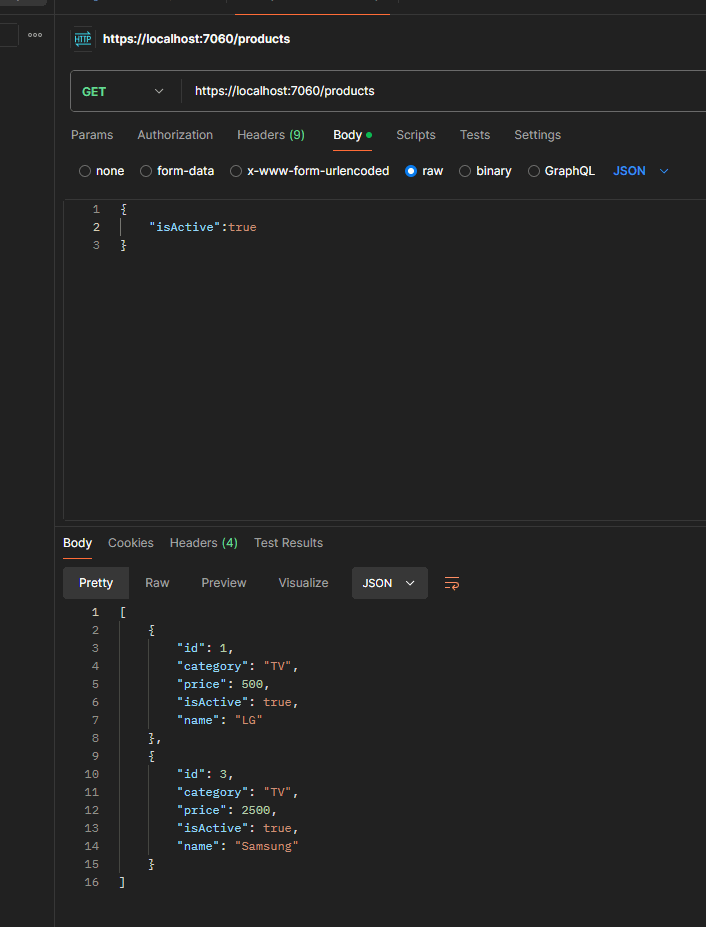
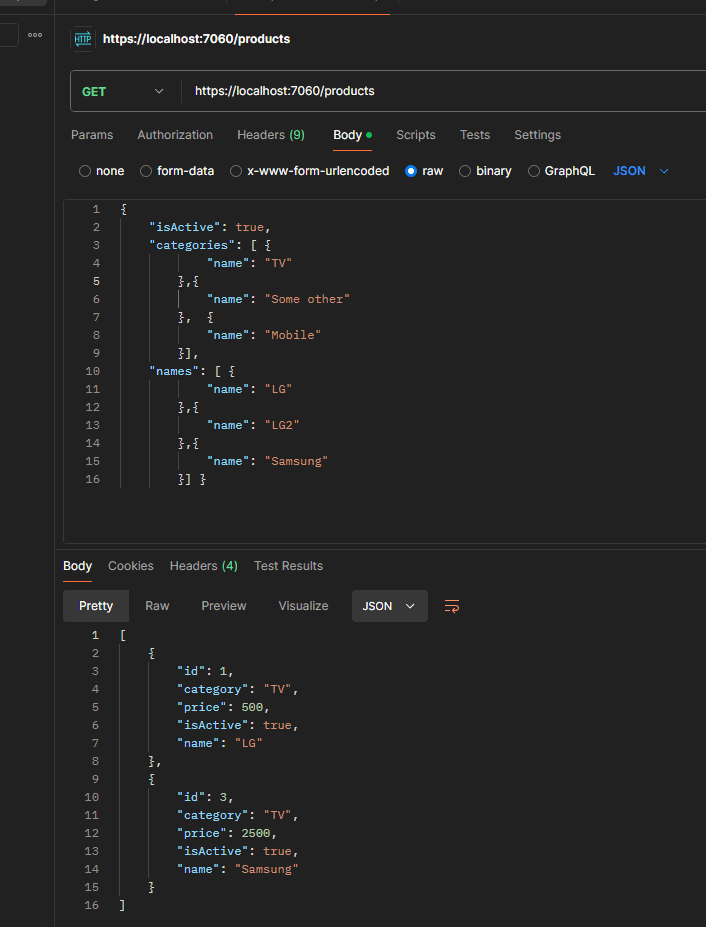
If we get all filter parameters like isActive, categories, and names from the request body, we will get the following lambda expression at the end:
{x => (((True AndAlso (x.IsActive == True)) AndAlso (((False OrElse (x.Category == "TV")) OrElse (x.Category == "Some Other")) OrElse (x.Category == "Mobile"))) AndAlso (((False OrElse (x.Name == "LG")) OrElse (x.Name == "LG2")) OrElse (x.Name == "Samsung")))}
Here is what it looks like when running the application and sending the query:
The final argument for our dynamic filtering is Price. It is a complex object which consists of min and max values. The user should be able to provide any of them, both or none of them. That is why we designed it with nullable parameters.
Here is what our code implementation looks like:
if (productSearch.Price is not null)
{
//x.Price 400
MemberExpression memberExp = Expression.Property(parameterExp, nameof(Product.Price));
//x.Price>=min
if (productSearch.Price.Min is not null)
{
var constExp = Expression.Constant(productSearch.Price.Min);
var binaryExp = Expression.GreaterThanOrEqual(memberExp, constExp);
predicate = Expression.AndAlso(predicate, binaryExp);
}
//(x.Price>=min && x.Price.Max<=max)
if (productSearch.Price.Max is not null)
{
var constExp = Expression.Constant(productSearch.Price.Max);
var binaryExp = Expression.LessThanOrEqual(memberExp, constExp);
predicate = Expression.AndAlso(predicate, binaryExp);
}
}
This code dynamically constructs a predicate for filtering products based on their `Price` range using expression trees. It starts by checking if the `productSearch.Price` object is not null, which indicates that a price filter is applied.
The `memberExp` expression is created to represent the `Price` property of the `Product` (`x.Price`). This expression is used to compare the product's price against the minimum and maximum values in the `productSearch.Price` object.
If the minimum price (`productSearch.Price.Min`) is provided (not null), an expression is built to check if the product's `Price` is greater than or equal to this minimum value. This condition is added to the overall `predicate` using `Expression.AndAlso`, meaning the product must satisfy this condition to be included in the results.
Similarly, if the maximum price (`productSearch.Price.Max`) is provided, another expression is constructed to check if the product's `Price` is less than or equal to the maximum value. This condition is also combined with the existing `predicate` using `Expression.AndAlso`, ensuring that both the minimum and maximum price conditions are applied.
Long story short, the code builds a predicate that filters products by a specified price range, ensuring that products have a price greater than or equal to the minimum (if provided) and less than or equal to the maximum (if provided).
If the User provides only Price from the Body of the query, we will get approximately the following lambda expression at the end:
{x => ((True AndAlso (x.Price >= 400)) AndAlso (x.Price <= 5000))}
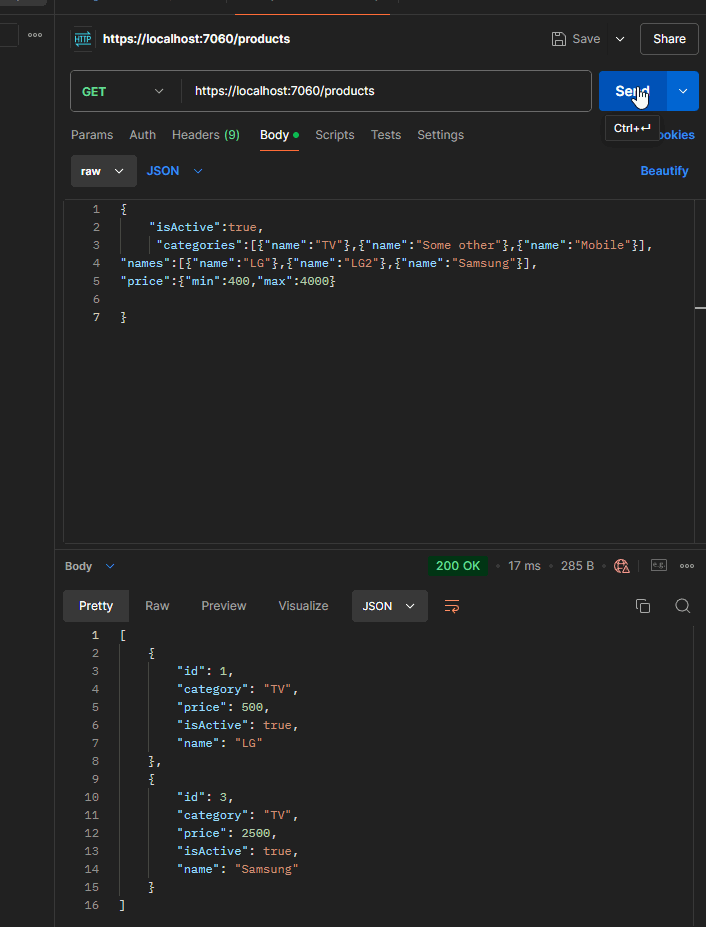
If we get all filter parameters like IsActive, Categories, Names, and Price from the request body, we will get the following lambda expression at the end:
{x => (((((True AndAlso (x.IsActive == True)) AndAlso (((False OrElse (x.Category == "TV")) OrElse (x.Category == "Some Other")) OrElse (x.Category == "Mobile"))) AndAlso (((False OrElse (x.Name == "LG")) OrElse (x.Name == "LG2")) OrElse (x.Name == "Samsung"))) AndAlso (x.Price >= 400)) AndAlso (x.Price <= 5000))}
Here is what it looks like when running the application and sending the query:
The elegant ending
This article serves as a practical continuation of the previous tutorial on C# expression trees, focusing on their real-world usage within an ASP.NET Core web API. It explores the creation of dynamic filtering functionality using minimal API, Entity Framework Core (EF Core), and expression trees.
The project involves building a product database with dynamic filtering capabilities, such as filtering by product attributes like `IsActive`, `Category`, `Name`, and `Price`. The use of expression trees is highlighted to construct flexible, dynamic queries without hardcoding-specific filters.
The setup begins with an ASP.NET Core Web API using an in-memory database for storage, although other EF Core-supported databases could be used. The article emphasizes using minimal API over traditional controllers for simplicity and performance and guides the user through the necessary steps, including setting up the database context (`DbContext`) and initializing data.
One of the core features demonstrated is how expression trees are used to build predicates dynamically. For example, when filtering by the `IsActive` property, the system checks whether the user provided this filter and then dynamically constructs a condition that compares the product's `IsActive` status with the provided value. The process is extended to handle dynamic filtering of other properties such as `Category`, `Name`, and `Price`, each of which allows flexible criteria for querying.
By using expression trees, the article illustrates how complex and flexible queries can be constructed without writing multiple hardcoded query methods. The example of filtering products by `Name` and `Category` demonstrates how logical `OR` conditions can be combined dynamically, depending on user input, resulting in concise and reusable query logic.
Additionally, the price filtering is handled by checking both minimum and maximum values and dynamically adjusting the predicate to include only those products within the specified price range.
In conclusion, this article demonstrates the power of expression trees in building dynamic, flexible queries in C# applications. It provides hands-on code examples of using expression trees to construct queries for an ASP.NET Core web API, offering a practical way to manage complex, real-world scenarios like filtering product databases based on varying user input.