European ASP.NET 4.5 Hosting BLOG

BLOG about ASP.NET 4, ASP.NET 4.5 Hosting and Its Technology - Dedicated to European Windows Hosting Customer

European FREE ASP.NET 4.5 Hosting - Germany :: ASP.NET 4.5 Shared Web Hosting Trust Level

clock April 2, 2014 08:22 by author Scott

With more and more people and companies developing websites by Microsoft .NET technology, ASP.NET 4.5 shared web hosting comes to be the major solution provided by many web hosting companies. Most of people choose an ASP.NET 4.5 web host considering about .NET framework version, ASP.NET MVC support, SQL Server database, disk space or bandwidth but they usually ignore the most important feature “IIS security level”. That determines whether the ASP.NET 4.5 websites can run successfully on the shared web host. In result to, if you developing an ASP.NET 4.5 website that works well in the local development environment and attempt to run it in the ASP.NET 4.5 shared web host, you may get the following exception,

System.Security.SecurityException: That assembly does not allow partially trusted caller

This is caused by the security level of the ASP.NET 4.5 shared web host that your application is forced to run with the limited permission, by locking down the access to server file system, preventing the background threads, or interacting with COM interfaces, etc.

ASP.NET 4.5 Web Hosting Trust Levels


This security level is known as the Trust Level of IIS for ASP.NET 4.5 websites

It can be configured with the following setting:

  • Full Trust: website can do everything that the account of the application pool can do on the web server. This is the most flexible configuration for running websites on the shared web hosts. You won’t have any problems unless your website accesses the system information.
  • High Trust: websites are limited to call unmanaged code, e.g. Win32 APIs, COM interop.
  • Medium Trust: websites are limited to access the file system except the website application directory, system registry, Code DOM, and more (we will talk it later), compared to High Trust.
  • Low Trust & Minimal Trust: these two options restrict the websites seriously. Even they don’t allow websites to call the service out of process, such as database, network, etc. But we never saw an ASP.NET 4.5 shared web host configured with either one of these two options.

Full Trust and Medium Trust are two widely used levels in ASP.NET 4.5 shared web hosting. The full trust provides best flexibility but it has potential security issues to the shared server, especially when the web hosting provider doesn't have rich experience on setting up Windows permission and IIS. Compared to Full Trust, you have to review the website carefully before you go with a web host only supports Medium Trust Level. You can refer to the following checkpoints for the review,

  • The website shall not call unmanaged APIs.
  • The website shall not access to file system, system registry, event logs and anything else related to the system.
  • The website shall not generate code for execution dynamically using Code DOM.
  • The website shall not use XslTransform to transform something from XML using XSLT.
  • The website has to be signed with a Strong Name.

Check with the web page from Microsoft about which namespaces and classes are not supported in Medium Trust environment. 

And here is quick way to confirm the compatibility of websites to Medium Trust Level, in the local environment,

1. Add partially trusted callers attribute into AssemblyInfo.cs file of the website project, as following code snippet,

[assembly: AllowPartiallyTrustedCallers]

2. Add the following line into the web.config,

<trust level="Medium" />

Suggestion

It's a tradeoff between these two trust level. But if you confirm that the website can run successfully with Medium Trust in your local environment, we suggest you choose an ASP.NET 4.5 web host with Medium Trust only. It shall be more secure and reliable anyway. If you host the website based on 3rd party framework such as DotNetNuke, or using 3rd party component, we recommend you going with Full Trust web host.


FREE ASP.NET 4.5 Hosting UK - HostForLIFE.eu :: How can HostForLIFE.eu Guarantee Our Windows ASP.NET 4.5 Hosting Service?

clock March 24, 2014 07:05 by author Scott

Only focusing on ASP.NET hosting service, HostForLIFE prove ourselves to be one of the best ASP.NET hosting providers that offer the most highlights, although there are thousands of ASP.NET hosting companies on the market. In below, we have listed our main features that has integrated with our 4 ASP.NET hosting plans.

Offering Many Excellent Features

- 1-Click Application Installer

In the HostForLIFE control panel, there is a 1-click web application installer for convenient installation of many popular open source web applications, including PHP apps like WordPress, Joomla, Drupal and phpBB, and ASP.NET applications like DotNetNuke, nopCommerce, BlogEngine and Orchard.

- PHP & MySQL

In the past, PHP didn't run well on a Windows server, but over the last several years, Microsoft has improved IIS and now PHP runs vey well on Windows hosting platforms, which means famous open source apps like Joomla, WordPress and Drupal can run well on HostForLIFE Windows hosting plans.

In addition, by supporting MySQL as part of their Windows hosting platform, a popular open source relational database system, HostForLIFE enables customers to use a lot of popular open source apps.

- ASP.NET 4.5.1 Hosting

We support ASP.NET 4.5.1 hosting on our Windows 2012 platform, which is compatible with Visual Studio 2013/2012, and our Windows 2008 hosting platform also fully supports ASP.NET 4.0 and is compatible with Visual Studio 2010, which enables customers' applications to be written in any language that is compatible with the common language runtime, including Visual Basic and C#.

- SQL Server

HostForLIFE always improve our technology and we always up to date with the Micorosoft technology. We offer the latest SQL 2012 version. We also support integrated full text search, stored procedures and ASP.NET SQL Session, which makes their customers get DBO right and manage SQL database remotely using SQL Management Studio or SQL Management Studio Express.

- Windows 2012 Hosting

We use Windows server 2012 – the latest Windows operating system comes with IIS8 to deliver customers with more options for their web applications including support for .NET, ASP and PHP. What's more, they support Full Trust to make customers' sites isolated from one another for greater reliability and security.

Utilizing Cutting-Edge Facilities & Infrastructures

HostForLIFE uses a state-of-the-art data enter which is featured with UPS backup power, diesel generators, firewall protection and 24×7 security. Moreover, we houses dual quad Dell servers that are 100% factory built and tested, coming with the best specification of 64 bit software, 32 GB of RAM, and RAID 10 disk arrays. All of the first-class facilities and infrastructures enable HostForLIFE to provide satisfying uptime and fast hosting speed for our customers to run websites smoothly and stably.

Providing Quality Technical Support

As one of the most reliable hosting companies, HostForLIFE offers quality technical support powered by a group of support staffs through email, all of who are professional, knowledgeable, experienced and on-site 24×7, so that we are able to give quick response and effective assistance to troubled customers to resolve problems.

In addition, in our online knowledgebase and blog, HostForLIFE technicians and engineers have worked out a lot of in-depth articles to teach customers how to deal with common issues independently.


European ASP.NET 4.5 Hosting - Amsterdam :: Model Binding with Dropdown List in ASP.NET 4.5

clock December 20, 2013 05:32 by author Administrator

ASP.NET 4.5 Preview introduces new model binding for  ASP.NET web forms. The concept of model binding was first introduced with ASP.NET MVC and now it has incorporated with ASP.NET Web Forms. You can easily perform any CURD operation with any sort of data controls using any data access technology like Entity Framework,  ADO.NET, LINQ to SQL Etc.  In this post I am going talk about how you can bind the data with ASP.NET DropdownList using new Model Binding features.

Let’s say we have a speaker database and we wants to bind the name of the speakers with the DropDownList.  First placed an ASP.NET Dropdown control with the page  and set the “DataTextField” and “DataValueField” properties.

We can set the  ddlName.DataSource to specifying the data source from the code behind and bind the data with dropdpwnlist, but  in this case from the code behind to providing the data source.

Now, instead of specifying the DataSource, we will be setting the Dropdownlists SelectMethod property to point a method GetSpeakerNames() within the code-behind file.

Select method is expected to return us result of type IQueryable<TYPE>. Here is GetSpeakerName() method is defined as follows.

So, Instead of specifying the data source we are specifying the SelectMethod, which return the IQueryable type of Speaker object. Run the application, you will find the names binded with dropdown list. Hope this helps !


European ASP.NET 4.5 Hosting - Amsterdam :: Tutorial Customize ASP.NET 4.5 Membership

clock December 17, 2013 10:29 by author Patrick

The ASP.NET MVC 4 Internet template adds some new, very useful features which are built on top of SimpleMembership. These changes add some great features, like a much simpler and extensible membership API and support for OAuth. However, the new account management features require SimpleMembership and won't work against existing ASP.NET Membership Providers. I'll start with a summary of top things you need to know, then dig into a lot more detail.

Summary:

  • SimpleMembership has been designed as a replacement for the previous ASP.NET Role and Membership provider system
  • SimpleMembership solves common problems developers ran into with the Membership provider system and was designed for modern user / membership / storage need
  • SimpleMembership integrates with the previous membership system, but you can't use a MembershipProvider with SimpleMembership
  • The new ASP.NET MVC 4 Internet application template AccountController requires SimpleMembership and is not compatible with previous MembershipProviders
  • You can continue to use existing ASP.NET Role and Membership providers in ASP.NET 4.5 and ASP.NET MVC 4 - just not with the ASP.NET MVC 4 AccountController
  • The existing ASP.NET Role and Membership provider system remains supported, as it is part of the ASP.NET core
  • ASP.NET 4.5 Web Forms does not use SimpleMembership; it implements OAuth on top of ASP.NET Membership
  • The ASP.NET Web Site Administration Tool (WSAT) is not compatible with SimpleMembership

The following is the result of a few conversations with Erik Porter (PM for ASP.NET MVC) to make sure I had some the overall details straight, combined with a lot of time digging around in ILSpy and Visual Studio's assembly browsing tools.

SimpleMembership: The future of membership for ASP.NET
The ASP.NET Membership system was introduced with ASP.NET 2.0 back in 2005. It was designed to solve common site membership requirements at the time, which generally involved username / password based registration and profile storage in SQL Server. It was designed with a few extensibility mechanisms - notably a provider system (which allowed you override some specifics like backing storage) and the ability to store additional profile information (although the additional  profile information was packed into a single column which usually required access through the API). While it's sometimes frustrating to work with, it's held up for seven years - probably since it handles the main use case (username / password based membership in a SQL Server database) smoothly and can be adapted to most other needs (again, often frustrating, but it can work).

The ASP.NET Web Pages and WebMatrix efforts allowed the team an opportunity to take a new look at a lot of things - e.g. the Razor syntax started with ASP.NET Web Pages, not ASP.NET MVC. The ASP.NET Web Pages team designed SimpleMembership to (wait for it) simplify the task of dealing with membership. As Matthew Osborn said in his post Using SimpleMembership With ASP.NET WebPages:
With the introduction of ASP.NET WebPages and the WebMatrix stack our team has really be focusing on making things simpler for the developer. Based on a lot of customer feedback one of the areas that we wanted to improve was the built in security in ASP.NET. So with this release we took that time to create a new built in (and default for ASP.NET WebPages) security provider. I say provider because the new stuff is still built on the existing ASP.NET framework. So what do we call this new hotness that we have created? Well, none other than SimpleMembership. SimpleMembership is an umbrella term for both SimpleMembership and SimpleRoles.

Part of simplifying membership involved fixing some common problems with ASP.NET Membership.

Problems with ASP.NET Membership
ASP.NET Membership was very obviously designed around a set of assumptions:

  • Users and user information would most likely be stored in a full SQL Server database or in Active Directory
  • User and profile information would be optimized around a set of common attributes (UserName, Password, IsApproved, CreationDate, Comment, Role membership...) and other user profile information would be accessed through a profile provider

Some problems fall out of these assumptions.
Requires Full SQL Server for default case
The default, and most fully featured providers ASP.NET Membership providers (SQL Membership Provider, SQL Role Provider, SQL Profile Provider) require full SQL Server. They depend on stored procedure support, and they rely on SQL Server cache dependencies, they depend on agents for clean up and maintenance. So the main SQL Server based providers don't work well on SQL Server CE, won't work out of the box on SQL Azure, etc.

Custom Membership Providers have to work with a SQL-Server-centric API
If you want to work with another database or other membership storage system, you need to to inherit from the provider base classes and override a bunch of methods which are tightly focused on storing a MembershipUser in a relational database. It can be done (and you can often find pretty good ones that have already been written), but it's a good amount of work and often leaves you with ugly code that has a bunch of System.NotImplementedException fun since there are a lot of methods that just don't apply.

Designed around a specific view of users, roles and profilesThe existing providers are focused on traditional membership - a user has a username and a password, some specific roles on the site (e.g. administrator, premium user), and may have some additional "nice to have" optional information that can be accessed via an API in your application.
This doesn't fit well with some modern usage patterns:

  • In OAuth and OpenID, the user doesn't have a password
  • Often these kinds of scenarios map better to user claims or rights instead of monolithic user roles
  • For many sites, profile or other non-traditional information is very important and needs to come from somewhere other than an API call that maps to a database blob

What would work a lot better here is a system in which you were able to define your users, rights, and other attributes however you wanted and the membership system worked with your model - not the other way around.

Requires specific schema, overflow in blob columns
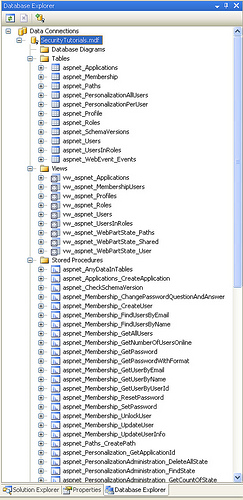

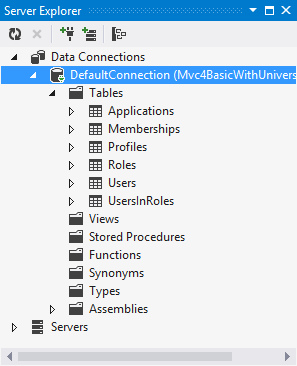
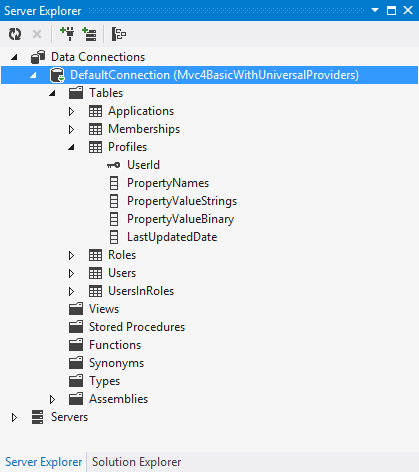
Update: This schema has been improved a lot with Universal Providers. The views and stored procedures have been removed, and the tables are simplified.
SimpleMembership as a better membership system
As you might have guessed, SimpleMembership was designed to address the above problems.

Then we point SimpleMemberhip at that table with a one-liner:
WebSecurity.InitializeDatabaseFile("SecurityDemo.sdf", "Users", "UserID", "Username", true);

Broaden database support to the whole SQL Server family
While SimpleMembership is not database agnostic, it works across the SQL Server family. It continues to support full SQL Server, but it also works with SQL Azure, SQL Server CE, SQL Server Express, and LocalDB. Everything's implemented as SQL calls rather than requiring stored procedures, views, agents, and change notifications.

Note that SimpleMembership still requires some flavor of SQL Server - it won't work with MySQL, NoSQL databases, etc. You can take a look at the code in WebMatrix.WebData.dll using a tool like ILSpy if you'd like to see why - there are places where SQL Server specific SQL statements are being executed, especially when creating and initializing tables. It seems like you might be able to work with another database if you created the tables separately, but I haven't tried it and it's not supported at this point.

Easy to with Entity Framework Code First
The problem with with ASP.NET Membership's system for storing additional account information is that it's the gate keeper. That means you're stuck with its schema and accessing profile information through its API.

SimpleMembership flips that around by allowing you to use any table as a user store. That means you're in control of the user profile information, and you can access it however you'd like - it's just data. Let's look at a practical based on the AccountModel.cs class in an ASP.NET MVC 4 Internet project. Here I'm adding a Birthday property to the UserProfile class.

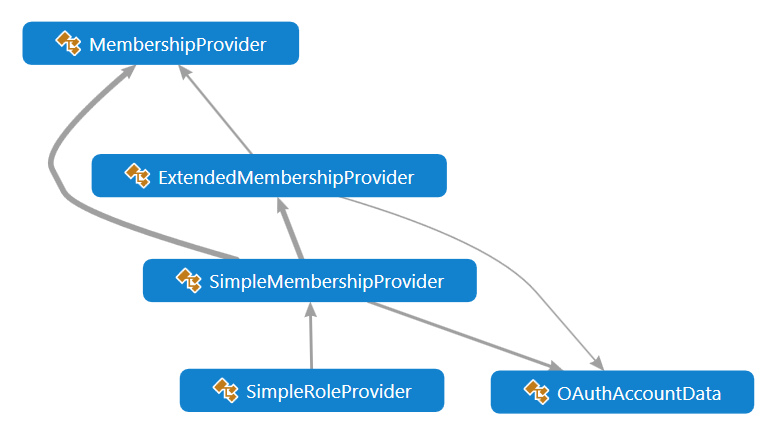
How SimpleMembership integrates with ASP.NET MembershipOkay, enough sales pitch (and hopefully background) on why things have changed. How does this affect you? Let's start with a diagram to show the relationship (note: I've simplified by removing a few classes to show the important relationships):
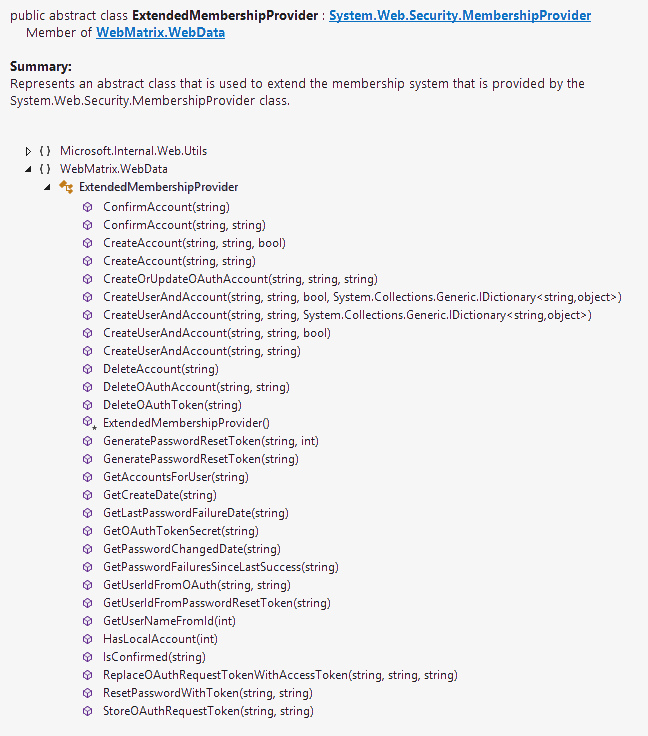
So SimpleMembershipProvider is an implementaiton of an ExtendedMembershipProvider, which inherits from MembershipProvider and adds some other account / OAuth related things. Here's what ExtendedMembershipProvider adds to MembershipProvider:
Membership in the ASP.NET 4.5 project template
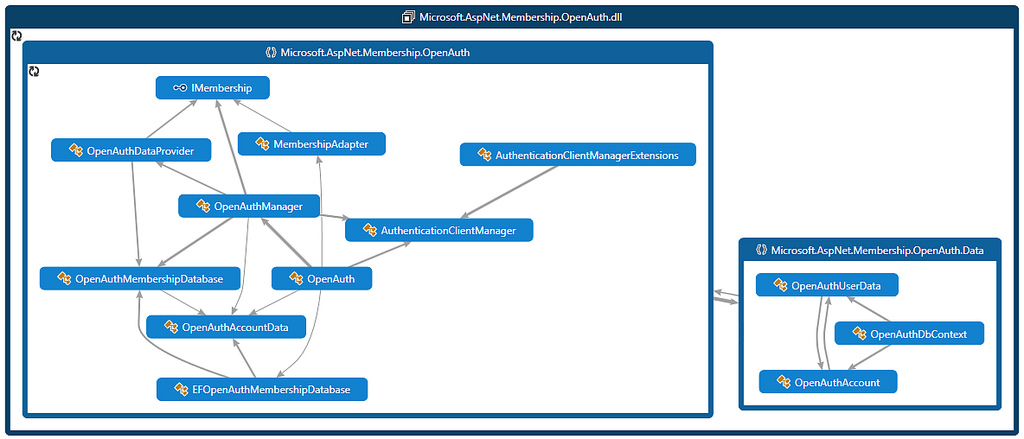
ASP.NET 4.5 Web Forms took a different approach which builds off ASP.NET Membership. Instead of using the WebMatrix security assemblies, Web Forms uses Microsoft.AspNet.Membership.OpenAuth assembly. I'm no expert on this, but from a bit of time in ILSpy and Visual Studio's (very pretty) dependency graphs, this uses a Membership Adapter to save OAuth data into an EF managed database while still running on top of ASP.NET Membership.
How does this fit in with Universal Providers (System.Web.Providers)?
Just to summarize:

  • Universal Providers are intended for cases where you have an existing ASP.NET Membership Provider and you want to use it with another SQL Server database backend (other than SQL Server). It doesn't require agents to handle expired session cleanup and other background tasks, it piggybacks these tasks on other calls.
  • Universal Providers are not really, strictly speaking, universal - at least to my way of thinking. They only work with databases in the SQL Server family.
  • Universal Providers do not work with Simple Membership.
  • The Universal Providers packages include some web config transforms which you would normally want when you're using them.


European ASP.NET 4.5 Hosting :: Key HTML Editor Features ASP.NET 4.5

clock December 12, 2013 07:32 by author Patrick

We will be go through the key HTML editor features introduced in ASP.NET 4.5. Automatic Renaming of the matching tag. In ASP.NET 4.5, we have a very productive feature where matching tags are automatically renamed when we change the opening tag.

Consider the following code in HTML side

Now in earlier versions of ASP.NET if I had to make a change in the starting tag then I had to manually update the end tag too. However, with ASP.NET 4.5, you will see that if you update the starting tag then the end tag will also update automatically.

Please see the following image for more details.

Extract to User Control

The ASP.NET 4.5 desiners have developed a very unique and productive feature where at any point of time, we can change code present in a web form to a user control.
Consider I have a web form containing TextBoxes for userName and Password for authentication. While working on this page, we found that we need this user name and password authentication in various modules of the project.


With this said, ASP.NET 4.5 provides us the great feature where we must simply select the code and we can change that selected code to a User Control; see:

Smart Task in HTML Editor

One of the productive features added to ASP.NET a few years back was the addition of a smart task. On the click of the smart available on the control, you can accomplish some of the common tasks on that control.


Now with ASP.NET 4.5, we have the same feature while working on the HTML side. Hence, we don't need to go to design mode to use this feature.

If you click on the line present under "a" , this would open up the smart task for that control.

You will see that you can perform all the common tasks for that control.

Code Snippets in HTML

With ASP.NET 4.5, we have code snippets available in HTML. If you want to add audio or video to you page then you simply must type video on HTML and press TAB twice. You will see that full audio / video control is available, mentioning all the common properties.

Event Handler generation

Before the release of ASP.NET 4.5, if we must create any event handler for any control then we either must double-click on that control, that will generate an event for that control or define the event in the properties of that control. However, with ASP.NET 4.56 we have a new property added in the control, where we can generate an event for the control at the HTML side and we don't need to switch to design mode.

Clicking on "Create New Event" will create a default event for that control; however we can provide any name of that event and you would see that Visual Studio will then automatically generate the appropriate server side event handler within your code behind file for you.

Hope this article of mine has been helpful in giving some knowledge of the new features of ASP.NET 4.5.


European ASP.NET 4.5 Hosting - HostForLIFE.eu :: Friendly URLs in ASP.NET 4.5 Web Forms

clock November 27, 2013 06:10 by author Scott

In the recent update of ASP.NET, Microsoft released support for Friendly URLs in ASP.NET Web Forms. It is based on the concept of Routing. But, we don’t need to deal with route table to manually add the routes to be mapped. URLs of the site will be automatically made friendly after invoking when the application starts.

To get started using the Friendly URLs, we need to install the NuGet Package Microsoft.AspNet.FriendlyUrls. The package is not stable yet, so we need to search it in pre-release packages.

This package adds following files to the web application:

  • Microsoft.AspNet.FriendlyUrls assembly – Contains required set of classes and interfaces
  • Site.Mobile.Master – Master page for mobile devices
  • ViewSwitcher.ascx – A user control that can be used to switch views from desktop view to Mobile view and vice versa

Once Visual Studio finishes installing the NuGet package, a read me file will be popped up. This file contains the steps to be followed to enable Friendly URLs on your site. All you have to do is, call the EnableFriendlyUrls extension method of RouteTable in RegisterRoutes method of RouteConfig class. This method is defined in Microsoft.AspNet.FriendlyUrls namespace.

routes.EnableFriendlyUrls();

And make sure that the RegisterRoutes method is called in Application_Start event of Global.asax:

RouteConfig.RegisterRoutes(RouteTable.Routes);

Now run the application and check URL on the address bar of your browser.

And the magic happened! As we see here, the URL doesn’t contain extension of the page.

Note: You don’t have to install NuGet package and apply the above settings if you have installed ASP.NET and Web Tools 2012.2. These changes are built into the ASP.NET web application template in the new template.

If you are using default ASP.NET 4.5 Web application template, you can invoke the Login (which resides in Account folder) page using:

http://mysite/Account/Login

You can link any page that resides in a folder using the same convention.

Hyperlinks to the pages can be replaced with the friendly convention.

<a id="loginLink" runat="server" href="~/Account/Login">Log in</a>

Data can be passed to a page using segments. Href method of FriendlyUrl class can be used for this purpose:

<a href="<%: FriendlyUrl.Href("~/BookDetails","AspNet") %>">ASP.NET</a>

This hyperlink forms the following URL:

http://mysite/BookDetails/AspNet

This data can be displayed on the page in any mark-up element. To display the topic of book sent through the above URL in a span element, we have to get the value from the segment as shown below:

<span><%: Request.GetFriendlyUrlSegments()[0].ToString() %></span>

Also, this value can be passed as a parameter to a method used for Model Binding as shown below:

public IQueryable<Customer> GetBooks([FriendlyUrlSegments]string topic)
{
    var selectedBooks = context.Books.Where(c => c.BookName.Contains(topic));
    return selectedBooks;
}

Remember that, if you are navigating to the page ListBooks.aspx with following URL,

http://mysite/ListBooks/Book/AspNet

then the parameter marked with FriendlyUrlSegments will hold the value Book/AspNet. So, this should be handled with care.


European ASP.NET 4.5 Hosting - Amsterdam :: AjaxControlToolkit version 7.0123 with .NET 4.5

clock April 25, 2013 06:26 by author Scott

Here’s my steps and workarounds from the very beginning (in Visual Studio 2012), hopefully some part of this will help fix whatever error you are encountering.

File -> New Project
.NET Framework 4.5
Visual C# -> Web
ASP.NET Web Forms Application
Add AjaxControlToolkit version 7.0123 (dll is actually 4.5.7.123 which is January 2013 I believe) via NuGet

Open Default.aspx
Add a calendar to the BodyContent / MainContent:

<asp:TextBox ID="myTextBox" runat="server" />
<ajaxToolkit:CalendarExtender ID="myCalendar" runat="server" TargetControlID="myTextBox" Format="dd/MM/yyyy" />

Run it up (F5 will do)

It might error about ASP.NET Ajax 4.0 scripts:
0x800a139e – JavaScript runtime error: AjaxControlToolkit requires ASP.NET Ajax 4.0 scripts. Ensure the correct version of the scripts are referenced. If you are using an ASP.NET ScriptManager, switch to the ToolkitScriptManager in AjaxControlToolkit.dll.

I’ve also seen it error about:
‘MsAjaxBundle’ is not a valid script name. The name must end in ‘.js’.

No bother, let’s remove that reference from the Site.Master, so:

<asp:ScriptManager runat="server">
    <Scripts>
        <%--Framework Scripts--%>
        <asp:ScriptReference Name="MsAjaxBundle" />
        <asp:ScriptReference Name="jquery" />
        <asp:ScriptReference Name="jquery.ui.combined" />
        <asp:ScriptReference Name="WebForms.js" Assembly="System.Web" Path="~/Scripts/WebForms/WebForms.js" />
        <asp:ScriptReference Name="WebUIValidation.js" Assembly="System.Web" Path="~/Scripts/WebForms/WebUIValidation.js" />
        <asp:ScriptReference Name="MenuStandards.js" Assembly="System.Web" Path="~/Scripts/WebForms/MenuStandards.js" />
        <asp:ScriptReference Name="GridView.js" Assembly="System.Web" Path="~/Scripts/WebForms/GridView.js" />
        <asp:ScriptReference Name="DetailsView.js" Assembly="System.Web" Path="~/Scripts/WebForms/DetailsView.js" />
        <asp:ScriptReference Name="TreeView.js" Assembly="System.Web" Path="~/Scripts/WebForms/TreeView.js" />
        <asp:ScriptReference Name="WebParts.js" Assembly="System.Web" Path="~/Scripts/WebForms/WebParts.js" />
        <asp:ScriptReference Name="Focus.js" Assembly="System.Web" Path="~/Scripts/WebForms/Focus.js" />
        <asp:ScriptReference Name="WebFormsBundle" />
        <%--Site Scripts--%>

    </Scripts>
</asp:ScriptManager>

Now becomes:

<asp:ScriptManager runat="server">
    <Scripts>
        <asp:ScriptReference Name="jquery" />
        <asp:ScriptReference Name="jquery.ui.combined" />
        <asp:ScriptReference Name="WebForms.js" Assembly="System.Web" Path="~/Scripts/WebForms/WebForms.js" />
        <asp:ScriptReference Name="WebUIValidation.js" Assembly="System.Web" Path="~/Scripts/WebForms/WebUIValidation.js" />
        <asp:ScriptReference Name="MenuStandards.js" Assembly="System.Web" Path="~/Scripts/WebForms/MenuStandards.js" />
        <asp:ScriptReference Name="GridView.js" Assembly="System.Web" Path="~/Scripts/WebForms/GridView.js" />
        <asp:ScriptReference Name="DetailsView.js" Assembly="System.Web" Path="~/Scripts/WebForms/DetailsView.js" />
        <asp:ScriptReference Name="TreeView.js" Assembly="System.Web" Path="~/Scripts/WebForms/TreeView.js" />
        <asp:ScriptReference Name="WebParts.js" Assembly="System.Web" Path="~/Scripts/WebForms/WebParts.js" />
        <asp:ScriptReference Name="Focus.js" Assembly="System.Web" Path="~/Scripts/WebForms/Focus.js" />
        <asp:ScriptReference Name="WebFormsBundle" />
    </Scripts>
</asp:ScriptManager>

Next is ToolkitScriptManager, the snippet above now becomes:

<ajaxToolkit:ToolkitScriptManager runat="server">
    <Scripts>
        <asp:ScriptReference Name="jquery" />
        <asp:ScriptReference Name="jquery.ui.combined" />
        <asp:ScriptReference Name="WebForms.js" Assembly="System.Web" Path="~/Scripts/WebForms/WebForms.js" />
        <asp:ScriptReference Name="WebUIValidation.js" Assembly="System.Web" Path="~/Scripts/WebForms/WebUIValidation.js" />
        <asp:ScriptReference Name="MenuStandards.js" Assembly="System.Web" Path="~/Scripts/WebForms/MenuStandards.js" />
        <asp:ScriptReference Name="GridView.js" Assembly="System.Web" Path="~/Scripts/WebForms/GridView.js" />
        <asp:ScriptReference Name="DetailsView.js" Assembly="System.Web" Path="~/Scripts/WebForms/DetailsView.js" />
        <asp:ScriptReference Name="TreeView.js" Assembly="System.Web" Path="~/Scripts/WebForms/TreeView.js" />
        <asp:ScriptReference Name="WebParts.js" Assembly="System.Web" Path="~/Scripts/WebForms/WebParts.js" />
        <asp:ScriptReference Name="Focus.js" Assembly="System.Web" Path="~/Scripts/WebForms/Focus.js" />
        <asp:ScriptReference Name="WebFormsBundle" />
    </Scripts>
</ajaxToolkit:ToolkitScriptManager>

But of course this fails with:
Could not load file or assembly ‘System.Web’ or one of its dependencies. The system cannot find the file specified.

Remove the Assembly=”System.Web” part from the ScriptReference so we have have:

<ajaxToolkit:ToolkitScriptManager runat="server">
    <Scripts>
        <asp:ScriptReference Name="jquery" />
        <asp:ScriptReference Name="jquery.ui.combined" />
        <asp:ScriptReference Name="WebForms.js" Path="~/Scripts/WebForms/WebForms.js" />
        <asp:ScriptReference Name="WebUIValidation.js" Path="~/Scripts/WebForms/WebUIValidation.js" />
        <asp:ScriptReference Name="MenuStandards.js" Path="~/Scripts/WebForms/MenuStandards.js" />
        <asp:ScriptReference Name="GridView.js" Path="~/Scripts/WebForms/GridView.js" />
        <asp:ScriptReference Name="DetailsView.js" Path="~/Scripts/WebForms/DetailsView.js" />
        <asp:ScriptReference Name="TreeView.js" Path="~/Scripts/WebForms/TreeView.js" />
        <asp:ScriptReference Name="WebParts.js" Path="~/Scripts/WebForms/WebParts.js" />
        <asp:ScriptReference Name="Focus.js" Path="~/Scripts/WebForms/Focus.js" />
        <asp:ScriptReference Name="WebFormsBundle" />
    </Scripts>
</ajaxToolkit:ToolkitScriptManager>

It seems the new web forms project template adds ‘Microsoft.AspNet.ScriptManager.MSAjax 4.5.6′ package, this appears to conflict with the toolkit, so remove this via “Manage NuGet Packages”
Visual Studio might still leave the dll in your bin directory even after a clean, make sure you manually clean that out.


European ASP.NET 4.5 Hosting - Amsterdam :: How to Enable Unobtrusive Validation Mode in ASP.NET 4.5

clock February 27, 2013 05:09 by author Scott

In this article we will learn how to enable Unobtrusive Validation in ASP.NET 4.5.

Visual Studio 2012 provides some new Validation features that include Unobtrusive Validation. When you work with this Validation mode you will find that there is not much difference in this validation and previous validations but to enable this type of validation you had to first configure your Web Application.

There are three ways to enable the Unobtrusive Validation in your Web Application; they are:

- By using Web.Config file
- By using Global.asax file
- By using Page_Load event on each page

The first method is by using the Web.Config file.

Step 1

Write the following code in your Web.Config file:

<configuration>
  <
appSettings>
    <
add key="ValidationSettings:UnobtrusiveValidationMode" value="None"></add>
  </
appSettings>
    <
system.web>
      <
compilation
 debug="true" targetFramework="4.5" />
      <
httpRuntime targetFramework="4.5" />
    </
system.web> 
</configuration>

Step 2

Now write the following code in your WebForm.aspx Page:

<asp:TextBox runat="server" ID="txt" />
     <asp:RequiredFieldValidator ID="RequiredFieldValidator1" ErrorMessage="txt is required"ControlToValidate="txt" runat="server" Text="Text is Required" Display="Dynamic" />

    <asp:Button ID="Button1" Text="Send info" runat="server" />

Step 3

Now debug your code, on debugging the code you will get the output like this:

When you click on the button in the output window you will see an Error Message. As you write in the Text Box and click again on the Button the error message will be disposed of automatically.

The second method is by using a Global.asax file.

Step 1

In the Global.asax file, first add the namespace "using System.Web.UI;".

After adding the namespace write the following code in the Application_Start method:

protected void Application_Start(object sender, EventArgs e)
{
    ValidationSettings.UnobtrusiveValidationMode =
 UnobtrusiveValidationMode.None;
}

Step 2

Now write the following code in your WebForm.aspx page:

<asp:TextBox runat="server" ID="txt" />
     <asp:RequiredFieldValidator ID="RequiredFieldValidator1" ErrorMessage="txt is required"ControlToValidate="txt" runat="server" Text="Text is Required" Display="Dynamic" />

    <asp:Button ID="Button1" Text="Send info" runat="server" />

Step 3

Again debugging your Web Application you will again get the same output as you got in the first method.

The third method is by simply writing the code on each page inside the Page_Load event.

Step 1

protected void Page_Load(object sender, EventArgs e)
{
    this.UnobtrusiveValidationMode = System.Web.UI.UnobtrusiveValidationMode.None;

}

Step 2

Now write the following code in your WebForm.aspx page:

<asp:TextBox runat="server" ID="txt" />
     <asp:RequiredFieldValidator ID="RequiredFieldValidator1" ErrorMessage="txt is required"ControlToValidate="txt" runat="server" Text="Text is Required" Display="Dynamic" />

    <asp:Button ID="Button1" Text="Send info" runat="server" />

Step 3

Again debug your Web Application and you will again get the same output as you got in the first method.


European ASP.NET 4.5 Hosting - Amsterdam :: How to Disable Bundling and Minification in ASP.NET 4.5/MVC 4

clock February 12, 2013 05:51 by author Scott

Lots of people are excited about the new bundling and minification feature in the next version of ASP.NET and MVC. One major drawback I see a lot of people clamoring about is the fact that you cannot conditionally disable bundling or minification when you are in debug mode. Out of the box (and to be clear, I’m referring to the version that ships with MVC 4 beta) it’s impossible to debug your CSS and Javascript.

I expect this will change in the release version, but for now you are forced to create your own custom bundles (something you’d end up doing anyway) and conditionally check if you’re in debug mode to short-circuit the bundling/minification.

Disabling minification while in debug mode

It’s as simple as an #if DEBUG line and creating a transformer that does nothing. For example:

01           protected void Application_Start()
02           {
03               IBundleTransform jsTransformer;
04           #if DEBUG
05               jsTransformer = new NoTransform("text/javascript");
06           #else
07               jstransformer = new JsMinify();
08           #endif
09          
10               var bundle = new Bundle("~/Scripts/js", jsTransformer);
11          
12               bundle.AddFile("~/Scripts/script1.js");
13               bundle.AddFile("~/scripts/script2.js");
14          
15               BundleTable.Bundles.Add(bundle);
16           }

Now when you reference this javascript bundle like <script src="@System.Web.Optimization.BundleTable.Bundles.ResolveBundleUrl("~/Scripts/js")"></script> in a view it will render a single bundled and minified script when in release mode, but as a single bundled, non-minified file while in debug mode.

Disabling bundling while in debug mode

The above approach improves this situation, but I don’t think it goes far enough. If I’m going to have multiple source files, I want to debug with the same multiple source files, at least initially. It would get too confusing writing code in a several files and then debugging it in a single monolithic file.

As an experiment to see if it was possible, I ended up building a better bundler that does just what I want: bundles and minifies in release mode, but doesn’t bundle or minify when the build is set to debug.

The entire class is below, explanation to follow:

01           public static class BetterBundler
02           {
03               private static bool _debug;
04               const string CssTemplate = "<link href=\"{0}\" rel=\"stylesheet\" type=\"text/css\" />";
05          
06               public static void Init()
07               {
08           #if DEBUG
09                   _debug = true;
10           #endif
11                   var bundle = new Bundle("~/content/css", new CssMinify());
12          
13                   bundle.AddFile("~/Content/test.css");
14                   bundle.AddFile("~/Content/site.css");
15                   
16                   BundleTable.Bundles.Add(bundle);
17               }
18          
19               public static MvcHtmlString ResolveBundleUrl(string bundleUrl)
20               {
21                   return _debug ? BundledFiles(BundleTable.Bundles.ResolveBundleUrl(bundleUrl)) : UnbundledFiles(bundleUrl);
22               }
23               
24               private static MvcHtmlString BundledFiles(string bundleVirtualPath)
25               {
26                   return new MvcHtmlString(string.Format(CssTemplate, bundleVirtualPath));
27               }
28          
29               private static MvcHtmlString UnbundledFiles(string bundleUrl)
30               {
31                   var bundle = BundleTable.Bundles.GetBundleFor(bundleUrl);
32          
33                   StringBuilder sb = new StringBuilder();
34                   var urlHelper = new UrlHelper(HttpContext.Current.Request.RequestContext);
35          
36                   foreach (var file in bundle.EnumerateFiles(new BundleContext(new HttpContextWrapper(HttpContext.Current), BundleTable.Bundles, bundleUrl)))
37                   {
38                       sb.AppendFormat(CssTemplate + Environment.NewLine, urlHelper.Content(ToVirtualPath(file.FullName)));
39                   }
40          
41                   return new MvcHtmlString(sb.ToString());
42               }
43          
44               private static string ToVirtualPath(string physicalPath)
45               {
46                   var relativePath = physicalPath.Replace(HttpContext.Current.Request.ServerVariables["APPL_PHYSICAL_PATH"], "");
47                   return relativePath.Replace("\\", "/").Insert(0, "~/");
48               }
49          
50               public static MvcHtmlString CssBundle(this HtmlHelper helper, string bundleUrl)
51               {
52                   return ResolveBundleUrl(bundleUrl);
53               }
54           }

To summarize, I’m using the same technique to determine debug mode, and of course this could be extended to conditionally bundle or not based on any boolean. The interesting code is in the UnbundledFiles(string bundleUrl) method.

Currently, there is no concept of named bundles – bundles are specified simply by the virtual path of the resultant bundle. This means all our calling code in the view has to give is the virtual path of the bundle. We have to start from that and uncover all the physical files deeper within the BundleTable.

var bundle = BundleTable.Bundles.GetBundleFor(bundleUrl);

This line retrieves the bundle that we created from the BundleTable.

bundle.EnumerateFiles(new BundleContext(new HttpContextWrapper(HttpContext.Current), BundleTable.Bundles, bundleUrl))

This gets all of the physical files from the bundle.

The rest is just boilerplate code to turn those raw physical files back into relative virtual paths and into the proper html tags.

Finally, you’ll note that I have an HtmlHelper method in there, CssBundle(this HtmlHelper helper, string bundleUrl). To render a bundle link in a view, this must be used. Since the result of a bundle could be one or multiple files, I decided the simplest approach would be to allow the BetterBundler to render the full html tag itself. This could easily be changed or enhanced.

1              In the view:
2             
3              @Html.CssBundle("~/content/css")

The Result

In release mode:

<link href="/content/css?v=7GiB-1k9Pr1JbbYY72bT3T2EOpxXf0rGPdEOXVKl5oQ1" rel="stylesheet" type="text/css" />

In debug mode:

<link href="/content/test.css" rel="stylesheet" type="text/css" />
<link href="/content/site.css" rel="stylesheet" type="text/css" />


European ASP.NET 4.5 Hosting - Amsterdam :: Web Sockets and How to Develop HTML5 Web Sockets in ASP.NET 4.5

clock December 20, 2012 05:02 by author Scott

HTML5 WebSockets allow you to perform two-way (duplex) communication between the client browser and the server. ASP.NET 4.5 and IIS 8 provide support for WebSocket protocol so that you can program WebSockets in your ASP.NET web forms and ASP.NET MVC applications. This article discusses what WebSockets are and how to develop web applications that take advantage of HTML5 WebSockets.

Overview of HTML5 Web Sockets

Typically a communication over the web is comprised of two distinct parties participating in the communication, viz. the client and the web server. An ordinary web page uses a request-response model of communication wherein the browser sends a request to the server and the server then sends back a response. Each request and response uses a new connection and that connection is closed once the response is returned by the server. As you might have guessed, such a communication is poor in terms of performance since a new connection is established between the same client and the server every time. Additionally, such a communication can't be two way, i.e. client talking to server and server talking to the client simultaneously.

In the case of two-way or duplex communication both the parties participating in the communication can communicate at the same time. A common application of the duplex communication is chat systems such as MSN or Yahoo Messenger and Google Talk. In any chat system, two or more members can chat with each other at the same time. As far as HTML5 is concerned, the technique to achieve two way communications is Web Sockets.

Unlike the request-response model, WebSockets keep the underlying communication channel open throughout the course of communication. A WebSocket based communication typically involves three steps:

- Establishing a connection between the client and the server or Hand Shake.
- Asking the Web Socket server to listen to the incoming communication
- Sending and receiving data

Web applications use HTTP protocol for their functioning and HTTP protocol essentially makes use of the request-response model. The plain HTTP protocol isn't well suited for performing two-way communications. The WebSockets therefore, need to "upgrade" the plain HTTP protocol to WebSocket protocol. This "upgrade" takes place while establishing the connection between the client and the server. In order to upgrade the communication from plain HTTP to WebSocket, you need a web server that is capable of doing this upgrade.

Enabling WebSocket Protocol in Windows 8

As far IIS is concerned, IIS 8.0 that ships with Windows 8 is capable of accepting Web Socket communications. If you are developing a web application that makes use of HTML5 Web Sockets, you may need to install WebSocket support in IIS 8.0. The following figure shows the "Turn Windows features on or off" option from the control panel. It can be used to install WebSocket protocol.


Notice how the "WebSocket Protocol" feature is checked under "World Wide Web Services". If the IIS installation doesn't have WebSocket protocol enabled your ASP.NET applications won't be able to receive and respond to the WebSocket requests on the server.

A WebSocket based application consists of two parts, viz. WebSocket server side code and WebSocket client side code. The WebSocket server side code sits on the web server and "listens" to the incoming communication from clients. When some communication is received from the client it processes the communication and typically sends some communication back to the client. If there is no communication from the client the WebSocket server can either keep waiting for the communication or can terminate the communication channel. The WebSocket client side code makes use of the WebSocket object of HTML5 for the purpose of sending and receiving data to and from the WebSocket server side code.

The WebSocket client side code follows the same coding pattern regardless of your web server software. As far as ASP.NET is concerned, IIS 8 and certain .NET framework classes together allow you to develop WebSocket server side functionality. To understand how the client side and server side code goes hand in hand let's develop a simple application that performs a two-way communication. The web form that acts as a WebSocket client is shown below:


Using the above web form you can send a text message from the client to the server. The server then sends the same message back to the client (this is purely for the sake of simplicity and testing purposes. You can send any other data from the server. Clicking on the Stop button stops the server and no further communication can take place between the client and the server.

Coding the Client Side

Open the default web form and add the following jQuery code to a <script> block:

var socket;
$(document).ready(function () {
    socket = new WebSocket("ws://localhost:1046/WebSocketGenericHandler.ashx");
    socket.addEventListener("open", function (evt) {
      $("#divHistory").append('<h3>Connection Opened with the Echo server.</h3> ');},
    false);  
    socket.addEventListener("message", function (evt) {
      $("#divHistory").append('<h3^gt;' + evt.data + '</h3> ');   },
    false);  
    socket.addEventListener("error", function (evt) {
      $("#divHistory").append('<h3>Unexpected Error.</h3> ');},
    false);
    ...
});


The code shown above declares a global variable named socket to hold a reference to a WebSocket object. A WebSocket instance is then created by passing the URL of the WebSocketHandler.ashx. The WebSocketHandler.ashx contains the WebSocket server side code that "listens" to the client requests. You will develop WebSocketHandler.ashx later in this article. Notice how the URL uses ws:// protocol instead of http://. Next, event handlers for the three events, viz. open, message, and error, are wired using the addEventListener() method. The open event is raised when the readyState property (discussed next) changes to 1 (OPEN) and indicates that the connection is ready to send and receive data. The message event is raised when a message is received from the WebSocket server. The error event is raised when an error occurs during the communication with the Web Socket server.

Inside the message event handler the data sent by the server is retrieved using the evt.data property. The returned data is then appended to a <div> element. The other event handlers simply output the specified messages in the <div> element. The data from the client is sent to the server when the Send button is clicked. The click event handler of the Send button looks like this:

$("#btnSend").click(function () {
    if (socket.readyState == WebSocket.OPEN) {
        socket.send($("#txtMsg").val());
    }
    else {
        $("#divHistory").append('<h3>The underlying connection is closed.</h3> ');
  }
});


The click event handler of the Send button checks the readyState property of the WebSocket object. If the readyState is OPEN, it calls the send() method on the WebSocket instance. This read only property returns the current state of the connection. Possible values are 0 - CONNECTING, 1 - OPEN, 2 - CLOSING, 3 - CLOSED. The send() method sends data to the WebSocket server side code over an established connection. The text entered in the textbox is passed as a parameter to the send() method.

You can close the underlying connection by calling the close() method of the WebSocket object as follows:

$("#btnStop").click(function () {
  socket.close();
});

Coding the Server Side

The WebSocketHandler.ashx contains the server side code that listens and responds to the client requests. This code is shown below:

public class WebSocketHandler : IHttpHandler
{
    public void ProcessRequest(HttpContext context)
    {
        if (context.IsWebSocketRequest)
        {
            context.AcceptWebSocketRequest(DoTalking);
        }
    }
    ...
}


The above code shows an ASP.NET generic handler - WebSocketHandler - that triggers the WebSocket server. The ProcessRequest() method of the generic handler first checks whether the incoming request is a WebSocket request. This is done by checking the IsWebSocketRequest property of the HttpContext object. This property works hand-in-hand with the IIS 8.0 WebSocket module and returns true if an incoming request is a WebSocket request. A Web Socket request is different than an ordinary HTTP request in that instead of using http:// protocol it uses ws:// (Web Socket) protocol.

If the IsWebSocketRequest returns true, the AcceptWebSocketRequest() method of the HttpContext is called. This method takes one parameter - user function - that supplies a function that listens and responds to the client requests. In this case the user function contains the logic to listen to the incoming data and send it back to the client. The user function supplied to the AcceptWebSocketRequest() method should be an asynchronous function as shown below:

public async Task DoTalking(AspNetWebSocketContext context)
{
    WebSocket socket = context.WebSocket;
    while (true)
    {
        ArraySegment buffer = new ArraySegment(new byte[1024]);
        WebSocketReceiveResult result = await socket.ReceiveAsync(buffer, CancellationToken.None);
        if (socket.State == WebSocketState.Open)
        {
            string userMessage = Encoding.UTF8.GetString(buffer.Array, 0, result.Count);
            userMessage = "You sent: " + userMessage + " at " +  DateTime.Now.ToLongTimeString();
            buffer = new ArraySegment(Encoding.UTF8.GetBytes(userMessage));
            await socket.SendAsync(buffer, WebSocketMessageType.Text, true, CancellationToken.None);
        }
        else
        {
            break;
        }
    }
}


The DoTalking() method is marked as "async" indicating that the code inside it is going to run in asynchronous fashion. The DoTalking() method returns a Task object. The Task class acts as a wrapper to the asynchronous code. The DoTalking() method receives a parameter of type AspNetWebSocketContext. The AspNetWebSocketContext class gives you access to the WebSocket through its WebSocket property. The WebSocket class is the server side counterpart of the HTML5 WebSocket object. An endless while loop is then started so that the server can continuously listen to the incoming requests. To receive the incoming data, the ReceiveAsync() method of the WebSocket class is used. The ReceiveAsync() method is invoked along with the await operator. In this case the awaited task is to receive incoming data and store it in an ArraySegment, a byte array. The results of the receive operation are stored in WebSocketReceiveResult object. If the WebSocket is open as indicated by the State property, the received data is sent back to the client using the SendAsync() method. If the State property has any value other than Open, the while loop is exited thus terminating the server.

Summary

HTML5 WebSockets allow you to perform two-way (duplex) communication. To use HTML5 WebSockets in an ASP.NET application you need to enable the WebSocket protocol in IIS 8.0. You can then use IsWebSocketRequest property and AcceptWebSocketRequest() method to start the client-server communication. Using WebSockets, you can develop web applications such as Chat systems that require the ability to send and receive data simultaneously between the client and the server.


About HostForLIFE.eu

HostForLIFE.eu is European Windows Hosting Provider which focuses on Windows Platform only. We deliver on-demand hosting solutions including Shared hosting, Reseller Hosting, Cloud Hosting, Dedicated Servers, and IT as a Service for companies of all sizes.

We have offered the latest Windows 2016 Hosting, ASP.NET Core 2.2.1 Hosting, ASP.NET MVC 6 Hosting and SQL 2017 Hosting.


Tag cloud

Sign in