European ASP.NET 4.5 Hosting BLOG

BLOG about ASP.NET 4, ASP.NET 4.5 Hosting and Its Technology - Dedicated to European Windows Hosting Customer

ASP.NET Core 8 Hosting - HostForLIFE.eu :: Best Practices for ASP.NET Core REST API Development Using OpenAPI

clock August 23, 2023 07:39 by author Peter

ASP.NET Core is a robust and adaptable framework for developing web apps and APIs. When developing a RESTful API, it is critical to define a clear and standardized interface for seamless integration with client applications. OpenAPI, formerly Swagger, is a complete solution for creating, documenting, and implementing APIs in ASP.NET Core. In this post, we will look at the best practices for developing an ASP.NET Core REST API with OpenAPI in order to ensure consistency, scalability, and maintainability.


Specify API Requirements
Before we begin development, we must first precisely outline the API's needs. Examine the specific functionalities that must be exposed, the data that must be handled, and the expected replies.

A well-defined API specification will provide a solid foundation for creating our OpenAPI API.

An example of how to define API requirements for a hypothetical "Task Management API" with OpenAPI. Assuming we're creating an API for task management, let's go over some fundamental criteria.

Define the Functions

Specify the features that our API must provide. Consider these essential functionalities in this example, which are listed below.
    Make a task list.
    Obtain information about a certain assignment.
    Make a new task.
    An current task should be updated.
    Remove a task.

Create Data Structures
Define the data structures (models) that will be handled by our API. The models we'll utilize in this example are listed below.
components:
  schemas:
    Task:
      type: object
      properties:
        id:
          type: integer
          format: int64
        title:
          type: string
        description:
          type: string
        dueDate:
          type: string
          format: date


Endpoints must be defined.
Create endpoints for each capability, each with its own set of HTTP methods, request bodies (if any), and response models.
paths:
  /tasks:
    get:
      summary: Get a list of tasks.
      responses:
        '200':
          description: Successful response.
          content:
            application/json:
              schema:
                type: array
                items:
                  $ref: '#/components/schemas/Task'
    post:
      summary: Create a new task.
      requestBody:
        required: true
        content:
          application/json:
            schema:
              $ref: '#/components/schemas/Task'
      responses:
        '201':
          description: Task created successfully.
          content:
            application/json:
              schema:
                $ref: '#/components/schemas/Task'

  /tasks/{taskId}:
    get:
      summary: Get details of a specific task.
      parameters:
        - name: taskId
          in: path
          required: true
          schema:
            type: integer
            format: int64
      responses:
        '200':
          description: Successful response.
          content:
            application/json:
              schema:
                $ref: '#/components/schemas/Task'
    put:
      summary: Update an existing task.
      parameters:
        - name: taskId
          in: path
          required: true
          schema:
            type: integer
            format: int64
      requestBody:
        required: true
        content:
          application/json:
            schema:
              $ref: '#/components/schemas/Task'
      responses:
        '200':
          description: Task updated successfully.
          content:
            application/json:
              schema:
                $ref: '#/components/schemas/Task'
    delete:
      summary: Delete a task.
      parameters:
        - name: taskId
          in: path
          required: true
          schema:
            type: integer
            format: int64
      responses:
        '204':
          description: Task deleted successfully.

We provide a clear and disciplined foundation for our API development process by specifying API requirements with OpenAPI. The offered example demonstrates how to create functions, data structures, and endpoints for a "Task Management API." Our actual API design would expand on these ideas, taking into account authentication, error handling, query parameters, and other factors.

Remember that OpenAPI allows us to accurately specify our API needs, making it easier to communicate them to our development team and guarantee that everyone is on the same page before we begin working.

Install OpenAPI Tools
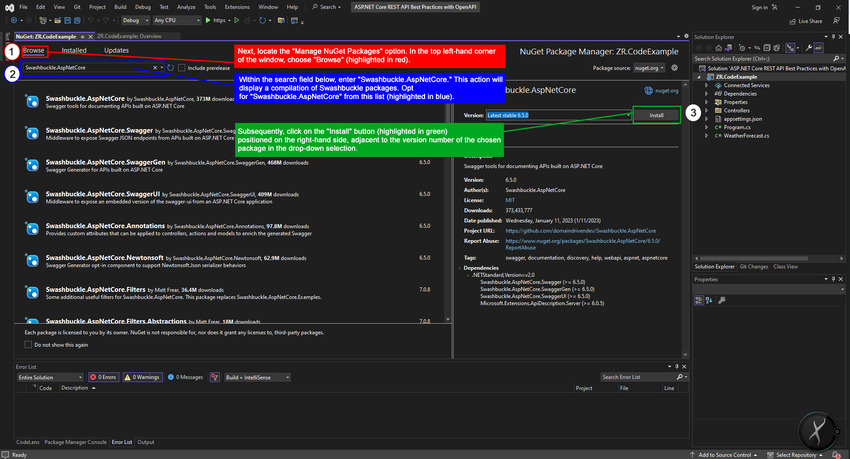
To begin using OpenAPI in ASP.NET Core, we must first install the necessary NuGet packages. Swashbuckle is a pirate.For integrating OpenAPI into our project, we commonly use the ASP.NETCore package. We can use the NuGet Package Manager or the Package Manager Console to install it. The graphic below shows how to install it using the NuGet Package Manager.

NuGet Package Access in ASP.NET Core API Project via Solution Explorer.

The instructions below will show us how to install the Swashbuckle.Manage NuGet Package Manager to install AspNetCore.


Step 2. Initiate by finding the essential "Manage NuGet Packages" option, located at the window's top left corner. Click on "Browse" (highlighted in red) below, and type "Swashbuckle.AspNetCore" in the search field. The search will display various Swashbuckle packages. Choose "Swashbuckle.AspNetCore" (highlighted in blue) and then click the "Install" button (highlighted in green) on the right, next to the chosen package's version. This completes the process.

Enable OpenAPI in Program

As we proceed through this part, our attention will be drawn to enhancing the capabilities of OpenAPI within our application. With this goal in mind, we will begin the process of enabling smooth interaction with OpenAPI. This critical phase is configuring the components required for our application to successfully exploit the power of OpenAPI. We will open up a world of increased documentation and interaction opportunities for our application's API in the future steps.

Configure the OpenAPI services and middleware in the Program.cs file. In the ConfigureServices and Configure methods, add the following code.

Step 1: Set up the Services Method

// Configure Services method
builder.Services.AddSwaggerGen(c =>
{
    c.SwaggerDoc("v1", new OpenApiInfo { Title = "Best Practices for Creating ASP.NET Core REST API using OpenAPI by Peter", Version = "v1" });
});

Step 2. Configure Method
// Configure method
app.UseSwagger();
app.UseSwaggerUI(c =>
{
c.SwaggerEndpoint("/swagger/v1/swagger.json", "Peter Demo API V1");
});


Design API with RESTful Principles
As we embark on the journey of designing our API, it's imperative to embrace the core tenets of RESTful principles. These principles serve as the foundation for creating an API that not only aligns with industry best practices but also facilitates seamless interaction and comprehension.

In this meticulous process, each API endpoint is meticulously crafted, bearing in mind the essence of nouns for resource identification and HTTP verbs for defining actions. This approach lends a level of clarity and consistency that greatly enhances the user experience.

GET /api/users

Action: Retrieve a list of users

Description: This endpoint serves to fetch a comprehensive list of users within the system. It adheres to the RESTful principle of using the HTTP GET verb to retrieve data.

GET /api/users/{id}

Action: Retrieve a specific user by ID

Description: By including the user's unique identifier (ID) in the endpoint, we enable the retrieval of precise user details. The RESTful nature of the design leverages the HTTP GET verb for this purpose.

POST /api/users

Action: Create a new user

Description: This endpoint facilitates the addition of a new user to the system. Employing the HTTP POST verb aligns with RESTful principles, as it signifies the act of creating a resource.

PUT /api/users/{id}

Action: Update an existing user by ID

Description: Through this endpoint, we empower the modification of user information. The specific user is identified by their unique ID. The RESTful approach is upheld by employing the HTTP PUT verb for resource updating.

DELETE /api/users/{id}

Action: Delete a user by ID

Description: By utilizing this endpoint, users can be removed from the system. The targeted user is pinpointed by their ID. In accordance with RESTful principles, the HTTP DELETE verb is employed for resource deletion.

A meticulous approach to API design ensures that our endpoints not only facilitate meaningful actions but also adhere to the robust RESTful framework, enriching our API's usability and comprehensibility.

Use Data Transfer Objects (DTOs)

In our quest to establish seamless communication between clients and the API, we embrace the prowess of Data Transfer Objects (DTOs). These robust constructs serve as data containers, ensuring a structured and controlled exchange of information. Unlike exposing our intricate domain models directly, DTOs assume the role of intermediaries, proficiently governing access to data.

By wielding this strategic approach, we fortify security and mitigate the potential vulnerability of overexposing sensitive data. DTOs epitomize a sophisticated layer that safeguards the integrity of our data and promotes encapsulation.

In this code example, we draw inspiration from the "Task Management API"  we've encountered.

// Original domain model
public class TaskModel
{
    public int Id { get; set; }
    public string Title { get; set; }
    public string Description { get; set; }
    public DateTime DueDate { get; set; }
}

// Data Transfer Object (DTO)
public class TaskDto
{
    public int Id { get; set; }
    public string Title { get; set; }
    public DateTime DueDate { get; set; }
}

We have created a DTO called TaskDto that encapsulates the communication properties. Note that the Description property is omitted because DTOs provide an efficient method of sharing data. With DTOs, we can optimize the communication process and safeguard sensitive aspects of our domain model by orchestrating a controlled and purpose-driven flow of data.

In the end, Data Transfer Objects represent a strategic move toward robust communication that maintains a delicate balance between access and security.

Validate Request Data

Within the realm of building a resilient API, the cardinal principle of data integrity stands tall. This entails rigorous validation of incoming request data, an indispensable safeguard against potential security vulnerabilities and data discrepancies. The journey toward a secure and reliable API begins with meticulous validation practices underpinned by the synergy of data annotations and custom validation logic.

In the ASP.NET Core landscape, a robust validation paradigm serves as a bulwark against data inconsistencies and unauthorized access. The integration of data validation holds particular significance when harmonized with the power of OpenAPI, effectively ensuring that only legitimate and correctly structured data enters our API.

Step 1. Employing Data Annotations
Data annotations, inherent within ASP.NET Core, emerge as a formidable tool to imbue request data with an aura of reliability. Through the strategic placement of attributes, we assert validation rules that guide the permissible format and constraints of incoming data.

In this code example, we will understand how data annotations can be applied to a DTO in conjunction with our TaskModel example.

using System.ComponentModel.DataAnnotations;

public class TaskDto
{
    public int Id { get; set; }

    [Required(ErrorMessage = "Title is required.")]
    public string Title { get; set; }

    [DataType(DataType.Date)]
    public DateTime DueDate { get; set; }
}

Step 2. Crafting Custom Validation Logic
For scenarios that transcend the realm of data annotations, custom validation logic takes the lead. By extending the ValidationAttribute class, we can create tailor-made validation rules that resonate with our API's unique requirements.

In this code example below, let's consider a custom validation attribute that ensures the due date is in the future.
using System;
using System.ComponentModel.DataAnnotations;

public class FutureDateAttribute : ValidationAttribute
{
    public override bool IsValid(object value)
    {
        if (value is DateTime date)
        {
            return date > DateTime.Now;
        }
        return false;
    }
}


Step 3. Integrating with OpenAPI
The fusion of data validation with OpenAPI crystallizes in the validation constraints, becoming an integral part of our API's documentation. When a client consumes our API through the OpenAPI documentation, they are guided by these constraints, thus minimizing the chances of invalid or erroneous requests.

By coupling data validation with OpenAPI, we're forging a path of data integrity and security that resonates through every interaction with our API. The result is a fortified ecosystem where reliable and validated data forms the bedrock of seamless communication.

In this code example below, the TaskDto class is annotated with data validation attributes, ensuring that the data adheres to defined rules. The CreateTask action method employs ModelState.IsValid to verify the validity of incoming data. If validation fails, a BadRequest response is returned, including the validation errors.
using Microsoft.AspNetCore.Mvc;
using Microsoft.OpenApi.Models;

namespace TaskManagementAPI.Controllers
{
    [ApiController]
    [Route("api/[controller]")]
    public class TasksController : ControllerBase
    {
        // ...

        [HttpPost]
        public ActionResult<TaskDto> CreateTask(TaskDto taskDto)
        {
            if (!ModelState.IsValid)
            {
                return BadRequest(ModelState);
            }

            // Process valid data and create the task
            // ...

            return Ok("Task created successfully");
        }
    }
    public class TaskDto
    {
        public int Id { get; set; }

        [Required(ErrorMessage = "Title is required.")]
        public string Title { get; set; }

        [DataType(DataType.Date)]
        public DateTime DueDate { get; set; }
    }
}

Remember the keep important when this API is documented using OpenAPI, the validation constraints specified in the TaskDto class become part of the documentation. Clients accessing our API via the OpenAPI documentation are equipped with the knowledge of exactly what data is expected and the validation criteria it must satisfy. This synergy between data validation and OpenAPI augments the reliability of data interactions and ensures a secure communication channel for our API.

Step 4. Leveraging Built-in Validation Features

ASP.NET Core graciously equips developers with a suite of built-in validation features. These intrinsic capabilities work in synergy with OpenAPI, yielding a seamless integration that bolsters the API's robustness.

Within our controller actions, we can invoke the ModelState.IsValid property to effortlessly validate incoming request data. This dynamic property gauges the validity of the request data based on the applied data annotations and custom validation logic.

In this code example, we illustrative excerpt from our controller methods.
[HttpPost]
public ActionResult<TaskDto> CreateTask(TaskDto taskDto)
{
    if (!ModelState.IsValid)
    {
        return BadRequest(ModelState);
    }

    // Process valid data and create the task
    // ...
}


By embracing this methodology, our API empowers itself to efficiently scrutinize incoming data, weed out discrepancies, and respond to invalid data with grace.

Step 5. Enhancing Data Integrity Through Documentation

When data validation is harmonized with OpenAPI, its impact extends beyond mere code execution. It becomes a cornerstone of our API's documentation. Every validation rule, be it a data annotation or custom logic, is vividly presented within the OpenAPI documentation. This empowers developers, whether they are consuming or contributing to our API, to understand the parameters of valid data exchange.

With meticulous validation, our API's documentation serves as a comprehensive guide for clients to interact securely and effectively. Each interaction is facilitated by a robust validation process that inherently safeguards data integrity.

In essence, the process of data validation, when intertwined with OpenAPI, creates a symbiotic relationship where data integrity, security, and comprehensibility thrive in harmony. This holistic approach ensures that our API not only functions as intended but does so with a profound commitment to security and reliability.

In this code example below, our TaskDto class is annotated with data validation attributes, just as before. Additionally, a custom OpenApiDefinitions class is created to provide information for the OpenAPI documentation. This class is used to define details such as the API's title, version, description, and contact information.
using Microsoft.AspNetCore.Mvc;
using Microsoft.OpenApi.Models;
using System;
using System.ComponentModel.DataAnnotations;
namespace TaskManagementAPI.Controllers
{
    [ApiController]
    [Route("api/[controller]")]
    public class TasksController : ControllerBase
    {
        // ...
        [HttpPost]
        public ActionResult<TaskDto> CreateTask(TaskDto taskDto)
        {
            if (!ModelState.IsValid)
            {
                return BadRequest(ModelState);
            }

            // Process valid data and create the task
            // ...
            return Ok("Task created successfully");
        }
    }
    public class TaskDto
    {
        public int Id { get; set; }

        [Required(ErrorMessage = "Title is required.")]
        public string Title { get; set; }

        [DataType(DataType.Date)]
        public DateTime DueDate { get; set; }
    }

    // OpenAPI documentation
    public class OpenApiDefinitions
    {
        public OpenApiInfo Info {


By integrating data validation with OpenAPI, we ensure that the validation rules are an integral part of our API's documentation. When clients access our API through the OpenAPI documentation, they have a clear understanding of the validation criteria for each data attribute. This alignment between validation and documentation fosters secure and effective interactions, reinforcing data integrity throughout the API ecosystem.

Step 6. Handling Validation Errors Gracefully

Validation is a two-way street. While it ensures data integrity, it also necessitates efficient error handling when data doesn't meet the defined criteria. This engagement between validation and error handling is crucial to create a user-friendly experience for clients.

Within our controller actions, we can further customize our responses to address validation errors. This provides clients with clear insights into what went wrong and how they can rectify it.
[HttpPost]
public ActionResult<TaskDto> CreateTask(TaskDto taskDto)
{
    if (!ModelState.IsValid)
    {
        var validationErrors = ModelState.Where(e => e.Value.Errors.Any())
                                          .ToDictionary(k => k.Key, v => v.Value.Errors.Select(e => e.ErrorMessage));
        return BadRequest(validationErrors);
    }

    // Process valid data and create the task
    // ...
}

By enriching the response with detailed error messages, we empower clients to rectify the issues efficiently, leading to smoother interactions and a positive user experience.

Step 7.The Power of Continuous Improvement

The beauty of embracing data validation within the OpenAPI context is its adaptability. As our API evolves, so can our validation rules. With OpenAPI serving as the documentation layer, changes in validation are seamlessly reflected, providing clients with up-to-date expectations for data exchange.

By nurturing a culture of continuous improvement, we ensure that our API's validation mechanisms align with the ever-changing landscape of data security and integrity.

In this code example below, we've introduced a custom validation attribute FutureDateAttribute that validates if a date is in the future. This showcases how the validation logic can evolve and adapt to changing requirements.
using Microsoft.AspNetCore.Mvc;
using Microsoft.OpenApi.Models;
using System;
using System.ComponentModel.DataAnnotations;
namespace TaskManagementAPI.Controllers
{
    [ApiController]
    [Route("api/[controller]")]
    public class TasksController : ControllerBase
    {
        // ...
        [HttpPost]
        public ActionResult<TaskDto> CreateTask(TaskDto taskDto)
        {
            if (!ModelState.IsValid)
            {
                return BadRequest(ModelState);
            }
            // Process valid data and create the task
            // ...
            return Ok("Task created successfully");
        }
    }

    public class TaskDto
    {
        public int Id { get; set; }
        [Required(ErrorMessage = "Title is required.")]
        public string Title { get; set; }
        [DataType(DataType.Date)]
        [FutureDate(ErrorMessage = "Due date must be in the future.")]
        public DateTime DueDate { get; set; }
    }
    // Custom validation attribute for future date
    public class FutureDateAttribute : ValidationAttribute
    {
        public override bool IsValid(object value)
        {
            if (value is DateTime date)
            {
                return date > DateTime.Now;
            }
            return false;
        }
    }
    // OpenAPI documentation
    public class OpenApiDefinitions
    {
        public OpenApiInfo Info { get; } = new OpenApiInfo
        {
            Title = "Task Management API",
            Version = "v1",
            Description = "An API for managing tasks with data validation integrated.",
            Contact = new OpenApiContact
            {
                Name = "Our Name",
                Email = "[email protected]"
            }
        };
    }
}

By nurturing a culture of continuous improvement, our API's validation mechanisms remain in alignment with the dynamic landscape of data security and integrity. As we update our validation rules, OpenAPI's role as a documentation layer ensures that clients are always informed of the latest expectations for data exchange. This dynamic harmony between validation and documentation enhances the reliability of our API over time.

It is the journey of data validation within the realm of OpenAPI a holistic endeavor that encapsulates meticulous design, execution, documentation, and adaptability. By weaving together these facets, we create an API ecosystem that's fortified by validation, poised for secure data exchanges, and dedicated to offering a refined experience to both clients and developers.

Document API with Descriptive Comments

In the meticulous endeavor of crafting an API that stands as a beacon of clarity and functionality, the act of documentation assumes a pivotal role. At the heart of this process lies the use of descriptive comments—a mechanism through which we articulate the essence of our API endpoints, parameters, and responses. These comments don't merely serve as annotations; they are the pillars upon which the comprehensibility and usability of our API stand. The symbiosis between these descriptive comments and the power of OpenAPI furnishes an automated mechanism for generating API documentation. With each carefully crafted comment, we set the stage for developers to seamlessly comprehend the intricacies of interacting with our API.

Step 1. Endpoints and Parameters
Every API journey commences with endpoints—gateways to functionality. Enriching these gateways with descriptive comments acts as a guide for developers navigating through the labyrinth of capabilities. Take, for instance, the scenario of retrieving a user's details.

In this code example below, the <summary> tag provides a concise summary of the endpoint's purpose. The <param> tag expounds on the parameters' roles, and the <returns> tag elucidates the anticipated response.
/// <summary>
/// Retrieve a specific user's details by ID.
/// </summary>
/// <param name="id">The ID of the user to retrieve.</param>
/// <returns>The details of the requested user.</returns>
[HttpGet("{id}")]
public ActionResult<UserDto> GetUser(int id)
{
    // Implement your logic here
}


Step 2. Responses
Responses are the soul of API interactions—they hold the outcomes developers eagerly anticipate. Elaborating on these outcomes through descriptive comments crystallizes the understanding. Consider the act of creating a new user. Once more, the descriptive comments underpin the API interaction with insights into its purpose, the nature of the request payload, and the response to be expected as the code example below shows us this.

Step 3. Harnessing OpenAPI's Magic

As these descriptive comments enrobe our API, they forge a pathway for OpenAPI to work its magic. As developers interact with our API documentation, OpenAPI diligently translates these comments into a coherent and structured resource. The documentation reflects the essence of every endpoint, parameter, and response, extending a helping hand to developers striving to navigate the intricacies of our API.

In this code example, we have the comments above; the CreateTask method provides a clear description of the endpoint's purpose, its parameters, and its expected response. When we integrate OpenAPI into our ASP.NET Core application, it utilizes these comments to automatically generate structured API documentation. This documentation helps developers understand the API's intricacies, ensuring that they can interact with it effectively and confidently.
using Microsoft.AspNetCore.Mvc;
using Microsoft.OpenApi.Models;
using System;
using System.ComponentModel.DataAnnotations;

namespace TaskManagementAPI.Controllers
{
    [ApiController]
    [Route("api/[controller]")]
    public class TasksController : ControllerBase
    {
        // ...

        /// <summary>
        /// Create a new task.
        /// </summary>
        /// <param name="taskDto">The task's information for creation.</param>
        /// <returns>A confirmation of the task's successful creation.</returns>
        [HttpPost]
        public ActionResult<string> CreateTask(TaskDto taskDto)
        {
            if (!ModelState.IsValid)
            {
                return BadRequest(ModelState);
            }
            // Implement your logic here
            // ...
            return Ok("Task created successfully");
        }
        // Other endpoints and actions
        /// <summary>
        /// Data Transfer Object (DTO) for task information.
        /// </summary>
        public class TaskDto
        {
            public int Id { get; set; }
            [Required(ErrorMessage = "Title is required.")]
            public string Title { get; set; }
            [DataType(DataType.Date)]
            [FutureDate(ErrorMessage = "Due date must be in the future.")]
            public DateTime DueDate { get; set; }
        }
        /// <summary>
        /// Custom validation attribute for future date.
        /// </summary>
        public class FutureDateAttribute : ValidationAttribute
        {
            public override bool IsValid(object value)
            {
                if (value is DateTime date)
                {
                    return date > DateTime.Now;
                }
                return false;
            }
        }
        // OpenAPI documentation
        public class OpenApiDefinitions
        {
            public OpenApiInfo Info { get; } = new OpenApiInfo
            {
                Title = "Peter Task Management API",
                Version = "v1",
                Description = "An API for managing tasks with comprehensive documentation.",
                Contact = new OpenApiContact
                {
                    Name = "Peter",
                    Email = "[email protected]"
                }
            };
        }
    }
}


Step 4. Empowering Developers, Amplifying Usability
With each comment etched in precision, the resulting documentation becomes an invaluable resource. Developers, whether novices or veterans, are equipped with the knowledge necessary to seamlessly engage with our API. Descriptive comments transcend mere code; they encapsulate our API's essence and communicate it to those seeking to harness its power.

In this code example below, we have carefully crafted comments that transcend the boundaries of mere code annotations. They encapsulate the essence of our API's functionality, clarifying its purpose and the expected interactions. Developers, regardless of their experience level, are armed with invaluable insights as they traverse our API documentation. This empowers them to harness our API's capabilities effectively and fully unlock its potential.
using Microsoft.AspNetCore.Mvc;
using Microsoft.OpenApi.Models;
using System;
using System.ComponentModel.DataAnnotations;
namespace TaskManagementAPI.Controllers
{
    [ApiController]
    [Route("api/[controller]")]
    public class TasksController : ControllerBase
    {
        // ...
        /// <summary>
        /// Create a new task.
        /// </summary>
        /// <param name="taskDto">The task's information for creation.</param>
        /// <returns>A confirmation of the task's successful creation.</returns>
        [HttpPost]
        public ActionResult<string> CreateTask(TaskDto taskDto)
        {
            if (!ModelState.IsValid)
            {
                return BadRequest(ModelState);
            }
            // Implement your logic here
            // ...
            return Ok("Task created successfully");
        }
        // Other endpoints and actions
        /// <summary>
        /// Data Transfer Object (DTO) for task information.
        /// </summary>
        public class TaskDto
        {
            public int Id { get; set; }
            [Required(ErrorMessage = "Title is required.")]
            public string Title { get; set; }
            [DataType(DataType.Date)]
            [FutureDate(ErrorMessage = "Due date must be in the future.")]
            public DateTime DueDate { get; set; }
        }
        /// <summary>
        /// Custom validation attribute for future date.
        /// </summary>
        public class FutureDateAttribute : ValidationAttribute
        {
            public override bool IsValid(object value)
            {
                if (value is DateTime date)
                {
                    return date > DateTime.Now;
                }
                return false;
            }
        }
        // OpenAPI documentation
        public class OpenApiDefinitions
        {
            public OpenApiInfo Info { get; } = new OpenApiInfo
            {
                Title = "
Peter Task Management API",
                Version = "v1",
                Description = "An API for managing tasks with comprehensive documentation.",
                Contact = new OpenApiContact
                {
                    Name = "
Peter
",
                    Email = "[email protected]"
                }
            };
        }
    }
}

The integration of descriptive comments with OpenAPI nurtures a realm where developers can immerse themselves in the API's essence, thereby fostering a harmonious union between comprehension and usability. As a result, the API becomes a conduit for innovation, enabling developers to channel their creativity with the confidence that they're interacting with a well-documented and empowering resource.

In the intricate dance between descriptive comments and OpenAPI, we orchestrate an experience of unimpeded comprehension. This experience, in turn, fuels the vitality of our API and beckons developers to embark on journeys of innovation, all while enjoying the robust support of a comprehensible and fully-documented API ecosystem.

Versioning Our API

As we embark on the journey of architecting a robust and adaptable API, the importance of versioning takes center stage. The art of versioning bestows upon us the ability to uphold backward compatibility while leaving the gateway open for future enhancements. This process ensures that the intricate tapestry of our API continues to serve both current and future demands. One of the potent methods to wield versioning lies in the inclusion of version numbers—a beacon guiding both developers and clients through the labyrinth of iterations.

Step 1. Embracing the Versioning Paradigm
The foundation of versioning is rooted in a simple yet profound principle: to clearly demarcate each iteration of our API. By assigning a version number to our API, we transform it into a cohesive entity that evolves while preserving its historical roots.

In this code example below, we have the versioning paradigm embraced by including version number v1 in the route of the TasksController class. This version number clearly demarcates the iteration of the API, turning it into a distinct and cohesive entity. As our API evolves, we can introduce new versions, such as v2, while preserving the historical roots of previous versions. This way, our API remains adaptable and backward-compatible, catering to both existing and potential consumers.

using Microsoft.AspNetCore.Mvc;
using Microsoft.OpenApi.Models;
using System;
namespace TaskManagementAPI.Controllers
{
    [ApiController]
    [Route("api/v1/[controller]")]
    public class TasksController : ControllerBase
    {
        // ...
        [HttpGet]
        public ActionResult<IEnumerable<TaskDto>> GetTasks()
        {
            // Implement your logic here
        }
        // Other endpoints and actions
        public class TaskDto
        {
            public int Id { get; set; }
            public string Title { get; set; }
            public DateTime DueDate { get; set; }
        }
        // OpenAPI documentation
        public class OpenApiDefinitions
        {
            public OpenApiInfo Info { get; } = new OpenApiInfo
            {
                Title = "
Peter Task Management API",
                Version = "v1",
                Description = "An API for managing tasks with version 1.",
                Contact = new OpenApiContact
                {
                    Name = "
Peter
",
                    Email = "[email protected]"
                }
            };
        }
    }
}


Step 2. Selecting the Path of URL-Based Versioning
The landscape of versioning beckons us with diverse routes, each tailored to specific use cases. Among these, the URL-based approach emerges as an epitome of simplicity and adherence to RESTful practices. In the code example below, let's suppose we have an API for tasks, and we're venturing into versioning. Here's how the URL-based approach looks in practice.

[ApiController]
[Route("api/[controller]")]
public class TasksController : ControllerBase
{
    // ...
}


[ApiController]
[Route("api/v1/[controller]")]
public class TasksController : ControllerBase
{
    // ...
}


In this code example above, we have the addition of /v1/ in the route explicitly indicating the API's version. This way, the existing clients continue to interact with the previous version, while newer clients can access the enhanced version seamlessly.

Step 3. Bestowing Client-Friendly Simplicity

The beauty of the URL-based approach lies in its innate simplicity. Clients intuitively navigate through the API, with version numbers acting as signposts. The result is a streamlined experience that minimizes friction and maximizes engagement.

In this code example, we have the versioning approach demonstrated by including the version number v1 in the route of the TasksController class. This version number serves as a signpost for clients as they navigate through the API. By intuitively including the version in the URL, clients experience a seamless and straightforward interaction. The result is a streamlined experience that reduces friction and encourages engagement. This simplicity in navigation enhances the usability of the API and ensures that clients can easily discover and leverage the features provided by each version.
using Microsoft.AspNetCore.Mvc;
using Microsoft.OpenApi.Models;
using System;
namespace TaskManagementAPI.Controllers
{
    [ApiController]
    [Route("api/v1/[controller]")]
    public class TasksController : ControllerBase
    {
        // ...
        [HttpGet]
        public ActionResult<IEnumerable<TaskDto>> GetTasks()
        {
            // Implement your logic here
        }
        // Other endpoints and actions
        public class TaskDto
        {
            public int Id { get; set; }
            public string Title { get; set; }
            public DateTime DueDate { get; set; }
        }
        // OpenAPI documentation
        public class OpenApiDefinitions
        {
            public OpenApiInfo Info { get; } = new OpenApiInfo
            {
                Title = "
Peter Task Management API",
                Version = "v1",
                Description = "An API for managing tasks with version 1.",
                Contact = new OpenApiContact
                {
                    Name = "
Peter
",
                    Email = "[email protected]"
                }
            };
        }
    }
}


Step 4. Adaptability for the Future
Versioning isn't a mere strategy; it's a roadmap for evolution. As our API matures, new features and refinements will emerge. With the URL-based versioning approach, accommodating these changes becomes a natural progression. New iterations can be gracefully introduced, maintaining a harmonious balance between innovation and compatibility.

In this code example below, we have the API initially designed with version 1 using the URL-based versioning approach (api/v1/[controller]). As the API evolves, a new version (v2) is introduced by creating a new controller class (TasksControllerV2) with an updated route (api/v2/[controller]). This approach allows for the graceful introduction of new features and refinements while maintaining compatibility with existing clients. Each version has its own set of endpoints, actions, and DTOs, ensuring a harmonious balance between innovation and compatibility.
using Microsoft.AspNetCore.Mvc;
using Microsoft.OpenApi.Models;
using System;
namespace TaskManagementAPI.Controllers
{
    // Original version (v1)
    [ApiController]
    [Route("api/v1/[controller]")]
    public class TasksController : ControllerBase
    {
        // ...
        [HttpGet]
        public ActionResult<IEnumerable<TaskDto>> GetTasks()
        {
            // We Implementation our logic here
        }
        // Other endpoints and actions
        public class TaskDto
        {
            public int Id { get; set; }
            public string Title { get; set; }
            public DateTime DueDate { get; set; }
        }
        // OpenAPI documentation
        public class OpenApiDefinitions
        {
            public OpenApiInfo Info { get; } = new OpenApiInfo
            {
                Title = "
Peter Task Management API",
                Version = "v1",
                Description = "An API for managing tasks with version 1.",
                Contact = new OpenApiContact
                {
                    Name = "
Peter",
                    Email = "[email protected]"
                }
            };
        }
    }
    // New version (v2) introduced
    [ApiController]
    [Route("api/v2/[controller]")]
    public class TasksControllerV2 : ControllerBase
    {
        // ...

        [HttpGet]
        public ActionResult<IEnumerable<TaskDtoV2>> GetTasks()
        {
            // Implementation our logic here for version 2
        }

        // Other endpoints and actions specific to v2
        public class TaskDtoV2
        {
            public int Id { get; set; }
            public string Title { get; set; }
            public DateTime DueDate { get; set; }
            public string Priority { get; set; } // Additional property in v2
        }
        // OpenAPI documentation for version 2
        public class OpenApiDefinitionsV2
        {
            public OpenApiInfo Info { get; } = new OpenApiInfo
            {
                Title = "
Peter Task Management API",
                Version = "v2",
                Description = "An API for managing tasks with version 2.",
                Contact = new OpenApiContact
                {
                    Name = "
Peter
",
                    Email = "[email protected]"
                }
            };
        }
    }
}


Step 5. Harnessing Header-Based Versioning
While the URL-based approach garners favor for its simplicity, another avenue is header-based versioning. This method involves specifying the version number in the request header. While it offers flexibility, it may require more client-side effort to incorporate the header. Below is a code example showing us the Header-based versioning.
// Header-based versioning
[ApiController]
[Route("api/[controller]")]
public class TasksController : ControllerBase
{
    // ...
    [HttpGet]
    [ApiVersion("1.0")] // Version specified in the header
    public ActionResult<IEnumerable<Task>> GetTasks()
    {
        // Implementation of your logic here
    }
}

Step 6. In Summation
Versioning our API encapsulates the ethos of evolution within its framework. By employing version numbers in URLs or headers, we extend an olive branch to both current and future stakeholders. We align ourselves with RESTful principles, ensuring compatibility and simplicity for clients. This meticulous approach doesn't just enhance our API; it nurtures an ecosystem that thrives on the continuous synergy between innovation and accessibility.

In this code example below, we have the API versioned using URL-based versioning (api/v1/[controller] and api/v2/[controller]). Each version is encapsulated within its own controller class (TasksController and TasksControllerV2). Additionally, custom OpenAPI documentation classes (OpenApiDefinitions and OpenApiDefinitionsV2) are defined to describe each version of the API. The custom ApiVersionAttribute demonstrates how we can create our own versioning attributes to encapsulate versioning behavior, providing a seamless way to apply versioning across multiple controllers. This approach aligns with RESTful principles, allowing for compatibility and simplicity for clients while fostering a dynamic ecosystem that thrives on innovation and accessibility.
using Microsoft.AspNetCore.Mvc;
using Microsoft.OpenApi.Models;
using System;
namespace TaskManagementAPI.Controllers
{
    // Version 1
    [ApiController]
    [Route("api/v1/[controller]")]
    public class TasksController : ControllerBase
    {
        // ...
    }
    // Version 2
    [ApiController]
    [Route("api/v2/[controller]")]
    public class TasksControllerV2 : ControllerBase
    {
        // ...
    }
    // OpenAPI documentation for version 1
    public class OpenApiDefinitions
    {
        public OpenApiInfo Info { get; } = new OpenApiInfo
        {
            Title = "
Peter Task Management API",
            Version = "v1",
            Description = "An API for managing tasks with version 1.",
            Contact = new OpenApiContact
            {
                Name = "
Peter",
                Email = "[email protected]"
            }
        };
    }

    // OpenAPI documentation for version 2
    public class OpenApiDefinitionsV2
    {
        public OpenApiInfo Info { get; } = new OpenApiInfo
        {
            Title = "
Peter Task Management API",
            Version = "v2",
            Description = "An API for managing tasks with version 2.",
            Contact = new OpenApiContact
            {
                Name = "Peter",
                Email = "[email protected]"
            }
        };
    }
    // Custom versioning attribute
    [AttributeUsage(AttributeTargets.Class, Inherited = false, AllowMultiple = false)]
    public class ApiVersionAttribute : RouteAttribute
    {
        public ApiVersionAttribute(string version) : base($"api/{version}/[controller]")
        {
        }
    }
}


ASP.NET Core 8 Hosting - HostForLIFE.eu :: How to Receive JObject in C#.NET Post API?

clock August 18, 2023 07:33 by author Peter

In C#, a JObject is a JSON object. It is a type of object capable of representing JSON data. You can use the following steps to get a JObject in a C#.NET POST API:
Make a new HttpClient object.


  • Set the BaseAddress field of the HttpClient object to the URL of the POST API.
  • Set the DefaultRequestHeaders property of the HttpClient object to include the Content-Type: application/json header.
  • Make a HttpContent object with the ContentType field set to application/json.
  • To transmit the HttpContent object to the POST API, use the PostAsJsonAsync() method of the HttpClient object.
  • Cast the response from the POST API to a JObject object.

Here's an example of how to receive a JObject in a C#.NET POST API.
1. Create a class that represents the structure of the JSON object you anticipate receiving. If your JSON object has "name" and "age" fields, for example, you can construct a class like this.

public class MyJsonObject
{
    public string Name { get; set; }
    public int Age { get; set; }
}

In your API controller, define a POST method with a parameter of the type JObject. This parameter will hold the received JSON object, for example.
[HttpPost]
   public IActionResult MyApiMethod([FromBody] JObject jsonObject)
   {
       //here you can process data

       return Ok();
   }


Inside the POST method, you can deserialize the JObject into an instance of your defined class using the ToObject() method for example.
[HttpPost]
   public IActionResult MyApiMethod([FromBody] JObject jsonObject)
   {
       MyJsonObject myObject = jsonObject.ToObject<MyJsonObject>();

       // Access the properties of myObject
       string name = myObject.Name;
       int age = myObject.Age;

       // Process the received object further if you wish


       return Ok();
   }


Now, when you send a POST request to your API with a JSON object in the request body, it will be automatically mapped to the JObject parameter of your API method. The received JSON object can then be accessed as an instance of your defined class.

Remember to include the necessary namespaces at the top of your files.
using Newtonsoft.Json.Linq;
using Microsoft.AspNetCore.Mvc;


Make sure to also install the Newtonsoft.Json NuGet package if you haven't already.

I hope this article helps you understand how to receive a JObject in a POST API in C#.NET.

HostForLIFE.eu ASP.NET 8 Hosting
HostForLIFE.eu is European Windows Hosting Provider which focuses on Windows Platform only. We deliver on-demand hosting solutions including Shared hosting, Reseller Hosting, Cloud Hosting, Dedicated Servers, and IT as a Service for companies of all sizes. We have customers from around the globe, spread across every continent. We serve the hosting needs of the business and professional, government and nonprofit, entertainment and personal use market segments.


ASP.NET Core 8 Hosting - HostForLIFE.eu :: Combining Async and Yield in C#

clock August 15, 2023 10:34 by author Peter

Asynchronous operations and lazy data streaming are two fundamental ideas in C# programming that help developers design efficient and responsive apps. While there is no straight "async yield" term in C#, you can combine the power of async and yield to achieve equivalent behavior. In this post, we will look at how to efficiently stream data by using asynchronous generators with async functions and iterators.

Lazy Loading and Asynchronous Programming
Before we get started, let's go through the two main principles we'll be working with:
Programming in an Asynchronous Environment

Asynchronous programming allows you to run tasks at the same time without interrupting the main thread. In C#, the async and await keywords make it easier to design code that waits for asynchronous activities to complete, which improves application responsiveness.

Loading Time and Yield

Lazy loading is a strategy that loads data only when it is required. In C#, the yield keyword is used to generate iterators, which allow for lazy data loading in a memory-efficient manner. It produces elements on the fly, which saves memory and improves efficiency.

Asynchronous Generator Design
We will develop asynchronous generators using a combination of async methods and iterators to combine asynchronous programming and lazy loading. This is how it works:

Asynchronous Iterator Method Definition
To begin, we will write an asynchronous procedure that uses the yield return statement to generate items. This method will include asynchronous actions as well as the yield keyword.
internal class AsyncGeneretors
    {

        public static async IAsyncEnumerable<int> GenerateNumbersAsync()
        {
            for (int i = 0; i < 10; i++)
            {
                await Task.Delay(100); // Simulate asynchronous work
                yield return i;
            }
        }

    }

Note. IAsyncEnumerable was introduced in C# 8.0. It is a feature that allows you to work with asynchronous sequences of data in a more convenient and efficient manner. It is used in scenarios where you want to represent and process collections of data that are produced asynchronously, such as when working with streams, databases, or other asynchronous data sources.

Consuming the Asynchronous Generator:
To consume the asynchronous generator, we'll use the await foreach statement. This allows us to asynchronously iterate over the generated elements without blocking the main thread.
using AsyncYield;

Console.WriteLine("Combine Async and Yield");

var numbers = AsyncGeneretors.GenerateNumbersAsync();

await foreach (var number in numbers )
{
    Console.WriteLine(number);
}
Console.Read();


Benefits and Use Cases

Combining async and yield provides several benefits for data streaming and processing.

  • Memory Efficiency: Asynchronous generators load and process data lazily, reducing memory consumption. This is especially useful when dealing with large datasets.
  • Responsive Applications: By leveraging asynchronous programming, your application remains responsive even when performing time-consuming tasks.
  • Parallelism: Asynchronous operations can execute concurrently, allowing for efficient utilization of available resources.
  • Real-time Data: Asynchronous generators are well-suited for scenarios where data is constantly changing or being updated in real time.


Conclusion
While C# does not offer a built-in "async yield" keyword, you can achieve similar behavior by combining async methods and the yield keyword. This approach enables you to create asynchronous generators that efficiently stream data while keeping your application responsive. By understanding and leveraging the power of asynchronous programming and lazy loading, you can build high-performance, memory-efficient applications that handle data streaming seamlessly. Happy coding!


ASP.NET Core 8 Hosting - HostForLIFE.eu :: JWT Authentication in ASP.NET Core

clock August 8, 2023 07:08 by author Peter

Because of its simplicity, statelessness, and versatility, JWT (JSON Web Token) authentication has become a popular way for securing APIs and web applications. In this post, we'll look at how to use JWT authentication with ASP.NET Core, a powerful framework for creating modern web apps.

JWT Authentication Explained
JWT is a concise and self-contained method of transmitting JSON-formatted information between parties. It is made up of three sections: a header, a payload, and a signature. Typically, the header contains information about the token, such as its type and the hashing algorithm employed. The payload holds the claims or data linked with the token, whereas the signature is used to validate the token's integrity.

The Advantages of JWT Authentication

  • JWT tokens are stateless since they are self-contained and do not require the server to keep session information. As a result, JWT authentication is well suited to scalability and microservices designs.
  • Decentralized: Because the token contains all of the required information, the authentication procedure is not reliant on centralized authentication servers.
  • JWT tokens are secure since the signature verifies that the information has not been tampered with.

ASP.NET Core JWT Authentication Implementation
Step 1: Begin by creating a new ASP.NET Core project. Begin by launching a new ASP.NET Core project using the specified template.
Step 2: Install the Necessary Packages Install the following packages with NuGet Package Manager: System and Microsoft.AspNetCore.Authentication.JwtBearer.IdentityModel.Tokens.Jwt.
Step 3: Set up Authentication To configure JWT authentication, add the following code to the Startup.cs file inside the ConfigureServices method:
services.AddAuthentication(options =>
{
    options.DefaultAuthenticateScheme = JwtBearerDefaults.AuthenticationScheme;
    options.DefaultChallengeScheme = JwtBearerDefaults.AuthenticationScheme;
})
.AddJwtBearer(options =>
{
    options.TokenValidationParameters = new TokenValidationParameters
    {
        ValidateIssuer = true,
        ValidateAudience = true,
        ValidateLifetime = true,
        ValidateIssuerSigningKey = true,
        ValidIssuer = "your-issuer",
        ValidAudience = "your-audience",
        IssuerSigningKey = new SymmetricSecurityKey(Encoding.UTF8.GetBytes("your-secret-key"))
    };
});

Step 4: Secure Your API Endpoints Add the [Authorize] attribute to the necessary controllers or actions to protect your API endpoints using JWT authentication.

Step 5: Create JWT Tokens You must produce a JWT token and return it to the client when a user logs in. To create and sign tokens, you can use libraries such as System.IdentityModel.Tokens.Jwt.

HostForLIFE.eu ASP.NET 8 Hosting
HostForLIFE.eu is European Windows Hosting Provider which focuses on Windows Platform only. We deliver on-demand hosting solutions including Shared hosting, Reseller Hosting, Cloud Hosting, Dedicated Servers, and IT as a Service for companies of all sizes. We have customers from around the globe, spread across every continent. We serve the hosting needs of the business and professional, government and nonprofit, entertainment and personal use market segments.


ASP.NET Core 8 Hosting - HostForLIFE.eu :: ASP.NET Secure CAPTCHA Generator

clock July 31, 2023 07:18 by author Peter

After submitting the download link, follow these steps to import the ADCaptcha.dll into an ASP.NET project:

Provide a download link to the ADCaptcha.dll file on your website or any other platform where users can access it.
Include ADCaptcha.dll in the project: After downloading the ADCaptcha.dll, you must include it in the references section of your ASP.NET project.

  • In the Solution Explorer of your project, right-click on the "References" node.
  • Select "Add Reference."
  • Locate the downloaded ADCaptcha.dll file by clicking the "Browse" option.
  • Click "Add" to add the ADCaptcha.dll file to the project's references.

Import ADCaptcha Namespace: Import the necessary namespaces into the files where you want to use the ADCaptcha library. For example, if your ADCaptcha.dll has the namespace ADCaptcha, import it in the code files where you use the CAPTCHA functionalities:

using ADCaptcha; // Import the ADCaptcha namespace.

Utilize the ADCaptcha Library: Now that you have imported the ADCaptcha namespace, you can use the CAPTCHA functionalities provided by the ADCaptcha.dll in your code. For example:
using ADCaptcha;

// ... (other code)

// Generate a new CAPTCHA text and image.

string captchaText = CaptchaGenerator.GenerateRandomText(6, DifficultyMode.Medium);

byte[] captchaImageBytes = CaptchaGenerator.GenerateCaptchaImage(captchaText, 200, 60, 30, Color.White, Color.DarkBlue, DistortionTechnique.Warp, DistortionTechnique.NoiseLines);

// ... (other code)

By following these steps, you can successfully import the ADCaptcha.dll into your ASP.NET project and leverage its CAPTCHA generation and verification capabilities to secure your website from automated bots and spam.

How to generate a CAPTCHA image and verify user input

Below are example usages and sample code for the ADCAPTCHA DLL. We will demonstrate how to generate a CAPTCHA image in an ASP.NET web form and how to verify user input against the CAPTCHA text.

Generating and Displaying a CAPTCHA Image (ASP.NET Web Form)
In your ASP.NET web form (e.g., CaptchaPage.aspx), add an Image control to display the CAPTCHA image:

<asp:Image ID="CaptchaImage" runat="server" />
<asp:TextBox ID="UserInputTextBox" runat="server" CssClass="form-control mt-2"></asp:TextBox>
<asp:Button ID="SubmitButton" runat="server" Text="Submit" OnClick="SubmitButton_Click" CssClass="btn btn-info mt-2" />
<%--For Testing Purpose Only DLL By ASHOK DUDI--%>
<asp:Label Text="" ID="lblMsg" runat="server" />

In the code-behind file (CaptchaPage.aspx.cs), add the following code:
using ADCaptcha;

Add the below code to Page_Load event
if (!IsPostBack)
{
    // Generate a new CAPTCHA text (You can also store this in session for verification later).
    string captchaText = CaptchaGenerator.GenerateRandomText(6, DifficultyMode.Medium);

    // Generate the CAPTCHA image and convert it to a base64 string.
    byte[] captchaImageBytes = CaptchaGenerator.GenerateCaptchaImage(captchaText, 200, 60, 24, System.Drawing.Color.White, System.Drawing.Color.DarkBlue,DistortionTechnique.NoiseLines,DistortionTechnique.Swirl, DistortionTechnique.Warp);
    // You can use anyone as required. Generate the CAPTCHA image and convert it to a base64 string.
    //byte[] captchaImageBytes = CaptchaGenerator.GenerateCaptchaImage(captchaText, 200, 60);
    string captchaImageBase64 = Convert.ToBase64String(captchaImageBytes);

    // Set the CAPTCHA image source to the base64 string.
    CaptchaImage.ImageUrl = "data:image/png;base64," + captchaImageBase64;
    CaptchaImage.BorderColor = System.Drawing.Color.DarkBlue;
    CaptchaImage.BorderWidth = 1;

    // Store the CAPTCHA text in a session for verification during form submission.
    Session["CaptchaText"] = captchaText;
}


To verify Captcha, use the below code on SubmitButton_Click event
protected void SubmitButton_Click(object sender, EventArgs e)
{
    lblMsg.Text = "";
    // Retrieve the stored CAPTCHA text from the session.
    string captchaText = Session["CaptchaText"] as string;

    // Retrieve the user's input from the TextBox.
    string userInput = UserInputTextBox.Text;

    // Verify the user's input against the CAPTCHA text (case-insensitive comparison by default).
    bool isCaptchaValid = CaptchaVerifier.VerifyCaptcha(captchaText, userInput,false);

    if (isCaptchaValid)
    {
        // CAPTCHA verification successful.
        // Proceed with the form submission or any other action.
        // ...
        lblMsg.Text = "Success";
        // Optionally, you can remove the CAPTCHA text from the session to prevent reuse of the same CAPTCHA.
       Session.Remove("CaptchaText");
    }
    else
    {
        lblMsg.Text = "Failed";
        // CAPTCHA verification failed.
        // Show an error message to the user and ask them to try again.
        // ...
    }
}


Remember to modify the code and styling to match the structure and design of your unique ASP.NET project. Additionally, ensure that the session state in your ASP.NET application is appropriately configured to save and retrieve the CAPTC. Remember to alter the code and styling to reflect your individual ASP.NET project structure and design. Additionally, check that the session state in your ASP.NET application is appropriately configured to save and retrieve the CAPTCHA text for verification.Text from HA for verification.

HostForLIFE.eu ASP.NET 8 Hosting
HostForLIFE.eu is European Windows Hosting Provider which focuses on Windows Platform only. We deliver on-demand hosting solutions including Shared hosting, Reseller Hosting, Cloud Hosting, Dedicated Servers, and IT as a Service for companies of all sizes. We have customers from around the globe, spread across every continent. We serve the hosting needs of the business and professional, government and nonprofit, entertainment and personal use market segments.


European ASP.NET Core Hosting :: How to Implementing Real-Time Cache Sync with NCache and SignalR?

clock July 28, 2023 10:26 by author Peter

This article will give you a complete insight into SignalR and how to implement the Real-time cache sync with NCache.

What is SignalR?

One client can communicate with other clients dynamically is possible with SignalR. When we are talking about web applications, one browser instance can somehow communicate with the other browser instances dynamically, which is made possible with SignalR. These kinds of applications are called real-time applications. It enabled the browser to update the data dynamically to reflect the latest data change as they happen in real-time.

How does SignalR work?
The real-time communication provided by SignalR is enabled by the concepts called Hubs and clients. The "Hub" is a class derived from the Hub base class that is present within the ASP.NET Core framework. It maintains connections with clients. Once the connection between the browser and the hub on the server has been established, the hub can communicate with the browser and the browser to the hub because the connection is two-way. The hub can act as a relay for all the connected clients once the client sends the message to the hub, and based on the new message, the hub could send a message to all the connected clients. Hub can be part of any ASP.NET Core server-side application.

SignalR uses RPC(Remote Procedure Call) principle to do its work. The procedure, in other terms, is called methods or functions, so SignalR makes it possible to call methods or functions remotely. SignalR uses the Hub Protocol that defines the format of the messages that go back and forth, just like HTTP is the protocol that can be used on a TCP connection. It uses the new WebSocket transport where available and gets back to the older one where it’s needed. WebSocket is a full-duplex and stateful protocol, which means the connection between client and server will stay alive until terminated by any one of them.

Use cases of SignalR
Chat System
IoT
Stock Market System
Any Game Score check application
Gaming Industry

Scaling Out SignalR

We use the web farm to scale out the SignalR application. Based on the above image, the web servers connect with the respective clients with a load balancer. Now with the SignalR, there is a web socket connection between the client and the server. From the above image, it’s obvious that client A is connected with Server A and clients B and C to the respective servers B and C. The main problem here is if the SignalR invokes some functionality on the client end, it would only do it for the currently connected clients; since there are multiple servers and multiple clients, and these clients can grow in the long run, there is a chance that lot of the clients have been missed because other web server has its respective clients, so each web server sends messages for the invocation of the methods through SignalR to it’s only connected clients through web socket. So you end up having inconsistent user experience from all the clients which are connected.

For example, if server A invoked some functionality, it would sync with Client A, B, and C but not with servers B and C. This will lead to inconsistent user experience. To overcome this issue, we can use SignalR backplane.

What is SignalR Backplane?
It is a shared bus, repository, or resource where all your web servers are connected. So, with Backplane, the web servers, instead of connected with the client by invoking the functions on clients, send the message to Backplane, and that will broadcast the message to all the web servers, and it broadcast to all the connected clients from this process you will achieve the consistent view and scalability factor.


Bottlenecks with SignalR Backplane
Database as a SignalR BackPlane is slow SignalR needs low latency
SignalR application with Backplane should be reliable; sometimes, using a database may lead to a single point of failure due to high load.
SignalR Backplane should be highly available; the unplanned outage may lead to service delivery issues.

We can overcome all these bottlenecks by using scalable In-memory distributed Cache. In this article, I’m going to explain the NCache, which provides a distributed linear scalability that will help us to overcome all the bottlenecks which we discussed earlier.

What is NCache?
NCache is an in-memory distributed cache for .NET, Java, and Node.js, and it is also open-source. NCache is super-fast and scalable and caches application data to reduce database trips. NCache is used to overcome the performance issues related to data storage, databases, and scaling the .NET, Java, and Node.js applications.

What is ASP.NET Core SignalR?
ASP.NET Core SignalR is a library for developers to implement the process to integrate real-time functionality. The library can be used to integrate any kind of real-time web functionality into your ASP.NET application. It can have server-side code push content to the connected clients immediately once it is available. It is an open-source Microsoft API.
Implementing Real-Time Cache Sync NCache as a Backplane and ASP.Net Core SignalR Application

I’m going to use my existing ASP.NET Core SignalR application for the demo. You can download the source code from GitHub. Please read this article to understand how to create an ASP.NET Core SignalR application.

Add the below JSON object in the appsettings.json file:
"NCacheConfiguration": {
  "CacheName": "myLocalCache",
  "EventKey ": "signalRApplication"
},


CacheName: Provide your newly created cluster cache name
ApplicationID: Give some unique string relevant to your application. It acts as an event key, and each client of the application will use the same key while using the invoking NCache extension method.

Download and install the package AspNetCore.SignalR.NCache from NuGet Package Manager or use the below command from the package manager console in Visual Studio.
Install-Package AspNetCore.SignalR.NCache

Add the below code to Program.cs file.
ConfigurationManager configuration = builder.Configuration;
builder.Services.AddSignalR().AddNCache(ncacheOptions => {
    ncacheOptions.CacheName = configuration["NCacheConfiguration:CacheName"];
    ncacheOptions.EventKey = configuration["NCacheConfiguration: EventKey"];
});


Now our application is connected with NCache, assume we have two web servers connected with NCache as a backplane.

The application which I have used is to collect the real-time temperature from different agriculture farms; in real-time, the data will come from an IoT device, but for a demo, I used the client-side data entry for the temperature update. Once the temperature is updated from one client, it will reach the SignalR hub; since the web server is connected with NCache, an In-memory distributed cache acts as a Backplane. It will sync the data with other servers, and the real-time data will reach all the clients.

The default Hub protocol is using JSON. The sample looks like the below statement.
{
 “type”: 1
  “target”: “Receiving a message”
   “argument”: [{”id”:1, “NewTemperature”:29}]
}


Type 1 means that this is a function invocation.
Target is the name of the function, and argument is an array of parameters passed to the function.
Run the application and try it from two browsers as two clients and assume we have two web servers connected with NCache as a Backplane.

Update the temperature of farm B from 26 to 29. It will reflect across different clients.


Client Connection has been established, and now the NCache will act as a backplane for our SignalR application. Once the NCache initiates, you can see the client count in the NCache web monitor application, as shown in the below figure:

We have seen the basics of SignalR, the Backplane for SignalR to avoid the inconsistency in the real-time data across all the clients, and we found some bottlenecks with maintaining performance and avoiding the single point of failure with the conventional implementation of the SignalR with Backplane. To overcome these bottlenecks, we used NCache distributed Cache as a Backplane for our ASP.NET Core SignalR application to sync to real-time data and maintain user consistency across all the clients with high performance and no single point of failure.


European ASP.NET Core Hosting :: How to Implementing Real-Time Cache Sync with NCache and SignalR

clock July 28, 2023 10:24 by author Peter

This article will give you a complete insight into SignalR and how to implement the Real-time cache sync with NCache.

What is SignalR?


One client can communicate with other clients dynamically is possible with SignalR. When we are talking about web applications, one browser instance can somehow communicate with the other browser instances dynamically, which is made possible with SignalR. These kinds of applications are called real-time applications. It enabled the browser to update the data dynamically to reflect the latest data change as they happen in real-time.
How does SignalR work?

The real-time communication provided by SignalR is enabled by the concepts called Hubs and clients. The "Hub" is a class derived from the Hub base class that is present within the ASP.NET Core framework. It maintains connections with clients. Once the connection between the browser and the hub on the server has been established, the hub can communicate with the browser and the browser to the hub because the connection is two-way. The hub can act as a relay for all the connected clients once the client sends the message to the hub, and based on the new message, the hub could send a message to all the connected clients. Hub can be part of any ASP.NET Core server-side application.


European ASP.NET Core Hosting :: OneOf Package for.NET Core to Handle Multiple Return Types

clock July 24, 2023 09:42 by author Peter

The "OneOf" library in.NET Core offers a quick and efficient mechanism for C# programmers to interact with discriminated unions (sum types). It is advantageous for portraying situations with numerous possible outcomes or states because it enables you to design types that can hold values of different types but only one value at a time.

We'll cover how to utilize "OneOf" as a return type in a.NET Core Web API in this section:

Create a Web API Project with the.NET 6.0 framework as the target in Step 1.
Installing the "OneOf" NuGet package is step two.

Create API endpoints that return a "OneOf" type in step 3.

Let's examine the illustration.
using Microsoft.AspNetCore.Mvc;
using OneOf;

namespace OneOfTutorial.Controllers
{
    [Route("api/[controller]")]
    [ApiController]
    public class SampleController : ControllerBase
    {
        /// <summary>
        /// returnType : default, error
        /// </summary>
        /// <param name="returnType"></param>
        /// <returns></returns>
        [HttpGet("data/{returnType}")]
        public IActionResult GetData([FromRoute] string returnType ="default")
        {

            var data = GetDataByType(returnType);
            return Ok(data.Value);
        }

        /// <summary>
        ///
        /// </summary>
        /// <param name="recordType"></param>
        /// <returns></returns>
            private OneOf<MyDataModel,ErrorViewModel> GetDataByType(string recordType)
            {

                try
                {
                    if (recordType == "error")
                        throw new Exception("Returning Error View Model");
                    var data = new MyDataModel
                    {
                        Id = 1,
                        Name = "default message"
                    };
                    return data;
                }
                catch (Exception ex)
                {
                    // Handle errors and return ErrorViewModel
                    var errorViewModel = new ErrorViewModel
                    {
                        StatusCode = 500,
                        ErrorMessage = ex.Message
                    };
                    return errorViewModel;

                }
            }
        }

        public class MyDataModel
        {
            public int Id { get; set; }
            public string? Name { get; set; }
        }

        public class ErrorViewModel
        {
            public int StatusCode { get; set; }
            public string? ErrorMessage { get; set; }
        }
}

This code defines a SampleController class that inherits from ControllerBase, and it contains two action methods: GetData and GetDataByType. The controller demonstrates how to use the OneOf type in a .NET Core Web API to handle different response types based on a specified returnType.

  • GetData Action Method: This action method is an HTTP GET endpoint that takes a returnType as a parameter from the route (e.g., "/data/default" or "/data/error"). The GetData method then calls the private GetDataByType method to get the data based on the returnType. It returns an IActionResult, and in this case, it returns an OkObjectResult with the value extracted from the OneOf<MyDataModel, ErrorViewModel> response.
  • GetDataByType Private Method: This private method is called by the GetData action method and takes a recordType parameter that determines the type of data to return. If the recordType is "error", the method throws an exception to simulate an error scenario. It then returns an ErrorViewModel wrapped in the OneOf type. If the recordType is not "error", the method creates a MyDataModel instance with default values, and it returns the MyDataModel wrapped in the OneOf type.
  • MyDataModel and ErrorViewModel Classes: These are two simple model classes representing the data and the error response, respectively. They are used to demonstrate the OneOf usage.


To summarize, the SampleController class defines two endpoints. The GetData endpoint takes a returnType parameter, calls the GetDataByType method to get the data, and then returns the data as an OkObjectResult. The GetDataByType method determines the type of data to return based on the recordType parameter, either a MyDataModel instance or an ErrorViewModel instance, wrapped in the OneOf<MyDataModel, ErrorViewModel> type. This allows the client to handle different response types gracefully based on the specified returnType.

Here's how a potential usage of this method might look like.

// Example usage of the method
var result = GetDataByType("error");

if (result.IsT0) // Check if the result is of type MyDataModel
{
    MyDataModel data = result.AsT0; // Extract the MyDataModel value
    // Handle the data as needed
}
else if (result.IsT1) // Check if the result is of type ErrorViewModel
{
    ErrorViewModel error = result.AsT1; // Extract the ErrorViewModel value
    // Handle the error as needed
}

By using the "OneOf" library, you can easily work with discriminated unions in a type-safe and concise manner, improving the readability and maintainability of your code.


European ASP.NET Core Hosting :: How to Use ASPX Files in .NET Core?

clock July 17, 2023 10:46 by author Peter

.NET Core issues
In .NET Core, there are problems such as the bad complexity of web programming and the vagueness of coding in the controller, and the destruction of the web programming structure on the server side. Also, one of the negative points of .NET Core is the lack of support for aspx files. An executable physical file (aspx) in the root makes your program more structured.

Introducing Code-Behind

This style is completely based on MVC, and in the near future, we will expand it in such a way that there is no need for coding the view part, such as for, foreach, and while loops.

We will also try to add support for a Web-Form structure in Code-Behind in such a way that it does not have the past problems of the standard .NET Web-Form and avoids generating additional codes, and does not generate additional overhead on the server; in fact, this new Web-Form structure will not be different from the MVC model in terms of performance, bandwidth, and server overhead; therefore, our Code-Behind can support MVC, Code-Behind, and Web-Form at the same time.

We added Code-Behind in Nuget so you can easily access it.

Write code with Code-Behind

You can add aspx files in the wwwroot directory and its subdirectories.

An example of an aspx file based on Code-Behind.
<%@ Page Controller="YourProjectName.wwwroot.DefaultController" Model="YourProjectName.wwwroot.DefaultModel" %><!DOCTYPE html>
<html>
<head>
    <meta charset="utf-8" />
    <title><%=model.PageTitle%></title>
</head>
<body>
    <%=model.BodyValue%>
</body>
</html>


An example of a controller class that is based on Code-Behind.
using CodeBehind;

namespace YourProjectName.wwwroot
{
    public partial class DefaultController : CodeBehindController
    {
        public DefaultModel model = new DefaultModel();
        public void PageLoad(HttpContext context)
        {
            model.PageTitle = "My Title";
            model.BodyValue = "HTML Body";
            View(model);
        }
    }
}


An example of a model class that is based on Code-Behind.
using CodeBehind;

namespace YourProjectName.wwwroot
{
    public partial class DefaultModel : CodeBehindModel
    {
        public string PageTitle { get; set; }
        public string BodyValue { get; set; }
    }
}


Program file and additional Code-Behind items.
using CodeBehind;
using SetCodeBehind;

var builder = WebApplication.CreateBuilder(args);

var app = builder.Build();

// Configure the HTTP request pipeline.
if (!app.Environment.IsDevelopment())
{
    app.UseExceptionHandler("/Error");
    // The default HSTS value is 30 days. You may want to change this for production scenarios, see https://aka.ms/aspnetcore-hsts.
    app.UseHsts();
}

+ CodeBehindCompiler.Initialization();

app.Run(async context =>
{
+    CodeBehindExecute execute = new CodeBehindExecute();
+    await context.Response.WriteAsync(execute.Run(context));
});

app.UseHttpsRedirection();
app.UseStaticFiles();
app.UseRouting();
app.Run();

In the Program.cs class codes above, the three values marked with the + character must be added.
We show the codes separately for you.
CodeBehindCompiler.Initialization();

CodeBehindExecute execute = new CodeBehindExecute();
await context.Response.WriteAsync(execute.Run(context));

You can use the Write method in the model and controller classes; the Write method adds a string value to the ResponseText attribute; you can also change the values of the ResponseText attribute by accessing them directly.

In the controller class, there is an attribute named IgnoreViewAndModel attribute, and if you activate the IgnoreViewAndModel attribute, it will ignore the values of model and view, and you will only see a blank page; this feature allows you to display the values you need to the user and avoid multiple redirects and transfers.

To receive the information sent through the form, you can follow the instructions below.
public DefaultModel model = new DefaultModel();
public void PageLoad(HttpContext context)
{
    if (!string.IsNullOrEmpty(context.Request.Form["btn_Add"]))
        btn_Add_Click();

    View(model);
}

private void btn_Add_Click()
{
    model.PageTitle = "btn_Add Button Clicked";
}


Note. After running the program and compiling the aspx pages by Code-Behind, your program will no longer refer to any aspx files.
If the scale of the program you are building is high or you need to act dynamically, using Code-Behind will definitely give you more freedom.

If the scale of the program is low, using Code-Behind will simplify your program, and you will generate faster and more understandable code.

The following example shows the power of Code-Behind

aspx page
<%@ Page Controller="YourProjectName.wwwroot.DefaultController" Model="YourProjectName.wwwroot.DefaultModel" %><!DOCTYPE html>
<html>
<head>
    <meta charset="utf-8" />
    <title><%=model.PageTitle%></title>
</head>
<body>
    <%=model.LeftMenuValue%>
    <div class="main_content">
        <%=model.MainContentValue%>
    </div>
    <%=model.RightMenuValue%>
</body>
</html>


Controller class
using CodeBehind;

namespace YourProjectName.wwwroot
{
    public partial class DefaultController : CodeBehindController
    {
        public DefaultModel model = new DefaultModel();

        public void PageLoad(HttpContext context)
        {
            model.PageTitle = "My Title";
            CodeBehindExecute execute = new CodeBehindExecute();

            // Add Left Menu Page
            context.Request.Path = "/menu/left.aspx";
            model.LeftMenuValue = execute.Run(context);

            // Add Right Menu Page
            context.Request.Path = "/menu/right.aspx";
            model.RightMenuValue = execute.Run(context);

            // Add Main Content Page
            context.Request.Path = "/pages/main.aspx";
            model.MainContentValue = execute.Run(context);

            View(model);
        }
    }
}


Each of the pages is left.aspx, right.aspx, and main.aspx can also call several other aspx files; these calls can definitely be dynamic, and an add-on can be executed that the kernel programmers don't even know about.

Enjoy Code-Behind, but be careful not to loop the program! (Don't call pages that call the current page).

What power does Code-Behind give you while running the program?
Accessing hypertext contents of pages and replacing some values before calling in other pages.

Microsoft usually ties your hands, so you cannot create a dynamic system.

By using the default architecture of Microsoft's ASP.NET Core, you will face some very big challenges. Creating a system with the ability to support plugins that both provides security and does not loop, and can call other pages on your pages is very challenging.

Suppose you have created an application using the default ASP.NET Core cshtml that has a main page that includes a right menu and a left menu. As shown in the code above, can you change the values of these menus to Fill the dynamic form with cshtml pages and replace the values obtained from the pages? It is definitely possible, but it is difficult.

Code-Behind will not even refer to the physical aspx file to call the aspx pages and will only call a method.

How do you manage events in ASP.NET Core?

For example, a route from your program requires several methods to be executed, and these methods do not exist in the core of your program! This work can be blinded with the default cshtml of .NET, but it is difficult.

For example, we should have an event before the request to the search page and not allow the user to do more than 2 searches per minute. Using Code-Behind, we only need to check an aspx page, then reject or allow the search request.

Have you ever tried to create a plugin, module, or dynamic page for .NET systems?
Have you ever built a .NET system that supports a plugin, module, or dynamic page add-on?
Have you ever wondered why this process is so difficult in .NET?


European ASP.NET Core Hosting :: What is ASP.NET Core Response Caching?

clock July 12, 2023 08:28 by author Peter

Response buffering entails storing output responses. Response caching enables browsers and other clients to retrieve a server's response swiftly and efficiently in response to subsequent requests. Response caching in ASP.NET Core reduces server burden and enhances the user experience in web applications. This blog will provide a comprehensive explanation of response caching in ASP.NET Core.

What exactly is Response Cache?

Using the response cache, the server can store responses in memory or on disk so that subsequent requests can retrieve them rapidly. Caching mechanisms examine the cache for responses whenever a server request is made. The cache returns the response rather than generating a new one. Using response caching decreases the server's burden and the number of requests made to the server.

Note the HTTP caching directives and how they can be used to control caching behavior.

Response Header Caching
To cache the response, the 'Client and Server' exchange HTTP header information. How HTTP caching directives can be used to control caching behavior. Cache control specifies the manner in which the response can be retained. When the cache-control header is present in the response, it is the responsibility of browsers, clients, and proxy servers to honor it.

Principal Response Caching Headers appear as follows:

  • Cache-Control Pragmatism
  • Vary
  • Header with the Cache-Control directive

The Cache-Control header is the primary response caching header. To add a Cache-Control header in ASP.Net Core, use the Response object in the action method of your controller. So, let's begin with the most prevalent cache-control directives:

  • This cache can either store the response on the device or in a shared location.
  • This Private Cache always stores Client Side Response, but does not purge the cache on the client side.
  • max-age: This cache-control directive indicates how long a response should be stored in the cache.
  • no-cache: This value denotes that the client should not store a copy of the response in its cache.
  • no-store: This cache is not permitted to retain the response.

Pragma Header
The Pragma header can control cache performance for ASP.NET Core. Included in the Pragma preface are server and client instructions. If the response is decorated with Cache-Control, Pragma is omitted.

Change Header
The Vary HTTP response header is included in this method's request message, and the URL is the response's body.

ResponseCache Property

ResponseCache attributes specify header properties for response cache headers in ASP.NET Core web applications. This attribute can be applied at either the controller or endpoint level.

Following are several input parameters for the cache attribute.

Duration
You can set or retrieve the cached duration of the response in seconds. This defines the "max-age" attribute within the "cache-control" header. The max-age header, which is used to specify the cache duration, will be generated based on the duration of this property.

Location
specifies the Location where data from a specific URL will be cached. If the Location is decorated with "ResponseCacheLocation.Client," it functions as a cached response on the client and adds "cache-control" to the private header.

In this example, the Location has the "ResponseCacheLocation" attribute."None" operates as "cache-control", and the "Pragma" header is set to "no-cache."

Note: If you are able to examine the cached response, follow the links on web pages or use Swagger to execute API endpoints in the browser.

Otherwise, if you attempt to refresh the page or revisit the URI, the browser will always request a new response from the server regardless of the response cache settings.

Public
public class HomeController: Controller
{
    [HttpGet]
    [ResponseCache(Duration = 180, Location = ResponseCacheLocation.Any)]
    public IActionResult getCache()
    {
        return Ok($"Responses are generated on {DateTime.Now}");
    }
}


This Duration property will generate the max-age header, which we use to define the duration of the cache for 3 minutes (180 seconds). The Location property will define the Location within the cache-control header.

So, the API endpoint and verify these response headers:
cache-control: public,max-age=180

​The status code indicates that the response comes from the disk cache:
Status Code: 200

Private
We just need to change the Location property in ResponseCacheLocation.Client to private:
​public class HomeController: Controller
{
    [HttpGet]
    [ResponseCache(Duration = 180, Location = ResponseCacheLocation.Client)]
    public IActionResult getCache()
    {
        return Ok($"Responses are generated on {DateTime.Now}");
    }
}

This changes the value of the cache control header to private, which means that only the client can cache the response:
cache-control: private,max-age=180
No-Cache


Now let us update the Location parameter to ResponseCacheLocation.  None:
public class HomeController: Controller
{
    [HttpGet]
    [ResponseCache(Duration = 180, Location = ResponseCacheLocation.None)]
    public IActionResult getCache()
    {
        return Ok($"Responses are generated on {DateTime.Now}");
    }
}


Because the cache-control and pragma headers are set to no-cache, the client is unable to use a cached response without first verifying it with the server:

cache-control: no-cache,max-age=180

pragma: no-cache

The server generates a new response each time, and the browser does not use the cached response.

NoStore
Gets or sets the value to determine whether to store the data. If NoStore is decorated with the value "true", the "cache-control" header is set to "no-store". It ignores the "Location" and the parameter has ignored the values; otherwise values "None".

​public class HomeController: Controller
{
    [HttpGet]
    [ResponseCache(Duration = 180, Location = ResponseCacheLocation.Any,NoStore =True)]
    public IActionResult getCache()
    {
        return Ok($"Responses are generated on {DateTime.Now}");
    }
}


This sets the response header cache control to no-store. This means that the client should not cache the response:

cache-control: no-store
VaryByHeader

Sets or gets the "Vary" response header value. ResponseCache's VaryByHeader property allows us to set the vary header:

Now that User-Agent is the value for the VaryByHeader property, the cached response will be used as long as the request originates from the same client device. Once the User-Agent value on the client device changes, a new response will be fetched from the server. Let's verify this.
​public class HomeController: Controller
{
    [HttpGet]
    [ResponseCache(Duration = 180, Location = ResponseCacheLocation.Any,VaryByHeader="User-Agent")]
    public IActionResult getCache()
    {
        return Ok($"Responses are generated on {DateTime.Now}");
    }
}


In the response headers, check for the Vary header:

vary: User-Agent

The application is run in desktop mode, then you can see the response header "Vary" contains the value "User-Agent" (see below).

    user-agent: Mozilla/5.0 (Windows NT 10.0; Win64; x64) AppleWebKit/537.36 (KHTML, like Gecko) Chrome/110.0.0.0 Safari/537.36
    user-agent: Mozilla/5.0 (iPhone; CPU iPhone OS 13_2_3 like Mac OS X) AppleWebKit/605.1.15 (KHTML, like Gecko) Version/13.0.3 Mobile/15E148 Safari/604.1

VaryByQueryKeys Property

The VaryByQueryKeys property can be used to trigger the server to deliver a fresh response every time the response will change. There is a change in query string parameters.

​public class HomeController: Controller
{
    [HttpGet]
    [ResponseCache(Duration = 180, Location = ResponseCacheLocation.Any, VaryByQueryKeys = new string[] { "Id " })]
    public IActionResult getCache()
    {
        return Ok($"Responses are generated on {DateTime.Now}");
    }
}

C#

For example, When the Id value change and then URI also change, and  we want to generate a new response:

/api/Home?Id=1

/api/Home?Id=2

Cache Profile

In this project, you can use Response Cache attributes, as most action methods have the same input parameters. With ASP.Net Core, all parameter options are related in a Program class and with it's name and which can be used in the Response Cache attribute to remove duplicate parameter settings.

Cache3 is a new cache profile that has a time duration of 3 minutes and a location of the public.
builder.Services.AddControllers (option =>
{
   option.Cache Profiles.Add("Cache3",
      new CacheProfile()
      {
          Duration= 180,
          Location = ResponseCacheLocation.Any
      });
});

public class HomeController: Controller
{
    [HttpGet]
    [ResponseCache (Cache ProfileName ="Cache3")]
     public IActionResult getCache()
     {
          return Ok ($"Responses are generated on (DateTime.Now}");
     }
}

The defined cache-control response (see below):
cache-control: public,max-age=180
Caching Middleware

Middleware can be written to add a response cache, but this implementation adds a response cache to every page.

Program.cs File
var builder = WebApplication.CreateBuilder(args);
builder.Services.AddControllers();
builder.Services.AddResponseCaching();

var app = builder.Build();

app.MapControllers();
app.UseResponseCaching () ;
app.Run();


​public class HomeController: Controller
{
    [HttpGet]
    [ResponseCache(Duration = 180, Location = ResponseCacheLocation.Any, VaryByQueryKeys = new string[] { "Id" })]
    public IActionResult getCache(int Id)
    {
        return Ok($"Responses are generated on Id:{Id} at {DateTime.Now}");
    }
}


First, add the response caching middleware using the AddResponseCaching() method, then configure the app to use it with UseResponseCaching().

That's it. Response caching middleware has been enabled, so VaryByQueryKeys should now work.

Let us start the application and navigate to the /Home?id=1 endpoint:

The response was generated for Id:1 at 23-05-2022 05:52:50

Changing the query string resulted in a new response from the server.

Let's change the query string to /Home?id=2:

The response was generated for Id:2 at 23-05-2022 05:53:45

Conclusion

ASP.NET Core's response caching feature allows web applications to scale and perform better. It is possible to speed up and improve page loading efficiency by caching responses at the server or client level.

ASP.NET Core lets you configure caching middleware to cache responses based on URL path, query string parameters, and HTTP headers. Additionally, you can customize the caching behavior using options such as cache expiration times, cache location, and cache key prefixes.

You can increase user satisfaction and reduce hosting costs by using response caching in ASP.NET Core. If you're building a high-traffic website or web application, response caching should be considered a key optimization strategy.


About HostForLIFE.eu

HostForLIFE.eu is European Windows Hosting Provider which focuses on Windows Platform only. We deliver on-demand hosting solutions including Shared hosting, Reseller Hosting, Cloud Hosting, Dedicated Servers, and IT as a Service for companies of all sizes.

We have offered the latest Windows 2016 Hosting, ASP.NET Core 2.2.1 Hosting, ASP.NET MVC 6 Hosting and SQL 2017 Hosting.


Tag cloud

Sign in