Let's say you have a.NET-built e-commerce website. You implement a remedy after discovering a minor flaw in the customer browsing function. You must make one more little edit to the product page the next day. Even minor changes to a classic monolithic application can need redeploying the entire program. Deployments may become riskier and slower as your system expands and releases increase in frequency.
By dividing the application into discrete services that can be created, implemented, and scaled independently, microservices solve this problem. I'll demonstrate how to create a microservices architecture with.NET in this post. A traditional monolith.This is how the net website will appear:
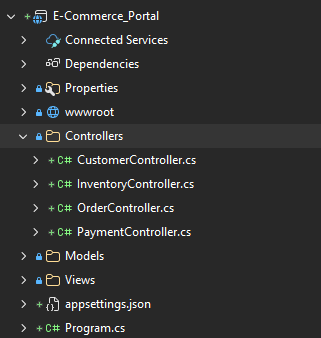
The Customer, Inventory, Order, and Payment modules might be arranged within a single solution and deployed as a single application in a traditional monolithic.NET application. The code is still a part of the same deployable unit even though it is divided into many controllers and layers.
On the other hand, every business domain is built as a separate service in a microservices architecture. Because each service usually has its own database and project, it may be independently created, deployed, and scaled.
The customer, inventory, order, and payment services may all have their own projects in Visual Studio. Every API is published as a separate service during deployment (for instance, to IIS, Azure App Service, or containers).
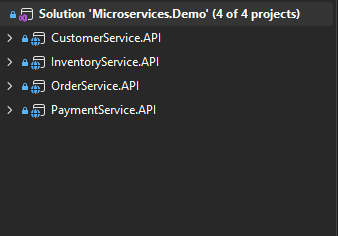
The biggest advantage is independent deployment. If you need to modify the Customer service, you only redeploy that service instead of redeploying the entire application. This reduces deployment risk and allows different teams to work and release features independently. In this article, I’ll demonstrate how services in a microservices architecture communicate with one another using REST APIs through HttpClient to implement common business workflows.
Our sample e-commerce application consists of four services:
- Customer Service — Manages customer registration and information. It has its own database.
- Inventory Service — Manages product information and stock levels. It has its own database, which stores product and inventory data.
- Order Service — Handles order creation when a customer checks out. Before saving an order, it calls the Customer Service to verify that the customer exists and the Inventory Service to retrieve product information and calculate the order total.
- Payment Service — Simulates payment processing. Before processing a payment, it calls the Order Service to validate the order, then forwards the request to a mock payment gateway.
The interaction among services are look like this:
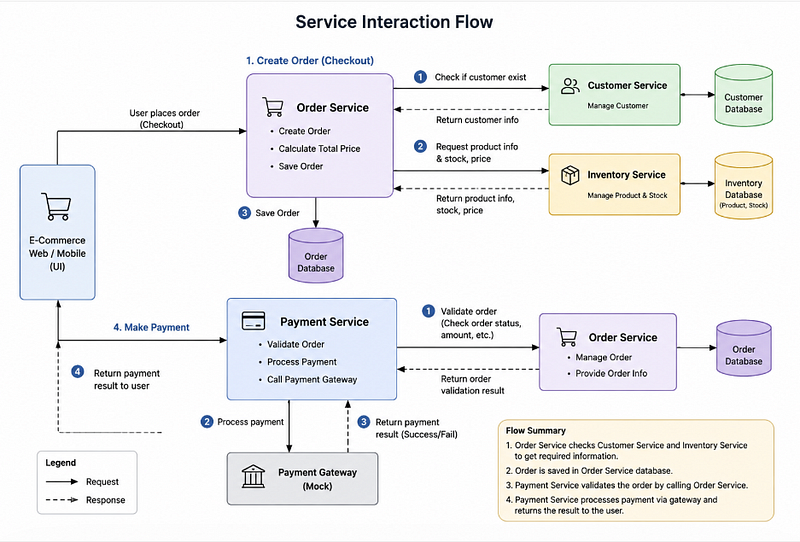
Or more detailed flow.
By the end of this article, you’ll understand how these independent services communicate with each other to complete a typical e-commerce workflow while keeping each service loosely coupled and independently deployable. Let’s walkthrough the code.
The Customer Service and Inventory Service are relatively straightforward. They expose standard REST APIs that perform basic CRUD operations on customers and products.
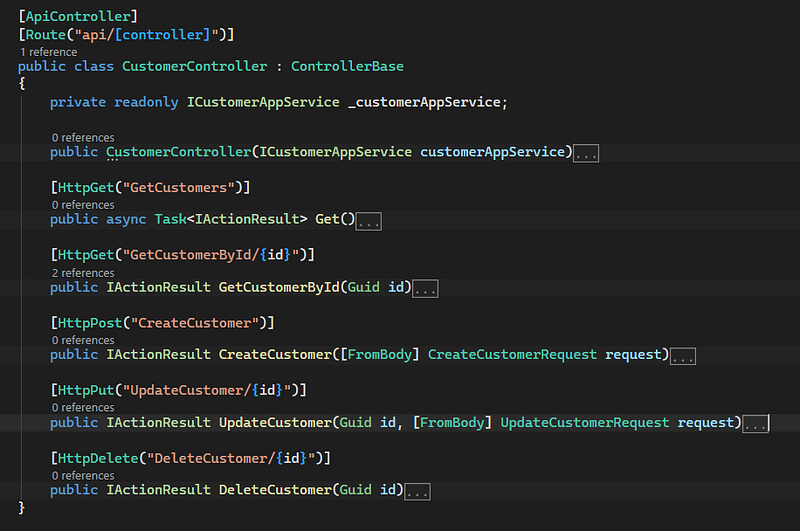
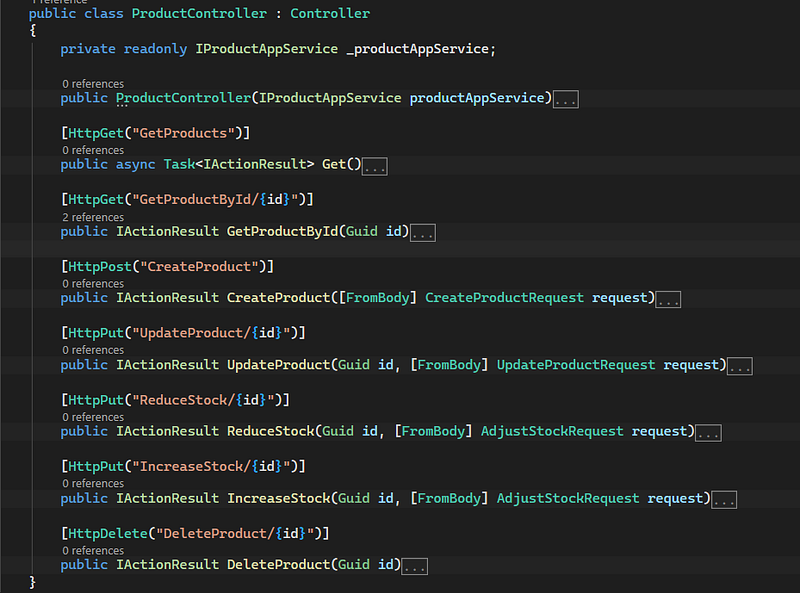
The Order Service is more interesting because it depends on information from other services. Before an order can be created, it needs to verify that the customer exists and that each product is a valid SKU with sufficient stock available.
public async Task<CreateOrderResult> CreateOrder(CreateOrderRequest request)
{
//...code omitted
//call customer service to get customer details
var customer = await _customerClient.GetCustomerByIdAsync(request.CustomerId);
if (customer == null)
{
return CreateOrderResult.NoCustomer($"Customer {request.CustomerId} does not exist.");
}
//...
foreach (var item in request.Items)
{
//call inventory service to get product details
var product = await _inventoryClient.GetProductAsync(item.ProductId);
if (product == null)
//...
Since the Order Service is isolated from the Customer and Inventory services, it cannot access their databases directly. Instead, it communicates with them through HTTP REST APIs.
To keep the code organized, the OrderService.API project contains an ExternalServices folder, which encapsulates all communication with external services. In this folder, we create dedicated CustomerClient and InventoryClient classes that wrap the HTTP requests using HttpClient. This approach keeps the business logic clean and makes it easier to maintain or replace external integrations in the future.
Next, configure the endpoints of the Customer and Inventory services in appsettings.json.
"Services": {
"CustomerService": "http://localhost:5108",
"InventoryService": "http://localhost:5155"
}
Using IHttpClientFactory is the recommended approach in ASP.NET Core because it manages the lifetime of HttpClient instances, avoids socket exhaustion, and centralizes the configuration of external service endpoints.
builder.Services.AddHttpClient("CustomerService", client =>
{
client.BaseAddress = new Uri(builder.Configuration["Services:CustomerService"]!);
});
builder.Services.AddHttpClient("InventoryService", client =>
{
client.BaseAddress = new Uri(builder.Configuration["Services:InventoryService"]!);
});
Finally, the CustomerClient and InventoryClient classes use these registered HttpClient instances to send HTTP requests to their respective services. These client classes encapsulate the communication logic, allowing the OrderService to focus on business logic without worrying about the implementation details of the HTTP calls
public class CustomerClient : ICustomerClient
{
private readonly IHttpClientFactory _httpClientFactory;
public CustomerClient(IHttpClientFactory httpClientFactory)
{
_httpClientFactory = httpClientFactory;
}
public async Task<CustomerSummary?> GetCustomerByIdAsync(Guid id)
{
var customerClient = _httpClientFactory.CreateClient("CustomerService");
var customerResponse = await customerClient.GetAsync($"api/Customers/GetCustomerById/{id}");
if (!customerResponse.IsSuccessStatusCode)
{
return null;
}
return await customerResponse.Content.ReadFromJsonAsync<CustomerSummary>();
}
}
public class InventoryClient : IInventoryClient
{
private readonly IHttpClientFactory _httpClientFactory;
public InventoryClient(IHttpClientFactory httpClientFactory)
{
_httpClientFactory = httpClientFactory;
}
public async Task<ProductSummary?> GetProductAsync(Guid productId)
{
var client = _httpClientFactory.CreateClient("InventoryService");
var response = await client.GetAsync($"api/Product/GetProductById/{productId}");
if (!response.IsSuccessStatusCode)
{
return null;
}
return await response.Content.ReadFromJsonAsync<ProductSummary>();
}
//....
Same thing in PaymentService, we need to call OrderService before proceed to
public async Task<CreatePaymentResult> CreatePaymentAsync(CreatePaymentRequest request)
{
var existingPayment = _db.Payments.FirstOrDefault(p => p.OrderId == request.OrderId);
//....
//call order service to get order details
var order = await _orderClient.GetOrderAsync(request.OrderId);
//...
How OrderClient in PaymentService send HTTP requests to its own service
public class OrderClient : IOrderClient
{
private readonly IHttpClientFactory _httpClientFactory;
public OrderClient(IHttpClientFactory httpClientFactory)
{
_httpClientFactory = httpClientFactory;
}
public async Task<OrderSummary?> GetOrderAsync(Guid orderId)
{
var client = _httpClientFactory.CreateClient("OrderService");
var response = await client.GetAsync($"api/Order/GetOrdersById/{orderId}");
if (!response.IsSuccessStatusCode)
{
return null;
}
return await response.Content.ReadFromJsonAsync<OrderSummary>();
}
//...
That’s all! This is a simple example of how services in a microservices architecture communicate with one another using REST APIs and HttpClient. For this demo, I configured the Solution Properties in Visual Studio to start all four services simultaneously, making it easy to test the complete workflow on my local machine. In a real production environment, each microservice would typically be deployed independently for example, to separate IIS websites, Azure App Services, Docker containers, or Kubernetes pods. Each service would have its own endpoint, allowing it to be updated and scaled without affecting the other services.
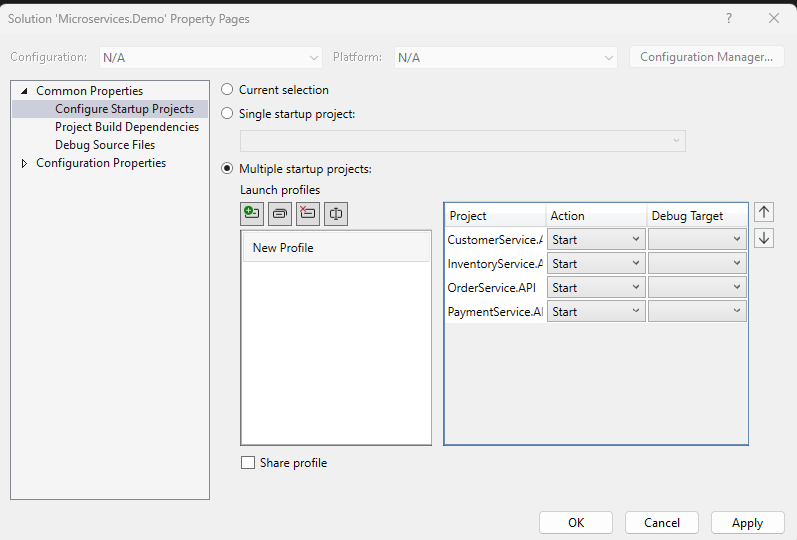
Then we can perform standard CRUD in our e-commerce microservices
Create new customer
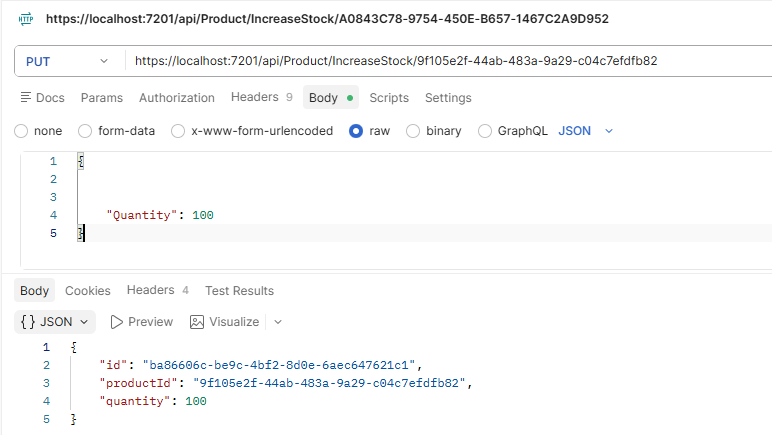
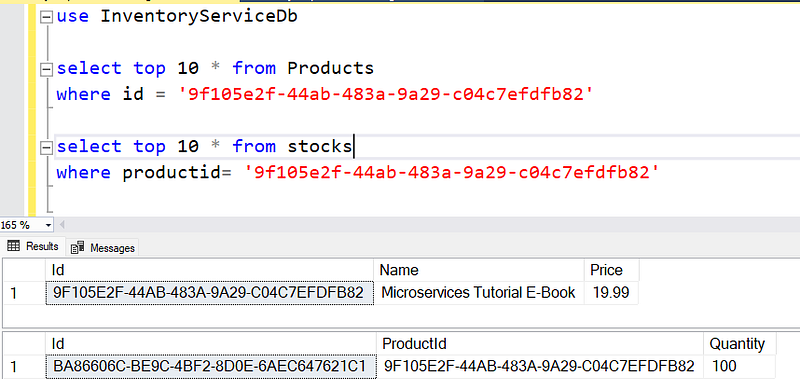
Create new product and update its quantity
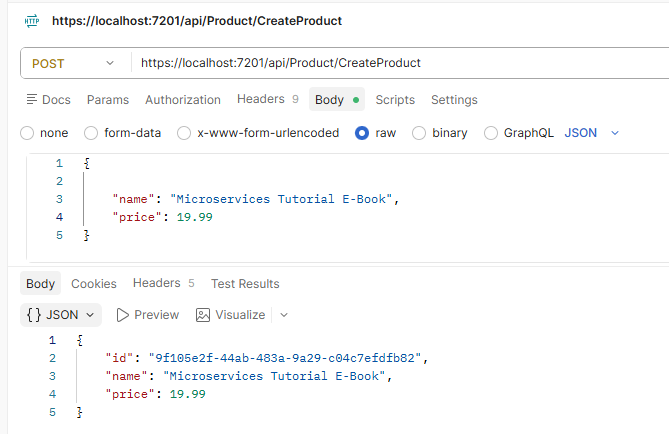
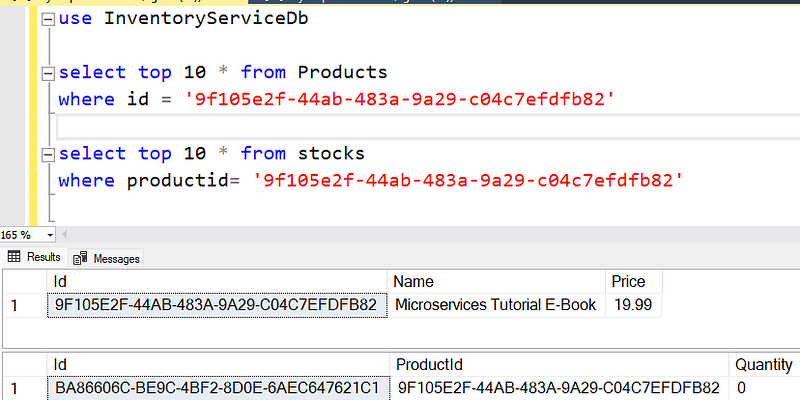
As shown above, the product was created successfully. However, the initial stock quantity is still 0 because creating a product and managing inventory are separate responsibilities in our Inventory Service. To add stock, we need to call the Increase Stock API to update the available quantity for this product.
Create Order
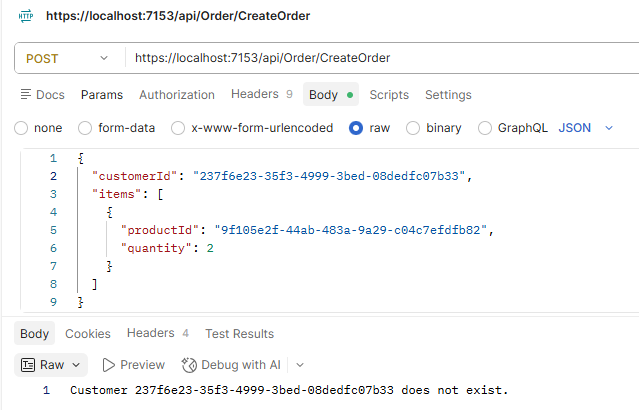
To test our order workflow, we first try creating an order with an invalid customer ID.
We can also test by requesting a purchase quantity that exceeds the available stock.
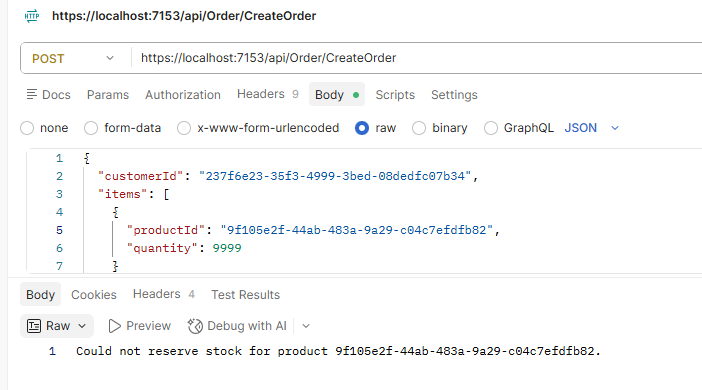
In both cases, the request fails with an appropriate error message. This confirms that the Order Service is successfully communicating with the Customer Service and Inventory Service to perform the required validation before creating an order.
A successful order creation
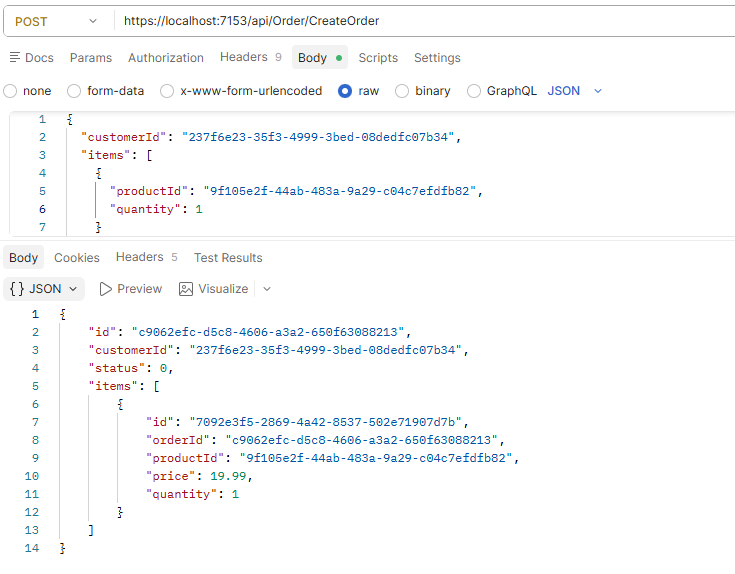
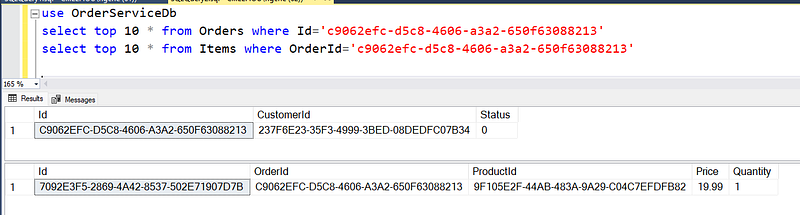
After providing valid customer information and sufficient stock quantity, the order is created successfully.
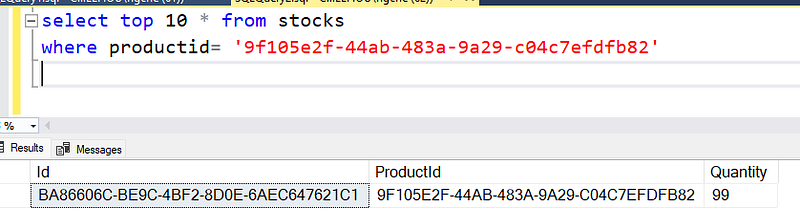
The inventory quantity is also reduced accordingly, which shows that the Order Service can successfully interact with the Inventory Service to complete the order workflow.
Create Payment
To test the payment workflow, we first try creating a payment request with an invalid order ID.
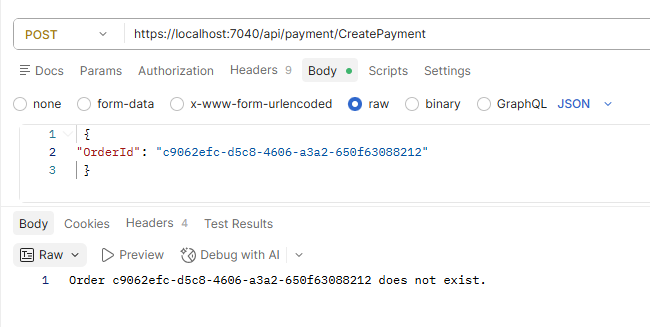
The request fails because the order does not exist. This confirms that the Payment Service is successfully communicating with the Order Service to validate the order before processing the payment.
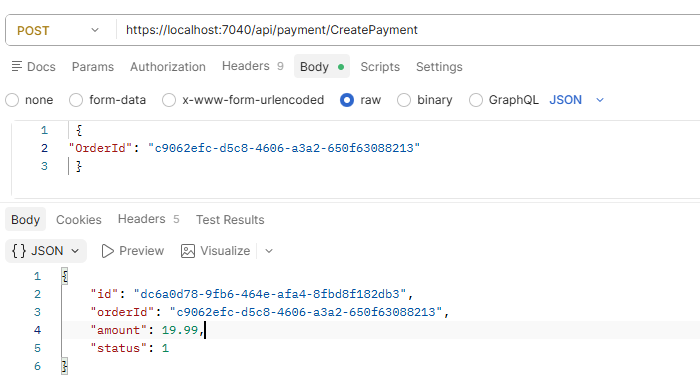
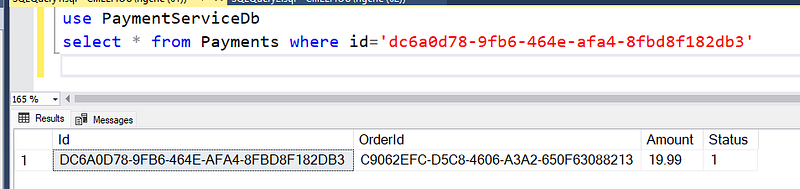
After providing a valid order ID, the payment request can proceed successfully through our mock payment gateway.
In this post, we used.NET to create a basic e-commerce microservices architecture in which each service is separately developed, has its own database, and uses REST APIs to interact. We showed how the Customer, Inventory, Order, and Payment services collaborate to finish a business workflow while maintaining a loose coupling between each service. Despite being a simplified example, it offers the basis for comprehending the design and implementation of real-world microservices systems.
HostForLIFE.eu ASP.NET Core 10.0 Hosting
European best, cheap and reliable ASP.NET hosting with instant activation. HostForLIFE.eu is #1 Recommended Windows and ASP.NET hosting in European Continent. With 99.99% Uptime Guaranteed of Relibility, Stability and Performace. HostForLIFE.eu security team is constantly monitoring the entire network for unusual behaviour. We deliver hosting solution including Shared hosting, Cloud hosting, Reseller hosting, Dedicated Servers, and IT as Service for companies of all size.